


介绍 (Introduction)
Just as organisations need services management for microservices, they need API management for their APIs.
正如组织需要微服务的服务管理一样,他们也需要其API的API管理。
With serverless services like Cloud Run, Cloud Functions and App Engine, it is very easy and quick to create APIs. However, Security, Monitoring, Publishing APIs are some of the major challenges.
借助Cloud Run,Cloud Functions和App Engine等无服务器服务, 创建API非常简单快捷。 但是,安全,监视和发布API是一些主要挑战。
In this blog, we will see how to secure API’s in Cloud Run, Cloud Functions and App Engine Standard environment using API Keys and Bearer Token.
在此博客中,我们将了解如何使用API密钥和Bearer令牌在Cloud Run,Cloud Functions和App Engine Standard环境中保护API。
什么是云端点? (What is Cloud Endpoints?)
Cloud Endpoints is a distributed API management system. It provides an API console, hosting, logging, monitoring and other features to help you to create, share, maintain and secure APIs.
Cloud Endpoints是一个分布式API管理系统。 它提供API控制台,托管,日志记录,监视和其他功能,以帮助您创建,共享,维护和保护API。
ESPv2 Beta
ESPv2 Beta
There are two versions of Extensible Service Proxy (ESP).ESPv1 is an Nginx-based proxy that is modified to be highly-scalable and to work as a Google product. ESPv2 is an Envoy-based, highly scalable product that promises to have a small footprint on your infrastructure.
有两种版本的可扩展服务代理(ESP)。ESPv1是基于Nginx的代理,已对其进行了修改,使其具有很高的可扩展性并可以用作Google产品。 ESPv2是基于Envoy的 ,高度可扩展的产品,有望在您的基础结构中占用很小的空间。
See architecture documentation for Cloud Endpoints.
请参阅云端点的体系结构文档 。
我们会做什么 (What we’ll be doing)
- Deploy services on Cloud Run, Cloud Functions, App Engine in Python3, using Flask. These will be in private mode. 使用Flask在Python3中的Cloud Run,Cloud Functions,App Engine上部署服务。 这些将处于私有模式。
- Deploy Endpoint ESPv2 Beta container on Cloud Run. 在Cloud Run上部署Endpoint ESPv2 Beta容器。
- Invoke services using API Key 使用API密钥调用服务
- Use server-to-server (JWT) authentication. 使用服务器到服务器(JWT)身份验证。
- Use Quota to limit API usage 使用配额限制API使用
- Track API activity. 跟踪API活动。
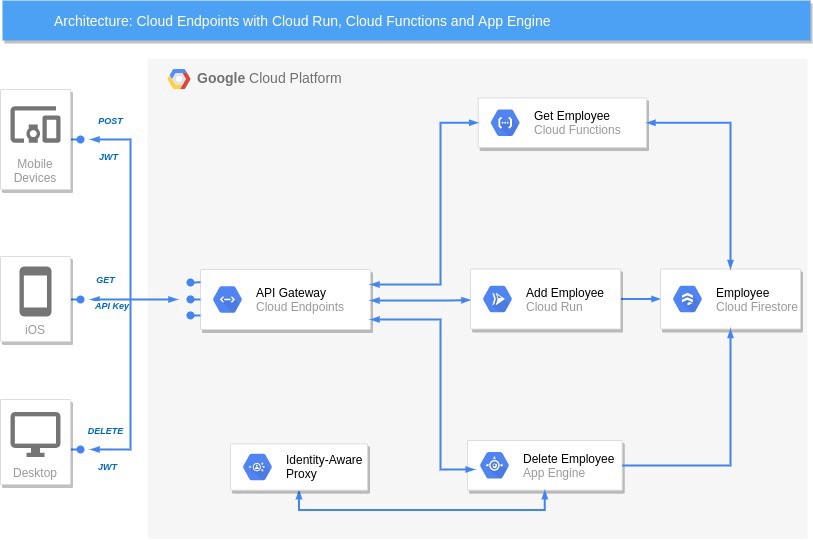
建筑 (Architecture)
We are aiming to create an app with 3 different services using following components.
我们旨在使用以下组件来创建具有3种不同服务的应用程序。
- Cloud Functions: GET an Employee from Firestore using API Key. 云功能:使用API密钥从Firestore中获取一名员工。
- Cloud Run: Add an Employee into Firestore using Bearer Token. 云端运行:使用Bearer令牌将一名员工添加到Firestore中。
- App Engine: DELETE an Employee from Firestore using Bearer Token. App Engine:使用Bearer令牌从Firestore中删除一名员工。
- Cloud Endpoints ESPV2 Beta: Proxy service to control the requests. Cloud Endpoints ESPV2 Beta:用于控制请求的代理服务。
- Firestore: Store Employee data. Firestore:存储员工数据。
All required files are stored here.
所有必需的文件都存储在这里 。
部署安全服务 (Deploy the secured services)
建立 (Setup)
In order to complete this guide, you’ll need to install the following tools
为了完成本指南,您需要安装以下工具
Git: Git is used to clone the example code and trigger new deployments.
Git :Git用于克隆示例代码并触发新的部署。
GCP: You will need a GCP account with billing enabled.
GCP :您需要一个启用了结算功能的GCP帐户。
- Python 3.7 : Python is installed to run a script. Python 3.7:已安装Python以运行脚本。
创建GCP项目 (Create GCP Project)
Create a GCP project for this tutorial.
为此教程创建一个GCP项目。
Select Firestore mode
选择Firestore模式
- Go to Firestore 前往消防站
- Select Native Mode 选择纯模式
- Select a Location (e.g. United States) 选择一个位置(例如美国)
- Click on “Create Database” 点击“创建数据库”
Enable APIs
启用API
Go to APIs & Services and Enable Following APIs
转到API和服务并启用以下API
- Cloud Build 云构建
- Cloud Run 云跑
- Identity-Aware Proxy 身份识别代理
- Service Control API 服务控制API
Create Service Account
创建服务帐号
Create a service account to be used in Authorization Bearer section and download key.
创建要在“授权承载”部分中使用的服务帐户并下载密钥。
Clone the Repository
克隆存储库
Open Cloud Shell, Clone the following repository containing the sample code, then switch to the cloud-run directory:
打开Cloud Shell,克隆以下包含示例代码的存储库,然后切换到cloud-run目录:
$ export PROJECT_ID = <PROJECT_ID>
$ export PROJECT_NUMBER = <PROJECT_NUMBER>$ git clone https://github.com/vikramshinde12/endpoints-espv2.git$ cd endpoints-espv2/cloud-run
云跑 (Cloud Run)
The code to add an employee in the Firestore.
在Firestore中添加员工的代码。
import os
from flask import Flask, request
from google.cloud import firestore


app = Flask(__name__)


@app.route('/employee', methods=['POST', 'PUT'])
def add_update_employee():
    json_ = request.get_json()
    if 'id' not in json_:
        return 'Precondition Failed', 412


    client = firestore.Client()
    doc_ref = client.collection(u'employee').document(u'{}'.format(json_.get('id')))
    doc_ref.set(json_)
    return 'Created', 201


if __name__ == '__main__':
    app.run(debug=True, host='0.0.0.0', port=int(os.environ.get('PORT', 8080)))
The Dockerfile of the image
映像的Dockerfile
FROM python:3.7
WORKDIR /
COPY requirements.txt /requirements.txt
RUN pip3 install -r requirements.txt
COPY . /
CMD ["python3", "api.py"]
First build the image.
首先建立映像。
$ gcloud builds submit --tag gcr.io/$PROJECT_ID/endpoint-espv2Then, deploy the container in private mode
然后,以私有模式部署容器
$ gcloud run deploy employee --no-allow-unauthenticated \
  --image gcr.io/$PROJECT_ID/endpoint-espv2 \
  --region us-central1 --platform managed
云功能 (Cloud Functions)
The code to get the employee from the Firestore.
从Firestore获取员工的代码。
from flask import jsonify
from google.cloud import firestore


def get_emp(request):
    try:
        if request.args and 'employee_id' in request.args:
            employee_id = request.args.get('employee_id')
        else:
            return 'Precondition Failed', 412


        client = firestore.Client()
        doc_ref = client.collection(u'employee').document(u'{}'.format(employee_id))
        doc = doc_ref.get()
        if doc.to_dict():
            response = jsonify(doc.to_dict())
            response.status_code = 200
        else:
            response = jsonify({
                'httpResponseCode': '404',
                'errorMessage': 'Employee does not exist'
            })
            response.status_code = 404
        return response
    except Exception as e:
        return e
Deploy the Cloud Function in private mode.
在私有模式下部署云功能。
$ cd ..
$ gcloud functions deploy employee --trigger-http \
  --runtime python37 --source cloud-function --entry-point get_emp \
  --region us-central1 --no-allow-unauthenticated
Google App Engine(标准 ) (Google App Engine (Standard))
The code to Delete the employee from theFirestore
从Firestore中删除员工的代码
import os
from flask import Flask
from google.cloud import firestore


app = Flask(__name__)


@app.route('/employee/<employee_id>', methods=['DELETE'])
def delete_employee(employee_id):
    client = firestore.Client()
    doc_ref = client.collection(u'employee').document(u'{}'.format(employee_id))
    if not doc_ref.get().to_dict():
        return 'Not Found', 404
    else:
        doc_ref.delete()
    return 'OK', 200


if __name__ == '__main__':
    app.run(debug=True, host='0.0.0.0', port=int(os.environ.get('PORT', 8080)))
There are 2 steps involved:
涉及两个步骤:
- Deploy the App Engine service in Standard environment. 在标准环境中部署App Engine服务。
$ cd app-engine$ gcloud app deploy2. Configure IAP.
2.配置IAP。
The App Engine is public by default, activate IAP on App Engine.
默认情况下,App Engine是公共的,请在App Engine上激活IAP。
Go to App Engine →Settings → Identity-Aware Proxy → Configure Now.
转到App Engine→设置→身份识别代理→现在配置。

Give permission “IAP-secured Web App User” to the service account <PROJECT-NUMBER>-compute@developer.gserviceaccount.com
向服务帐户<PROJECT-NUMBER> -compute@developer.gserviceaccount.com授予“受IAP保护的Web应用程序用户”权限
This is important so that App Engine will be accessible by the Cloud Endpoints service that we will be deploying in next step.
这一点很重要,以便我们将在下一步中部署的Cloud Endpoints服务可以访问App Engine。
云端点(ESPv2) (Cloud Endpoints (ESPv2))
Now, we have deployed backend services in Cloud Run, Cloud Functions and App Engine in private mode, we can start to frontend them using proxy service in Cloud Endpoints ESPv2 Beta.
现在,我们已经在私有模式下的Cloud Run,Cloud Functions和App Engine中部署了后端服务,我们可以开始使用Cloud Endpoints ESPv2 Beta中的代理服务来对它们进行前端处理。
Following steps are involved
涉及以下步骤
- Deploy an ESPv2 default Docker image 部署ESPv2默认Docker映像
- Create an OpenAPI definition 创建一个OpenAPI定义
- Deploy the OpenAPI definition 部署OpenAPI定义
- Build an ESPv2 Docker image 构建一个ESPv2 Docker镜像
- Deploy the ESPv2 Docker image 部署ESPv2 Docker映像
- Activate API 激活API
- Create an API key 创建一个API密钥
- Authorize Cloud Endpoints 授权云端点
部署ESPv2默认Docker映像 (Deploy an ESPv2 default Docker image)
As part of the OpenAPI definition, we need to obtain a valid hostname of the gateway service that will front all requests to our API services. We can only obtain a valid hostname for our proxy once we’ve deployed something to Cloud Run. To achieve this, we’ll deploy the default ESPv2 Docker image.
作为OpenAPI定义的一部分,我们需要获取网关服务的有效主机名,该主机名会将所有请求发送到我们的API服务。 将某些内容部署到Cloud Run后,我们才能为代理获取有效的主机名。 为此,我们将部署默认的ESPv2 Docker镜像。
$ gcloud run deploy gateway \
 --image="gcr.io/endpoints-release/endpoints-runtime-serverless:2" \
 --allow-unauthenticated \
 --region us-central1 \
 --platform managed
I gave CLOUD_RUN_SERVICE_NAME as gateway
我给CLOUD_RUN_SERVICE_NAME作为gateway
If you notice from the gcloud command, we won’t be blocking any traffic by default. The proxy service itself will do that for us.
如果您从gcloud命令中注意到,则默认情况下我们不会阻止任何流量。 代理服务本身将为我们做到这一点。
Once the proxy service has deployed, take note of the hostname, we’ll use this in the OpenAPI definition.
部署代理服务后,请记下主机名,我们将在OpenAPI定义中使用它。
创建一个OpenAPI定义 (Create an OpenAPI definition)
Now, we have to declare to Cloud Endpoint service where and how to reach the backend services.
现在,我们必须向Cloud Endpoint服务声明在何处以及如何到达后端服务。
You must have an OpenAPI document based on OpenAPI specification. Let’s create one for our Employee API.
您必须具有基于OpenAPI规范的OpenAPI文档。 让我们为Employee API创建一个。
Create a YAML file called openapi-defination.yaml.let’s start with header
创建一个名为openapi-defination.yaml的YAML文件。
Header
标头
swagger: '2.0'
info:
  title: Employee API
  description: Employee API on Cloud Endpoints with a Cloud Run, Cloud Function and App Engine with IAP backend
  version: 1.0.0
host: gateway-<hash>-uc.a.run.app
schemes:
  - https
The host is the hostname of the proxy or gateway when we deployed ESPv2 default Docker image.
host是我们部署ESPv2默认Docker映像时的代理或网关的主机名。
The title is the name of the API in the API & Services section.
title是“ API和服务”部分中API的名称。
Paths
路径
Add following paths in the openapi-defination.yaml file.
在openapi-defination.yaml文件中添加以下路径。
x-google-backend address: This is the full URL of the python services deployed earlier. (change <PROJECT_ID> with your project ID)
x-google-backend address :这是先前部署的python服务的完整URL。 (将<PROJECT_ID>更改为您的项目ID)
Cloud Functions
云功能
GET employee endpoint: This is endpoint receives employee_id in path parameter.
GET员工端点:这是端点在path参数中接收的employee_id。
/employee/{employee_id}:
  get:
    summary: Get an Employee
    operationId: getEmployee
    x-google-backend:
      address: https://us-central1-<PROJECT_ID>.cloudfunctions.net/employeeprotocol: h2
    parameters:
      - name: employee_id
        in: path
Cloud Run
云跑
This POST endpoint add/update employee in Firestore. It is recommend to use the APPEND_PATH_TO_ADDRESS for host_rewriting.
此POST端点在Firestore中添加/更新员工。 建议使用APPEND_PATH_TO_ADDRESS进行host_rewrite。
/employee:
  post:
    summary: Add Employee using Cloud Run Service
    operationId: add_update_employee
    x-google-backend:
      address: https://employee-<hash>-uc.a.run.apppath_translation: APPEND_PATH_TO_ADDRESS
    parameters:
      - name: employee
        in: body
        description: Employee to be Added
        schema:
          $ref: '#/definitions/Employee'
The Schema definition of the employee
员工的架构定义
definitions:
  Employee:
    type: object
    required:
     - id
     - firstname
     - lastname
    properties:
      id:
        type: string
      firstname:
        type: string
      lastname:
        type: string
App Engine
应用引擎
The DELETE endpoint to delete an employee from the firestore.
DELETE端点,用于从Firestore中删除员工。
delete:
  summary: Delete Employee using Google App Engine service.
  operationId: deleteEmployee
  x-google-backend:
    address: https://<PROJECT_ID>.appspot.com  path_translation: APPEND_PATH_TO_ADDRESS
    jwt_audience: <PROJECT_NUMBER>-<HASH>.apps.googleusercontent.com
    protocol: h2
  parameters:
    - name: employee_id
      in: path
In addition to x-google-backend address, IAP also check the correct audience of the JWT token. The jwt_audience is the IAP client ID. Get the Client ID from APIs & Services → Credentials → OAuth 2.0 client IDs →IAP-App-Engine-app
除了x-google-backend地址外,IAP还检查JWT令牌的正确受众。 jwt_audience是IAP客户端ID 。 从API和服务→凭据→OAuth 2.0客户端ID→IAP-App-Engine-app获取客户端ID
Add Authentication (API Keys)
添加身份验证(API密钥)
There are multiple ways to add security, let’s start with API Key.
有多种增加安全性的方法,让我们从API密钥开始。
Add API key security in each paths
在每个路径中添加API密钥安全性
security:
  - api_key: []
And add the security definition at the end of the file
并在文件末尾添加安全定义
securityDefinitions:  api_key:
    type: "apiKey"
    name: "key"
    in: "query"
部署OpenAPI定义 (Deploy the OpenAPI definition)
Now we have created the OpenAPI definition for the route in our service we need to deploy it to Cloud Endpoints.
现在,我们已经在服务中为路由创建了OpenAPI定义,我们需要将其部署到Cloud Endpoints。
gcloud endpoints services deploy openapi-definition.yaml When the deployment is successful, please note the CONFIG_ID in the response. It’ll follow the naming convention [YYYY-MM-DDrx] = [2020–01–01r0].
部署成功后,请在响应中记下CONFIG_ID。 它将遵循命名约定[YYYY-MM-DDrx] = [2020-01-0101r0]。
构建ESPv2 Docker映像 (Build ESPv2 Docker image)
We have our OpenAPI definition deployed. We have our API services deployed in Cloud Run, Cloud Functions and App Engine. Now we need to build an ESPv2 Docker image that holds the OpenAPI definition. The OpenAPI definition is what allows the ESPv2 proxy to understand what to do with requests; how to authenticate them and where to send them.
我们已经部署了OpenAPI定义。 我们将API服务部署在Cloud Run,Cloud Functions和App Engine中。 现在,我们需要构建一个包含OpenAPI定义的ESPv2 Docker映像。 ESPv2代理可以使用OpenAPI定义来了解如何处理请求。 如何进行身份验证以及将其发送到哪里。
Fortunately, Google has created a script to do this for us. We only need to input the CONFIG_ID of our OpenAPI definition, the hostname of our proxy and our project id.
幸运的是,Google已经创建了一个脚本来为我们执行此操作。 我们只需要输入OpenAPI定义的CONFIG_ID,代理的主机名和项目ID。
Download the script, make it executable and run the follow command.
下载脚本 ,使其可执行并运行follow命令。
$ chmod +x gcloud_build_image
$ ./gcloud_build_image -s CLOUD_RUN_HOSTNAME \
    -c CONFIG_ID -p PROJECT_ID
CLOUD_RUN_HOSTNAME is name of gateway e.g. gateway-<hash>-uc.a.run.appAfter a couple of minutes, the ESPv2 Docker image will complete its build and will be available in Container Registry. The name of the image will follow this naming convention.
CLOUD_RUN_HOSTNAME是网关的名称,例如gateway- <hash> -uc.a.run.app。几分钟后,ESPv2 Docker镜像将完成其构建并将在Container Registry中可用。 图像名称将遵循此命名约定。
gcr.io/<PROJECT_ID>/endpoints-runtime-serverless:ESP_VERSION-CLOUD_RUN_HOSTNAME-CONFIG_ID
gcr.io/<PROJECT_ID>/endpoints-runtime-serverless:ESP_VERSION-CLOUD_RUN_HOSTNAME-CONFIG_ID
部署ESPv2 Docker映像 (Deploy ESPv2 Docker image)
Now your ESPv2 proxy has been built you need to deploy it to Cloud Run.
现在您的ESPv2代理已经构建完毕,您需要将其部署到Cloud Run。
$ gcloud run deploy CLOUD_RUN_SERVICE_NAME \
  --image="gcr.io/$PROJECT_ID/endpoints-runtime-serverless:ESP_VERSION-CLOUD_RUN_HOSTNAME-CONFIG_ID" \
  --allow-unauthenticated \
  --region us-central1 \
  --platform managed \
  --project=$PROJECT_ID
激活API (Activate API)
By deploying the config on Cloud Endpoint, a new API service is created. Now, you have to activate it on your project. You can do this by command line:
通过在Cloud Endpoint上部署配置,可以创建新的API服务。 现在,您必须在项目上激活它。 您可以通过命令行执行此操作:
$ gcloud services enable gateway-<hash>-uc.a.run.appThe API service name is the name of your Cloud Run Endpoint gateway ENDPOINTS_SERVICE_NAME
API服务名称是您的Cloud Run Endpoint网关ENDPOINTS_SERVICE_NAME
This API can be enabled and disabled the same way Google’s API’s are. You can call the private API from other GCP projects, providing your projects are part of an organisation.
可以使用与Google API相同的方式来启用和禁用此API。 您可以从其他GCP项目中调用私有API,前提是您的项目是组织的一部分。
Go to APIs & Services > Dashboard > Enable APIs and Services > enable your private API.
转到API和服务>仪表板>启用API和服务>启用您的私有API。
创建API密钥 (Creating API Key)
For reaching the service, you have to use an API Key. For this you have to create one in Google Cloud console.
为了获得服务, 您必须使用API密钥。 为此,您必须在Google Cloud控制台中创建一个 。
Go to API & Services and select Credentials. Click on Create credentials and select API Key.
转到API & Services然后选择Credentials 。 点击Create credentials ,然后选择API Key 。
Because of the low level of security of an API Key, the best practice is to restrict the key.
由于API密钥的安全性较低, 因此最佳做法是限制密钥 。
Edit the key (click on the pencil), under API restrictions, click on Restrict key and, in the drop down list, only check your API Name.
编辑密钥(单击铅笔),在“ API restrictions ,单击“ Restrict key ,然后在下拉列表中仅检查您的API名称。
云端点授权 (Cloud Endpoint Authorization)
We have deployed three services and an Endpoint gateway. Now we need to give authorization to Endpoint so that that it will be able to access resources in services. Gateway endpoint service is deployed using <PROJECT_NUMBER>-compute@developer.gserviceaccount.com service account.
我们已经部署了三个服务和一个端点网关。 现在,我们需要授权给Endpoint,以便它能够访问服务中的资源。 网关端点服务是使用<PROJECT_NUMBER> -compute@developer.gserviceaccount.com服务帐户部署的。
Cloud Run
云跑
As describe previously, a private Cloud Run service can be reached by authenticated user with roles/run.invoker. So, let’s grant this role to the Cloud Run Endpoint gateway service-account.
如前所述,经过身份验证的用户可以使用roles/run.invoker来访问私有Cloud Run服务。 因此,让我们将此角色授予Cloud Run Endpoint网关服务帐户。
$ gcloud run services add-iam-policy-binding employee \
  --member "serviceAccount:$PROJECT_NUMBER-compute@developer.gserviceaccount.com" \
  --role "roles/run.invoker" \
  --platform managed \
  --region us-central1 \
  --project $PROJECT_ID
Cloud Functions
云功能
Like for Cloud Run, and as described previously, a private Cloud Functions service can be reached by authenticated user with roles/cloudfunctions.invoker.
与Cloud Run一样,如前所述,经过身份验证的用户可以使用roles/cloudfunctions.invoker来访问私有Cloud Functions服务。
$   gcloud functions add-iam-policy-binding employee \
   --region us-central1 \
   --member "serviceAccount:$PROJECT_NUMBER-compute@developer.gserviceaccount.com" \
   --role "roles/cloudfunctions.invoker" \
   --project $PROJECT_ID
App EngineApp Engine is secured by IAP and we have already given access IAP-secured Web App User to Endpoint gateway service-account.
App Engine App Engine受IAP保护,我们已经授予了受IAP-secured Web App User访问Endpoint Gateway服务帐户的权限。
All the steps have been completed now let’s access the endpoints using proxy.
现在,所有步骤都已完成,现在让我们使用代理访问端点。
验证云端点路由 (Validate Cloud Endpoints routes)
All the steps have been completed now let’s access the endpoints using proxy.
现在,所有步骤都已完成,现在让我们使用代理访问端点。
POST the employeecurl POST https://gateway-<hash>-uc.a.run.app/employee?key=API_KEY --header 'Content-Type: application/json' --data-raw '{"id": 11223344, "firstname": "Vikram", "lastname": "Shinde"}'
curl POST https://gateway-<hash>-uc.a.run.app/employee?key=API_KEY --header 'Content-Type: application/json' --data-raw '{"id": 11223344, "firstname": "Vikram", "lastname": "Shinde"}'员工curl POST https://gateway-<hash>-uc.a.run.app/employee?key=API_KEY --header 'Content-Type: application/json' --data-raw '{"id": 11223344, "firstname": "Vikram", "lastname": "Shinde"}'
GET the employeecurl https://gateway-<hash>-uc.a.run.app/employee/11223344?key=API_KEY
获取员工curl https://gateway-<hash>-uc.a.run.app/employee/11223344?key=API_KEY
DELETE the employeecurl DELETE https://gateway-<hash>-uc.a.run.app/employee/11223344?key=API_KEY
删除员工curl DELETE https://gateway-<hash>-uc.a.run.app/employee/11223344?key=API_KEY
API密钥的最佳做法 (Best practices with API Keys)
API keys are not secure way and it can be easily stolen as any man-in-the-middle attack or packet sniffer tool can read them as plain text.
API密钥不是安全的方式,并且很容易被盗,因为任何中间人攻击或数据包嗅探工具都可以将它们读取为纯文本格式。
Hence there are some best practices for using API Keys
因此,有一些使用API密钥的最佳做法
- Do not embed API keys directly in code. 不要将API密钥直接嵌入代码中。
- Delete unneeded API keys to minimize exposure to attacks. 删除不需要的API密钥,以最大程度地减少遭受攻击的风险。
- Regenerate your API keys periodically. 定期重新生成您的API密钥。
- Review your code before publicly releasing it. Ensure that your code does not contain API keys. 在公开发布代码之前,请先对其进行检查。 确保您的代码不包含API密钥。
Apply API key restrictions. API keys are unrestricted by default.
应用API密钥限制。 默认情况下,API密钥不受限制。
- Add application restrictions. Specify web sites, IP address or apps. 添加应用程序限制。 指定网站,IP地址或应用程序。
使用Bearer Auth令牌进行身份验证 (Authenticate with Bearer Auth Token)
After successfully creating an OpenAPI definition, and building an ESPv2 proxy for API key authentication, moving to bearer authentication will be easy.
成功创建OpenAPI定义并构建用于API密钥身份验证的ESPv2代理后,转移到承载身份验证将很容易。
资源资源 (Resources)
承载身份验证在Cloud Endpoints中的工作方式 (How bearer auth works in Cloud Endpoints)
There are different types of bearer authentication you can use with Cloud Endpoints. You can use server-to-server or OAuth2.0 (Google ID token) auth. We’ll be using server-to-server auth. However, OAuth works very similarly to server-to-server, so do some reading if you require users to interact with your API.
您可以对Cloud Endpoints使用不同类型的承载身份验证。 您可以使用服务器到服务器或OAuth2.0(Google ID令牌)auth 。 我们将使用服务器到服务器身份验证。 但是,OAuth的工作原理与服务器到服务器非常相似,因此如果您需要用户与API进行交互,请阅读一些内容。
The following notes are the steps the proxy will follow to authenticate the request. Use these notes when referencing the Cloud Endpoints architecture.
以下注释是代理将对请求进行身份验证的步骤。 引用Cloud Endpoints架构时,请使用这些说明。
- request made to the proxy 向代理人提出的要求
Service Control authenticates the bearer token
服务控制对承载令牌进行身份验证
the bearer token is decoded and checks the following:
承载令牌被解码并检查以下内容:
- the token is not expired
-令牌未过期
- issuer is correct
-发行人是正确的
- verifies the signature : checks the private certificate in the token against the public certificate
-验证签名:对照公共证书检查令牌中的私有证书
- the proxy forwards the request to the destination 代理将请求转发到目的地
为承载身份验证配置OpenAPI定义 (Configure the OpenAPI definition for Bearer Auth)
Let’s update our openapi-definition.yaml to include bearer auth for POST and DELETE methods
让我们更新我们的openapi-definition.yaml以包括POST和DELETE方法的承载认证
- Create service Account and download service account key. 创建服务帐户并下载服务帐户密钥。
- Update OpenAPI definition 更新OpenAPI定义
securityDefinitions:
  bearer:
    authorizationUrl: ""
    flow: "implicit"
    type: "oauth2"
    x-google-issuer: "email_of_sa"
    x-google-jwks_uri: "https://www.googleapis.com/robot/v1/metadata/x509/email_of_sa"
    x-google-jwt-locations:
      - header: "Authorization"
        value_prefix: "Bearer "
Update the email_of_sa with service account email.Change security flag from api-key to bearer
使用服务帐户email更新email_of_sa。将安全性标志从api-key更改为bearer
security:
  -
Redeploy
重新部署
Since definition has been change, we need to deploy OpenAPI definition, rebuild and redeploy gateway service.
由于定义已更改,因此我们需要部署OpenAPI定义,重建并重新部署网关服务。
$ gcloud endpoints services deploy openapi-definition.yamlIt will generate new CONFIG_ID. e.g. [2020–01–01r1]
它将生成新的CONFIG_ID。 例如[2020-01-01r 1 ]
$ ./gcloud_build_image -s CLOUD_RUN_HOSTNAME \
    -c CONFIG_ID -p ESP_PROJECT_ID
This will generate new version of image
这将生成新版本的图像
$ gcloud run deploy CLOUD_RUN_SERVICE_NAME \
  --image="gcr.io/ESP_PROJECT_ID/endpoints-runtime-serverless:ESP_VERSION-CLOUD_RUN_HOSTNAME-CONFIG_ID" \
  --allow-unauthenticated \
  --platform managed \
  --project=ESP_PROJECT_ID
You can use following Python code to create a bearer token.
您可以使用以下Python代码创建承载令牌。
import time
import google.auth.crypt
import google.auth.jwt


sa_keyfile = 'path_of_service_account'
iss = 'email_address_of_service_account'
aud = 'hostname_of_your_gateway'
iat = int(time.time())
exp = iat + 3600


def generate_jwt():
    """Generates a signed JSON Web Token using a Google API Service Account."""
    payload = {"iat": iat, "exp": exp, "iss": iss, "aud":  aud, "sub": iss, "email": iss}


    signer = google.auth.crypt.RSASigner.from_service_account_file(sa_keyfile)
    jwt = google.auth.jwt.encode(signer, payload)
    return jwt


if __name__ == '__main__':
    signed_jwt = generate_jwt()
    print(signed_jwt.decode()+'\n')
Once bearer token is generated, make a request to the proxy with the token.
生成承载令牌后,请使用令牌向代理发出请求。
curl --request POST \
  --header "Authorization: Bearer ${token}" \
  "https://gateway-{hash}-uc.a.run.app/employee" \
  --header 'Content-Type: application/json' \
  --data-raw '{
     "id": 411,
     "last": "vikram",
     "name": "Shinde"
  }'
API配额 (Quotas for API)
Cloud Endpoints provides quotas which let you control the rate at which applications can call your API. Setting a quota lets you specify usage limits to protect your API from an excessive number of requests from calling applications.
Cloud Endpoints提供了配额,可让您控制应用程序调用API的速率。 通过设置配额,您可以指定使用限制,以保护API免受来自调用应用程序的过多请求。
Add following 3 sections in openapi-definition.yaml file.
在openapi-definition.yaml文件中添加以下3个部分。
- metrics: A named metric that counts requests to your API. 指标:一种命名指标,用于统计对您的API的请求。
- limit: Represents a enforced limit on the named metrc. limit:表示对命名的metrc的强制限制。
- metricCosts: The metricCosts maps methods to metrics. metricCosts:metricCosts将方法映射到指标。
x-google-management:
  metrics:
    - name: "YOUR_METRIC_NAME"
      displayName: "YOUR_METRIC-DISPLAY_NAME"
      valueType: INT64
      metricKind: DELTA
metricKind and valueType must be DELTA and INT64
metricKind和valueType必须为DELTA和INT64
quota:
  limits:
    - name: "YOUR_LIMIT_NAME"
      metric: "YOUR_METRIC_NAME"
      unit: "1/min/{project}"
      values:
        STANDARD: VALUE_FOR_THE_LIMIT
In the paths sections add x-google-quota extension under the method.
在路径部分中,在方法下添加x-google-quota扩展名。
x-google-quota:
  metricCosts:
    YOUR_METRIC_NAME: YOUR_METRIC_COST
In our example, I have added quota in GET API to limit 5 requests per minute.
在我们的示例中,我在GET API中添加了配额,以限制每分钟5个请求。
paths:
 /employee/{employee_id}:
   get:
    summary: Get an Employee
    operationId: getEmployee
    x-google-backend:
      address: https://us-central1-<PROJECT_ID>.cloudfunctions.net/employeeprotocol: h2
    parameters:
      - name: employee_id
        in: path
    responses:
        ....
    security:
    - api_key: []
    x-google-quota:
      metricCosts:
         "api_requests": 1
        ....x-google-management:
  metrics:
    - name: api_requests
      valueType: INT64
      metricKind: DELTA
  quota:
    limits:
      - name: limit-on-api-requests
        metric: "YOUR_METRIC_NAME"
        unit: "1/min/{project}"
        values:
          STANDARD: 5
After redeploying the gateway service, I called the GET endpoints multiple times within a minutes and I received following error.
重新部署网关服务后,我在一分钟内多次调用GET端点,并且收到以下错误。
$ curl https://gateway-6bpnwgtf6q-uc.a.run.app/employee/111?key=API_KEY{"code":429,"message":"RESOURCE_EXHAUSTED:Quota exceeded for quota metric 'api_requests' and limit 'limit-on-api-requests' of service 'gateway-6bpnwgtf6q-uc.a.run.app' for consumer 'project_number:499537266481'."}跟踪API活动 (Tracking the API activity)
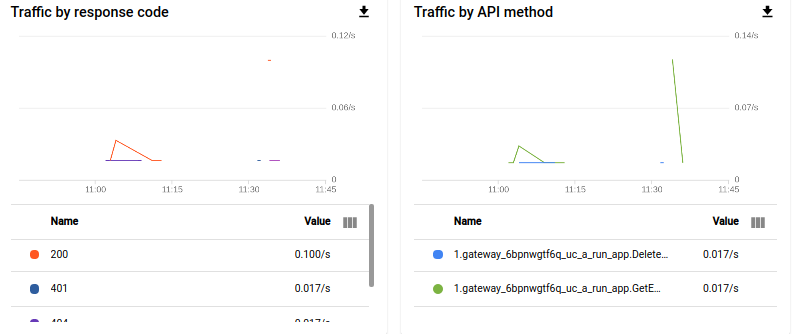
View the activity graphs for your API on Endpoints → Service page.
在“端点”→“服务”页面上查看API的活动图。

You can also track the activities from APIs & Services → API → Metrics.
您还可以从API和服务→API→指标跟踪活动。
结论 (Conclusion)
In this tutorial, we have secured APIs on Cloud Run, Cloud Functions, App Engine with Cloud Endpoints ESPV2 using API Key and Bearer token. Also we have seen how to add quotas and rate limits and track the API activities.
在本教程中,我们使用API密钥和Bearer令牌保护了Cloud Run,Cloud Functions,带有Cloud Endpoints ESPV2的App Engine上的API安全。 此外,我们还看到了如何添加配额和速率限制以及如何跟踪API活动。
Cloud Endpoints is almost free. First 2 Millions API calls per month is free and $3.00 per million thereafter.
Cloud Endpoints几乎是免费的。 每月前200万次API调用是免费的,其后每百万次调用$ 3.00。
If you look for advance features on API management, Apigee is the option.
如果您需要API管理方面的高级功能, 则可以选择Apigee 。
Please feedback how find this tutorial and connect me on LinkedIn.
请反馈如何找到本教程并在LinkedIn上与我建立联系。


 1万+
1万+

 被折叠的 条评论
为什么被折叠?
被折叠的 条评论
为什么被折叠?
 到【灌水乐园】发言


