


I should start this article with a disclaimer: It is based on iOS 13, Swift 5, and Xcode 11.x. If you’re reading this and those numbers look dated, be forewarned.
我应该以免责声明开头:它基于iOS 13,Swift 5和Xcode11.x。 如果您正在阅读本文,并且那些数字看起来过时,请提前警告。
I should also warn you that notifications — principally remote ones — involve Apple’s infrastructure, which means you’ll need an Apple Developer account to use them. Of course, you also need one to use CloudKit.
我还应该警告您,通知(主要是远程通知)涉及Apple的基础设施,这意味着您需要有Apple Developer帐户才能使用它们。 当然,您还需要使用CloudKit。
Finally, this is a series. You won’t be building your own WotsApp in 20 minutes. It will take at least ten chapters. In the following two chapters, we’ll start to build out our CloudKit code and again rework the interface with SwiftUI. The latter is far closer to our end goal than the previous ones. We’ll start building the UI from scratch again.
最后,这是一个系列。 您将不会在20分钟内构建自己的WotsApp。 至少需要十章。 在接下来的两章中,我们将开始构建CloudKit代码,并再次使用SwiftUI重做接口。 后者比先前的目标更接近我们的最终目标。 我们将再次从头开始构建UI。
第五章 (Chapter 5)
OK, here’s a very rough sketch showing the workflow. We’re going to go through the code needed to do roughly half this chart over the next two chapters.
好的,这是显示工作流程的非常粗略的草图。 在接下来的两章中,我们将遍历完成这张图表一半所需的代码。
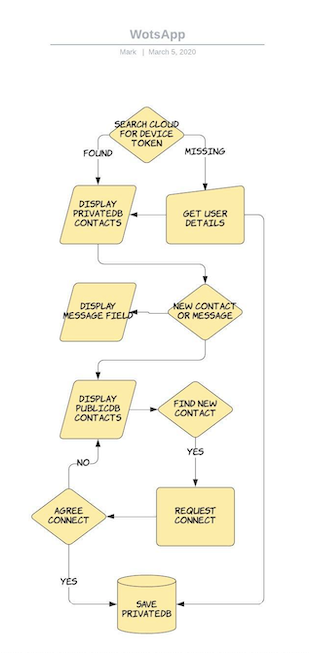
This is what we’re hoping to build: the WotsApp messaging app. It isn’t a contract — just a plan that will hopefully help us keep on target. Let’s get to the code. Now is the time to do some CloudKit work. Click on the target of your project and add CloudKit to the capabilities. Tick the box for CloudKit and create a new container. Use the bundle identifier of your project to name it.
这就是我们希望构建的:WotsApp消息传递应用程序。 这不是合同,只是一项计划,有望帮助我们实现目标。 让我们看一下代码。 现在是时候做一些CloudKit工作了。 单击项目的目标,然后将CloudKit添加到功能中。 选中CloudKit的框并创建一个新容器。 使用项目的包标识符来命名它。


When that’s done, you need to go across and log into the CloudKit Desktop. Be warned: This seems to change every WWDC, so if your view doesn’t look like mine, it must be summer 2020.
完成后,您需要遍历并登录到CloudKit Desktop。 请注意:这似乎会改变每个WWDC,因此,如果您的观点不像我的观点,那一定是2020年夏天。
Go to your new container and select Schema on the right side here:
转到新容器,然后在此处选择右侧的Schema:

Let’s keep things simple by creating a universal record that we’re able to use across the public and private databases. Select the new container and add a new record type. We’re going to call it directory. Add the fields you see in this snapshot. Once saved, go back and add the indexes too.
通过创建我们可以在公共数据库和私有数据库中使用的通用记录,让事情变得简单。 选择新的容器并添加新的记录类型。 我们将其称为directory 。 添加您在此快照中看到的字段。 保存后,返回并添加索引。
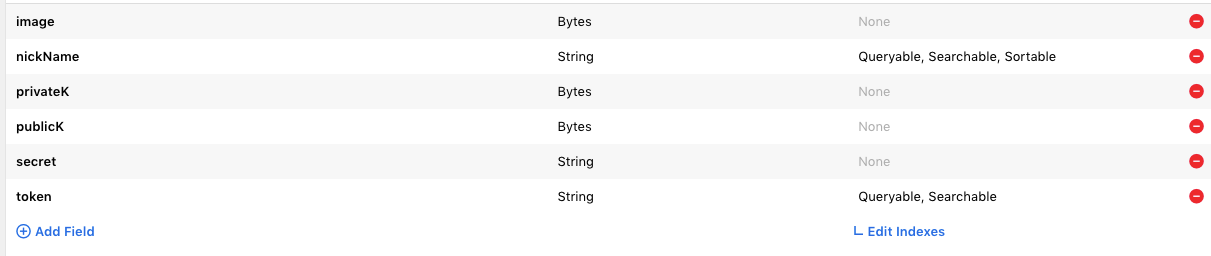
We’re looking to create six fields here. We won’t use all of them in the public database — only a selection — but we will use them all in the private copy. Go back to Xcode.
我们希望在这里创建六个字段。 我们不会在公共数据库中仅使用其中的一部分,而是在私有副本中使用它们。 返回到Xcode。
Create a new file and call Storage. I start by defining a local data structure within it for a local copy of the data in my CloudKit database. Don’t forget you’ll need to import the CloudKit and Combine frameworks.
创建一个新文件,然后调用Storage 。 我首先在其中定义一个本地数据结构,以用于CloudKit数据库中数据的本地副本。 不要忘记,您将需要导入CloudKit和Combine框架。
struct rex {
var id: CKRecord.ID?
var token: String?
var nickName: String?
var image: Data?
var secret: String?
var privateK: Data?
var publicK: Data?
init(id: CKRecord.ID?, token: String?, nickName: String?, image: Data?, secret: String?, publicK: Data?, privateK: Data?) {
self.id = id
self.token = token
self.nickName = nickName
self.image = image
self.secret = secret
self.publicK = publicK
self.privateK = privateK
}
}
class newUsers {
var rexes:[rex] = []
}
We need to declare some Combine structures too, which are known as passthroughsubjects. They’re a bit like delegates, except better.
我们还需要声明一些Combine结构,这些结构称为passthroughsubjects 。 他们有点像代表,但更好。
class Storage: NSObject {
let searchPubPublisher = PassthroughSubject<rex?, Never>()
let fetchPublisher = PassthroughSubject<Bool?, Never>()
let savePublisher = PassthroughSubject<Int?, Never>()
let errorPublisher = PassthroughSubject<String?, Never>()
let recordPublisher = PassthroughSubject<rex?,Never>()
let searchPriPublisher = PassthroughSubject<rex?, Never>()
let gotPublicDirectory = PassthroughSubject<Bool?, Never>()
let savedPublisher = PassthroughSubject<Bool?, Never>()
var publicDB: CKDatabase!
var privateDB: CKDatabase!
var sharedDB: CKDatabase!
var users:newUsers?
override init() {
super.init()
publicDB = CKContainer.default().publicCloudDatabase
privateDB = CKContainer.default().privateCloudDatabase
sharedDB = CKContainer.default().sharedCloudDatabase
users = newUsers()
}
Before we tackle the dreaded CloudKit code, a few words: Coding for CloudKit can be a challenge because it involves latency, which programmers aren’t used to. Normally, you expect instant execution and results, but not in CloudKit. CloudKit is also interesting because it has a few restrictions you need to think about. Most won’t affect our app in the short term but might if things take off.
在我们处理可怕的CloudKit代码之前,请先说几句话:CloudKit的编码可能是一个挑战,因为它涉及延迟,这是程序员不习惯的。 通常,您期望即时执行和结果,但不会在CloudKit中看到。 CloudKit也很有趣,因为它有一些您需要考虑的限制。 大部分不会在短期内影响我们的应用程序,但是如果事情开始的话,可能会有所影响。
When designing and coding, there are some restrictions you need to keep in mind. These include the fact that if you use the public database, you will be charged a fee if you use too much space. The quota is OK and goes up with the number of users, but keep it in mind. You need to be mindful of the space you use in the private database too. Your users will be none too pleased if you fill their iCloud with your app data. Even worse, all your time will have been wasted. If Apple thinks you’re being too cavalier with CloudKit, it’ll simply reject your App. Other restrictions include the number of requests you can make over a short period of time, although that one surely won’t impact us.
在设计和编码时,需要牢记一些限制。 其中包括以下事实:如果使用公共数据库,则使用过多的空间将向您收费。 配额还可以,并且随着用户数量的增加而增加,但请记住这一点。 您还需要注意私有数据库中使用的空间。 如果您用应用程序数据填充他们的iCloud,您的用户将不会太高兴。 更糟糕的是,您所有的时间都将被浪费。 如果Apple认为您对CloudKit过于谨慎,那么它将拒绝您的App。 其他限制包括您可以在短时间内提出的请求数量,尽管这肯定不会影响我们。
All that said, there is a limitation you may hit fairly early on: the number of records you can download in a single request. This limit is quite small — some 100 records per request. That’s food for thought considering we’ll be storing the main directory of tokens/basic user details here. Of course, you can code around it, although I haven’t done so here.
综上所述,您可能会在早期遇到一个限制:可以在单个请求中下载的记录数。 这个限制很小-每个请求大约100条记录。 考虑到我们将在这里存储令牌/基本用户详细信息的主目录,这是值得考虑的事情。 当然,您可以围绕它进行编码,尽管我在这里还没有这样做。
Alright, enough. Back to the code. We’ll start with some routines to search the public and private database given a token. Note: I put this behind a tap on the main interface because it takes a second or two to get the token and I needed to buy time.
好吧,够了。 回到代码。 我们将从一些例程开始,在给定令牌的情况下搜索公共和私有数据库。 注意:我将其放在主界面上的水龙头后面,因为要花费一两秒钟才能获得令牌,并且我需要花费时间。
func searchPublic(_ token:String) {
let predicate = NSPredicate(format: "token = %@", token)
let query = CKQuery(recordType: "directory", predicate: predicate)
publicDB.perform(query,inZoneWith: CKRecordZone.default().zoneID) { [weak self] results, error in
guard let _ = self else { return }
if let error = error {
DispatchQueue.main.async { self!.errorPublisher.send(error.localizedDescription) }
return
}
guard let results = results else { return }
if results.count == 0 {
DispatchQueue.main.async { self!.searchPubPublisher.send(nil) }
} else {
let newRex = rex(id: nil, token: nil, nickName: nil, image: nil, secret: nil, publicK: nil, privateK: nil)
DispatchQueue.main.async { self!.searchPubPublisher.send(newRex) }
}
}
}
func searchPrivate(_ token:String) {
let predicate = NSPredicate(format: "token = %@", token)
let query = CKQuery(recordType: "directory", predicate: predicate)
privateDB.perform(query,inZoneWith: CKRecordZone.default().zoneID) { [weak self] results, error in
guard let _ = self else { return }
if let error = error {
DispatchQueue.main.async { self!.errorPublisher.send(error.localizedDescription) }
return
}
guard let results = results else { return }
if results.count == 0 {
DispatchQueue.main.async { self!.searchPriPublisher.send(nil) }
} else {
// Assuming we tokens are unique, which I believe they should be
let record = results.first!
let name = record.object(forKey: "nickName") as? String
let secret = record.object(forKey: "secret") as? String
let publicK = record.object(forKey: "publicK") as? Data
let privateK = record.object(forKey: "privateK") as? Data
let token = record.object(forKey: "token") as? String
let image = record.object(forKey: "image") as? Data
let newRex = rex(id: record.recordID, token: token, nickName: name, image: image, secret: secret, publicK: publicK, privateK: privateK)
DispatchQueue.main.async { self!.searchPriPublisher.send(newRex) }
}
}
}
One notable part of this code is the need to execute the passthroughsubjects on the main thread. Fail to do so and your project may not compile. Worse, it could simply crash.
该代码的一个重要部分是需要在主线程上执行passthroughsubjects主题。 否则,您的项目可能无法编译。 更糟糕的是,它可能会崩溃。
Next, we need a routine to fetch all the records in the private and public databases for our directory. Keep in mind that restriction on the number you can get back per call. Sure, you’ll need 100 devices to break/test our WotsApp app, but… you get the message.
接下来,我们需要一个例程来获取目录中私有和公共数据库中的所有记录。 请记住,每次通话可以回拨的电话号码受到限制。 当然,您需要100台设备才能破坏/测试我们的WotsApp应用程序,但是……您会收到消息。
func getPublicDirectory() {
let predicate = NSPredicate(value: true)
let query = CKQuery(recordType: "directory", predicate: predicate)
publicDB.perform(query,inZoneWith: CKRecordZone.default().zoneID) { [weak self] results, error in
guard let _ = self else { return }
if let error = error {
DispatchQueue.main.async() { self!.errorPublisher.send(error.localizedDescription) }
return
}
guard let results = results else { return }
for result in results {
let name = result.object(forKey: "nickName") as? String
let publicK = result.object(forKey: "publicK") as? Data
let token = result.object(forKey: "token") as? String
let recordID = result.recordID
let newRex = rex(id: recordID, token: token, nickName: name, image: nil, secret: nil, publicK: publicK, privateK: nil)
self!.users!.rexes.append(newRex)
}
DispatchQueue.main.async() { self!.gotPublicDirectory.send(true) }
}
}
func getPrivateDirectory() {
let predicate = NSPredicate(value: true)
let query = CKQuery(recordType: "directory", predicate: predicate)
privateDB.perform(query,inZoneWith: CKRecordZone.default().zoneID) { [weak self] results, error in
guard let _ = self else { return }
if let error = error {
DispatchQueue.main.async() { self!.errorPublisher.send(error.localizedDescription) }
return
}
guard let results = results else { return }
for result in results {
let name = result.object(forKey: "nickName") as? String
let secret = result.object(forKey: "secret") as? String
let privateK = result.object(forKey: "privateK") as? Data
let publicK = result.object(forKey: "publicK") as? Data
let token = result.object(forKey: "token") as? String
let image = result.object(forKey: "image") as? Data
let recordID = result.recordID
let newRex = rex(id: recordID, token: token, nickName: name, image: image, secret: secret, publicK: publicK, privateK: privateK)
self!.users!.rexes.append(newRex)
}
}
}
Next, a few routines to save our token to the private and public databases. Most of this is template code, really, with only one small notable piece in the closures here — the use of a semaphore.
接下来,有一些例程将我们的令牌保存到私有和公共数据库。 实际上,其中大多数都是模板代码,这里的闭包中只有一小部分值得注意的部分-使用信号量。
func saveToPublic(user: rex) {
let record = CKRecord(recordType: "directory")
record.setValue(user.publicK, forKey: "publicK")
record.setValue(user.nickName, forKey: "nickName")
record.setValue(user.token, forKey: "token")
let saveRecordsOperation = CKModifyRecordsOperation()
saveRecordsOperation.recordsToSave = [record]
saveRecordsOperation.savePolicy = .allKeys
saveRecordsOperation.modifyRecordsCompletionBlock = { savedRecords,deletedRecordID, error in
if error != nil {
DispatchQueue.main.async() { self!.errorPublisher.send(error?.localizedDescription) }
} else {
self.semaphore.wait()
self.ops = self.ops + 1
self.semaphore.signal()
}
}
publicDB.add(saveRecordsOperation)
}
func saveToPrivate(user: rex) {
let record = CKRecord(recordType: "directory")
record.setValue(user.publicK, forKey: "publicK")
record.setValue(user.nickName, forKey: "nickName")
record.setValue(user.token, forKey: "token")
record.setValue(user.privateK, forKey: "privateK")
record.setValue(user.secret, forKey: "secret")
record.setValue(user.image, forKey: "image")
let saveRecordsOperation = CKModifyRecordsOperation()
saveRecordsOperation.recordsToSave = [record]
saveRecordsOperation.savePolicy = .allKeys
saveRecordsOperation.modifyRecordsCompletionBlock = { savedRecords,deletedRecordID, error in
if error != nil {
DispatchQueue.main.async() { self!.errorPublisher.send(error?.localizedDescription) }
} else {
self.semaphore.wait()
self.ops = self.ops + 1
self.semaphore.signal()
}
}
privateDB.add(saveRecordsOperation)
}
A semaphore brings our two save routines together and then sends me passthroughsubjects when they are both complete. The semaphore will guarantee that the code within the wait() and signal() is executed exclusively. That code simply counts the number of completed processes, which needs to be two in our case.
信号量将我们的两个保存例程放在一起,然后在两个对象都完成时向我发送passthroughsubjects 。 信号量将保证wait()和signal()中的代码被排他地执行。 该代码仅计算完成的过程数,在我们的例子中需要为两个。
var semaphore = DispatchSemaphore(value: 1)
var ops:Int = 0 {
didSet {
if ops == 2 {
DispatchQueue.main.async { self.savedPublisher.send(true) }
}
}
}
func saveRex(user: rex) {
saveToPublic(user: user)
saveToPrivate(user: user)
}
I suspect we’re going to need more code, but let’s move on to our SwiftUI interface.
我怀疑我们将需要更多代码,但让我们继续我们的SwiftUI界面。
第六章 (Chapter 6)
So that’s enough CloudKit code to last you a lifetime, I’m sure. Let’s try and do some SwiftUI. I have wiped the slate clean from Chapters 3 and 4.
我敢肯定,这足以使您持续一生。 让我们尝试做一些SwiftUI。 我已经将第3章和第4章中的内容全部清除。
I’ve got five sections right now. The first sets up our environment, creates different objects, and sets up a fixed array of icons for our users to choose from. You can use whatever you like for images. Just keep them small. Since we’ll ultimately be saving them in the public cloud space, think about fees.
我现在有五个部分。 第一种设置环境,创建不同的对象,并设置固定的图标阵列供用户选择。 您可以使用任何您喜欢的图像。 保持它们很小。 由于我们最终将它们保存在公共云空间中,因此请考虑费用。
import SwiftUI
let poster = RemoteNotifications()
let crypto = Crypto()
let cloud = Storage()
let images = ["mouse","bull","tiger","rabit","dragon","snake","horse","ram","monkey","roster","dog","bull"]
class nouvelleUsers: ObservableObject {
var rexes:[rex] = []
The most notable part here is the fact that our nouvelleUsers is an ObservableObject. This is a way of telling SwiftUI that it needs to redraw its interface if the data within this structure changes — a structure that may be updated elsewhere.
这里最值得注意的部分是我们的nouvelleUsers是一个ObservableObject的事实。 这是一种告诉SwiftUI的方法,如果该结构中的数据发生更改,则需要重绘其接口(该结构可以在其他位置进行更新)。
The next section declares a dozen or so variables in the true sense of the word: boxes within which we can change the value. This is a declaration that is required by SwiftUI since the view is a struct and not mutable. State variables have the same effect as the observable one I just mentioned. Change them and it signals the view that it potentially needs to redraw itself.
下一节将真正意义上的十几个变量声明为:可在其中更改值的框。 这是SwiftUI所需的声明,因为视图是结构且不可更改。 状态变量与我刚才提到的可观察变量具有相同的作用。 更改它们,并发出信号,表明可能需要重绘自身。
struct ContentView: View {
@State var user: rex?
@State var nouvelle = nouvelleUsers()
@State var selected = 0
@State var display1 = false
@State var display2 = false
@State var nickName = ""
@State var secret = ""
@State var showAlert2 = false
@State var index = 0
@State var image = UIImage(imageLiteralResourceName: "dog")
@State var message = ""
The next section defines what happens when you start the app. It decides if this is a new case or not. Assuming it isn’t a new device, it sets our crypto environment with the correct keys.
下一部分定义了启动应用程序时发生的情况。 它决定这是否是新案件。 假设它不是新设备,它将使用正确的密钥设置我们的加密环境。
The onReceive directives within it and other SwiftUI sections show the other half of our passThroughSubject, our Combine framework delegate method. The program execution is controlled by messages sent between the storage class methods we already defined and these closures within our SwiftUI code.
该onReceive内它和其他SwiftUI部分指令展示我们的另一半passThroughSubject ,我们的联合框架的委托方法。 程序的执行由已定义的存储类方法与SwiftUI代码中的这些闭包之间发送的消息控制。
var body: some View {
VStack(alignment: .center) {
// path as you start the app
Text("WotsApp")
.onTapGesture {
if token != nil {
cloud.searchPrivate(token)
}
}
.onReceive(cloud.searchPriPublisher) { (data) in
if data != nil {
self.user = data!
self.image = UIImage(data: self.user!.image!)!
self.nickName = self.user!.nickName!
self.secret = self.user!.secret!
crypto.putPublicKey(publicK: self.user!.publicK!, keySize: 2048, publicTag: "ch.cqd.WotsApp")
crypto.putPrivateKey(privateK: self.user!.privateK!, keySize: 2048, privateTag: "ch.cqd.WotsApp")
} else {
self.display2 = true
}
}.onReceive(cloud.gotPublicDirectory) { (success) in
if success! {
self.nouvelle.rexes = cloud.users!.rexes
DispatchQueue.main.asyncAfter(deadline: .now() + 0.1) {
self.display1 = true
}
}
}
Most of this code is fairly vanilla, with a tiny workaround at the end to delay displaying the pickerview while I copy the data downloaded to the local CloudKit copy to the display copy.
这些代码大部分都是原始代码,最后有一个微小的解决方法,可以在我将下载到本地CloudKit副本的数据复制到显示副本时延迟显示pickerview。
The next section is the path taken for a new user. It shows a form with a few text fields and an icon. This is where we define new crypto keys and save everything to the cloud. It is where our semaphore is used in the background to ensure both the private and public databases are updated before showing the alert.
下一部分是新用户采用的路径。 它显示了带有几个文本字段和一个图标的表单。 在这里,我们定义新的加密密钥并将所有内容保存到云中。 这是在后台使用我们的信号灯的地方,以确保在显示警报之前,私有数据库和公共数据库都已更新。
// path for a new user
if display2 {
Spacer()
TextField("NickName?", text: $nickName)
.multilineTextAlignment(.center)
.textFieldStyle(RoundedBorderTextFieldStyle())
TextField("Secret?", text: $secret)
.multilineTextAlignment(.center)
.textFieldStyle(RoundedBorderTextFieldStyle())
Image(images[index])
.resizable()
.frame(width: 128.0, height: 128.0)
.onTapGesture {
self.index = (self.index + 1) % images.count
}.animation(.default)
Text("Tap image to change it").font(.system(size: 12))
Spacer()
Spacer()
Button(action: {
let success = crypto.generateKeyPair(keySize: 2048, privateTag: "ch.cqd.WotsApp", publicTag: "ch.cqd.WotsApp")
if success {
let privateK = crypto.getPrivateKey()
let publicK = crypto.getPublicKey()
self.image = UIImage(named: images[self.index])!
let imagePNG = self.image.pngData()!
let newRex = rex(id: nil, token: token, nickName: self.nickName, image: imagePNG, secret: self.secret, publicK: publicK, privateK: privateK)
cloud.saveRex(user: newRex)
}
}) {
Image(systemName: "icloud.and.arrow.up")
.resizable()
.frame(width: 48.0, height: 48.0)
}.onReceive(cloud.savedPublisher) { ( success ) in
if success! {
self.showAlert2 = true
self.display2 = false
self.display1 = true
}
}
Spacer()
}
Finally, the last section is the path taken for an existing user. It shows a pickerview with the users known to the app and indeed a messaging window that is connected to nothing as I write this. It’s just for show.
最后,最后一部分是现有用户所采用的路径。 它显示了一个应用程序已知的用户的pickerview以及实际上是一个消息窗口,在我撰写本文时,该窗口未连接任何内容。 这只是为了展示。
// path for an existing user
if self.display1 {
Text(secret)
Image(uiImage: image)
.resizable()
.frame(width: 128.0, height: 128.0)
Text(nickName)
TextField("Message?", text: $message)
.multilineTextAlignment(.center)
.textFieldStyle(RoundedBorderTextFieldStyle())
Spacer()
Picker(selection: $selected, label: Text("")) {
ForEach(0 ..< self.nouvelle.rexes.count) {dix in
Text(self.nouvelle.rexes[dix].nickName!)
}
}.pickerStyle(WheelPickerStyle())
.padding()
.alert(isPresented:$showAlert2) {
Alert(title: Text("New User"), message: Text("Saved"), dismissButton: .default(Text("Ok")))
}
}
}
}
}
结论 (Conclusion)
And there you have it. I’m sorry I couldn’t/didn’t ask you to do any testing before now. You should be able to run the code at this point — once when you see the initial screens, then again to see the second one, and a third time on a second device for the final test.
那里有。 抱歉,在此之前我不能/不想让您进行任何测试。 此时,您应该能够运行代码-一次看到初始屏幕,然后再次看到第二个屏幕,第三次在第二台设备上进行最终测试。
I’ll close this chapter for now. As I said, we’re around halfway through the plan I sketched out at the beginning of the article. Read on.
我现在将结束本章。 正如我所说的,我们正在本文开头草拟的计划的一半左右。 继续阅读。
翻译自: https://medium.com/better-programming/building-your-own-wotsapp-part-3-924ba3f6c569


 670
670

 被折叠的 条评论
为什么被折叠?
被折叠的 条评论
为什么被折叠?
 到【灌水乐园】发言


