


锂离子电容器
I hear you thinking: “Building an IPA without a Mac? Folly!”. I, too, was under the impression that you had to spend money for access to a system with MacOS (a MacBook, an iMac or even renting online). Over the past week, however, I have found all the pieces of the puzzle to get you an IPA using a Windows PC.
我听到您在想:“没有Mac,要建立IPA吗? 蠢事!”。 我也给人一种印象,那就是您必须花钱才能访问使用MacOS的系统(MacBook,iMac甚至在线租用 )。 但是,在过去一周中,我发现了使用Windows PC获得IPA的所有难题。
IMPORTANT: I would not recommend this flow for an app in active development. Testing an app on a physical device using this method is very cumbersome and frustrating, especially when you wish to debug specific scenarios. Use this method if you have an app that is (almost) ready for release, if you just wish to try it or if you have no other way of building an IPA. If you are able to get hold of a system running MacOS within your reason and means, I would strongly advise you to go that route. Now that is out of the way, let us continue.
重要信息:对于积极开发中的应用程序,我不建议使用此流程。 使用此方法在物理设备上测试应用程序非常麻烦且令人沮丧,尤其是当您希望调试特定方案时。 如果您的应用程序(几乎)已经准备好发布,或者只想尝试使用它,或者您没有其他构建IPA的方法,请使用此方法。 如果您能够在一定范围内掌握运行MacOS的系统,强烈建议您采取这种做法。 既然这已成问题,让我们继续。
一些背景 (Some context)
Why would I even consider taking this convoluted way around MacOS? It started with a friend of mine, Bjarke, a hilarious streamer on Twitch. My hands were itching to build a mobile app with Ionic 5, Capacitor and React, so I asked him if he would like an app to complement his channel and he said yes.
为什么我甚至考虑采用这种复杂的方式围绕MacOS? 它始于我的一个朋友Bjarke,他是Twitch上热闹的流光。 我很想用Ionic 5 ,Capacitor和React构建一个移动应用程序,所以我问他是否想要一个应用程序来补充他的频道,他说是的。
After building the app, testing it in the browser and on my physical Android device, I was ready to test the “finished” product on his iPhone. For this I needed an IPA to distribute to his phone, but spending a significant amount of money for a Mac just to run “Build” on it was overkill for a small time practice app. So I started looking around and researching. This article is the result of my research and experiments. To prevent this article from becoming too big, I will reference a few other posts that handle specific actions in a more bite-size format.
构建该应用程序并在浏览器和我的物理Android设备上对其进行测试之后,我准备在他的iPhone上测试“成品”产品。 为此,我需要一个IPA分配到他的手机上,但花大量钱购买一台Mac,仅仅在Mac上运行“ Build”,对于一个小型的时间练习应用来说,这是过分的。 因此,我开始环顾四周并进行研究。 本文是我研究和实验的结果。 为防止本文太大,我将参考其他一些文章,这些文章以较小的格式处理特定的操作。
Even though the process has been described from the perspective of an Ionic app, the steps to get from an XCode project to an IPA should still apply in a more generic scenario.
即使已经从Ionic应用程序的角度描述了该过程,但从XCode项目到IPA的步骤仍应适用于更通用的场景。
先决条件 (Prerequisites)
The goal of this exercise will be to perform an Ad Hoc distribution of the Ionic app, which requires us to build an IPA as an intermediate step. For this specific exercise, I will assume you have the following already:
此练习的目标是执行Ionic应用程序的临时分发,这需要我们构建IPA作为中间步骤。 对于此特定练习,我将假定您已经具备以下条件:
An Ionic/Capacitor app
离子/电容器应用
A free Azure DevOps account (create an account, an organization in that account and a project in that organization if you don’t have those yet)
一个免费的Azure DevOps帐户 (如果尚未创建帐户,请在该帐户中创建一个组织 ,然后在该组织中创建一个项目 )
- The codebase on some git repo (GitHub, Azure DevOps Repos, etc.) 某些git仓库(GitHub,Azure DevOps仓库等)上的代码库
Paid Apple Developer account
付费的Apple Developer帐户
The paid Apple Developer account is a $100 downside to this, but if you’re planning on releasing something to the App Store, I assume you have one already or would create one anyway.
付费的Apple Developer帐户有100美元的缺点,但是如果您打算向App Store发行某些东西,我想您已经拥有一个,或者无论如何都会创建一个。
采取的步骤 (Steps to take)
Now to get to the nitty gritty! To get from app to Ad Hoc distribution, we will go through the following steps:
现在进入精髓! 要从应用分发到Ad Hoc分发,我们将执行以下步骤:
- Add iOS as platform to the Ionic App 将iOS作为平台添加到Ionic App
- Push the code to the git repo 将代码推送到git repo
- Get a Certificate and Provisioning Profile from your Apple Developer Console 从Apple开发者控制台获取证书和配置文件
- Construct the Azure Pipeline in DevOps, run it and download the IPA 在DevOps中构建Azure管道,运行并下载IPA
Upload the IPA to Diawi for distribution
将IPA 上载到Diawi以进行分发
We have quite a way to go, so let’s get to it!
我们还有很长的路要走,让我们开始吧!
将iOS作为平台添加到Ionic App (Add iOS as platform to the Ionic App)
First off we will need Ionic to generate the files for the iOS build. If you have already done this, you can skip to the next subsection where we make some necessary changes.
首先,我们需要Ionic为iOS构建生成文件。 如果您已经完成此操作,则可以跳至下一部分,我们将在此进行一些必要的更改。
We do that by opening up a command prompt at the root of the project (or if you’re using VS Code, Ctrl-` to spin up a terminal). Run
为此,我们在项目的根目录打开一个命令提示符(或者,如果您使用的是VS Code ,请按Ctrl-`旋转一个终端)。 跑
ionic capacitor add ios
ionic capacitor add ios
and hit ENTER. Ionic will now perform the necessary steps to prepare the app for iOS.
然后按Enter。 Ionic现在将执行必要的步骤,以为iOS准备该应用程序。
Good, now we have the iOS files, but we need to massage them into the right shape. Let’s do that next.
很好,现在我们有了iOS文件,但是我们需要将它们压缩成正确的形状。 让我们接下来做。
进行一些必要的更改 (Making some necessary changes)
For the build in Azure DevOps to work, we need to add some files to our git repository which are normally ignored and also make some alterations to an existing one.
为了使Azure DevOps中的生成正常工作,我们需要向git存储库中添加一些通常会被忽略的文件,并对现有文件进行一些更改。
Replace the
/node_modulesstatement in the root .gitignore file to make it look like this:在根.gitignore文件中替换
/node_modules语句,使其看起来像这样:

node_modules is generally kept in the .gitignore and that’s a good thing, because it contains a LOT of files. We want to keep it that way, but Azure will need this specific folder to be able to build the IPA, so that’s why we are adding it.
node_modules通常保存在.gitignore中,这是一件好事,因为它包含很多文件。 我们希望保持这种状态,但是Azure将需要此特定文件夹才能构建IPA,因此这就是我们添加它的原因。
Remove
App/publicandcapacitor-cordova-ios-pluginfromios/.gitignore:从
ios/.gitignore删除App/public和capacitor-cordova-ios-plugin:
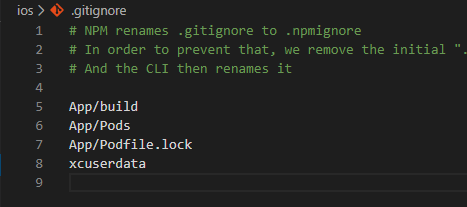
Azure will need those folders as well for the build.
Azure将也需要这些文件夹来进行构建。
Add a few extra lines to
ios/App/PodFile, which was created automatically in the last step:向
ios/App/PodFile添加几行,这是在最后一步中自动创建的:
post_install do |installer| installer.pods_project.targets.each do |target| target.build_configurations.each do |config| config.build_settings['EXPANDED_CODE_SIGN_IDENTITY'] = "" config.build_settings['CODE_SIGNING_REQUIRED'] = "NO" config.build_settings['CODE_SIGNING_ALLOWED'] = "NO" end end end
Why are we doing this? We are telling CocoaPods (the package manager that will run this file in Azure) to not try and sign the Pods. This is something that was added to CocoaPods in a previous version, but it breaks the build process.
我们为什么这样做呢? 我们告诉CocoaPods(将在Azure中运行此文件的程序包管理器)不要尝试对Pods签名。 这是以前版本中添加到CocoaPods的东西,但它破坏了构建过程。
That’s it for the changes we need to make. Make sure to push this to your git repo and we can continue.
这就是我们需要进行的更改。 确保将其推送到您的git repo,我们可以继续。
从Apple开发人员控制台获取证书和配置文件 (Get a Certificate and Provisioning Profile from your Apple Developer Console)
This is one of those steps for which Apple refers you to Keychain, a key management tool native to Apple. To use Keychain, you need to have access to a Mac, but luckily we can achieve the same results by using OpenSSL. I will refer you to some articles for the different steps to not clutter up this one. Let’s go through the steps:
这是Apple引导您使用Keychain(Apple固有的密钥管理工具)的步骤之一。 要使用钥匙串,您需要访问Mac,但是幸运的是,我们可以使用OpenSSL达到相同的结果。 我将向您介绍一些文章,以介绍不使该文章混乱的不同步骤。 让我们完成以下步骤:
Follow this article to install OpenSSL and add it to your PATH
Follow this article to create an Apple Provisioning Profile and a .p12 certificate (take note of the App ID you will create, we will need it!)
遵循本文以创建Apple Provisioning Profile和.p12证书 (请注意您将创建的App ID,我们将需要它!)
Right, that should leave you with at least the two files we will need in the Azure DevOps pipeline. There is one important thing we need to take care of, and that is to take that App ID you created and set that in our code. Go to ios/App/App/capacitor.config.json and set your App ID:
正确,这应该使您至少拥有我们在Azure DevOps管道中需要的两个文件。 我们需要注意的一件重要事情是,将您创建的应用程序ID放在我们的代码中进行设置。 转到ios/App/App/capacitor.config.json并设置您的应用ID:

Good show! We are ready to move on to getting a build pipeline started on Azure.
不错的演出! 我们准备继续在Azure上启动构建管道。
在DevOps中构建Azure管道,运行并下载IPA (Construct the Azure Pipeline in DevOps, run it and download the IPA)
The juicy part! Here we actually are going to get an .ipa file that can be run on an iOS device. That’s why we’re here, after all. To Azure!
多汁的部分! 在这里,我们实际上将获得一个可以在iOS设备上运行的.ipa文件。 毕竟,这就是为什么我们在这里。 到Azure!
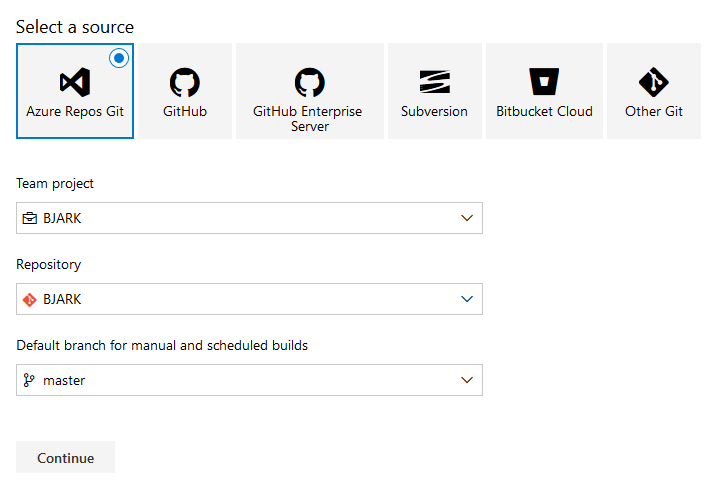
- Log into your Azure DevOps Portal, choose the organization and then the project you made for this: 登录到Azure DevOps Portal,选择组织,然后选择为此创建的项目:

Click on Pipelines > New Pipeline and then choose the Use the classic editor option at the bottom:
单击管道 > 新建管道 ,然后在底部选择使用经典编辑器选项:

- Make sure to choose the source, project, repository and default branch (master) depending on where you have stored your code (my code is in the same project, so I chose Azure Repos Git) and then hit continue. 确保根据源代码的存储位置(我的代码在同一项目中,所以我选择Azure Repos Git)选择源,项目,存储库和默认分支(主节点),然后单击继续。
In the template selection screen search for “xcode” and choose the Xcode template pipeline by hovering over it and hitting Apply:
在模板选择屏幕中搜索“ xcode”,然后将鼠标悬停在其上并点击Apply ,以选择Xcode模板管道:

- When you get to the Pipeline, adjust the fields in the right window to reflect the image below (Ionic named the ios source folder App, so I am keeping it that way): 当您到达“管道”时,请调整右侧窗口中的字段以反映下面的图像(Ionic命名为ios源文件夹App,因此我将其保持这种方式):

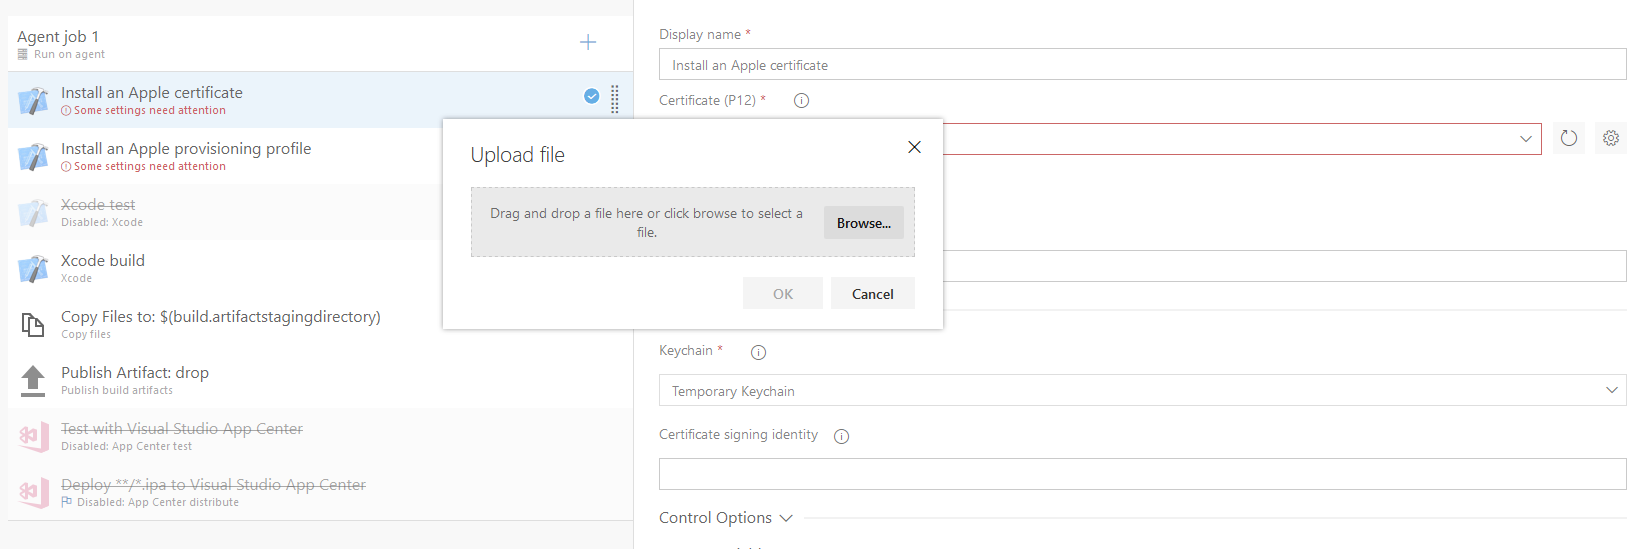
- Make sure to enable the first two tasks (right-click them to get the menu) as we will need those to get a valid .ipa to distribute: 确保启用前两个任务(右键单击它们以获取菜单),因为我们将需要获得有效的.ipa来进行分发:

Click the first task and upload your .p12 certificate by hitting the gear icon to the right of the Certificate (P12) field:
单击第一个任务,然后通过单击证书(P12)字段右侧的齿轮图标来上载.p12证书:
Once uploaded, click on Variables at the top and enter the password for the .p12 file:
上传后,单击顶部的变量 ,然后输入.p12文件的密码:

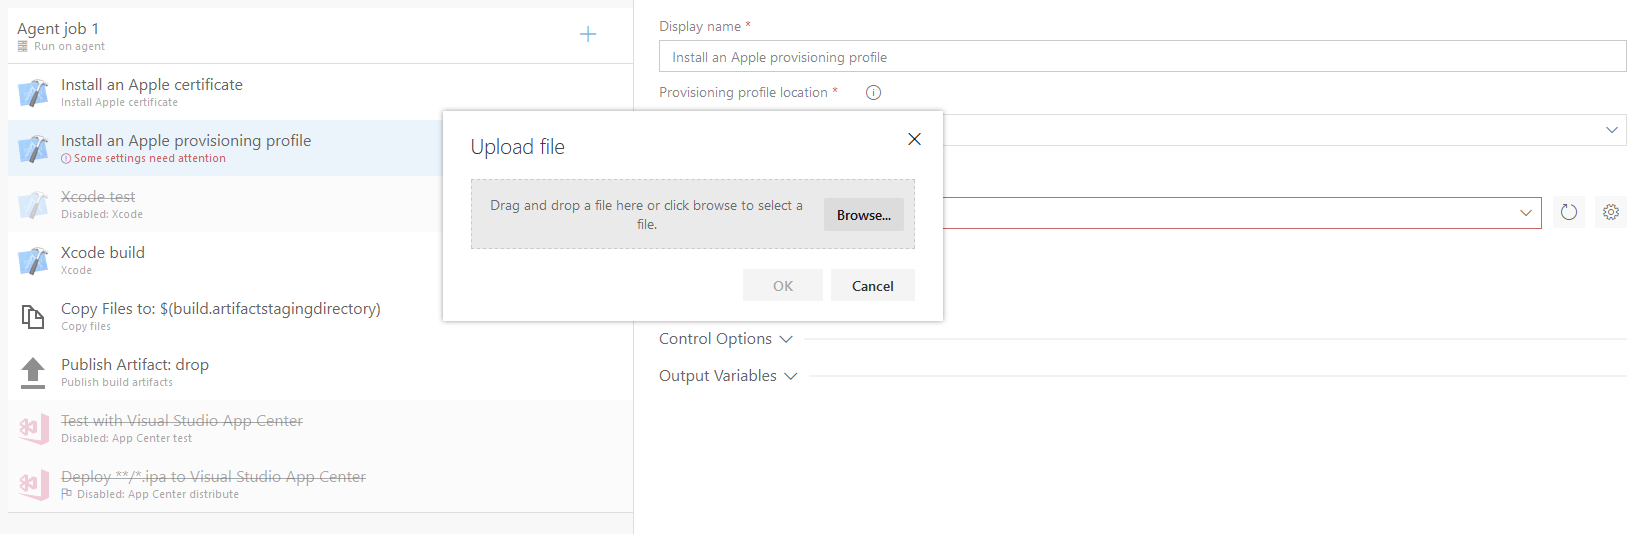
Now go back to Tasks, select the second task for the provisioning profile, and hit the gear icon again to upload the profile you created:
现在返回“ 任务” ,为配置文件选择第二个任务,然后再次点击齿轮图标以上传您创建的配置文件:
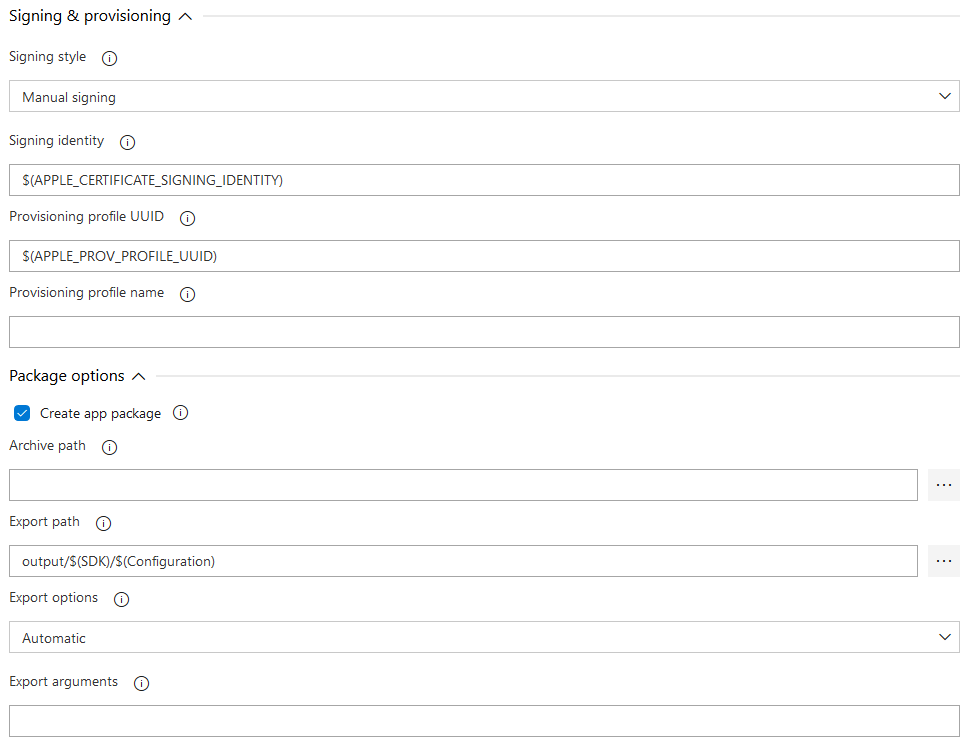
Now go to the Xcode build task, scroll down to the Signing & Provisioning section and fill in the fields as shown:
现在转到Xcode构建任务,向下滚动到Signing&Provisioning部分并填写字段,如下所示:
We need to add a task to the template, so hit the + icon in the Agent job 1 box, search for cocoapods, and add the CocoaPods task:
我们需要向模板添加任务,因此在“ 代理程序作业1”框中单击+图标,搜索cocoapods ,然后添加CocoaPods任务:

Once added, use the handle at the end of the task to move it just before the Xcode build task and also fill in the fields as shown below:
添加完成后,使用任务末尾的手柄将其移动到Xcode构建任务之前,并填写如下所示的字段:

Hit Save & Queue, enter a comment if you wish and then click Save and run:
点击“ 保存并排队” ,如果需要,输入注释,然后单击“ 保存并运行” :

Hit the Agent job 1 to see what’s going on:
点击代理工作1 ,查看发生了什么:

- Once finished, (if you followed the steps, the build should pass, else leave a comment and I’ll get back to you ASAP) you can download the artifact that was produced: 完成后,(如果您按照这些步骤操作,则构建应该会通过,否则请发表评论,我会尽快与您联系),您可以下载生成的工件:

- Once you click it, open the folders and download that fresh .ipa: 单击它后,打开文件夹并下载该新的.ipa:

Phew! We finally got our .ipa and surely by now you must realize why I recommend going through Mac when possible. Although, once everything is set up, building a new .ipa is simply a matter of pushing your code to your master branch, and kicking of this ready-to-go pipeline.
! 我们终于有了.ipa,现在肯定您必须明白为什么我建议尽可能推荐使用Mac。 虽然,一旦一切都设置好了,构建新的.ipa只是将代码推送到master分支,然后启动此现成的管道即可。
将IPA上载到Diawi以进行分发 (Upload the IPA to Diawi for distribution)
If you are not interested in an Ad Hoc distribution, then you can leave this step out. I want Bjarke to test out the app on his iPhone before releasing it, so I will use Diawi to distribute it to him.
如果您对Ad Hoc分发不感兴趣,则可以不执行此步骤。 我希望Bjarke在发布iPhone之前先对其应用进行测试,因此我将使用Diawi将其分发给他。
Go to Diawi and click Add file(s) to add your newly downloaded .ipa file:
转到Diawi ,然后单击“ 添加文件”以添加新下载的.ipa文件:

Wait for the upload to complete, hit Send and simply copy the link and/or QR-code:
等待上传完成,点击发送,然后简单地复制链接和/或QR码:

- Give either of them to the people who own the devices you registered in the Provisioning Profile and they should be able to download it (make sure they use mobile view in Safari if they are on an iPad) 将其中任何一个交给拥有您在Provisioning Profile中注册的设备的用户,他们应该可以下载(如果在iPad上,请确保他们在Safari中使用移动视图)
结束 (The End)
And that’s a wrap! Quite the journey, but we managed to build and distribute an app for iOS without owning/renting a Mac. Thank you for joining me on this journey through the jungle. Special thanks goes out to Bjarke (worth checking out if you like to laugh), who handed me the opportunity to do and learn all of this and build an app for him.
这就是包装! 经历了一段漫长的旅程,但我们设法在没有拥有/租用Mac的情况下为iOS构建和分发了应用。 感谢您加入我的丛林之旅。 特别感谢Bjarke (值得一试,如果您想笑的话可以检查一下),他让我有机会做和学习所有这些知识,并为他开发了一个应用程序。
If you have any questions or remarks I would love to hear about them.
如果您有任何疑问或意见,我很想听听。
翻译自: https://medium.com/dev-genius/ionic-capacitor-from-app-to-ios-ipa-without-a-mac-9b8616900528
锂离子电容器


 被折叠的 条评论
为什么被折叠?
被折叠的 条评论
为什么被折叠?
 到【灌水乐园】发言


