


图神经网络 图卷积神经网络
相关资料 (Related Material)
Deep learning on graphs: successes, challenges, and next steps (article by prof Michael Bronstein)
图上的深度学习:成功,挑战和下一步 (Michael Bronstein教授的文章)
目录 (Table of Contents)
- What are Explanation Techniques 什么是解释技巧
- Why Should We Bother? 我们为什么要打扰?
- Tools for the GNN Explanation Methods GNN解释方法的工具
- Hands-on Part with the GNNExplainer GNNExplainer的动手部分
- About Me 关于我
什么是解释技巧 (What are Explanation Techniques)
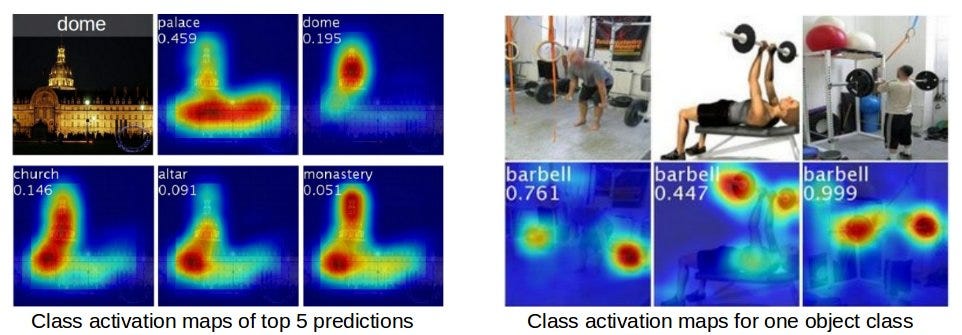
Explanations Techniques help us understand the model’s behaviour. For example, explanation methods are used to visualize certain parts of the image or to see how it reacts to a certain input. It is a well-established field of machine learning that has many different techniques which can be applied to deep learning (e.g. class activation maps, gradient attribution) and to other machine learning algorithms (e.g. LIME).
说明技术可以帮助我们了解模型的行为。 例如,解释方法用于可视化图像的某些部分或查看其对特定输入的React。 这是一个成熟的机器学习领域,具有许多可应用于深度学习(例如,类激活图,梯度归因)和其他机器学习算法(例如,LIME)的不同技术。
However, there have been only a few attempts to create explanation methods for graph neural networks (GNNs). Most of the “reuse” methods that were developed in deep learning and try to apply them in the graph domain.
但是,只有少数尝试创建图神经网络(GNN)的解释方法。 深度学习中开发的大多数“重用”方法,都尝试将其应用于图域。
If you would like to learn more about state-of-the-art research on explainable GNNs, I would highly recommend looking over my previous article. Here, I will keep the theory short and focus on how to use the existing GNN explanation package, GNNExplainer.
如果您想了解有关可解释的GNN的最新研究的更多信息,我强烈建议您阅读我以前的文章 。 在这里,我将简化理论,重点介绍如何使用现有的GNN解释包GNNExplainer。
我们为什么要打扰? (Why Should We Bother?)
Deep learning models can have millions of parameters and they often appear to us as a black box [1]. It is hard to say how the model will react to new data and why it makes certain predictions given a specific input.
深度学习模型可以具有数百万个参数,并且它们通常对我们来说是一个黑匣子[1]。 很难说模型将如何对新数据做出React,以及为什么要在给定特定输入的情况下做出某些预测。
With the explanation methods, we hope to develop trust in the model. They provide additional insights from the model which makes it more transparent and explainable. By developing trust in the model, we can safely deploy the model for wider use.
通过解释方法,我们希望在模型中建立信任。 他们从模型中提供了更多的见解,使它更加透明和可解释。 通过建立对模型的信任,我们可以安全地部署模型以进行更广泛的使用。
GNN解释方法的工具 (Tools for the GNN Explanation Methods)
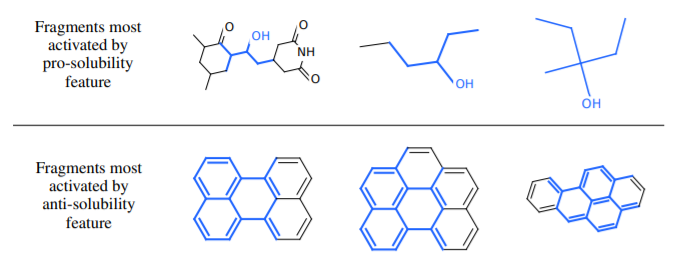
Unfortunately, the research on explanation methods for GNNs is quite new so there are not many ready-to-use tools and research papers. One of the first works on this topic was done by Duvenaud et al. in [2]. He managed to create a gradient-attribution method that highlights certain molecular substructures that trigger the predictions. For example, their method can highlight molecules substructures that make the molecule toxic or soluble in water.
不幸的是,关于GNN解释方法的研究还很新,因此现成的工具和研究论文不多。 Duvenaud等人完成了关于该主题的第一批作品之一。 在[2]中。 他设法创建了一种梯度归因方法,突出显示了触发预测的某些分子亚结构。 例如,他们的方法可以突出显示使分子有毒或可溶于水的分子亚结构。
Fortunately, researchers from Stanford University developed a model-agnostic GNN explanation method, GNNExplainer [3]. In the remainder of the article, we will explore how to use their tool.
幸运的是,斯坦福大学的研究人员开发了与模型无关的GNN解释方法GNNExplainer [3]。 在本文的其余部分,我们将探讨如何使用它们的工具。
If you don’t have time to read the whole paper on the GNNExplainer implementation, but you still would like to get an intuitive understanding of how it works, have a look at my article.
如果您没有时间阅读有关GNNExplainer实现的全文,但是您仍然希望对它的工作原理有一个直观的了解,请参阅我的文章 。
GNNExplainer的动手部分 (Hands-on Part with the GNNExplainer)
You can find the GNNExplainer repository here.
Link to the installation instructions with my personal notes.
The GNNExplainer is de facto the first model-agnostic open-source tool that can be used for GNN explanations. The researchers from Stanford University made a great job creating this tool for common use but it contains few bugs and is rather quite difficult to setup. In this guide, I will discuss some problems that I’ve faced during the installation and guide you on how to create GNN explanations as on the GIF above.
GNNExplainer实际上是第一个可用于GNN解释的与模型无关的开源工具。 斯坦福大学的研究人员在创建此通用工具方面做得很好,但是它包含的错误很少,并且安装起来相当困难。 在本指南中,我将讨论安装过程中遇到的一些问题,并指导您如何像上面的GIF一样创建GNN解释。
安装 (Installation)
Please note: my setup is Windows OS with the CUDA enabled GPU. The installation instructions might not work for a different setup. I will, however, try to point out the steps that you might have to adjust to make it work for other OS requirements. If you are just curious how this package works and you don’t have time to install it, please skip this instruction.
请注意: 我的设置是带有CUDA的GPU的Windows操作系统。 安装说明可能不适用于其他设置。 但是,我将尝试指出您可能需要调整的步骤,以使其能够满足其他操作系统的要求。 如果您只是好奇此软件包的工作原理,而又没有时间安装它,请跳过此说明。
To install the GNNExplainer, a prerequisite is to have conda installed. The installation instructions for their repository are also available on Github. They didn’t work for my setup and also had few mistakes, so I spend some time adjusting the installation instructions for my needs. The working instructions for my setup are below. If you have a different OS, you might need to change the cudatoolkit version, or install Pytorch without the CUDA support.
要安装GNNExplainer,一个先决条件是已经安装了畅达 。 Github上也提供了其存储库的安装说明。 它们对我的设置不起作用,并且也存在一些错误,因此我花了一些时间来调整安装说明以满足我的需要。 我的安装程序的工作说明如下。 如果您使用的是其他操作系统,则可能需要更改cudatoolkit版本,或者安装不具有CUDA支持的Pytorch。
# Setting up a repo
git clone https://github.com/RexYing/gnn-model-explainer.git
# Creating conda environment
conda create -n "gnn_env" python=3.7
conda activate gnn_env


# Installation
conda install pytorch torchvision cudatoolkit=10.1 -c pytorch
conda install -c conda-forge opencv
conda install matplotlib networkx pandas scikit-learn seaborn
conda install -c conda-forge tensorboardx
conda install tensorboard
conda install -c anaconda jupyter
如何训练GNN模型 (How to train the GNN model)
The authors provided a GNN model and few graph datasets as an example. It is a good starting point to test if everything works correctly and to understand the package a bit more.
作者提供了一个GNN模型和少量图数据集作为示例。 这是测试一切是否正常并进一步了解软件包的一个很好的起点。
Once the package is installed, run:
安装软件包后,运行:
# Training the model on syn2 dataset
python train.py --dataset=syn2
This will train the provided GNN model on the example syn2 data. It might even take half an hour so prepare yourself! Syn2 is a synthetic dataset created by authors and called “Random BA graph with community features”. The ground truth for the GNNExplainer model is a “house-like” structure (look at the GIF above). This is a set of nodes that GNNExplainer will try to find.
这将在示例syn2数据上训练提供的GNN模型。 甚至可能需要半个小时,所以请做好准备! Syn2是由作者创建的合成数据集,称为“具有社区特征的随机BA图”。 GNNExplainer模型的基本原理是“类似房子”的结构(请参见上面的GIF)。 这是GNNExplainer将尝试找到的一组节点。
如何使用解释器 (How to use the Explainer)
To run the GNNExplainer with the model trained on the Syn2 dataset, run:
要使用在Syn2数据集上训练的模型来运行GNNExplainer,请运行:
python explainer_main.py --dataset=syn2This will create an explanation file which can be then visualized using the Jupyter notebook. I did encounter an error while running it. There is a problem with saving the accuracy/loss figures at the end of the script. The required explanations are computed before that step so the issue is not crucial. If you want to still fix this issue and save the plots, replace the explain.py file with my gist that modifies the save paths. They will be located in the log/ folder.
这将创建一个说明文件,然后可以使用Jupyter笔记本可视化该文件。 我在运行时确实遇到错误。 在脚本末尾保存准确性/损失数字是有问题的。 所需的解释是在该步骤之前进行的,因此该问题并不重要。 如果您仍然想解决此问题并保存图表,请使用修改保存路径的要点替换explain.py文件。 它们将位于日志/文件夹中。
如何可视化结果 (How to Visualize the Results)
The authors provide us with two notebooks to visualize the results. They’re pretty much the same, but the interactive notebook contains additional interactive examples for the explanations.
作者为我们提供了两个笔记本以可视化结果。 它们几乎相同,但是交互式笔记本包含其他交互式示例进行解释。
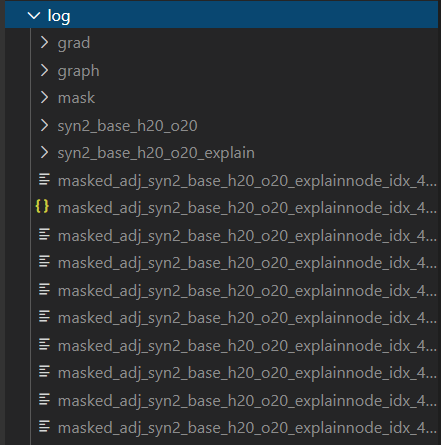
Before you launch a chosen notebook from the notebooks/ folder, you have to make one more adjustment. Go to log/ folder and move all of the files starting with masked_ to the syn2_base_h20_020_explain/ folder. This will ensure that we don’t have to change any paths in the notebook code.
从笔记本/文件夹启动选定的笔记本之前,您必须进行另一项调整。 转到日志/文件夹,然后将所有以masked_开头的文件移动到syn2_base_h20_020_explain /文件夹中。 这将确保我们不必更改笔记本代码中的任何路径。
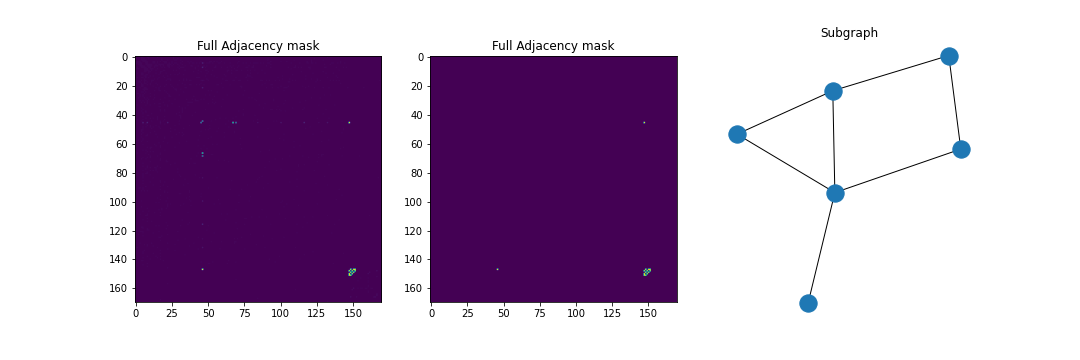
The notebook is quite straightforward and you just need to run all cells to generate the plots. For the syn2 dataset, they should look similarly to the one below:
笔记本非常简单,您只需要运行所有单元格即可生成图。 对于syn2数据集,它们的外观应类似于以下内容:
如何在分子数据上运行GNNExplainer? (How to Run the GNNExplainer on Molecular Data?)
You can use potentially use this software to run it with Tox21, Mutagenicity, or custom graph datasets. In order to do that, have a look at the original repository instructions.
您可以使用可能会使用此软件的Tox21,诱变性或自定义图形数据集来运行它。 为此,请查看原始存储库说明。
I managed to train the GNN model on Tox21 dataset. However, it seems like there are bugs in the software and the model is not saved after the training which makes it impossible to run the explainer. Hopefully, they will fix it soon.
我设法在Tox21数据集上训练了GNN模型。 但是,似乎软件中存在错误,并且在训练后未保存模型,这使得无法运行解释器。 希望他们会尽快解决。
PyTorch Geometric中的GNN解释器 (GNNExplainer in PyTorch Geometric)
The GNNExplainer is also a part of the PyTorch Geometric package. However, it supports only node explanations and it doesn’t have the visualizations utilities supplied by the original package. Anyway, it’s still might be worth looking into it.
GNNExplainer也是PyTorch Geometric软件包的一部分。 但是,它仅支持节点说明,而没有原始包提供的可视化实用程序。 无论如何,仍然值得研究。
Thank you for reading the article, I hope it was useful for you!
感谢您阅读本文,希望对您有所帮助!
关于我 (About Me)
I am an MSc Artificial Intelligence student at the University of Amsterdam. In my spare time, you can find me fiddling with data or debugging my deep learning model (I swear it worked!). I also like hiking :)
我是阿姆斯特丹大学的人工智能硕士研究生。 在业余时间,您会发现我不喜欢数据或调试我的深度学习模型(我发誓它能工作!)。 我也喜欢远足:)
Here are my social media profiles, if you want to stay in touch with my latest articles and other useful content:
如果您想与我的最新文章和其他有用内容保持联系,这是我的社交媒体个人资料:
翻译自: https://towardsdatascience.com/drug-discovery-with-graph-neural-networks-part-3-c0c13e3e3f6d
图神经网络 图卷积神经网络


 6432
6432

 被折叠的 条评论
为什么被折叠?
被折叠的 条评论
为什么被折叠?
 到【灌水乐园】发言


