


自动部署 持续集成
P- What’s Version Control?- What’s Docker?- What’s CI/CD?
P- 什么是版本控制? - 什么是Docker? - 什么是CI / CD?
目的 (Objective)
The goal is to give a friendly look into GitLab CI/CD with an example application that helps to get started without having to read all of GitLab documentation.
目的是通过一个示例应用程序对GitLab CI / CD进行友好的了解,该应用程序有助于入门,而无需阅读所有GitLab文档。
总览 (Overview)
Continuous Integration works by pushing small code chunks -commits- to your application’s codebase hosted in a Git repository, and, to every push, run a pipeline of scripts to build, test, and validate the code changes before merging them into the main branch.
持续集成的工作原理是:将小的代码块-commits-推送到Git存储库中托管的应用程序的代码库中,并且每次推送时,都要运行脚本管道来构建,测试和验证代码更改,然后再将其合并到主分支中。
Continuous Delivery and Deployment consist of a step further CI, deploying your application to production at every push to the default branch of the repository.
持续交付和部署包括进一步的CI,可在每次推送到存储库默认分支时将应用程序部署到生产环境。
These methodologies allow you to catch bugs and errors early in the development cycle, ensuring that all the code deployed to production complies with the code standards you established for your app.
这些方法使您可以在开发周期的早期发现错误和错误,从而确保部署到生产环境的所有代码均符合为应用程序建立的代码标准。
One of the major benefits of using Gitlab CI/CD is that you are freed from the cumbersome process of creating workflows using a lot of third-party plugins and tools.
使用Gitlab CI / CD的主要优点ØNE是你使用了很多第三方插件和工具的创建工作流程的繁琐的过程中解放出来。
If your codebase hosted on a version control system other than GitLab, and you want to use GitLab CI/CD you can read about Repository Mirroring.
如果您的代码库托管在除GitLab之外的版本控制系统上,并且您想使用GitLab CI / CD,则可以阅读有关存储库镜像的信息 。
If you’re coming over from Jenkins, you can also check out handy reference for converting your pipelines.
如果您是从詹金斯(Jenkins)过来的,还可以查看有关转换管道的方便参考 。
入门 (Getting started)
GitLab CI/CD is configured by a file called basic .gitlab-ci.yml placed at the repository's root. The scripts set in this file are executed by the GitLab Runner.
GitLab CI / CD由位于存储库根目录的名为basic .gitlab-ci.yml的文件配置。 该文件中设置的脚本由GitLab Runner执行。
To add scripts to that file, you’ll need to organize them in a sequence that suits your application and are by the tests you wish to perform. To visualize the process, imagine that all the scripts you add to the configuration file are the same as the commands you run on a terminal on your computer.
要将脚本添加到该文件,您需要按照适合您的应用程序的顺序对其进行组织,并通过您希望执行的测试进行。 为了可视化该过程,假设添加到配置文件中的所有脚本与在计算机的终端上运行的命令相同。
The scripts are grouped into jobs, and together they compose a pipeline.
这些脚本被分组为job ,它们共同组成了一个管道。
流水线 (Pipelines)
We can struct pipelines as we want because YAML is a serialization human-readable language
我们可以根据需要构造管道,因为YAML是一种序列化的人类可读语言
The assumption to build 3 pipelines:
建立3条管道的假设:
Project Pipeline installs dependencies, runs linters, and any scripts that deal with the code.
Project Pipeline将安装依赖项,运行linters,以及处理该代码的所有脚本。
Continuous Integration Pipeline runs automated tests and builds a distributed version of the code.
持续集成管道运行自动化测试并构建代码的分布式版本。
Deploy Pipeline deploys code to a designated cloud provider and environment.
部署管道将代码部署到指定的云提供商和环境。
Steps that pipelines execute are called jobs. When you group a series of jobs by those characteristics it is called stages. Jobs are the basic building block for pipelines. They can be grouped in stages and stages can be grouped into pipelines.
管道执行的步骤称为作业 。 当您根据这些特征将一系列作业分组时,称为阶段 。 作业是管道的基本构建块。 它们可以分为多个阶段,各个阶段可以分为多个管道。
基本管道 (Basic Pipelines)

Example basic /.gitlab-ci.yml pipeline configuration matching the diagram:
匹配该图的示例基本/.gitlab-ci.yml管道配置:
stages:
  - build
  - test
  - deploy


image: alpine


build_a:
  stage: build
  script:
    - echo "This job builds something."


build_b:
  stage: build
  script:
    - echo "This job builds something else."


test_a:
  stage: test
  script:
    - echo "This job tests something. It will only run when all jobs in the"
    - echo "build stage are complete."


test_b:
  stage: test
  script:
    - echo "This job tests something else. It will only run when all jobs in the"
    - echo "build stage are complete too. It will start at about the same time as test_a."


deploy_a:
  stage: deploy
  script:
    - echo "This job deploys something. It will only run when all jobs in the"
    - echo "test stage complete."


deploy_b:
  stage: deploy
  script:
    - echo "This job deploys something else. It will only run when all jobs in the"
    - echo "test stage complete. It will start at about the same time as deploy_a."
In this hierarchy, all three components are considered three different pipelines [{build_a, build_b}, {test_a, test_b}, {deploy_a, deploy_b}].
在此层次结构中,所有三个组件均被视为三个不同的管道[{build_a,build_b},{test_a,test_b},{deploy_a,deploy_b}]。
The main bullets -build, -test, and -deploy are stages and each bullet under those sections is a job
主要项目符号-build,-test和-deploy是阶段,这些部分下的每个项目符号都是一项工作。
Jobs will be executed based on the order listed in the stages directive.
作业将根据stages指令中列出的顺序执行。
You can make deploy_a deploys to a staging server and deploy_b deploys to the production server using the only directive which will trigger jobs when pushing commits to the branch under the only directive
您可以使用only指令使deploy_a部署到登台服务器,将deploy_b部署到生产服务器,当在only指令下将提交推送到分支时,将触发作业
deploy-production:stage: deployscript:
     - ./deploy_prod.shonly:
- masterNote: pipelines' names are custom. you can rename
deploy-productionto what makes sense for you.注意 :管道的名称是自定义的。 您可以将
deploy-production重命名为对您有意义的名称。
You can use CI Lint to write and validate your YAML file before adding it to the root of the repository (GitLab repository UI > left sidebar CI/CD > Pipelines CL Lint button)
在将YAML文件添加到存储库的根目录之前,可以使用CI Lint编写和验证您的YAML文件( GitLab存储库UI>左侧边栏CI / CD> Pipelines CL Lint按钮 )
You can also get started by using one of the templates available through the UI. You can use them by creating a new file, choosing a template that suits your application, and adjusting it to your needs:
您也可以通过使用UI中可用的模板之一来开始使用。 您可以通过创建新文件,选择适合您的应用程序的模板并根据需要进行调整来使用它们:

After saving your file to the root of the repo, it will be detected by GitLab as a CI/CD configuration and start executing
将文件保存到存储库的根目录后,GitLab会将其检测为CI / CD配置并开始执行
If you go to left sidebar CI/CD > Pipelines you will find your jobs stuck and if you click one of them you will see the following issue:
如果转到左侧边栏CI / CD>管道 ,则会发现作业卡住,如果单击其中之一,则会看到以下问题:

亚搏体育app Runner (GitLab Runner)
GitLab Runner is the open-source project that is used to run your jobs and send the results back to GitLab. It is used in conjunction with GitLab CI/CD, the open-source continuous integration service included with GitLab that coordinates the jobs.
GitLab Runner是一个开源项目,用于运行您的作业并将结果发送回GitLab。 它与GitLab CI / CD结合使用,GitLab CI / CD是GitLab随附的用于协调作业的开源持续集成服务。
安装GitLab Runner (Install GitLab Runner)

GitLab Runner can be installed and used on GNU/Linux, macOS, FreeBSD, and Windows. You can install it using Docker, download the binary manually, or use the repository for rpm/deb packages that GitLab offers. In this blog, I’ll install it as a docker service
可以在GNU / Linux,macOS,FreeBSD和Windows上安装和使用GitLab Runner。 您可以使用Docker安装它,手动下载二进制文件,或使用GitLab提供的rpm / deb软件包的存储库。 在此博客中,我将其作为docker服务安装
安装Docker映像并启动容器 (Install the Docker image and start the container)
Before you begin, ensure Docker is installed.
在开始之前,请确保已安装Docker 。
To run gitlab-runner inside a Docker container, you need to make sure that the configuration is not lost when the container is restarted. To do this, there are two options, which are described here. when asked for the image while installation I have typed alpine:3.7 which is light and enough for the purpose.
要在Docker容器中运行gitlab-runner ,您需要确保重新启动容器时配置不会丢失。 要做到这一点,有两个选项,其中描述了这里 。 在安装时要求提供映像时,我键入了alpine:3.7,它轻巧且足以满足要求。
Note: If you are using a
session_server, you will also need to expose port8093by adding-p 8093:8093to yourdocker runcommand.注意:如果您正在使用
session_server,则还需要通过将-p 8093:8093添加到docker run命令来公开端口8093。
注册跑步者 (Register the Runner)
The final step is to register a new Runner. The GitLab Runner Container won’t pick up any jobs until it’s registered.
最后一步是注册一个新的亚军。 在注册之前,GitLab Runner容器不会接收任何作业。
After you finish registration, the resulting configuration will be written to your chosen configuration volume (e.g. /srv/gitlab-runner/config), and will be automatically loaded by the Runner using that configuration volume.
完成注册后,结果配置将被写入您选择的配置卷(例如/srv/gitlab-runner/config ),并由Runner使用该配置卷自动加载。
To register a Runner using a Docker container:
要使用Docker容器注册Runner:
- Run the register command: 运行register命令:
- For local system volume mounts: 对于本地系统卷安装:
docker run --rm -it -v /srv/gitlab-runner/config:/etc/gitlab-runner gitlab/gitlab-runner registerIf you used a configuration volume other than
/srv/gitlab-runner/configduring install, then you should update the command with the correct volume.如果在安装过程中使用了
/srv/gitlab-runner/config以外的配置卷,则应使用正确的卷更新命令。
- For Docker volume mounts: 对于Docker卷挂载:
docker run --rm -it -v gitlab-runner-config:/etc/gitlab-runner gitlab/gitlab-runner:latest register2. Run the register command:
2.运行register命令:
Please enter the gitlab-ci coordinator URL (e.g. https://gitlab.com)
https://gitlab.com
3. Enter the token you obtained to register the Runner:
3.输入您获得的令牌来注册跑步者:
Please enter the gitlab-ci token for this runner
xxx
You can get URL and token from Settings>CI/CD>Runners>Expand>Set up a specific Runner manually
您可以从“设置”>“ CI / CD”>“ Runners”>“展开”>“手动设置特定的Runner”获取URL和令牌
Now time to restart the pipeline that stuck and then you can find it executed successfully.
现在该重新启动阻塞的管道了,然后您可以发现它已成功执行。

部署方式 (Deployment)
I’ll mention here accessing a remote server using ssh through YAML script
我将在这里提到使用SSH通过YAML脚本访问远程服务器
To deploy for a cloud provider easily, you can use dpl
要轻松地为云提供商部署,可以使用dpl
添加SSH密钥 (Add SSH key)
When your CI/CD jobs run inside Docker containers (meaning the environment is contained) and you want to deploy your code in a private server, you need a way to access it. This is where an SSH key pair comes in handy.
当您的CI / CD作业在Docker容器中运行(意味着环境已包含在内)并且您想要在私有服务器中部署代码时,您需要一种访问它的方法。 这是SSH密钥对派上用场的地方。
Make sure you can connect to the server before jumping to GitLab CI
跳至GitLab CI之前,请确保您可以连接到服务器
You will first need to create an SSH key pair. For more information, follow the instructions to generate an SSH key. Do not add a passphrase to the SSH key, or the before_script will prompt for it in the YAML file.
您首先需要创建一个SSH密钥对。 有关更多信息,请按照说明生成SSH密钥 。 请勿在SSH密钥中添加密码,否则before_script将在YAML文件中提示输入密码。
Here, I generate SSH RSA key
在这里,我生成SSH RSA密钥
ssh-keygen -t rsa -b 4096 -C "example"The -C flag adds a comment in the key in case you have multiple of them and want to tell which is which. It is optional.
-C标志在键中添加注释,以防您有多个注释并想知道是哪个。 它是可选的。
After that, we need to copy the private key, which will be used to connect to our server, to be able to automate our deployment process:
之后,我们需要复制私钥(该私钥将用于连接到我们的服务器),以便能够自动化我们的部署过程:
# Copy the content of public key to authorized_keys
cat ~/.ssh/id_rsa.pub >> ~/.ssh/authorized_keys
Use the following command to show the content of id_rsa and copy it:
使用以下命令显示id_rsa的内容并复制它:
cd .ssh && cat id_rsa- Go to GitLab UI sidebar>settings>CI/CD>Variables>Expand 转到GitLab UI边栏>设置> CI / CD>变量>展开
- Add a variable called SSH_PRIVATE_KEY and in the Value field, paste the private key you just copied from the server (if it’s AWE EC2 it will be the content of the /.pem file) 添加一个名为SSH_PRIVATE_KEY的变量,然后在“值”字段中,粘贴刚从服务器复制的私钥(如果是AWE EC2,它将是/.pem文件的内容)

添加部署密钥 (Add Deploy Key)
Deploy keys allow read-only or read-write (if enabled) access to your repository that’s cloned on a server.
部署密钥允许对服务器上克隆的存储库进行只读或读写(如果启用)访问。
- Got to GitLab UI sidebar>settings>Repository>Deploy Keys>Expand 转到GitLab UI边栏>设置>存储库>部署密钥>扩展
Create title and in the Key field paste the content existing in
id_rsa.pub创建标题,然后在“ 密钥”字段中粘贴
id_rsa.pub现有的内容
cd .ssh && cat id_rsa.pub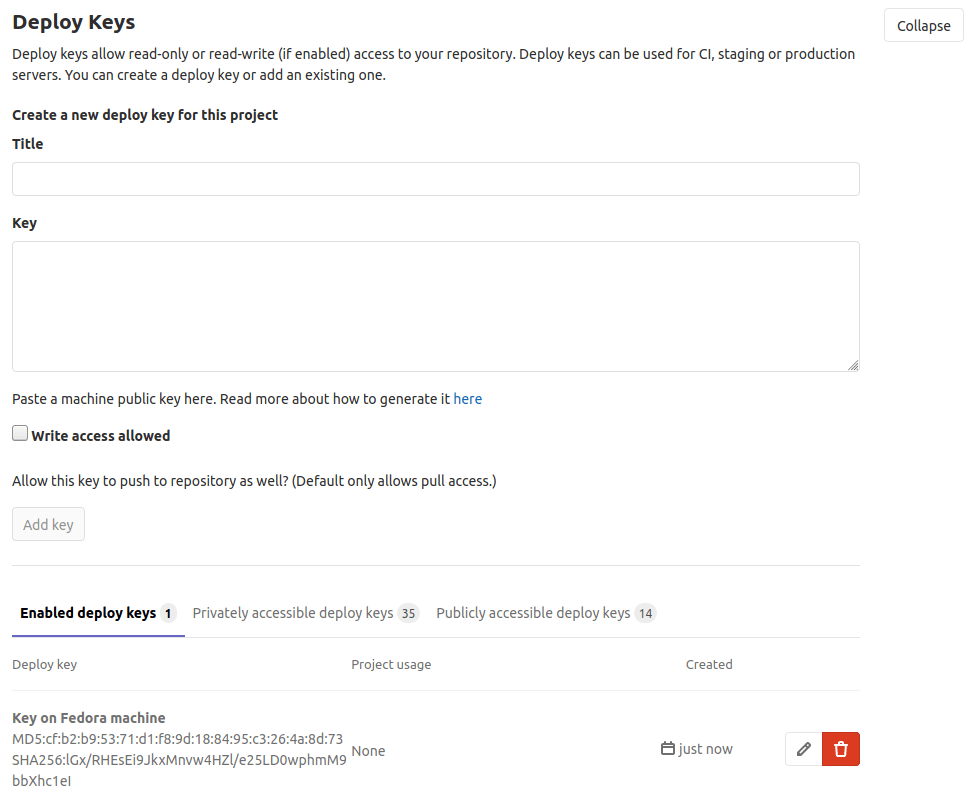
Time to write the YAML file:
编写YAML文件的时间:
# Includes deployment pipeline only
image: alpine:3.7
stages:
    - deploy

before_script:
  ##
  ## Optionally, if you will be using any Git commands, set the user name and
  ## and email.
  ##
  #- git config --global user.email "user@example.com"
  #- git config --global user.name "User name"


deploy_production:
    stage: deploy
    before_script:
        - apk add openssh-client # Add SSH client for alpine
        - eval $(ssh-agent -s) # Run the SSH client
        # Adding environment's variable SSH_PRIVATE_KEY to the SSH client's agent that manages the private keys
        - echo "$SSH_PRIVATE_KEY" | tr -d '\r' | ssh-add -
        # Create the SSH directory and give it the right permissions
        - mkdir -p ~/.ssh
        - chmod 700 ~/.ssh
    script:
        # Connecting to the server using SSH and executing commands like pulling updates to the cloned repo
        - ssh -o StrictHostKeyChecking=no username@host_ip_address "cd /project && git pull"
        # -o StrictHostKeyCheking=no is to disable strict host key checking in SSH
    only:
        - master
By default, alpine doesn’t come with an SSH client. That’s why I’m using the alpine package manager to add SSH client. You have to change commands depending on your flavored Linux system if you don’t use alpine in the runner registration or YAML configuration.
默认情况下,alpine不附带SSH客户端。 这就是为什么我使用alpine软件包管理器添加SSH客户端的原因。 如果您在运行程序注册或YAML配置中未使用alpine,则必须根据自己的Linux系统更改命令。

Hope this tour serves you well.
希望这次旅行对您有帮助。
Incredible resources on the internet though, so be sure to share what you can’t live without in the comments.
互联网上的资源实在令人难以置信,因此请务必分享您的生活,而这些都离不开评论。
翻译自: https://levelup.gitconnected.com/automating-integration-and-deployment-to-remote-server-63a2b6576ebf
自动部署 持续集成


 1万+
1万+

 被折叠的 条评论
为什么被折叠?
被折叠的 条评论
为什么被折叠?
 到【灌水乐园】发言


