


 本文介绍了如何将Docker容器部署到云端,详细解析了从本地构建Docker镜像到在云平台上配置和管理容器的全过程,帮助开发者实现无缝的云上部署。
docker 容器部署
Docker containers are brilliant little things. They are essentially self-contained applications that can run across any OS.
d ocker容器是辉煌的小东西。 它们本质上是可以在任何OS上运行的独立应用程序。
Imagine you have a Python application, you bundle it, along with everything you need to run it into a Docker container — that container can now be run on any Windows, Linux, or macOS system, without installing anything!
想象一下,您有一个Python应用程序,将其连同将其运行所需的一切捆绑到一个Docker容器中-该容器现在可以在任何Windows,Linux或macOS系统上运行,而无需安装任何东西!
Another great benefit of Docker is the level of support for containers on Cloud platforms, such as Google Cloud (GCP), which we will be using in this article.
Docker的另一个巨大优势是对云平台(例如Google Cloud(GCP))上的容器的支持水平,我们将在本文中使用它。
We can quickly build an application, package it into a container with Docker, and deploy it across the globe with GCP.
我们可以快速构建一个应用程序,使用Docker将其打包到一个容器中,然后使用GCP在全球范围内进行部署。
That is what we will do in this article. We will take a simple Python API, package it with Docker, and deploy it with GCP, covering:
这就是我们在本文中要做的。 我们将使用一个简单的Python API,将其与Docker打包,并与GCP一起部署,内容包括:
> Project Setup> Dockerfile
  - FROM
  - WORKDIR and COPY
  - RUN
  - CMD> Building the Docker Image> Deploy with Google Cloud Platform
  - GCloud SDK
  - Cloud Build and Container Registry
  - Cloud Run
项目设置 (Project Setup)
We won’t be focusing on the Python code simply because that is not the purpose of the article. Instead, bring-your-own-code — or, here’s something I made earlier.
我们不会仅仅因为那不是本文的目的而专注于Python代码。 而是带上您自己的代码-或者,这是我之前做的。

We store our code in a directory called gcp-api (call this anything you like) under the name app.py. Alongside our script, we need:
我们将代码存储在名为gcp-api的目录中(您可以app.py ),名称为app.py 除了脚本,我们还需要:
A Dockerfile — the instruction manual for Docker
Dockerfile -Docker使用手册
requirements.txt — a set of Python modules for our Dockerfile to install
requirements.txt —一组Python模块,供我们的Dockerfile安装
Of course, we’re using Docker, so; we need Docker too. It can be installed from here.
当然,我们使用的是Docker。 我们也需要Docker。 可以从这里安装。
If you have any OS-specific issues installing Docker, the 1:46:21 mark in this video explains Windows installation, followed by the 1:53:22 mark for macOS.
如果您在安装Docker时遇到任何特定于操作系统的问题,则此视频中的1:46:21标记说明了Windows安装,然后是macOS的1:53:22标记。
Docker文件 (Dockerfile)
The Dockerfile is our container building blueprint. It tells Docker exactly how to rearrange our scripts and files in a way that produces a self-contained application.
Dockerfile是我们的容器构建蓝图。 它告诉Docker确切的方法是如何重新生成脚本和文件,从而生成一个独立的应用程序。
It’s like building a house.
就像盖房子一样。
Our scripts and files are raw materials (timber, bricks, etc.). We create a set of instructions for what we want our house to be like (the Dockerfile), which we then give to our architect (Docker), who then does all the technical stuff to produce a house blueprint (the image).
我们的脚本和文件是原材料(木材,砖头等)。 我们为想要的房屋创建了一套指令(Dockerfile),然后将其提供给我们的建筑师(Docker),然后由建筑师进行所有技术工作以产生房屋蓝图(图像)。
Later, we will also give the blueprint to our builder (Google Build), who will construct the house (container) for us — but not yet.
稍后,我们还将蓝图提供给我们的建造者(Google Build),后者将为我们建造房屋(容器),但还没有。
So, our Dockerfile. It looks like this:
因此,我们的Dockerfile。 看起来像这样:
FROM python:3.6-slim-busterWORKDIR /app
COPY . .RUN pip install -r requirements.txtCMD exec gunicorn --bind :$PORT --workers 1 --threads 8 --timeout 0 app:app
Initially, it may look confusing — but it’s incredibly simple.
最初,它可能看起来令人迷惑-但它非常简单。
来自python:3.6-slim-buster (FROM python:3.6-slim-buster)
The very first line of our Dockerfile initializes our container image with another pre-built Docker image.
Dockerfile的第一行使用另一个预构建的Docker映像初始化我们的容器映像。
This pre-built image is, in essence, nothing more than a lightweight Linux OS containing Python 3.6.
本质上,此预构建映像仅是包含Python 3.6的轻量级Linux操作系统。
But why ‘slim-buster’? Well, buster is the codename for all version 10 variations of Debian (a Linux Distribution).
但是为什么要“苗条” ? 好吧, buster是Debian(Linux发行版)的所有版本10变体的代号。
As for why they chose the word ‘buster’ — I think someone opens a dictionary and picks the first word they see.
至于他们为什么选择“破坏者”一词的原因-我认为有人打开词典并选择他们看到的第一个单词。
Slim, on the other hand, does make sense. As you may have guessed, it means Debian 10.x — but trimmed down, resulting in a smaller package size.
另一方面,苗条确实有意义。 您可能已经猜到了,这意味着Debian 10.x —但被修整了,从而减小了包装尺寸。
A full list of official Python images is available here.
完整的官方Python映像列表在此处提供。

Warning: It’s also worth noting that we’re using Python 3.6 here; you don’t need to stick to this unless you will be using Google Firebase (which we won’t be using here, but it’s good to be aware of this).
警告:值得注意的是,我们在这里使用的是Python 3.6。 除非您要使用Google Firebase(我们将在这里不使用它,但请注意这一点),否则无需坚持这一点。
If you do happen to use Google Firebase with Python, you will likely use the python-firebase module, which contains an import called async.
如果您确实将Google Firebase与Python结合使用,则可能会使用python-firebase模块,该模块包含一个名为async的导入。
Unfortunately, Python 3.7 introduced that exact word as a keyword. We avoid the resultant SyntaxError by sticking with Python 3.6.
不幸的是,Python 3.7引入了确切的单词作为关键字。 我们坚持使用Python 3.6避免了由此产生的SyntaxError。
WORKDIR和COPY (WORKDIR and COPY)
Next up is WORKDIR and COPY.
接下来是WORKDIR和COPY 。
We use WORKDIR to set the active directory inside our image (the construction site of our container) to /app. From now on, . outside of our image refers to our current directory (eg /gcp-api) and . inside our image refers to /app.
我们使用WORKDIR将映像(容器的构建站点)内的活动目录设置为/app 。 从现在开始, . 图片之外的地方是指我们当前的目录(例如/gcp-api )和. 我们图片中的内容是/app 。
After WORKDIR , we COPY everything from our local directory /gcp-api to our internal active directory /app.
在WORKDIR之后,我们会COPY从本地目录/gcp-api到内部活动目录/app 。
The reason we copy app.py to /app inside our image is because this is the structure that our Google Cloud instance will expect. We can change this, but this is what we will use here.
我们将app.py复制到映像中的/app的原因是因为这是我们的Google Cloud实例所期望的结构。 我们可以更改它,但这就是我们将在这里使用的。
跑 (RUN)
Now, we have our pip install instructions. We use RUN to tell Docker to run the following command. That following command is pip install -r requirements.txt.
现在,我们有pip install说明。 我们使用RUN告诉Docker运行以下命令。 以下命令是pip install -r requirements.txt 。
By writing pip install -r requirements.txt we are telling Docker to run pip install recursively -r over every line contained within requirements.txt.
通过编写pip install -r requirements.txt我们告诉泊坞运行pip install递归-r在每行内包含requirements.txt 。
So what does requirements.txt look like?
那么,是什么requirements.txt样子?
pandas==1.1.1
gunicorn==20.0.4
flask==1.1.2
flask-api==2.0
When that is fed into our recursive pip install instruction, it is translated into:
当将其输入到我们的递归pip install指令中时,它会转换为:
pip install pandas==1.1.1
pip install gunicorn==20.0.4
pip install flask==1.1.2
pip install flask-api==2.0
Which I’m sure is something everyone recognizes.
我确定这是每个人都可以识别的东西。
CMD (CMD)
Our final instruction is, depending on our app, not necessarily required. In this case, it is used to host our API using the gunicorn Python package.
根据我们的应用程序,我们的最终指示不一定是必需的。 在这种情况下,它用于使用gunicorn Python软件包托管我们的API。
Nonetheless, the CMD instruction is the equivalent to opening our computer’s command-line interface CLI and typing whatever commands we provide, in this case exec gunicorn — bind :$PORT --workers 1 --threads 8 --timeout 0 app:app.
尽管如此, CMD指令等效于打开计算机的命令行界面CLI并键入我们提供的任何命令,在这种情况下为exec gunicorn — bind :$PORT --workers 1 --threads 8 --timeout 0 app:app 。
构建Docker映像 (Building the Docker Image)
Earlier in the article, we described the house building metaphor for Docker containers. So far, we’ve acquired our raw materials (scripts and files) and written a set of instructions explaining what we want our house to be like (the Dockerfile).
在本文的前面,我们描述了Docker容器的房屋建筑隐喻。 到目前为止,我们已经获取了原材料(脚本和文件)并编写了一组说明,以说明我们希望房子的样子(Dockerfile)。
Now, it’s time to create our blueprint — the Docker image.
现在,是时候创建我们的蓝图-Docker映像了。
We can create this by executing the command:
我们可以通过执行以下命令来创建它:
docker build -t gcp-api .Here, the Docker image build command is
docker build在这里,Docker image build命令是
docker buildNext, we use the
-tflag to specify our image name —gcp-api接下来,我们使用
-t标志指定我们的映像名称gcp-apiFinally, we tell Docker to include everything from the current directory with
.最后,我们告诉Docker将包含当前目录中的所有内容
.
At this point, we have our blueprint, and all we need now is our builder, the Cloud — so let’s begin setting it up.
至此,我们有了我们的蓝图,现在我们需要的只是我们的构建器Cloud(云),因此让我们开始进行设置。
使用Google Cloud Platform进行部署 (Deploy with Google Cloud Platform)
There are three steps we need to take to deploy our container to the Cloud. First we:
我们需要采取三个步骤将容器部署到云中。 首先,我们:
- Download the Google Cloud SDK, which we will use to — 下载Google Cloud SDK,我们将使用它-
- Build our container with Cloud Build. 使用Cloud Build构建我们的容器。
- Upload the container to GCP’s Container Registry. 将容器上传到GCP的容器注册表。
- Deploy it with Cloud Run. 使用Cloud Run进行部署。
GCloud SDK (GCloud SDK)
We can find the SDK installer here. Once it’s installed, we need to authenticate our GCloud SDK by opening CMD prompt (or your equivalent CLI) and typing:
我们可以在此处找到SDK安装程序。 安装完成后,我们需要通过打开CMD提示符(或等效的CLI)并输入以下内容来对GCloud SDK进行身份验证:
gcloud auth loginThis command opens our web browser and allows us to log in to Google Cloud as usual. We configure Docker to used our GCP credentials with:
此命令将打开我们的网络浏览器,并允许我们照常登录到Google Cloud。 我们将Docker配置为通过以下方式使用GCP凭据:
gcloud auth configure-dockerFinally, set the active project to your project ID (mine is medium-286319) with:
最后,使用以下命令将活动项目设置为您的项目ID(mine为medium-286319 ):
gcloud config set project medium-286319云构建和容器注册表 (Cloud Build and Container Registry)
Google’s Container Registry (GCR) service allows us to store Docker containers, which we can use as a launchpad for our deployments.
Google的Container Registry(GCR)服务允许我们存储Docker容器,我们可以将其用作部署的启动板。
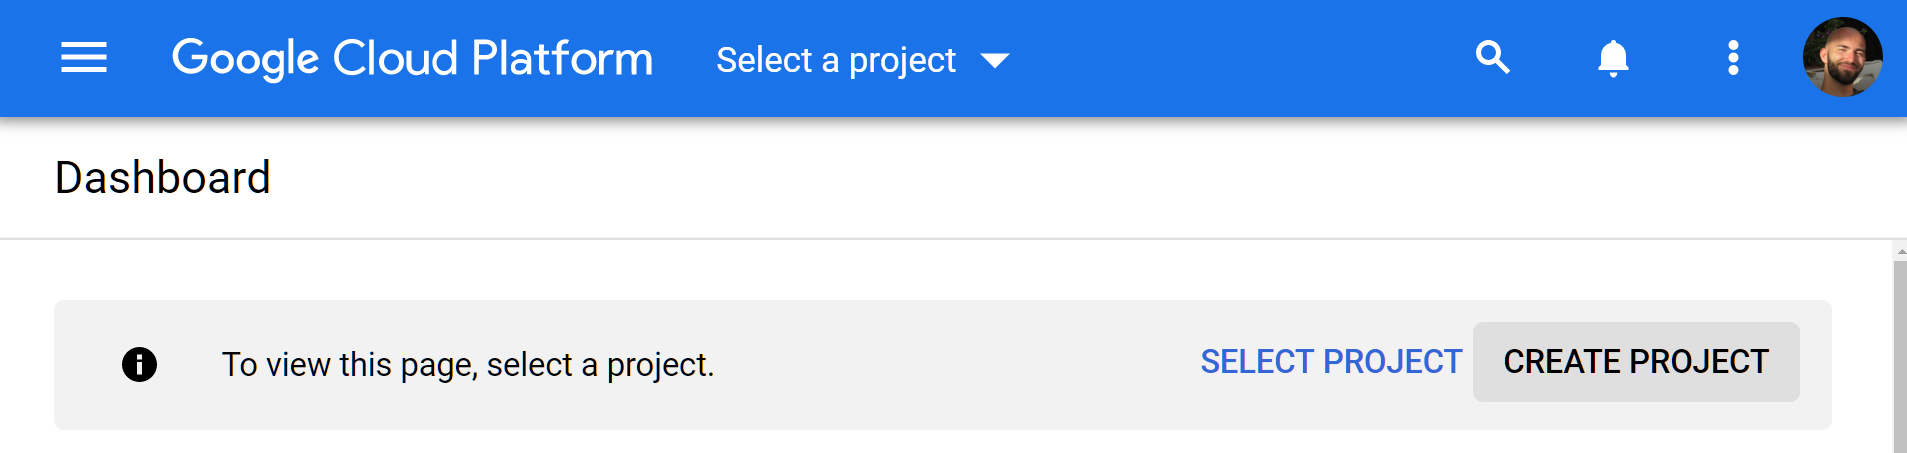
Before we can use GCR (or any other GCP services), we need to create a project. We can do this by navigating to the project selector page in the GCP console and clicking Create Project.
在使用GCR(或任何其他GCP服务)之前,我们需要创建一个项目。 为此,我们可以导航到GCP控制台中的项目选择器页面,然后点击创建项目。
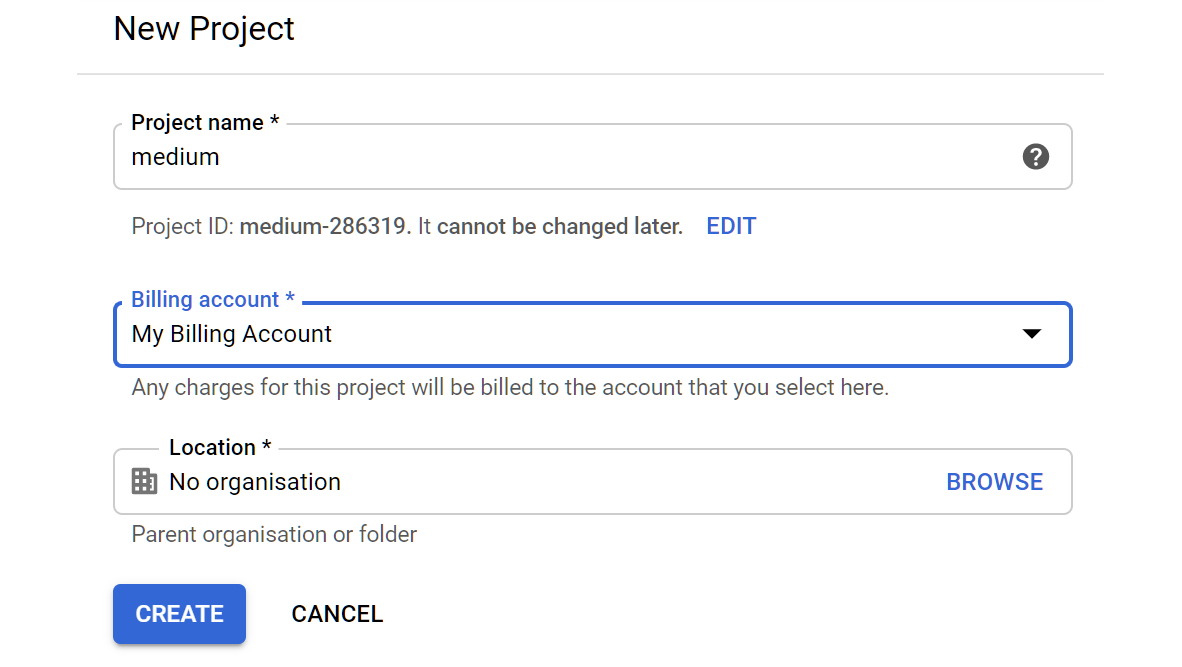
All we need to do here is give our project a name. I use medium.
我们在这里要做的就是给我们的项目起个名字。 我用中号。
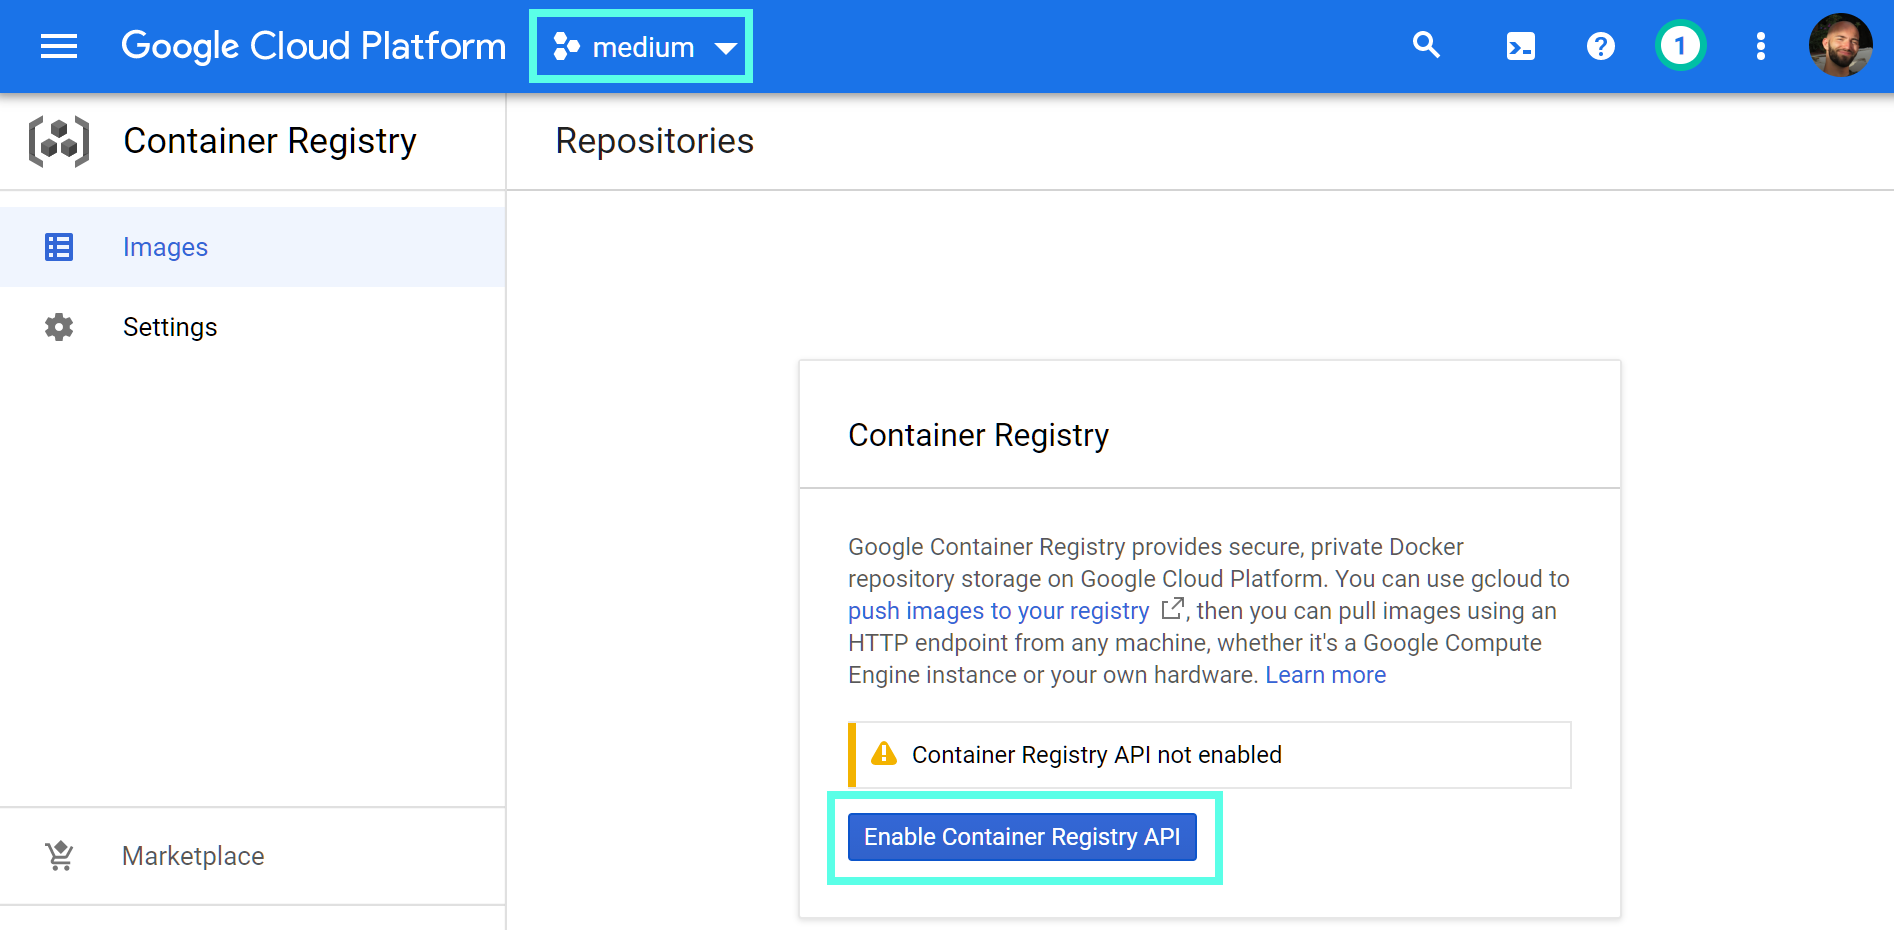
Now we have our project setup; we should be able to access Container Registry. Here, we should be able to see the name of our newly created project in the top bar.
现在我们有了项目设置。 我们应该能够访问Container Registry 。 在这里,我们应该能够在顶部栏中看到我们新创建的项目的名称。
To use GCR, we need to click Enable Container Registry API in the center of the console window.
要使用GCR,我们需要单击控制台窗口中心的Enable Container Registry API 。
Finally, we can upload our container to GCR by submitting it to Cloud Build — the GCP service that builds Docker containers.
最后,我们可以通过将容器提交到Cloud Build(用于构建Docker容器的GCP服务)将其上载到GCR。
To do this, we open our CLI in our project directory (gcp-api) and type:
为此,我们在项目目录( gcp-api )中打开CLI并输入:
gcloud builds submit --tag gcr.io/[PROJECT-ID]/gcp-apigcloud builds submitsubmits the Docker image attached to our current directory to Cloud Build — where it will be packaged into a container.gcloud builds submit附加到我们当前目录的Docker映像提交到Cloud Build,并将其打包到一个容器中。
Our Container Registry location is provided to the --tag flag, where:
我们的Container Registry位置提供给--tag标志,其中:
gcr.iois the GCR hostname.gcr.io是GCR主机名。[PROJECT-ID]is our project ID; we saw this when creating our project — for me, it ismedium-286319.[PROJECT-ID]是我们的项目ID; 我们在创建项目时就看到了这一点-对我来说,它是medium-286319。gcp-apiis our image name.gcp-api是我们的映像名称。
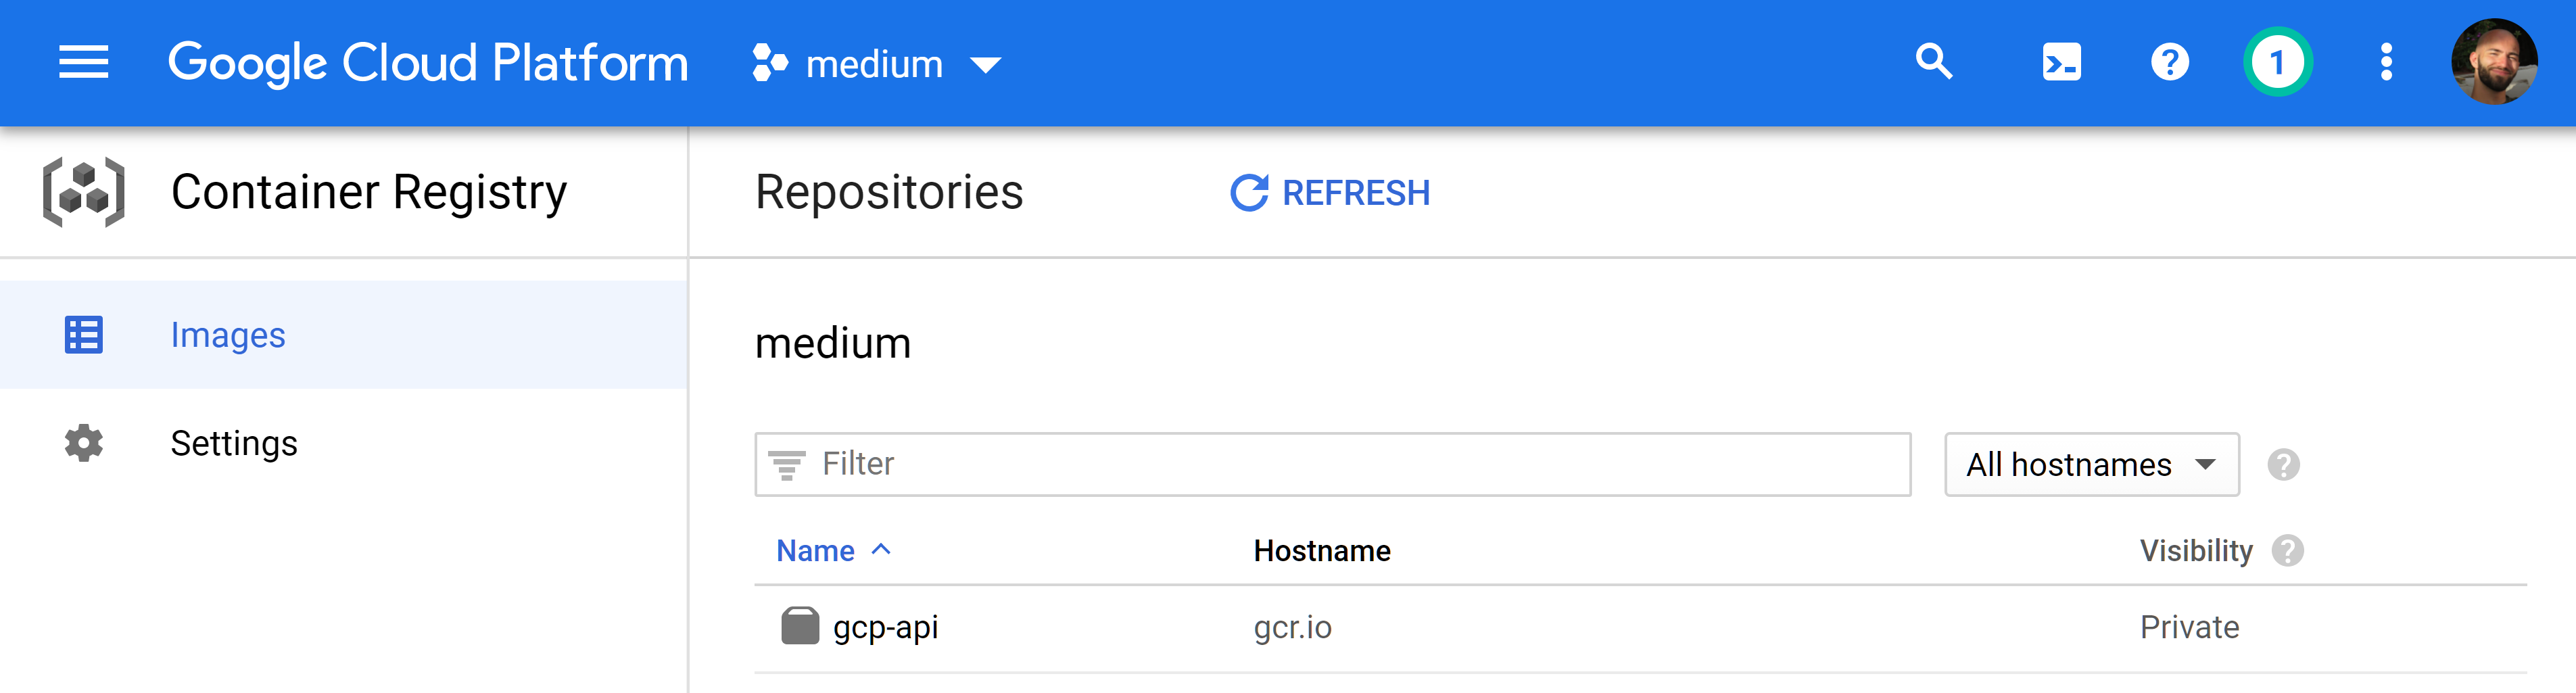
If we go back to our GCR window, we should be able to see our newly uploaded Docker image. If it isn’t there yet, it’s likely still in the build process — which we can find in our Cloud Build dashboard.
如果返回到GCR窗口,我们应该能够看到我们新上传的Docker映像。 如果尚不存在,则可能仍在构建过程中-我们可以在Cloud Build仪表板中找到它。
云跑 (Cloud Run)
Now we have our Docker container ready; we can deploy it with Cloud Run.
现在我们已经准备好了Docker容器。 我们可以使用Cloud Run进行部署。
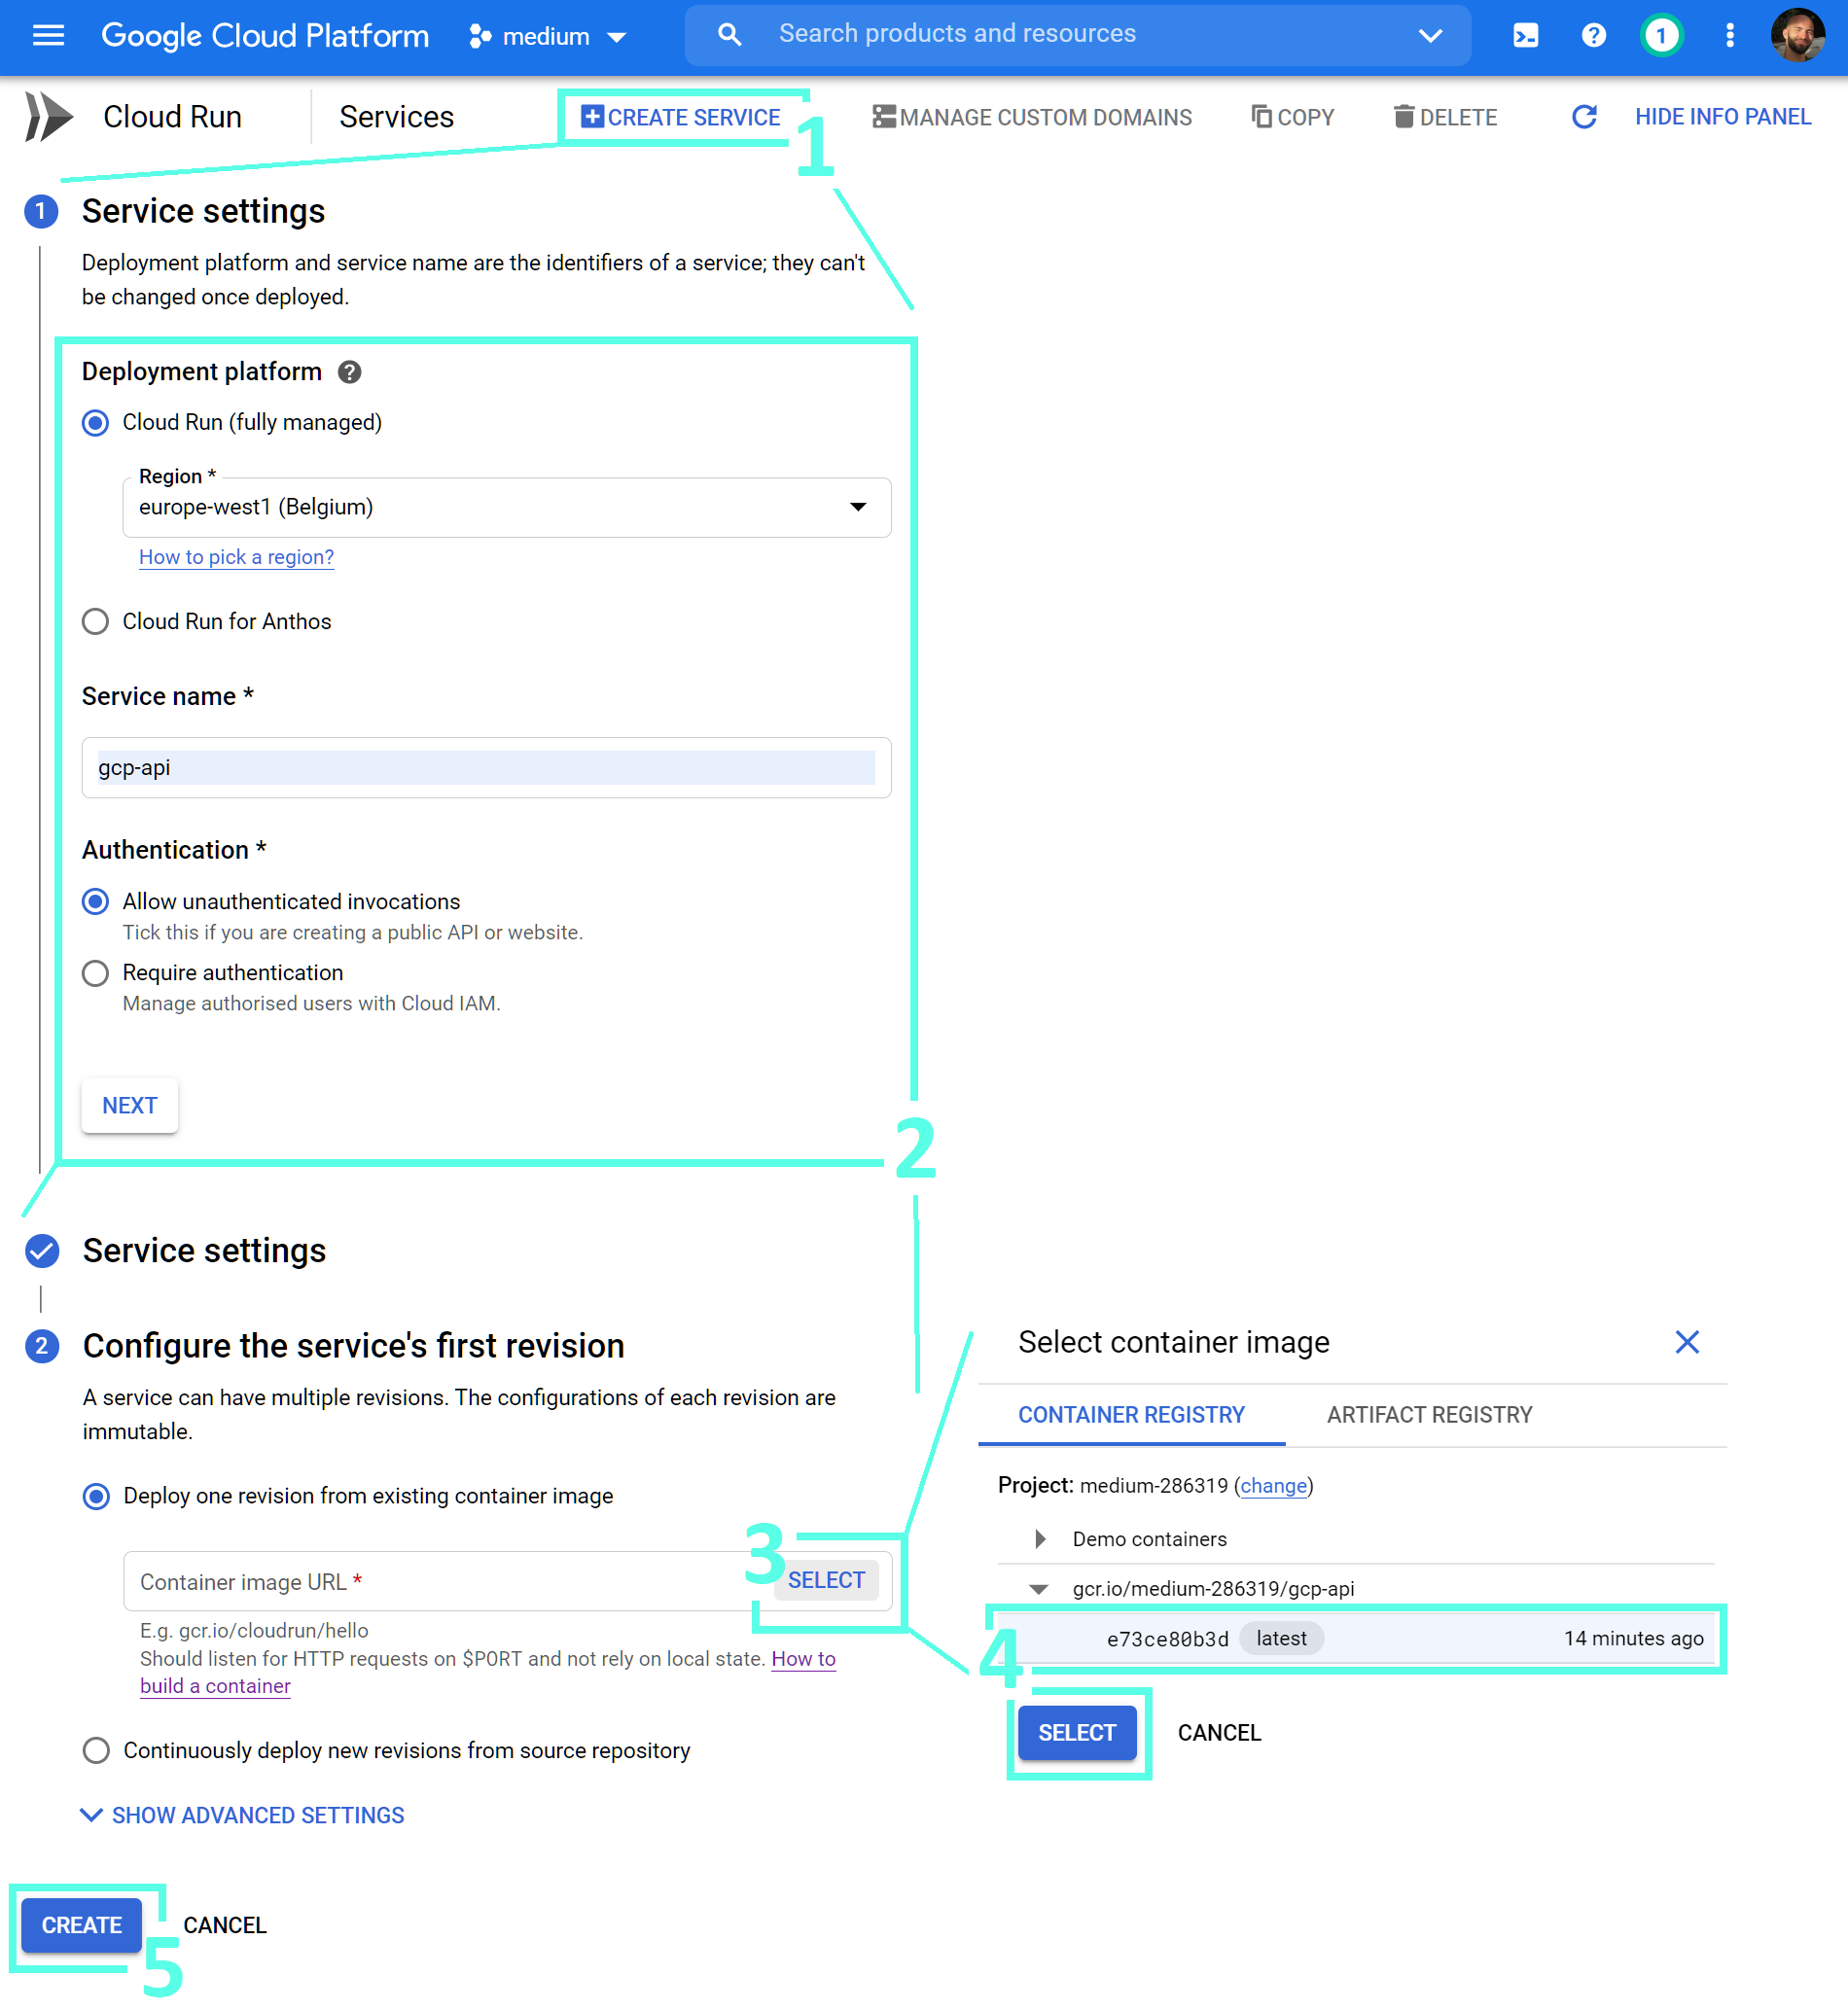
In the Cloud Run interface, we deploy by (1) clicking Create Service, (2) configuring our deployment, (3–4) selecting the container, and (5) creating our deployment!
在Cloud Run界面中,我们通过(1)单击创建服务,(2)配置我们的部署,(3–4)选择容器以及(5)创建我们的部署进行部署!
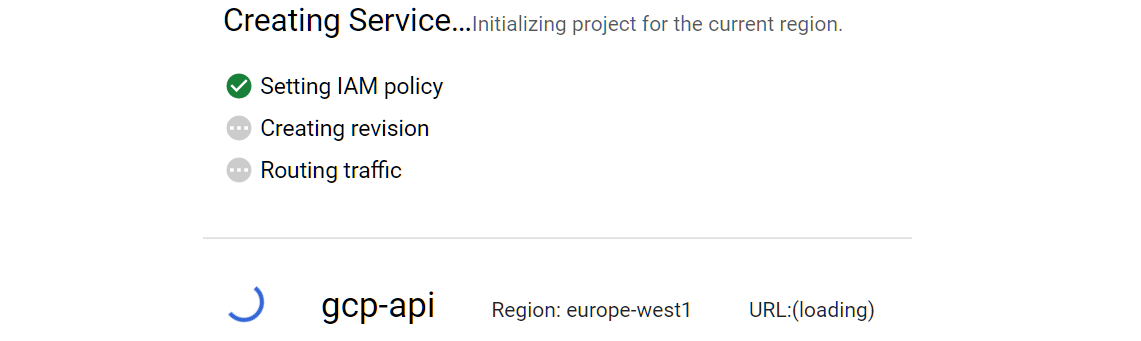
We will see the deployment status in the Cloud Run console, which should take no longer than a few minutes.
我们将在Cloud Run控制台中看到部署状态,该状态不会超过几分钟。

Once complete, we will see a green tick next to our deployment name and our deployment URL next to that.
完成后,我们将在我们的部署名称旁边看到一个绿色的勾号,并在其旁边看到我们的部署URL。
菲尼托 (Finito)
That’s it, we’ve taken our Python app, packaged it into a Docker container, and deployed it to the web with Google Cloud!
就是这样,我们已经将Python应用程序打包,打包到Docker容器中,并通过Google Cloud部署到了Web!
Thanks to some brilliant tools — namely Docker and GCP — the process is painless and (typically) results in flawless deployments time after time.
多亏了一些出色的工具(即Docker和GCP),该过程非常轻松,并且(通常)可以确保一次又一次的完美部署。
Now, more than ever before in the history of humanity. We can take the ideas and concepts in our minds and give them a tangible presence in the real world — which can result in some genuinely awe-inspiring creations.
现在,人类历史上比以往任何时候都多。 我们可以将想法和概念带入我们的脑海,并在现实世界中给予它们切实的展示-这可能会产生一些真正令人敬畏的创作。
I hope this article will help some of you out there — if you have any questions, feedback, or ideas, feel free to reach out via Twitter or in the comments below. Thanks for reading!
希望本文对您有所帮助-如果您有任何疑问,反馈或想法,请随时通过Twitter或以下评论与我们联系。 谢谢阅读!
翻译自: https://towardsdatascience.com/how-to-deploy-docker-containers-to-the-cloud-b4d89b2c6c31
docker 容器部署


 376
376

 被折叠的 条评论
为什么被折叠?
被折叠的 条评论
为什么被折叠?
 到【灌水乐园】发言


