


aws lambda使用
I’ve been working through the AWS SDK for S3 trying to make sense of it. It’s definitely not straight forward and lacking some decent complete examples. Anyway, I’ve figured out how to upload an object to S3 using Lambda and also using a Node.js script and thought I would share it with all of you. Now that I can upload objects with Lambda as per my other article React.js API calls to AWS Lambda, API Gateway and dealing with CORS this also means I’m able to initiate this from React.js via API Gateway.
我一直在研究适用于S3的AWS开发工具包,以试图理解它。 绝对不是直截了当的,缺少一些不错的完整示例。 无论如何,我已经弄清楚了如何使用Lambda以及Node.js脚本将对象上传到S3 ,并认为我会与大家共享它。 现在,我可以按照我的其他文章将Lambda的对象上传到AWS Lambda,API Gateway并处理CORS了,这也意味着我可以通过API Gateway从React.js初始化它。
So let’s start from the beginning…
因此,让我们从头开始...
The first step is to create an S3 bucket in the AWS Management Console. For the purpose of this tutorial I just created a temporary S3 bucket called “mediumtutorial” in EU (Ireland) region, also referred to as “eu-west-1”. Just select all the default options, by clicking Next, Next, Next and Create Bucket.
第一步是在AWS管理控制台中创建一个S3存储桶。 出于本教程的目的,我刚刚在欧盟(爱尔兰)地区创建了一个名为“ mediumtutorial ”的临时S3存储桶,也称为“ eu-west-1 ”。 只需选择所有默认选项,只需单击下一步,下一步,下一步和创建存储桶即可。
The next step is to open your S3 bucket, click on the Permissions tab, then CORS configuration.
下一步是打开S3存储桶,单击“权限”选项卡,然后单击“ CORS配置” 。
If you are not familiar with CORS this is the definition from Mozilla:
如果您不熟悉CORS,那么这是Mozilla的定义:
Cross-Origin Resource Sharing (CORS) is a mechanism that uses additional HTTP headers to tell browsers to give a web application running at one origin, access to selected resources from a different origin. A web application executes a cross-origin HTTP request when it requests a resource that has a different origin (domain, protocol, or port) from its own.All you need to do is enter in the configuration below and click “Save”.
您需要做的就是输入下面的配置,然后单击“保存”。
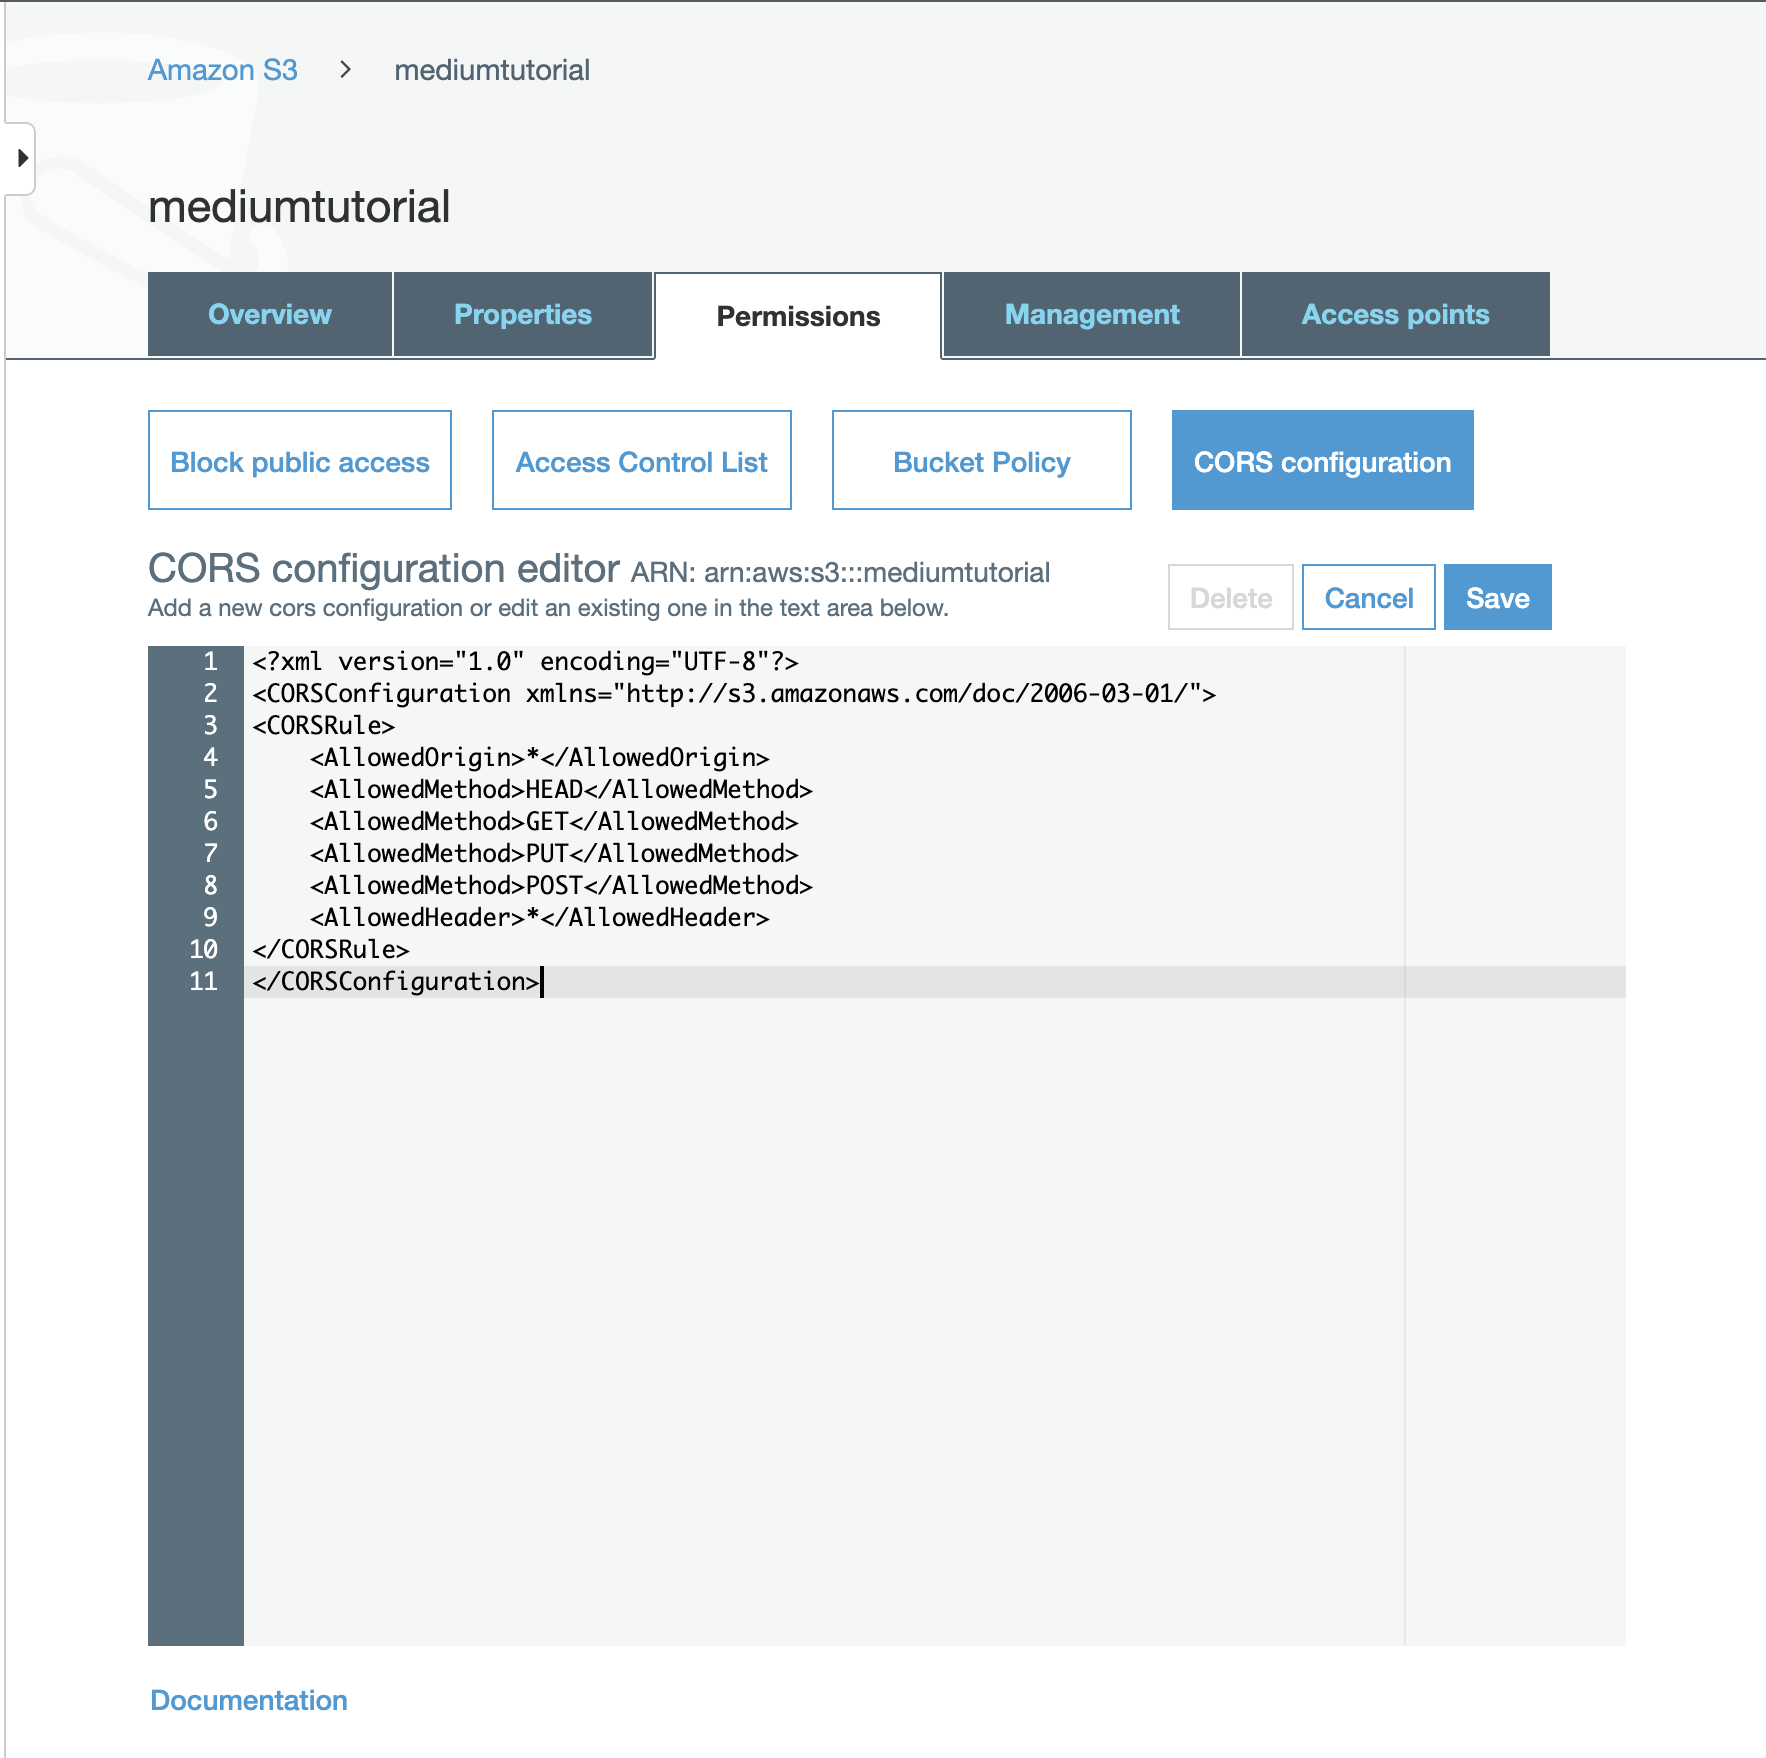
<?xml version="1.0" encoding="UTF-8"?>
<CORSConfiguration xmlns="http://s3.amazonaws.com/doc/2006-03-01/">
<CORSRule>
<AllowedOrigin>*</AllowedOrigin>
<AllowedMethod>HEAD</AllowedMethod>
<AllowedMethod>GET</AllowedMethod>
<AllowedMethod>PUT</AllowedMethod>
<AllowedMethod>POST</AllowedMethod>
<AllowedHeader>*</AllowedHeader>
</CORSRule>
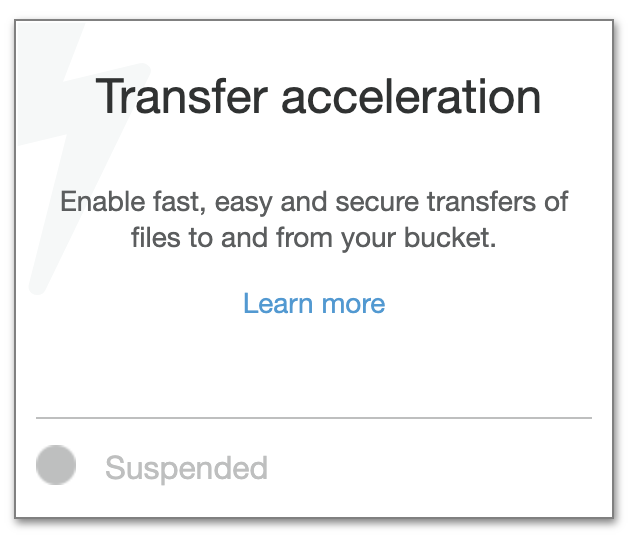
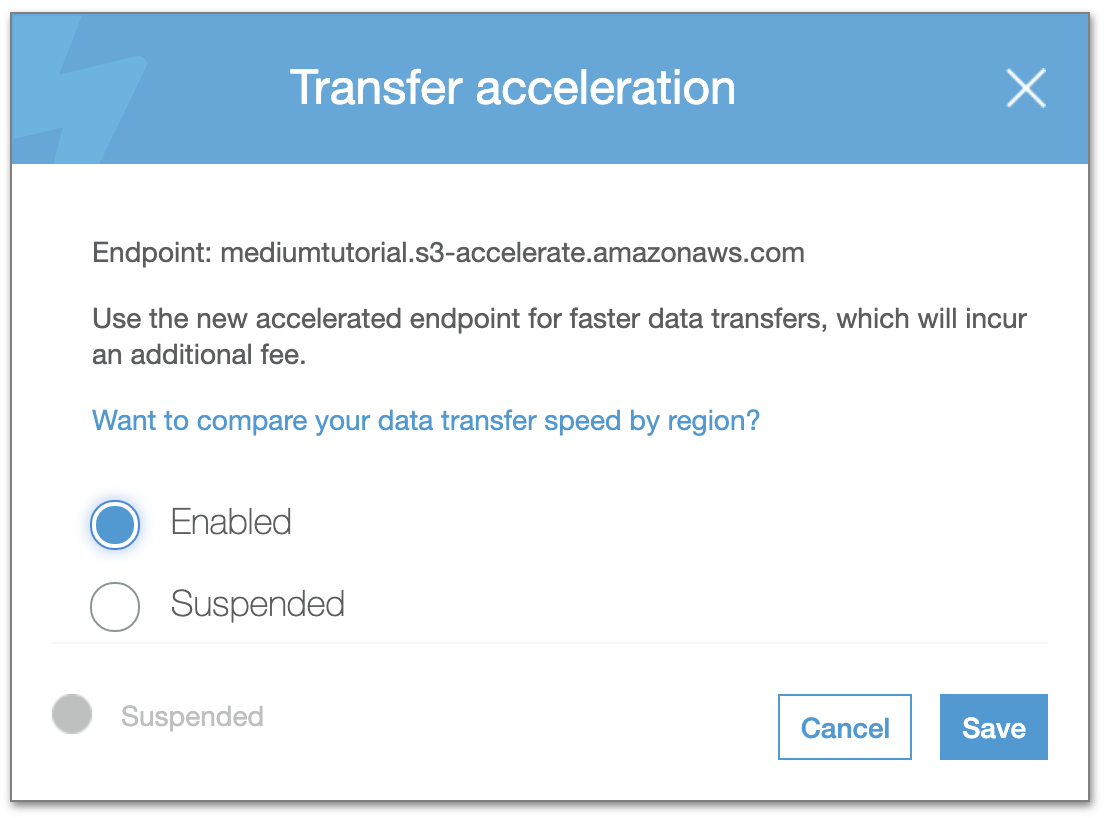
</CORSConfiguration>The next step is optional — Open your S3 bucket, click on the Properties tab, scroll down to Advanced Settings, and enable Transfer acceleration. Please note that if you use Transfer acceleration it will incur an additional fee so only enable this if you really need it. I doubt you will need it now but I just wanted to highlight it so you know that it is there and where to find it.
下一步是可选的-打开S3存储桶,单击“属性”标签,向下滚动到“高级设置” ,然后启用“传输加速” 。 请注意,如果您使用传输加速,则会产生额外费用,因此仅在确实需要时启用它。 我怀疑您现在会需要它,但是我只是想突出显示它,以便您知道它在那里以及在哪里可以找到它。
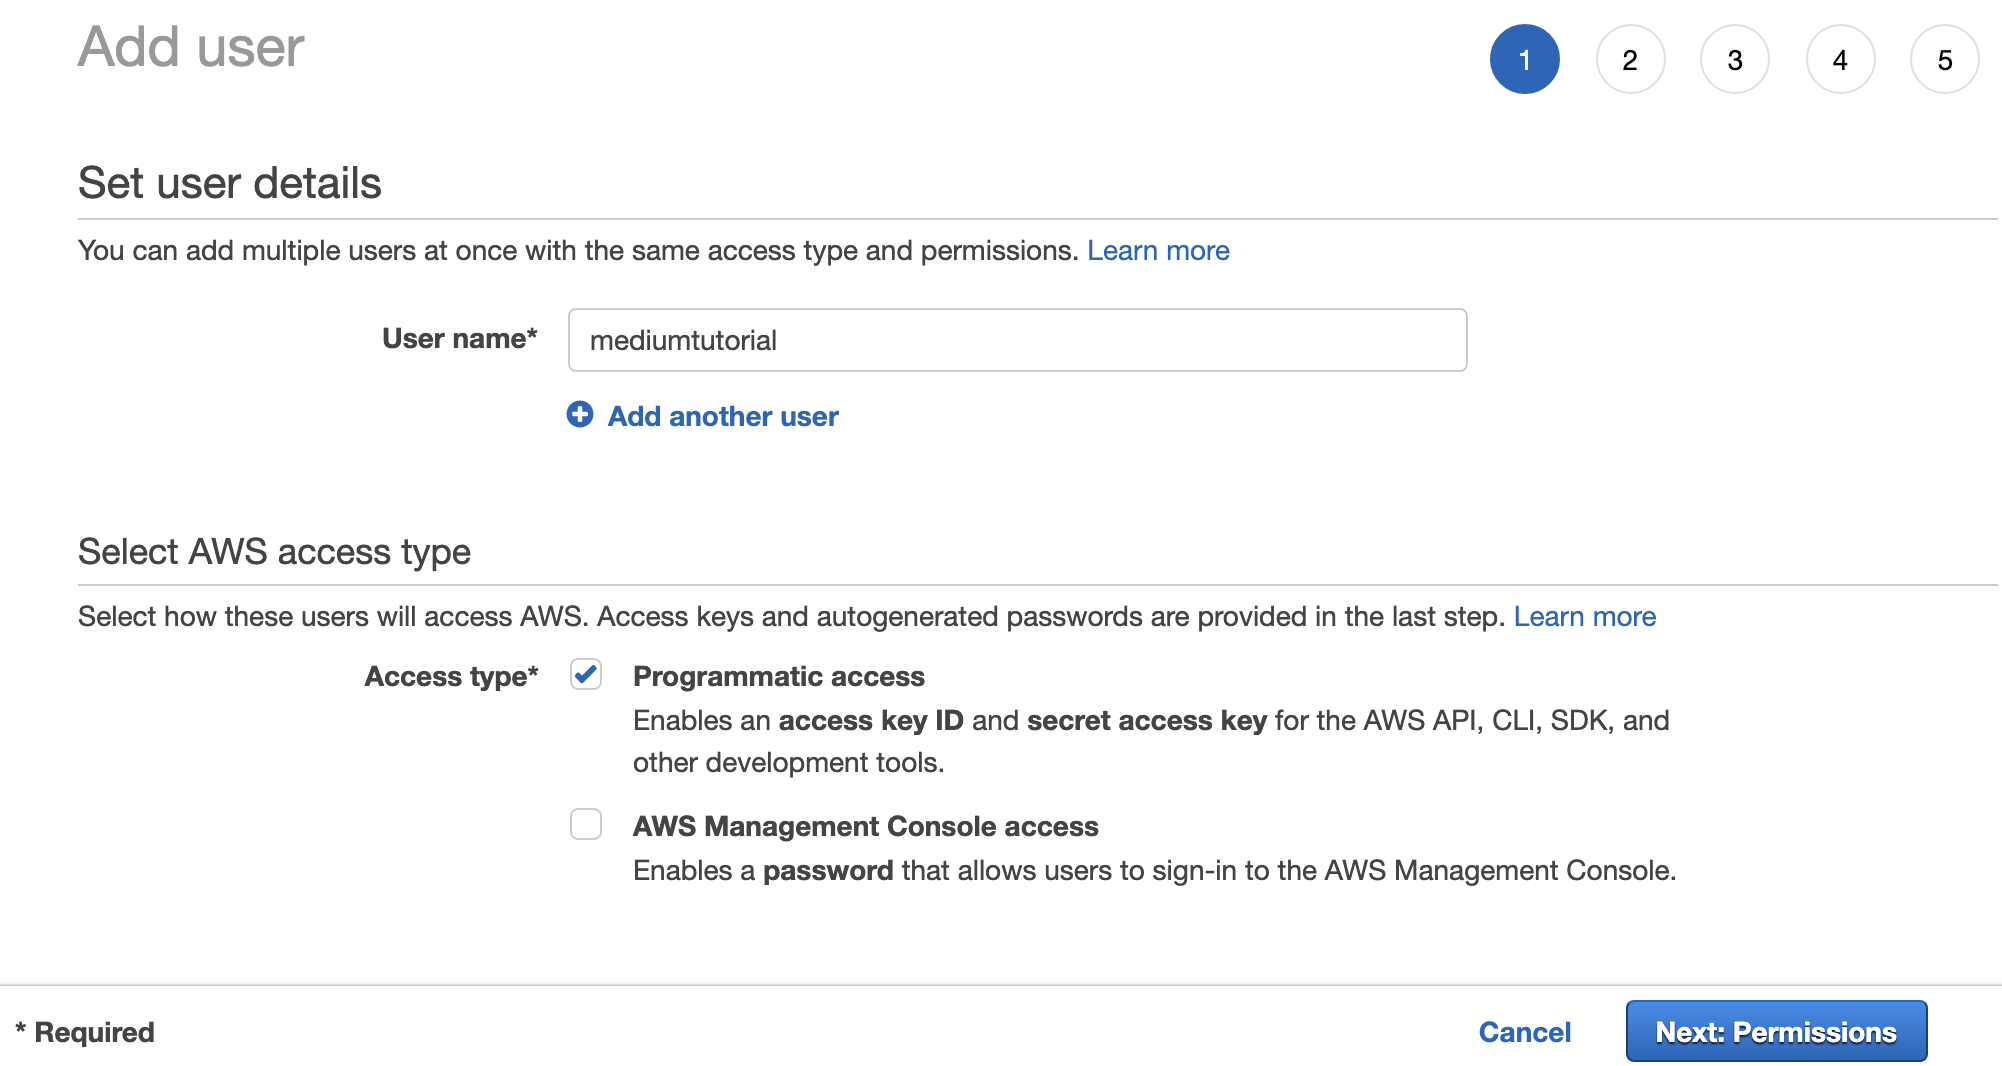
So that’s all you need to do for now in terms of S3. The next step is to open IAM in the AWS Management Console and add a new user. This will be a special user for “Programmatic access”. Make sure it is selected as an access type and “AWS Management Console access” is disabled. When you are done click “Next: Permissions”.
因此,就S3而言,这就是您现在需要做的所有事情。 下一步是在AWS管理控制台中打开IAM并添加一个新用户。 这将是“程序访问”的特殊用户。 确保将其选择为访问类型,并且“ AWS Management Console访问”已禁用。 完成后,单击“下一步:权限”。
On page 2 you need to select “Attach existing policies directly” and click on the “Create policy” button.
在第2页上,您需要选择“直接附加现有策略”,然后单击“创建策略”按钮。

You want to click on JSON and add the following configuration…
您要单击JSON并添加以下配置…
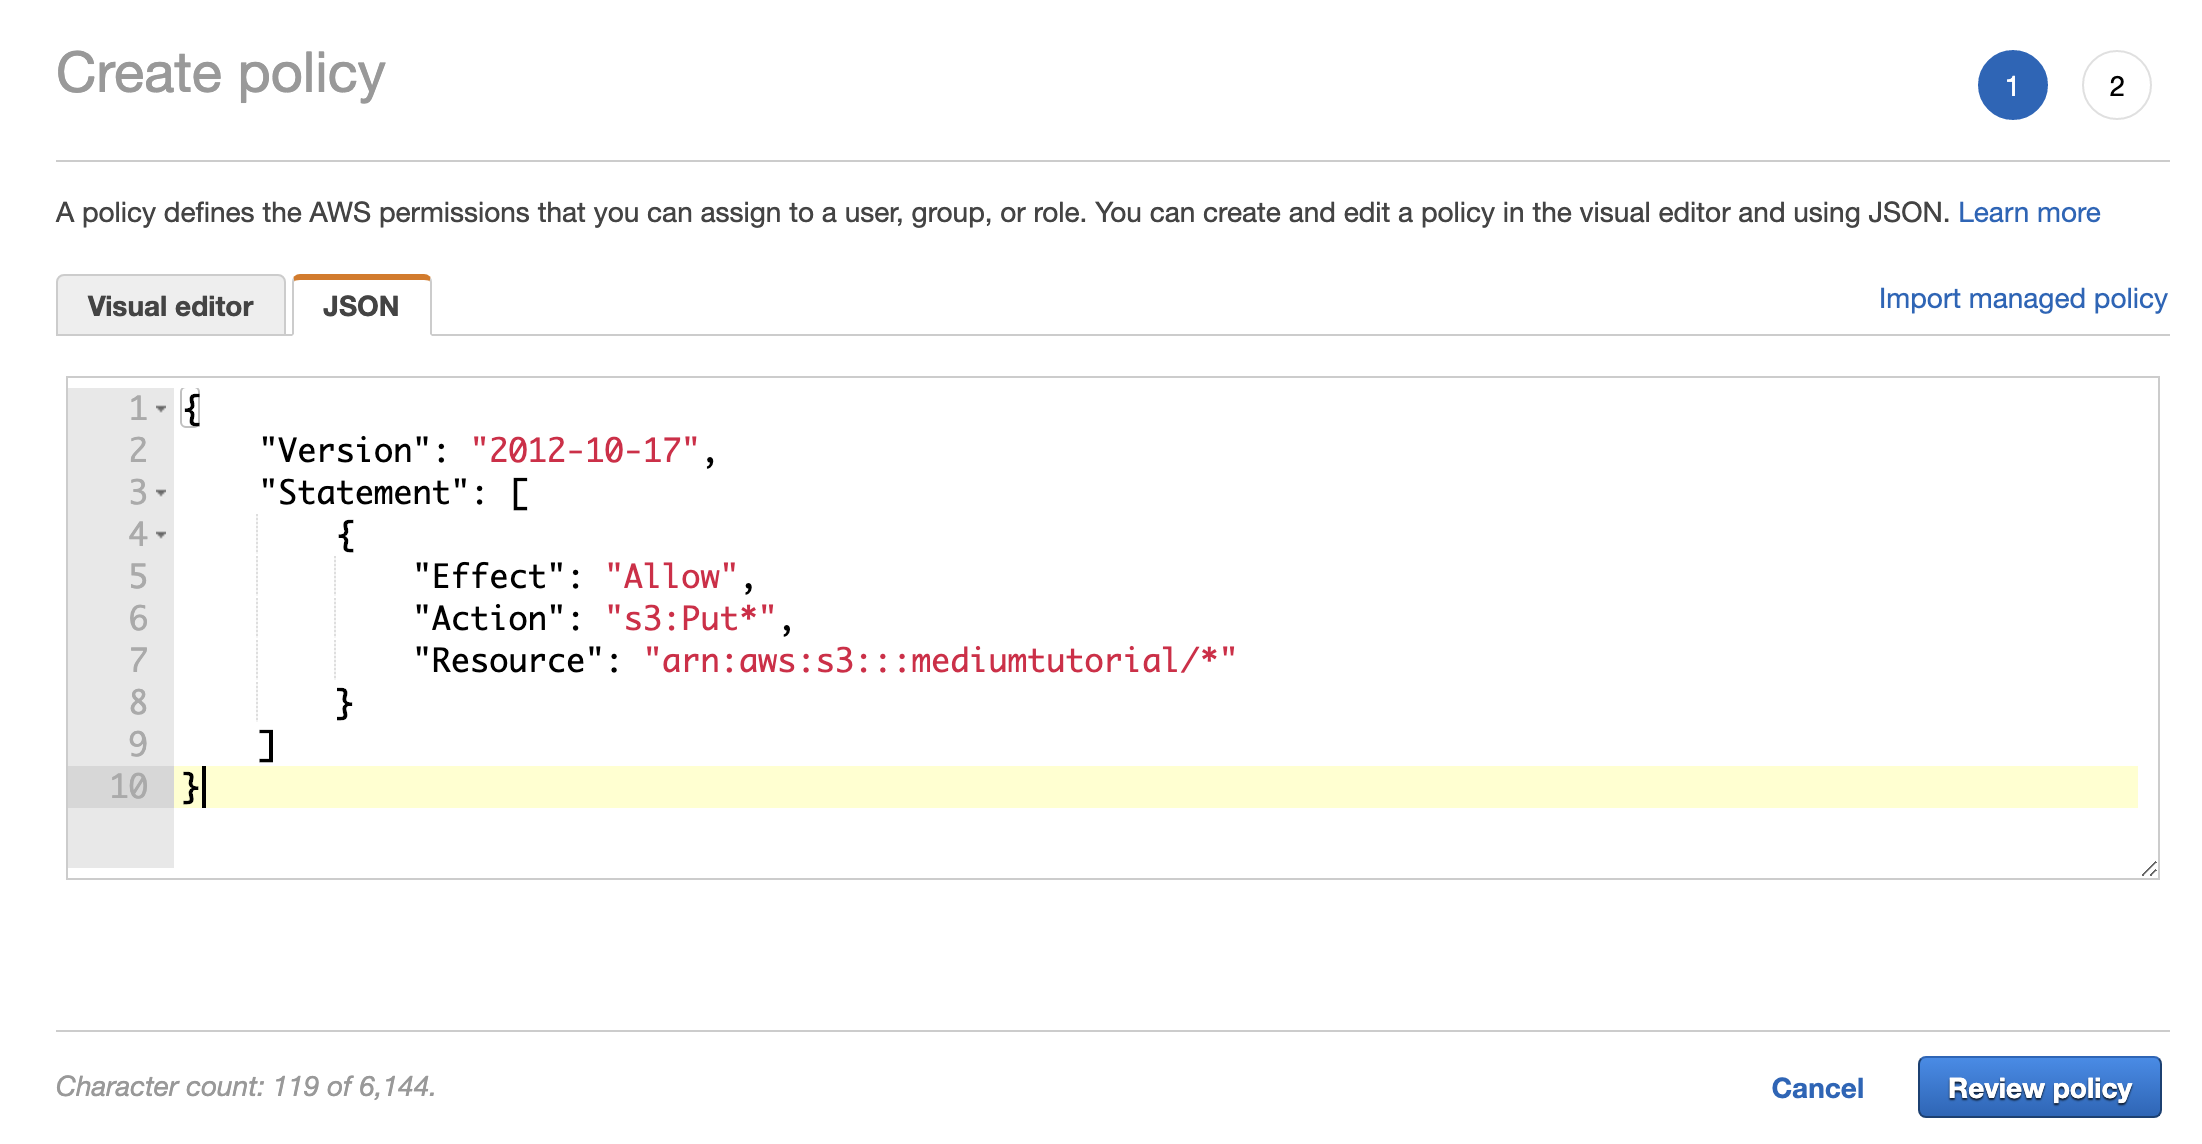
For your convenience I’ve included the configuration here. Please replace “YOUR_BUCKET_NAME” with your S3 bucket name.
为方便起见,我在此处包括了配置。 请用您的S3存储桶名称替换“ YOUR_BUCKET_NAME ”。
{
    "Version": "2012-10-17",
    "Statement": [
        {
            "Effect": "Allow",
            "Action": "s3:Put*",
            "Resource": "arn:aws:s3:::YOUR_BUCKET_NAME/*"
        }
    ]
}
Click on “Review policy”, give your policy a name like “MediumTutorial” in my case, then click “Create policy”.
单击“查看策略”,在我的情况下,为您的策略命名为“ MediumTutorial ”,然后单击“创建策略”。
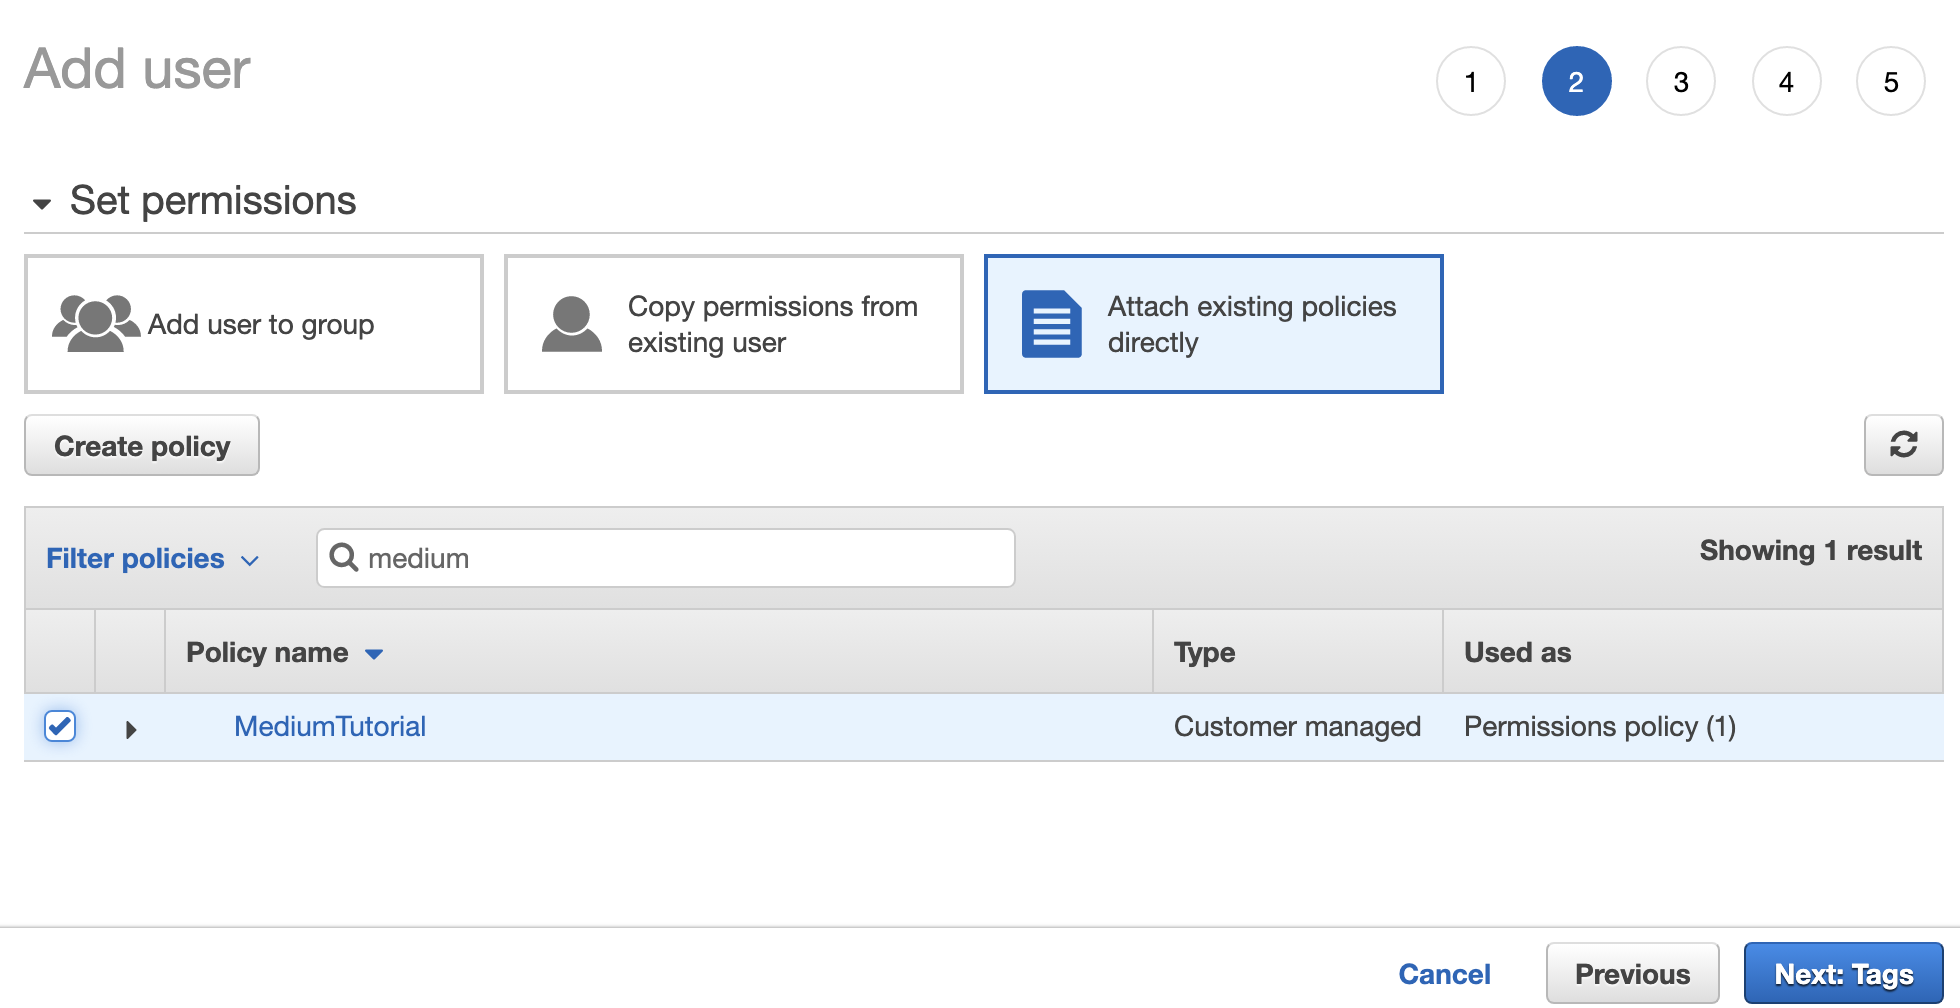
Now go back to this page and “Filter policies” for your new policy instead of clicking “Create policy”, select it, then click “Next: Tags”, give it some tags if you wish, then click “Next: Review”, then “Create user”.
现在返回此页面,并为您的新策略选择“过滤策略”,而不是单击“创建策略”,选择它,然后单击“下一步:标签”,根据需要为其提供一些标签,然后单击“下一步:审阅”,然后点击“创建用户”。
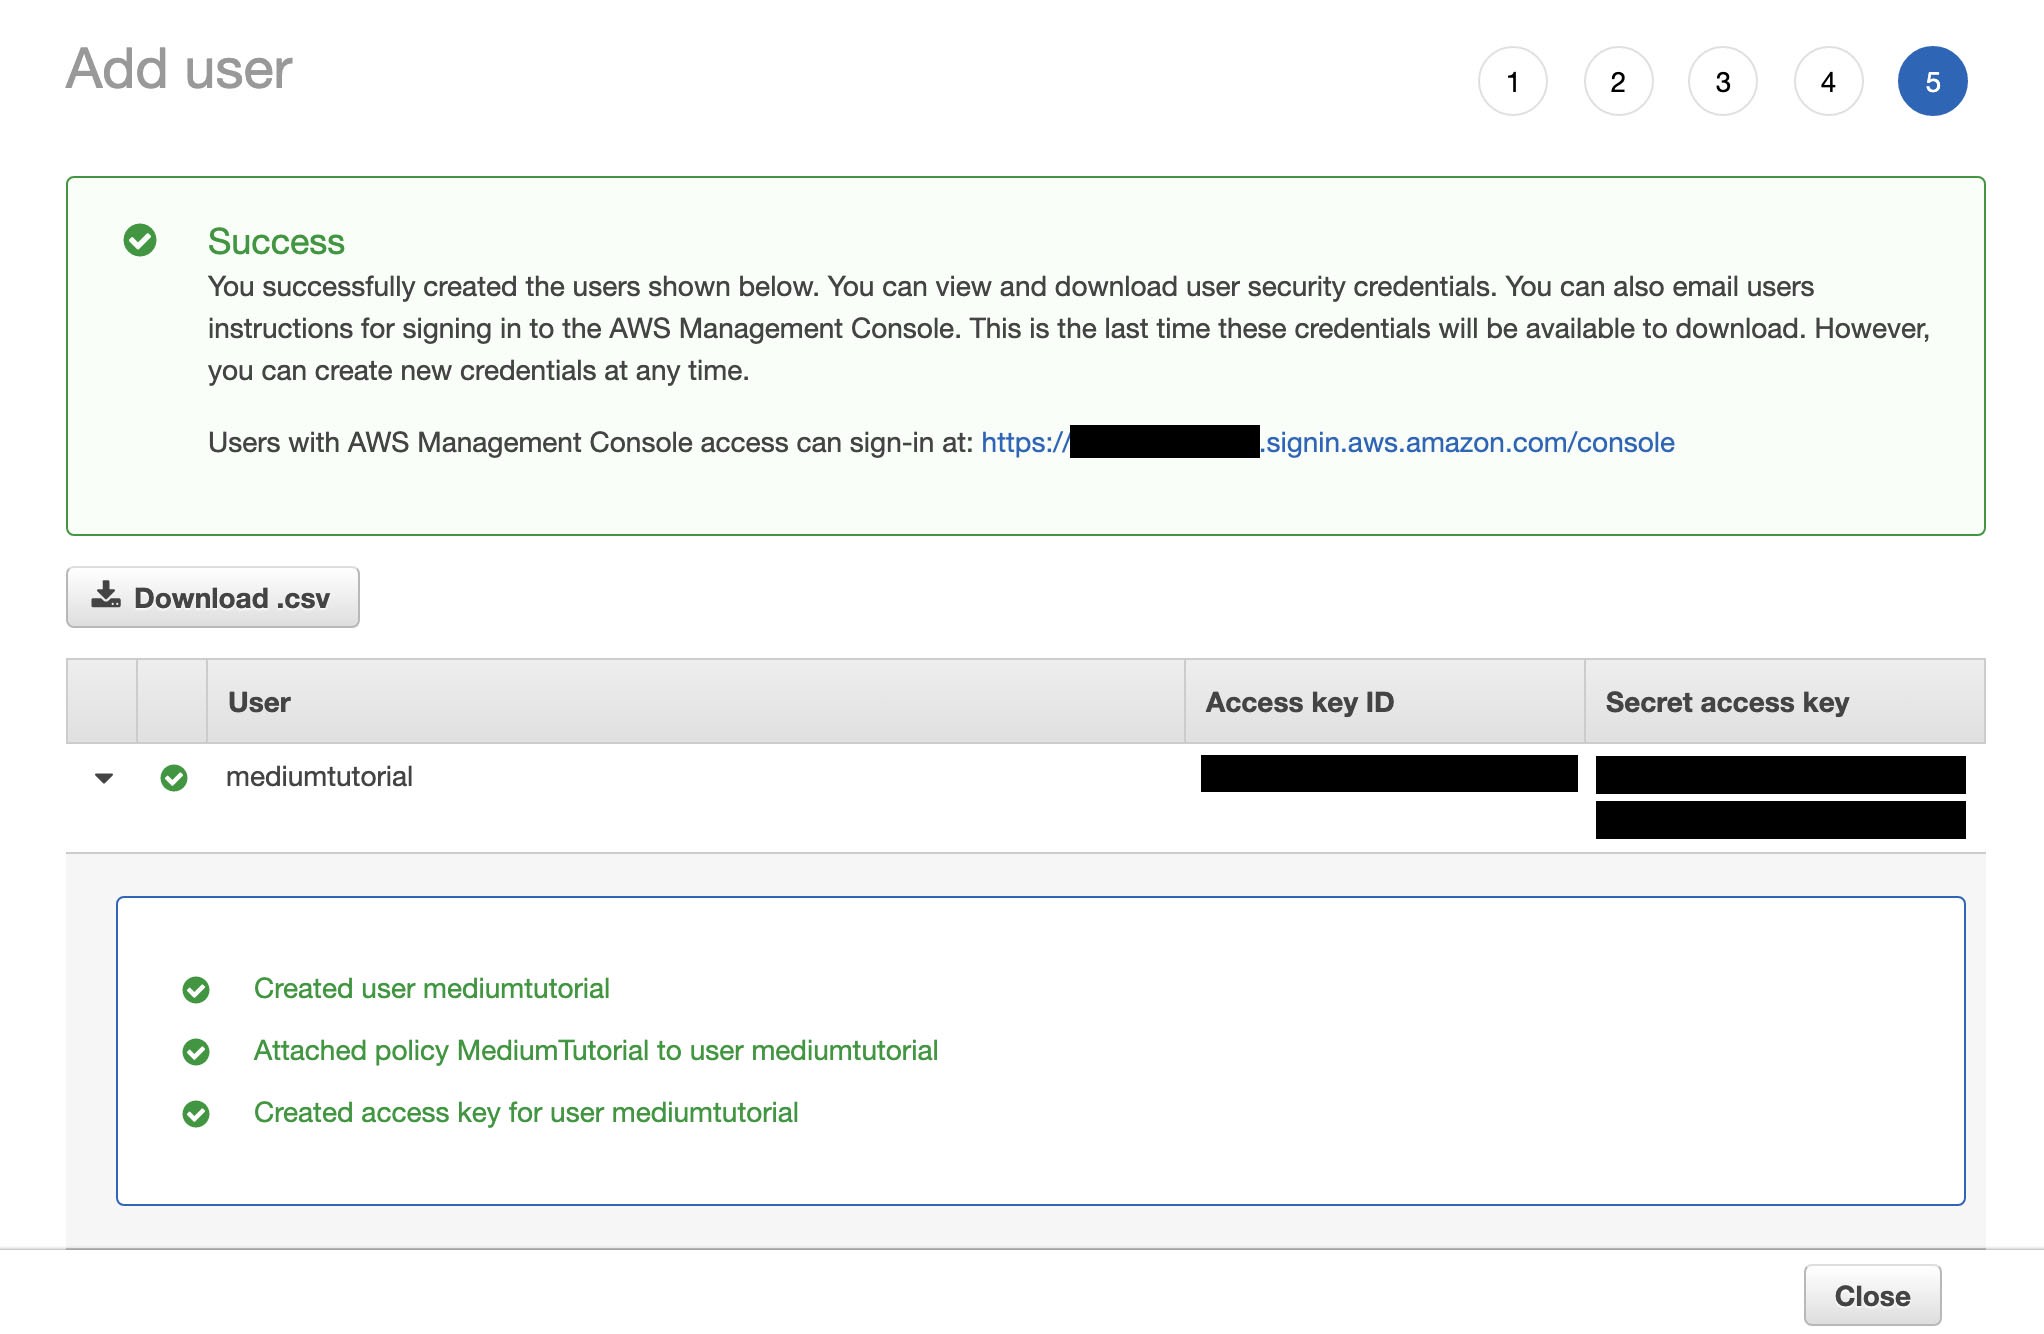
You will want to make note of the “Access key ID” and “Secret access key”. This user was obviously only temporary for the purpose of this tutorial. I’ve redacted the sensitive information anyway.
您需要记下“访问密钥ID ”和“秘密访问密钥”。 显然,该用户只是本教程的临时用户。 无论如何,我已经删除了敏感信息。
Okay, S3 and and our programmatic IAM user are done.
好的,S3和我们的程序化IAM用户已完成。
So now for a basic test using a Node.js script. I’m making the assumption you are using Linux or a Mac and have at least Node v12.* installed. Here are the steps to create a basic project.
现在开始使用Node.js脚本进行基本测试。 我假设您使用的是Linux或Mac,并且至少安装了Node v12。*。 以下是创建基本项目的步骤。
~ % node -v
v12.14.1~ % npm -v
6.13.4~ % mkdir ~/mediumtutorial
~ % cd ~/mediumtutorialmediumtutorial % npm install aws-sdk
npm WARN saveError ENOENT: no such file or directory, open '/Users/REMOVED/mediumtutorial/package.json'
npm notice created a lockfile as package-lock.json. You should commit this file.
npm WARN enoent ENOENT: no such file or directory, open '/Users/REMOVED/mediumtutorial/package.json'
npm WARN mediumtutorial No description
npm WARN mediumtutorial No repository field.
npm WARN mediumtutorial No README data
npm WARN mediumtutorial No license field.+ aws-sdk@2.756.0
added 14 packages from 66 contributors and audited 14 packages in 1.353s
found 0 vulnerabilities
Now create a file called helloworld.js using your favourite text editor.
现在,使用您喜欢的文本编辑器创建一个名为helloworld.js的文件。
const AWS = require('aws-sdk');const BUCKET_NAME = "YOUR_S3_BUCKET";
const IAM_USER_KEY = "YOUR_IAM_USER_KEY";
const IAM_USER_SECRET = "YOUR_IAM_USER_SECRET";const s3bucket = new AWS.S3({
  accessKeyId: IAM_USER_KEY,
  secretAccessKey: IAM_USER_SECRET
});function uploadObjectToS3Bucket(objectName, objectData) {
  const params = {
    Bucket: BUCKET_NAME,
    Key: objectName,
    Body: objectData
  };  s3bucket.upload(params, function(err, data) {
    if (err) throw err;
    console.log(`File uploaded successfully at ${data.Location}`)
  });
}uploadObjectToS3Bucket('helloworld.json', 'Hello World!');
If you have been following the steps with me in this tutorial if you run the script it will create an object in your S3 bucket called “helloworld.json” with the content ‘{ “message” : “Hello World!” }’.
如果您一直按照本教程中的步骤进行操作(如果您运行脚本),它将在您的S3存储桶中创建一个名为“ helloworld.json ”的对象,其内容为' {“ message”:“ Hello World!” } '。
mediumtutorial % node ./helloworld.js
File uploaded successfully at https://mediumtutorial.s3.amazonaws.com/helloworld.json
A tip here that had me a little flummoxed was when I ran this script I didn’t see the object in S3 automatically when I opened my bucket. I had to click the refresh icon in the S3 bucket for it to show.
这里有个让我有些困惑的提示是,当我运行此脚本时,当我打开存储桶时,没有自动在S3中看到该对象。 我必须单击S3存储桶中的刷新图标才能显示它。
So hopefully this worked for you.
因此,希望这对您有用。
So now to show you how to do this with Lambda. I could not get it working exactly using the same code so I had to tweak it a little.
现在,向您展示如何使用Lambda。 我无法使用相同的代码完全正常工作,因此我不得不对其进行一些调整。
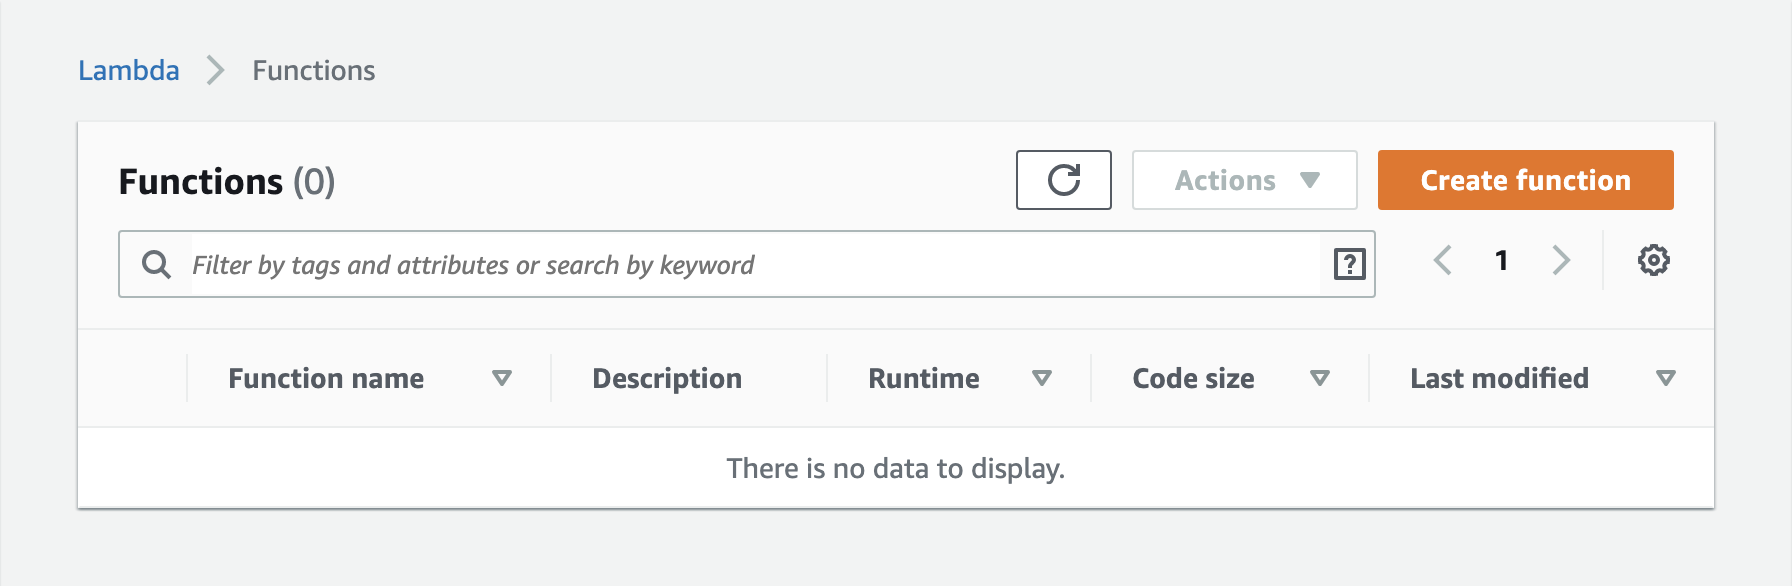
The first step is to log into the Amazon AWS Console and search for Lambda under Find Services.
第一步是登录Amazon AWS控制台并在Find Services下搜索Lambda 。
Click on the orange “Create function” button.
单击橙色的“创建功能”按钮。
For the purpose of this tutorial you will want to select the default “Author from scratch”, give your function a name (in this case “mediumtutorial”, select the Runtime (in this case “Node.js 12.x”), and for the Execution role make sure you select “Create a new rule with basic Lambda permissions”. If this isn’t your first Lambda function you may want to “Use an existing role”.
就本教程而言,您将要选择默认的“从头开始”,为函数命名(在此例中为“ mediatutorial ”,在此选择运行时(在此例中为“ Node.js 12.x ”)),然后对于执行角色,请确保选择“使用基本Lambda权限创建新规则”。如果这不是您的第一个Lambda函数,则可能需要“使用现有角色”。
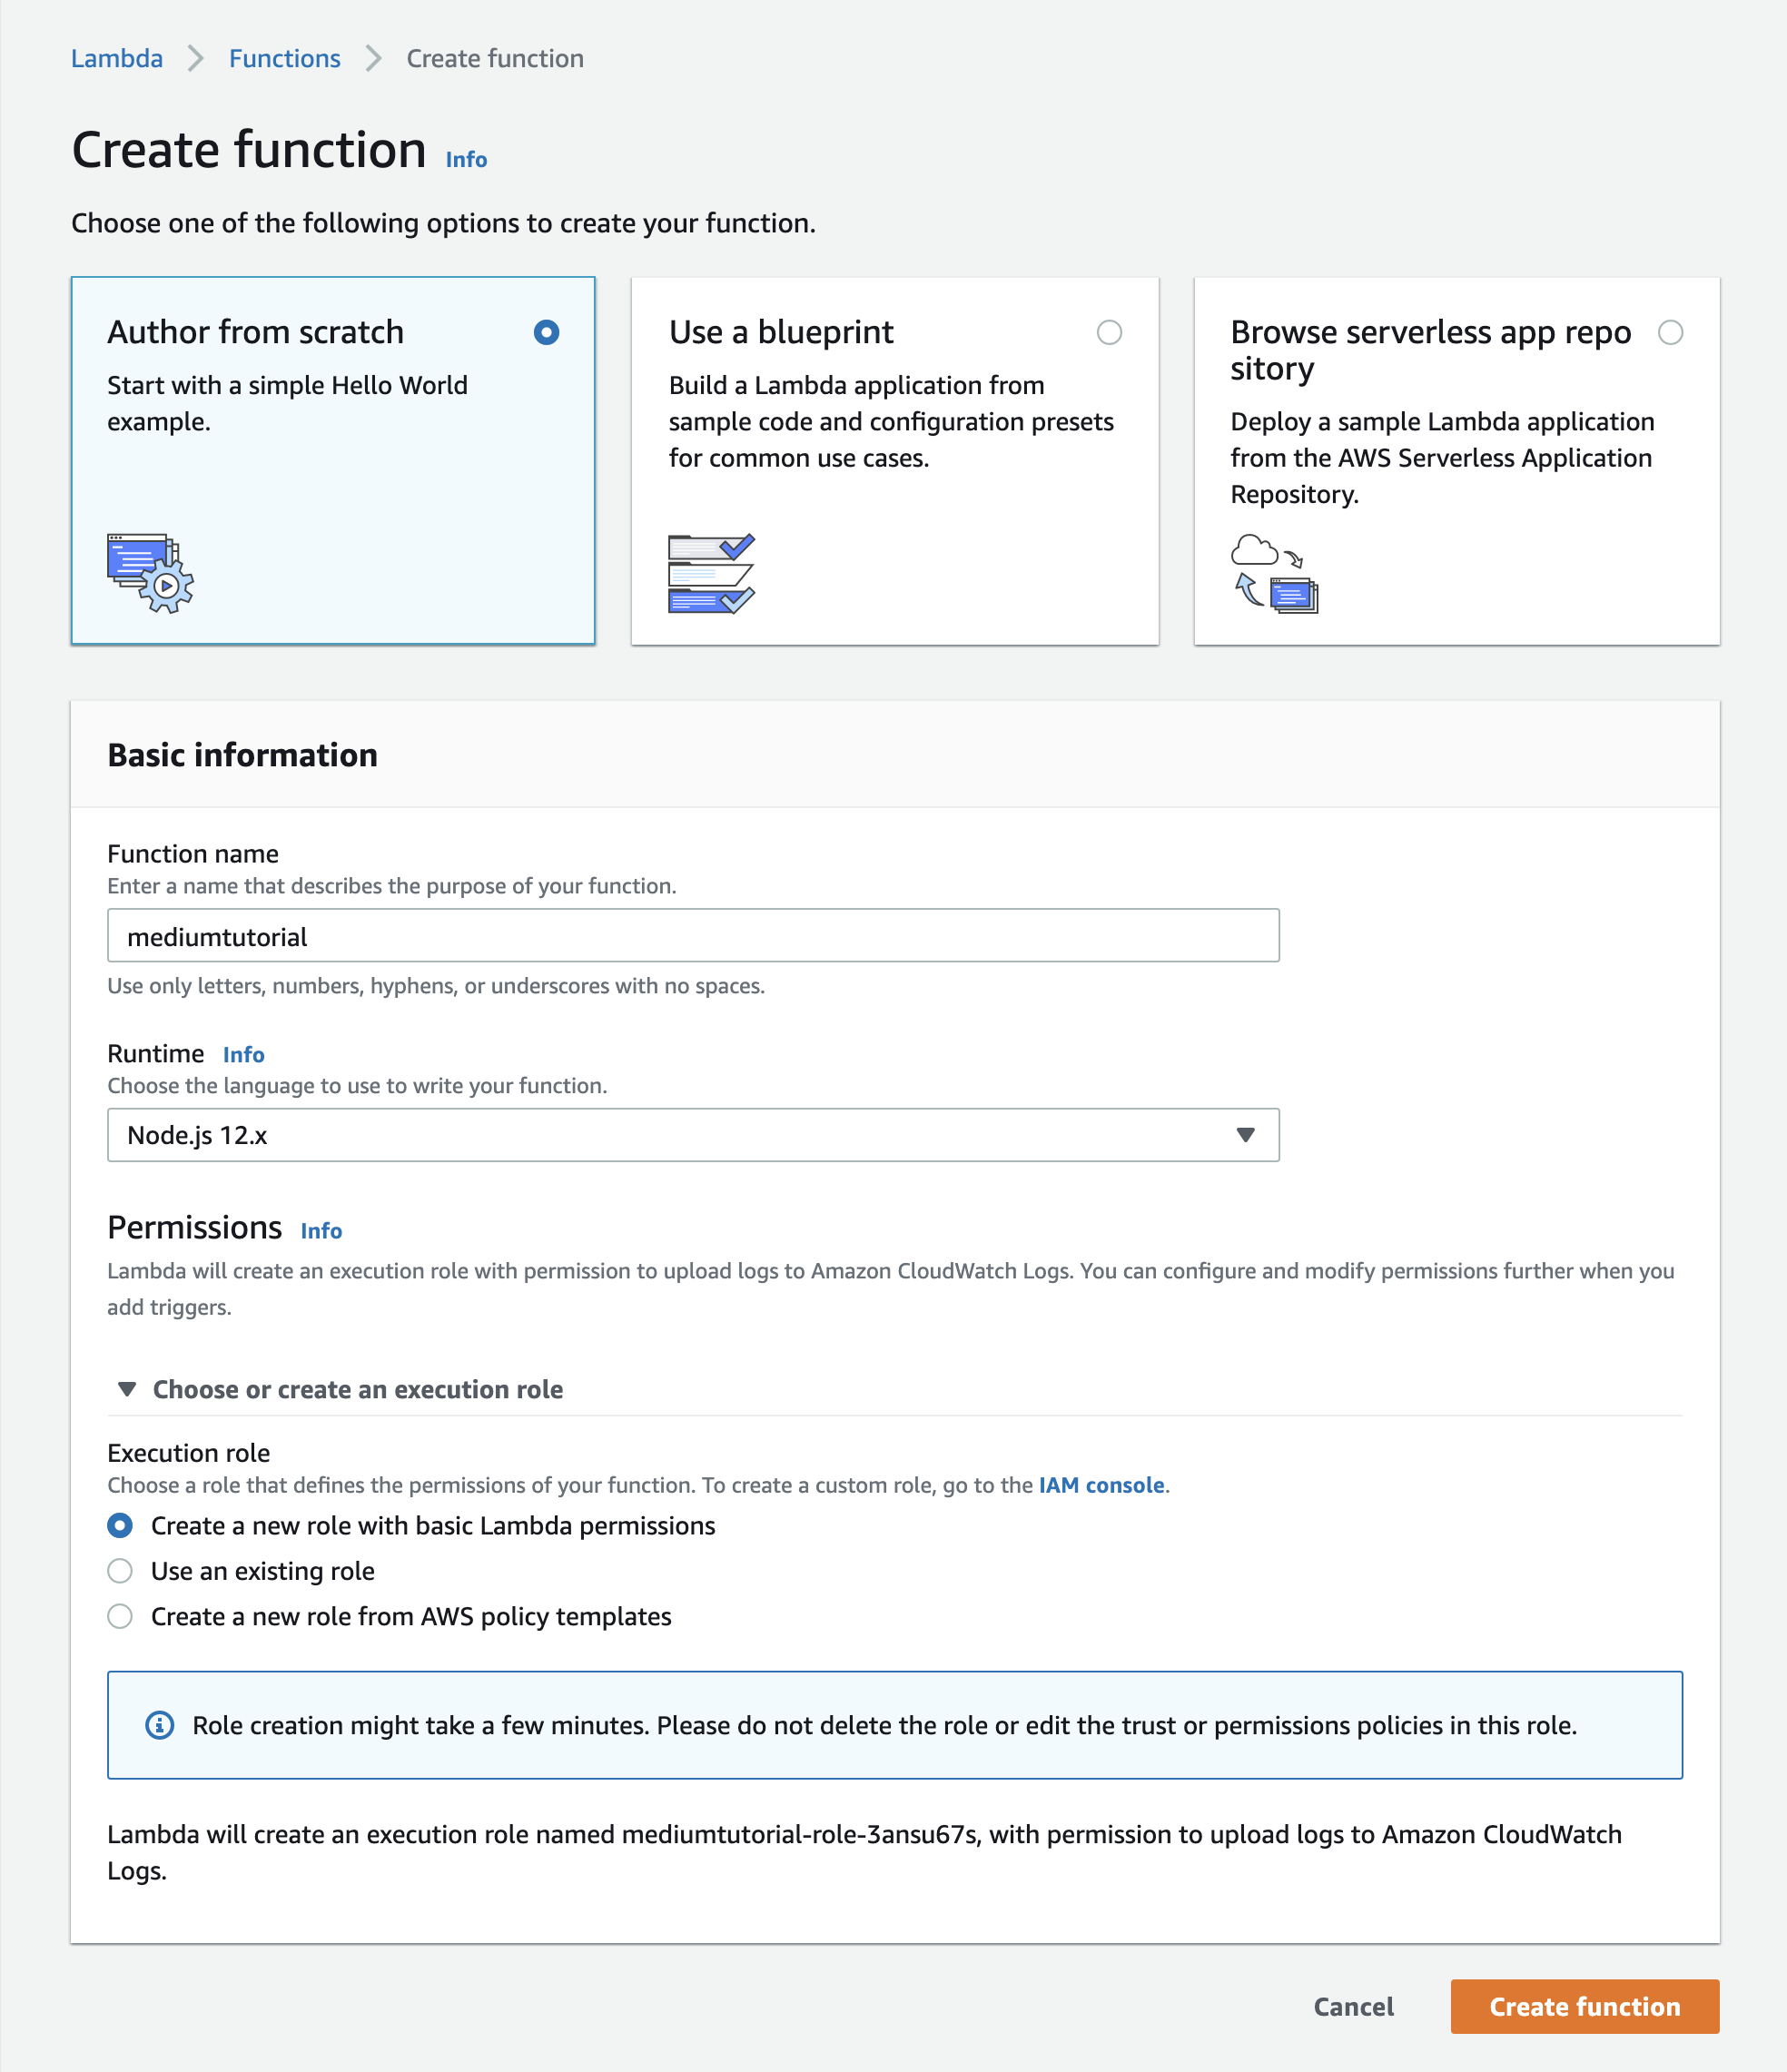
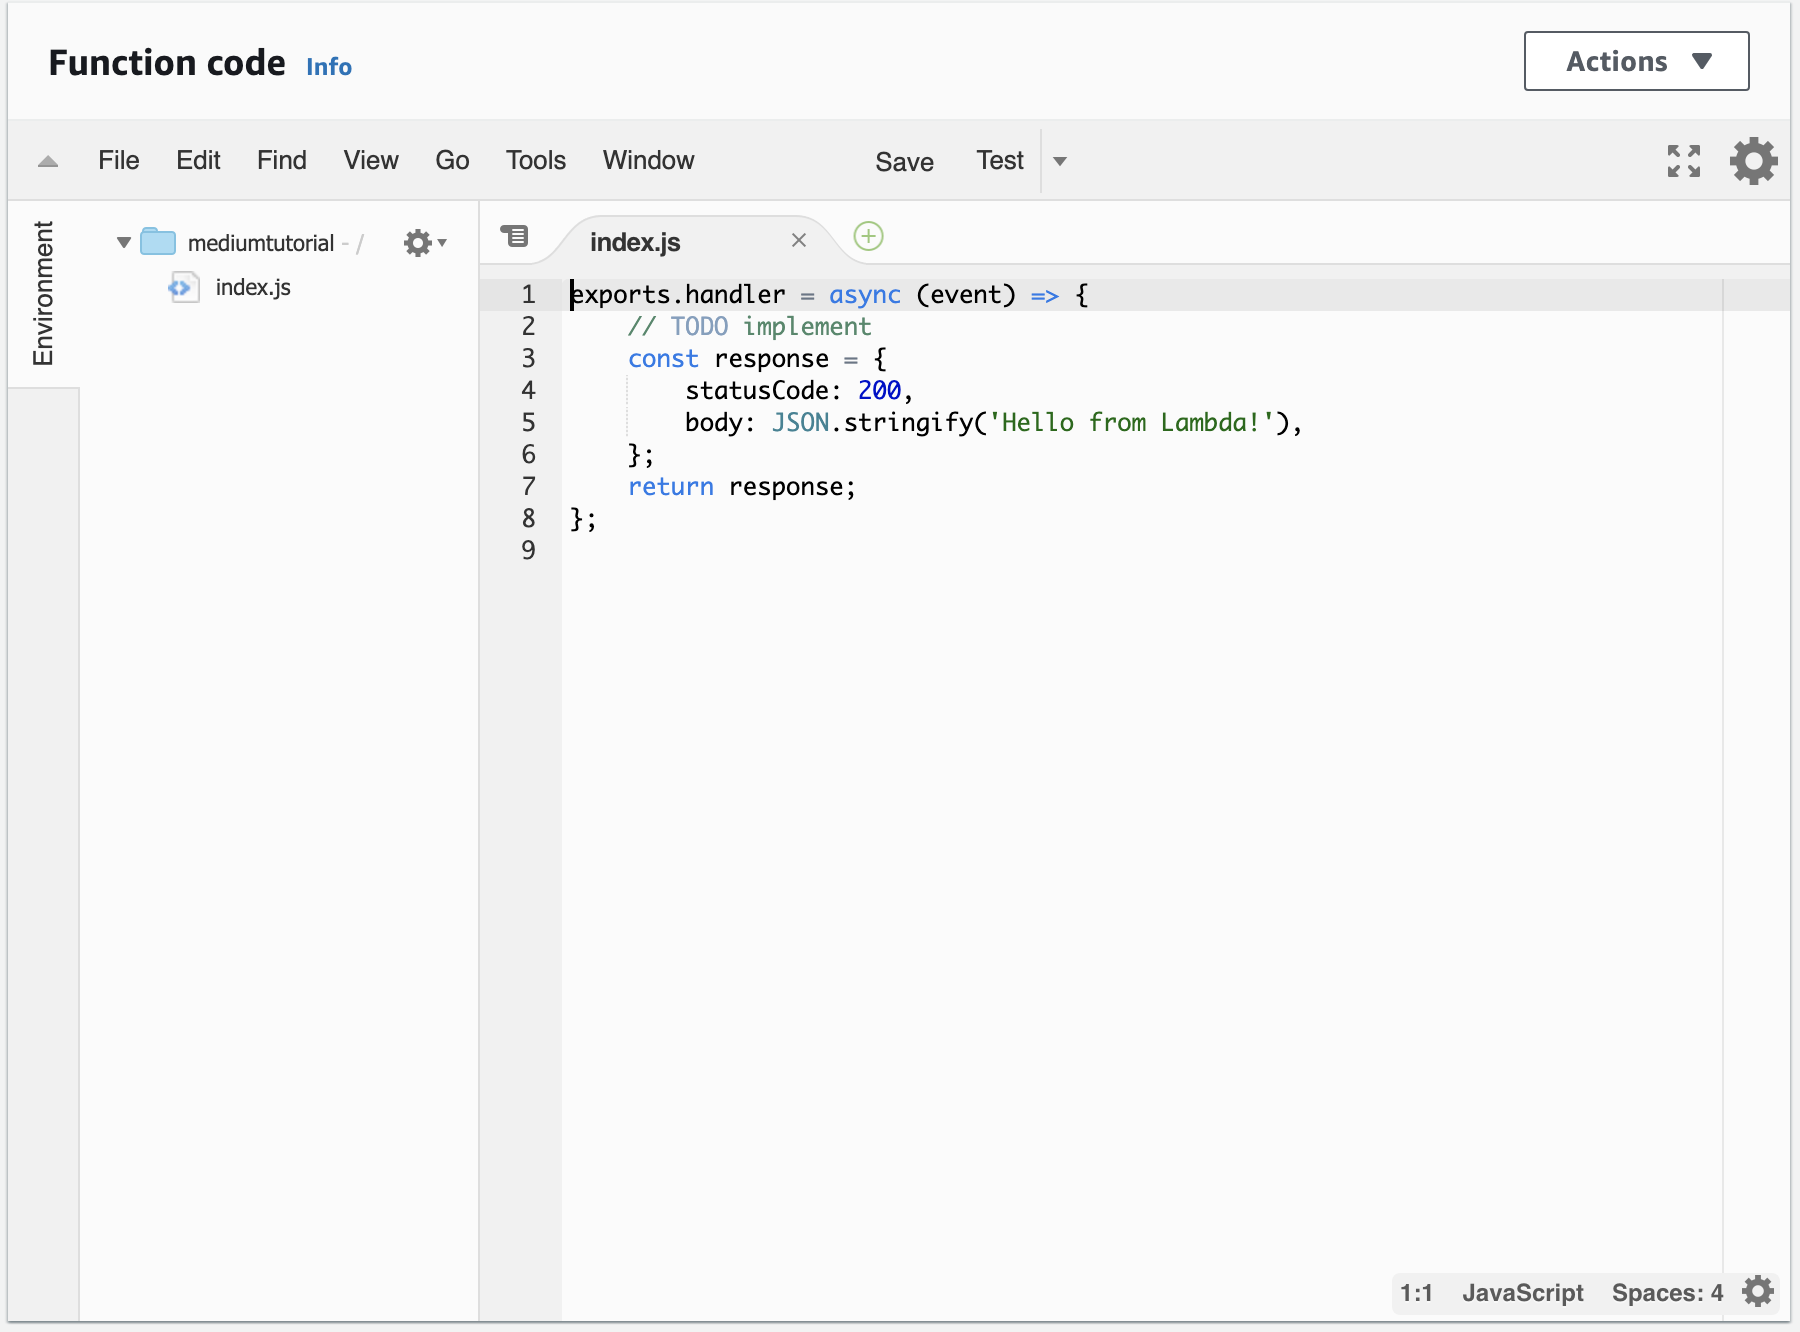
It will take some time to create the function but once completed you will be on the Configuration screen. There are many useful options there but for the purpose of the tutorial I want to keep this as simple as possible. Please scroll down to the “Function code” section to find the default “Hello from Lambda!” code.
创建功能将花费一些时间,但是一旦完成,您将进入“配置”屏幕。 那里有许多有用的选项,但出于教程的目的,我想使它尽可能简单。 请向下滚动到“功能代码”部分,以找到默认的“ Lambda,您好! ”代码。
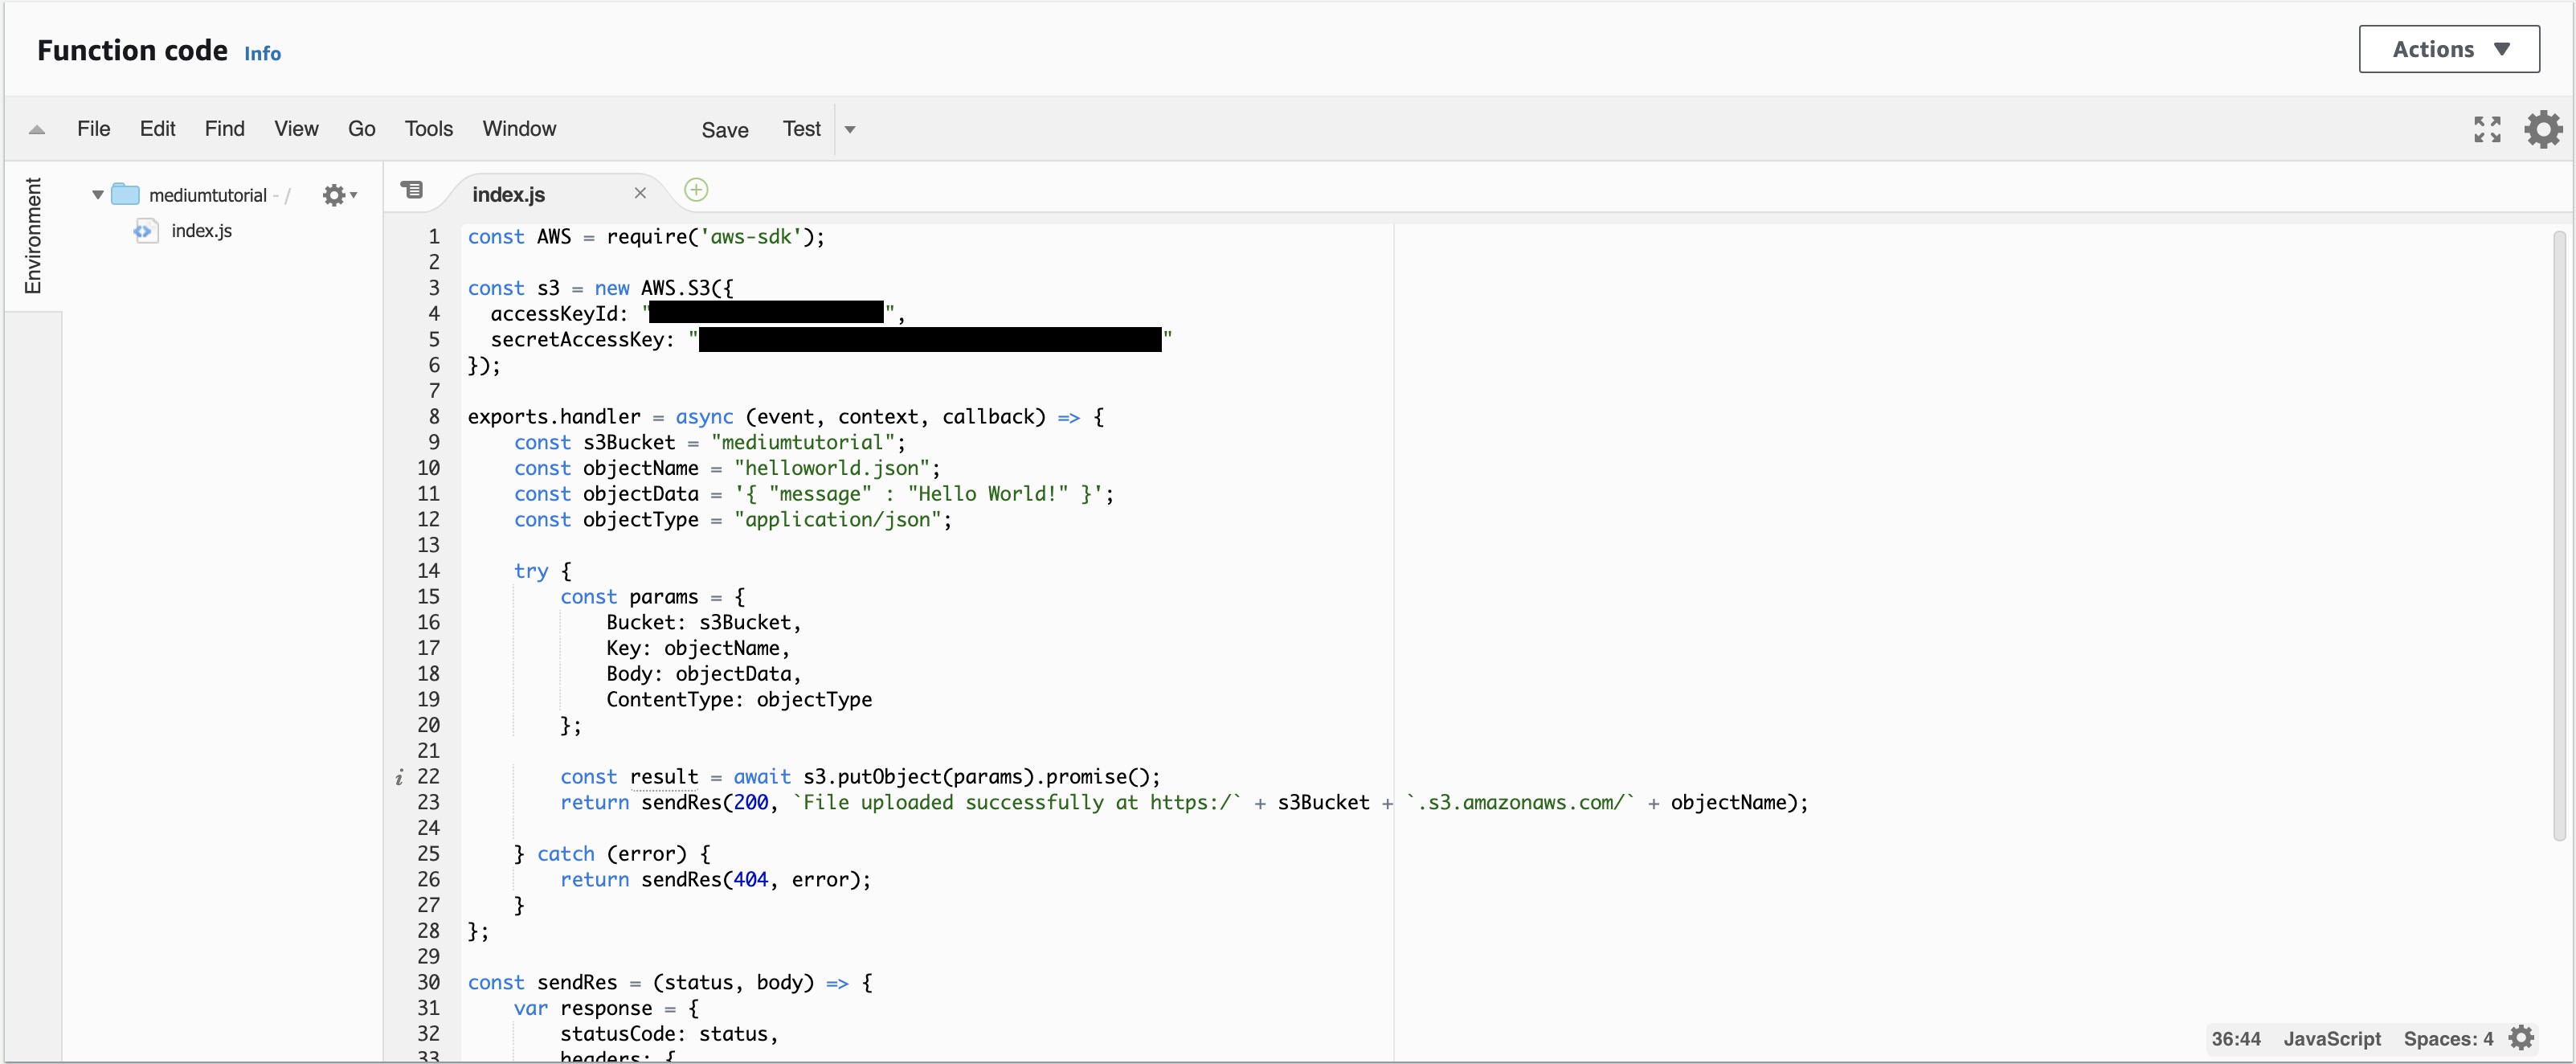
Please replace the default code with this…
请以此替换默认代码…
const AWS = require('aws-sdk');const s3 = new AWS.S3({
  accessKeyId: "YOUR_IAM_USER_KEY",
  secretAccessKey: "YOUR_IAM_USER_SECRET"
});exports.handler = async (event, context, callback) => {
    const s3Bucket = "YOUR_S3_BUCKET";
    const objectName = "helloworld.json";
    const objectData = '{ "message" : "Hello World!" }';
    const objectType = "application/json";try {
        const params = {
            Bucket: s3Bucket,
            Key: objectName,
            Body: objectData,
            ContentType: objectType
        };const result = await s3.putObject(params).promise();
        return sendRes(200, `File uploaded successfully at https:/` + s3Bucket + `.s3.amazonaws.com/` + objectName);

    } catch (error) {
        return sendRes(404, error);
    }
};const sendRes = (status, body) => {
    var response = {
        statusCode: status,
        headers: {
            "Content-Type" : "application/json",
            "Access-Control-Allow-Headers" : "Content-Type,X-Amz-Date,Authorization,X-Api-Key,X-Amz-Security-Token",
            "Access-Control-Allow-Methods" : "OPTIONS,POST,PUT",
            "Access-Control-Allow-Credentials" : true,
            "Access-Control-Allow-Origin" : "*",
            "X-Requested-With" : "*"
        },
        body: body
    };
    return response;
};
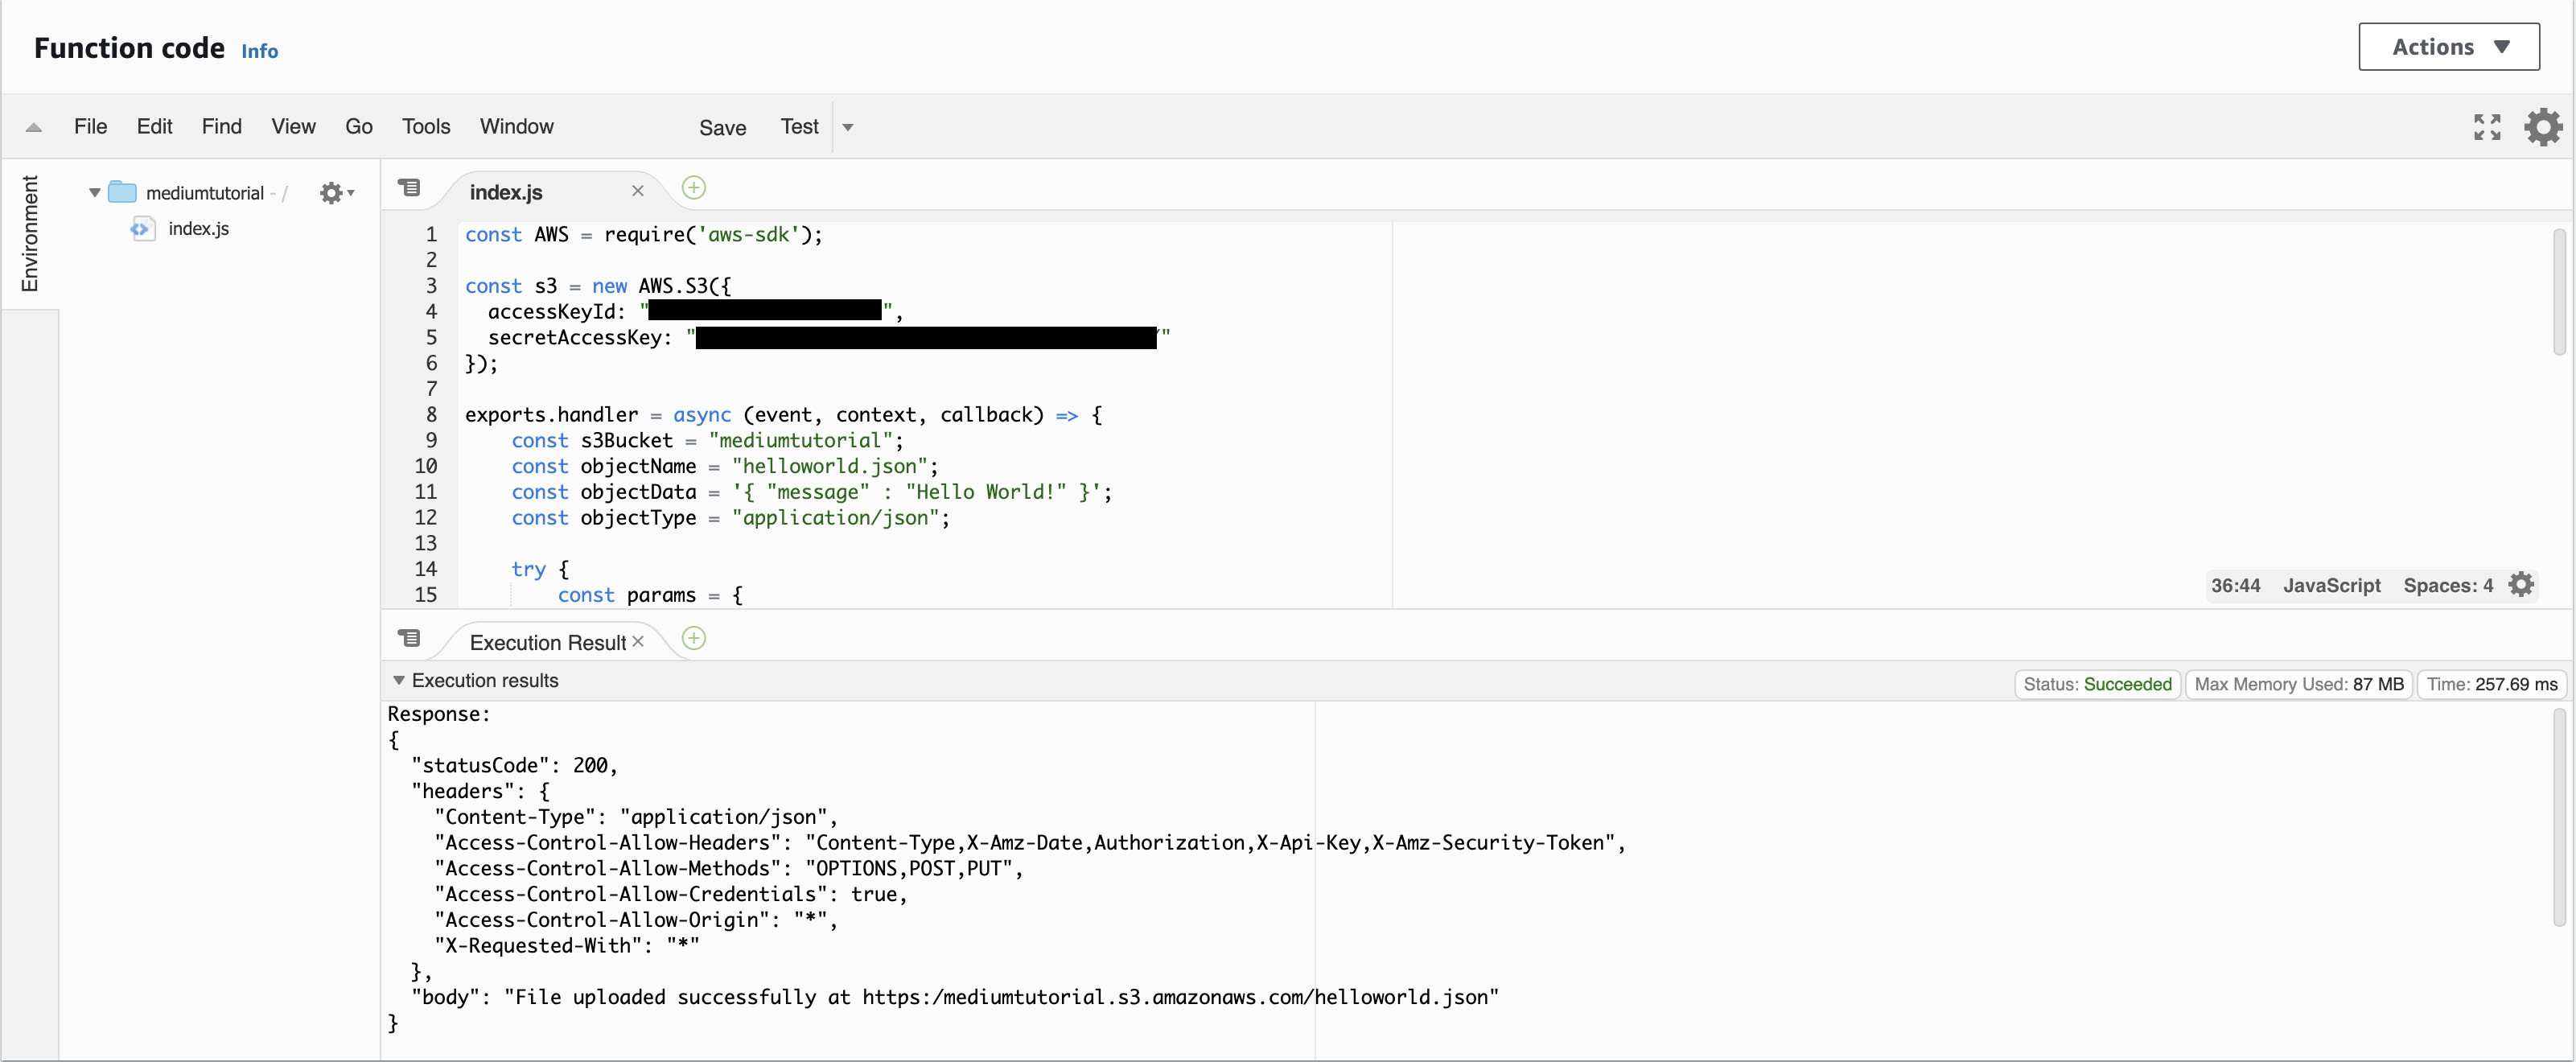
In order to test this works at the top of your Lambda function you will see a button called “Test” next to “Save”. Make sure the code is saved and click “Test”. A modal will pop up with test configuration. Just leave everything as default and click “Create”.
为了测试此功能在Lambda函数的顶部,您将在“保存”旁边看到一个名为“测试”的按钮。 确保代码已保存,然后单击“测试”。 将会弹出一个带有测试配置的模态。 只需将所有内容保留为默认值,然后单击“创建”即可。

When you click on the “Test” button after “Save” you will now see “Execution results”. As you can see the “body” is saying the object has been successfully created and you can confirm this as above by going to your S3 bucket.
当您单击“保存”后的“测试”按钮时,您现在将看到“执行结果”。 如您所见,“ body ”表示对象已成功创建,您可以通过转到S3存储桶来确认上述内容。
If you intend on uploading an object to S3 from your web application you may be interested in this other article of mine… React.js API calls to AWS Lambda, API Gateway and dealing with CORS. This will explain how to get API Gateway working with CORS to allow your web application to interact with Lambda (in this case uploading to S3).
如果您打算从Web应用程序将对象上传到S3,您可能会对我的另一篇文章感兴趣…… React.js API调用到AWS Lambda,API Gateway并处理CORS 。 这将说明如何使API Gateway与CORS配合使用,以允许您的Web应用程序与Lambda进行交互(在本例中为上载到S3)。
I’ve read in the AWS SDK for S3 that it is possible to POST directly from a web form to an S3 bucket using a pre-signed URL. I believe both a PUT and POST is possible. I’ve managed to generate the pre-signed URLs but still not got this working yet. When I do I’ll add an amendment to this article.
我已经阅读了适用于S3的AWS开发工具包,可以使用预先签名的URL从Web表单直接发布到S3存储桶。 我相信PUT和POST都是可能的。 我设法生成了预签名的URL,但仍然无法正常工作。 当我这样做时,我将对本文进行修改。
If you enjoyed reading this article and would like me to write on any other topics please let me know in the comments or email me directly.
如果您喜欢阅读本文,并且希望我写其他主题,请在评论中让我知道或直接给我发送电子邮件。
I’m the Head of the Networks Practice at Net Reply. My team specialises in networks, security and process automation including self-service dashboards. If you would like more information on this please contact me on m.whittle@reply.com. Alternatively you can learn more about us on LinkedIn and Twitter.
我是Net Reply网络部门的负责人。 我的团队专门研究网络,安全性和流程自动化,包括自助服务仪表板。 如果您想了解更多信息,请通过m.whittle@reply.com与我联系。 另外,您可以在LinkedIn和Twitter上了解有关我们的更多信息。
翻译自: https://medium.com/@michael_31310/upload-to-aws-s3-using-a-node-js-script-or-aws-lambda-e1877960bcea
aws lambda使用


 572
572


 被折叠的 条评论
为什么被折叠?
被折叠的 条评论
为什么被折叠?
 到【灌水乐园】发言


