


aws cdn 如何使用
Performance is one of the most important things in websites, and there is no need to explain reasons. Fast web pages lead your website to better search engine rankings while increasing traffic for your website.
性能是网站上最重要的事情之一,无需解释原因。 快速的网页引导您的网站获得更好的搜索引擎排名,同时增加网站的访问量。
However, almost every large scale websites contain many large files, and these files can have a significant impact on your website’s speed.
但是,几乎每个大型网站都包含许多大文件,这些文件可能会对您网站的速度产生重大影响。
As a solution, most developers use Gzip compression to reduce HTML, javascript, and CSS files, and Gzip can reduce file sizes by almost up to 90%.In this article, I will discuss how Gzip works and how easily you can configure it using AWS S3 and CloudFront with an example.
作为解决方案,大多数开发人员都使用Gzip压缩来减少HTML,javascript和CSS文件,而Gzip可以将文件大小减少近90%。在本文中,我将讨论Gzip的工作原理以及如何使用Gzip轻松配置它。 AWS S3和CloudFront的示例。
什么是Gzip及其工作原理? (What is Gzip & How It Works?)
GZip (GNU Zip) is an open-source compression algorithm (based on the DEFLATE algorithm) that can speed up your websites by reducing the file sizes. When your server receives a request for a web page, it checks the request header to see whether your browser supports gzip.
GZip(GNU Zip)是一种开源压缩算法(基于DEFLATE算法) ,可以通过减小文件大小来加快网站速度。 当服务器收到网页请求时,它将检查请求标头以查看您的浏览器是否支持gzip。

If your browser supports GZip, then the server generates the markup file for your web page, and after that, GZip converts that markup into a compressed data stream. As the final step, the browser decompresses the compressed data stream to show the web page to the user.
如果您的浏览器支持GZip,则服务器将为您的网页生成标记文件,然后GZip将标记转换为压缩数据流。 作为最后一步,浏览器将压缩的数据流解压缩以向用户显示网页。
GZip真的会说吗? (Does GZip Really do What it Says?)
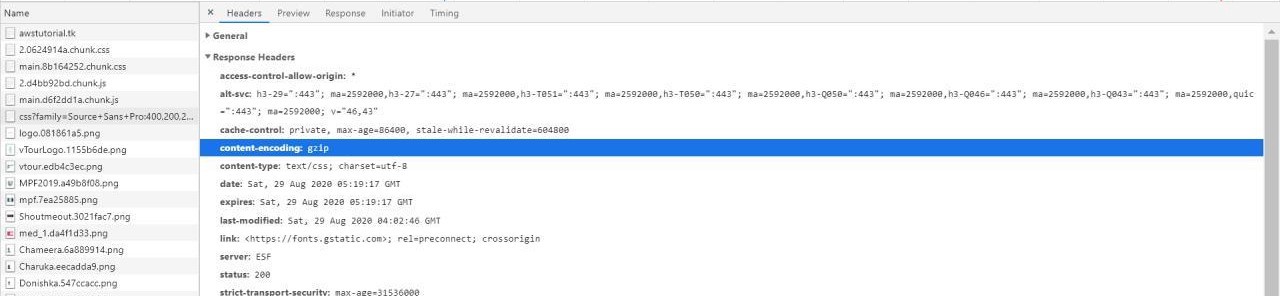
Now you know how GZip works, let’s see its performance in a real example to see whether it does what it says. The following example is from a static web site hosted in an AWS S3 bucket and the first screenshot shows the download time of a CSS/Text file without GZip compression. The second screenshot shows the stats after Gzipping for the same request.
现在您知道了GZip的工作原理,让我们在一个真实的示例中查看其性能,看看它是否按照其说明进行操作。 以下示例来自AWS S3存储桶中托管的静态网站,第一个屏幕截图显示了未使用GZip压缩CSS /文本文件的下载时间。 第二张屏幕截图显示了Gzip压缩后针对同一请求的统计信息。
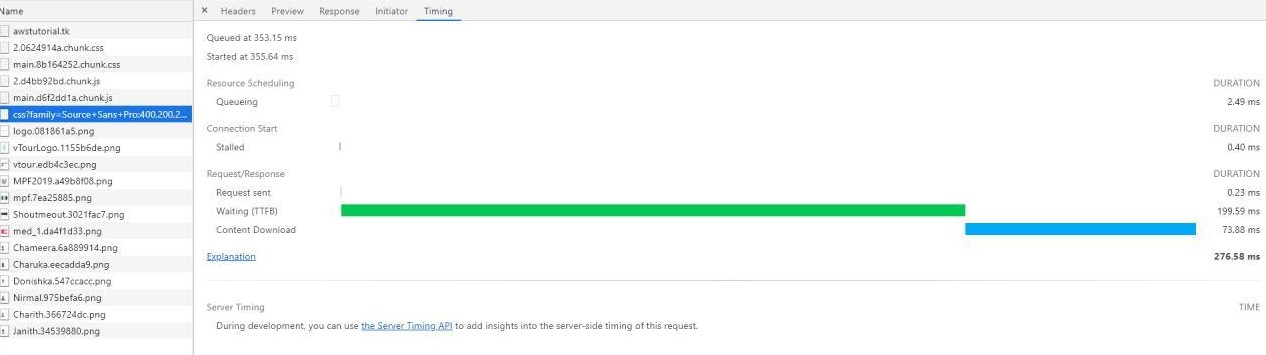

As you can see, the download time for the same file has been reduced to 1.02 ms from 73.88 ms. It is almost 72% percent smaller than the original file and it indicates that GZip can reduce the file sizes drastically while improving the website’s speed.
如您所见,同一文件的下载时间从73.88毫秒减少到1.02毫秒。 它比原始文件小了近72%,这表明GZip可以大大减少文件大小,同时提高网站的速度。
So, let’s see how we can enable Gzip easily for a static website using AWS CloudFront.
因此,让我们看看如何使用AWS CloudFront轻松为静态网站启用Gzip。
Tip: Share your reusable components between projects using Bit (Github). Bit makes it simple to share, document, and organize independent components from any project.
提示:使用Bit ( Github )在项目之间共享可重用组件 。 Bit使共享,记录和组织来自任何项目的独立组件变得简单。
Use it to maximize code reuse, collaborate on independent components, and build apps that scale.
使用它可以最大程度地重复使用代码,在独立组件上进行协作以及构建可扩展的应用程序。
Bit supports Node, TypeScript, React, Vue, Angular, and more.
Bit支持Node,TypeScript,React,Vue,Angular等。
JavaScript承诺的最新进展和改进 (Recent Advances and Improvements to JavaScript Promises)
自Promise.resolve()和Promise.reject()时代以来,它们已经走了很长一段路。 (They’ve come a long way since the days of Promise.resolve() and Promise.reject().)

承诺,承诺。 (Promises, Promises.)
JavaScript’s been slowly but steadily improving as a programming language ever since its inception back in 1995, and lately it seems as though those improvements are coming at a quicker and quicker pace. One of the biggest advancements (in my opinion, at least) was with the introduction of promises for asynchronous operations back in 2012.
自1995年问世以来,JavaScript作为一种编程语言一直在缓慢但稳步地改进,最近看来,这些改进的步伐越来越快。 最大的进步之一(至少在我看来是)是在2012年引入了对异步操作的承诺 。
The Promise object represents the eventual completion (or failure) of an asynchronous operation, and its resulting value, and it delivered JavaScript developers everywhere from the conundrum known as “callback hell.”
Promise对象表示异步操作的最终完成(或失败)及其结果值,它从称为“回调地狱”的难题中向JavaScript开发人员提供了无处不在的解决方案。
But that’s in the past, what I want to talk about now is the future: the future of promises. Not content to rest on the laurels of Promise.resolve() and Promise.reject(), the authors of JavaScript (the ECMAScript Committee) have added several new methods in ES2021 to make promises more useful and versatile than ever before.
但这就是过去,我现在要谈论的是未来:承诺的未来。 JavaScript的作者(ECMAScript委员会) Promise.reject()于Promise.resolve()和Promise.reject()的桂冠,在ES2021中添加了几种新方法,以使承诺比以往任何时候都更加有用和通用。
I want to share some of the newest promise methods available to developers today, and make suggestions for when you might take advantage of them in your own development. Let’s get going.
我想分享一些今天可供开发人员使用的最新Promise方法,并就何时在自己的开发中利用它们提出建议。 我们走吧。
使用AWS CloudFront为AWS S3中托管的静态网站配置GZip (Configuring GZip for a Static Website Hosted in AWS S3 with AWS CloudFront)
In this section, I’m going to explain how you can enable compression using AWS CloudFront. CloudFront is a CDN(Content Delivery Network) service from AWS. It also supports the compression of files before the delivery.
在本部分中,我将解释如何使用AWS CloudFront启用压缩。 CloudFront是来自AWS的CDN(内容交付网络)服务。 它还支持在交付之前压缩文件。
The CloudFront supports different file types such astext/css, text/html, text/javascript. You can find more details about it in the AWS CloudFront documentation.
CloudFront支持不同的文件类型,例如text/css, text/html, text/javascript 。 您可以在AWS CloudFront 文档中找到有关它的更多详细信息。
Let’s understand Gzip compression with CloudFront step by step, assuming that you already have a website hosted in an AWS S3 bucket.
假设您已经在AWS S3存储桶中托管了一个网站,让我们逐步了解如何使用CloudFront进行Gzip压缩。
第1步 (Step 1)
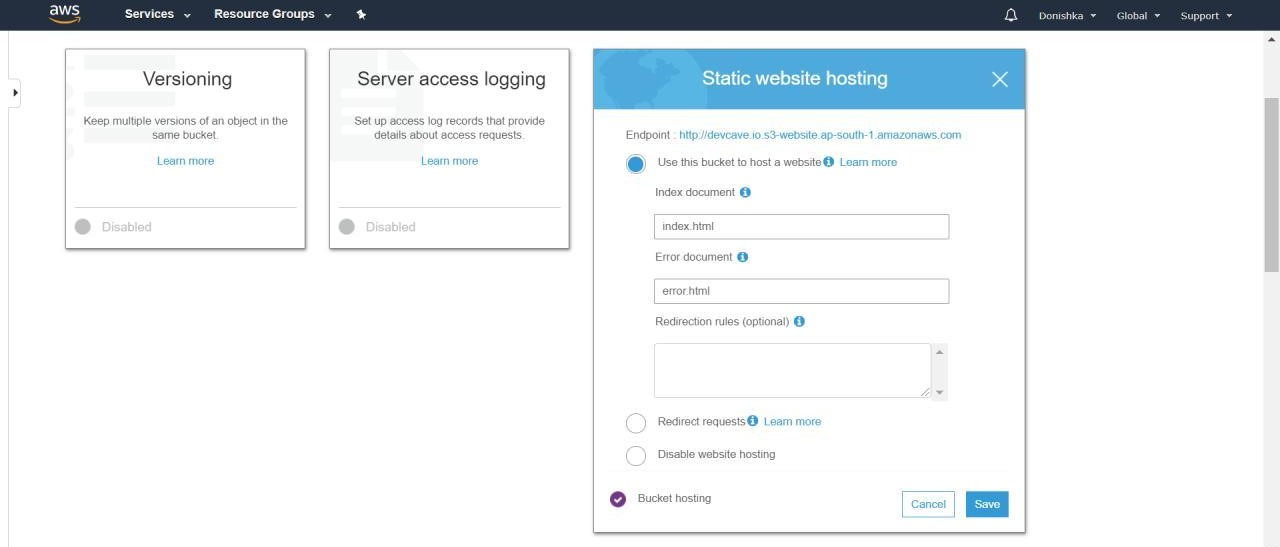
First, you need to make sure that static hosting is enabled in your S3 bucket. So, Login to your AWS console and search for S3. Then it will show all the buckets available in your account. Select the relevant bucket from the list and navigate to the Properties tab. There you will see an option to enable static hosting.
首先,您需要确保在S3存储桶中启用了静态托管。 因此,登录到您的AWS控制台并搜索S3。 然后,它将显示您帐户中所有可用的存储桶。 从列表中选择相关的存储桶,然后导航到“属性”选项卡。 在那里,您将看到启用静态托管的选项。
第2步 (Step 2)
If you have already created a CloudFront distribution for your application, you can skip this step and start with step 3. If not, please follow this step to create a CloudFront distribution.
如果您已经为您的应用程序创建了CloudFront分配,则可以跳过此步骤并从步骤3开始。如果没有,请按照此步骤创建CloudFront分配。
I assume that you already have a domain name reserved for your website. You can easily connect your domain to CloudFront distribution using AWS Route 53 and AWS provides good documentation about how you can configure Route 53.
我假设您已经为您的网站保留了一个域名。 您可以使用AWS Route 53轻松将域连接到CloudFront发行版,并且AWS提供了有关如何配置Route 53的良好文档 。
To get started, search for CloudFront in the services section and select the Create Distribution option.
首先,请在“服务”部分中搜索CloudFront,然后选择“ 创建分发”选项。
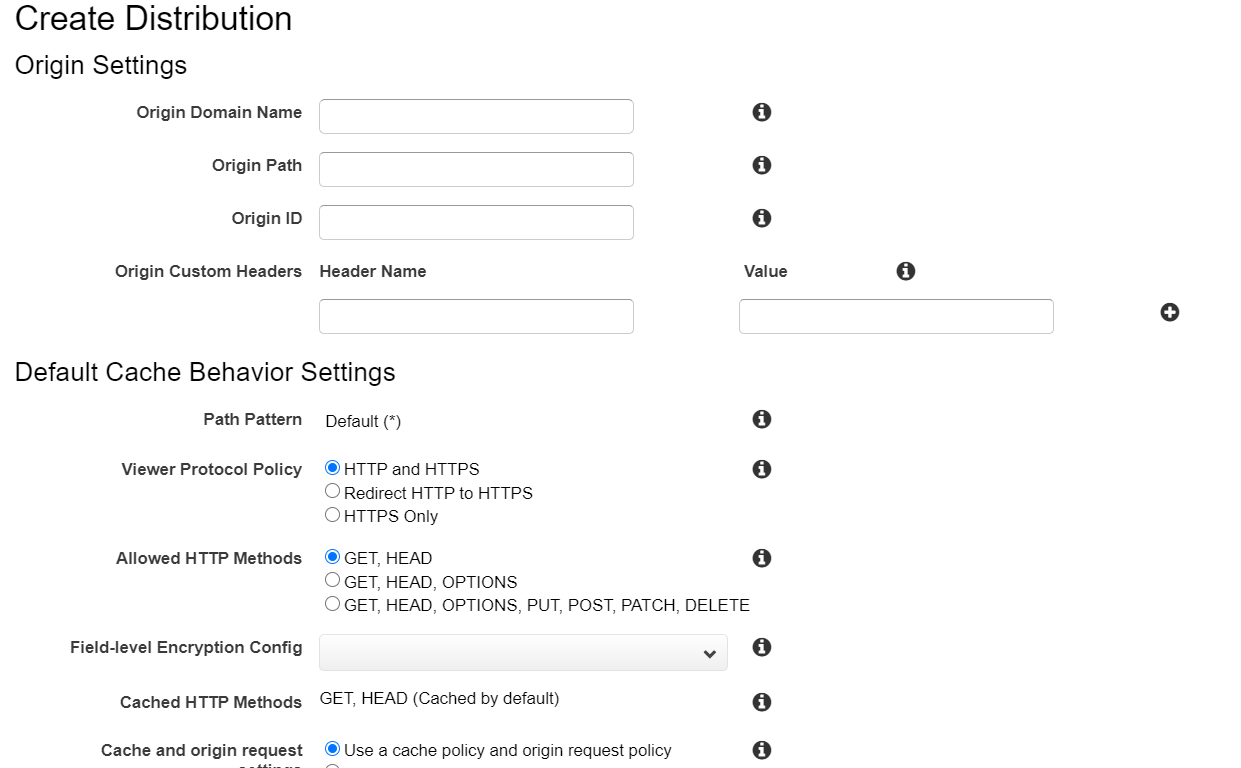
You will be requested to enter several details including Origin Domain Name. Please make sure to enter the website URL of your S3 bucket for that (without http:// part). Usually, the format is something like this:
系统将要求您输入一些详细信息,包括原始域名。 请确保为此输入S3存储桶的网站URL (无http://部分)。 通常,格式是这样的:
<bucket-name>.s3-website.<region>.amazonaws.comKeep the rest of the configuration as it is and select the Create Distribution option. Then you will see your newly created distribution.
保持其余配置不变,然后选择“ 创建分发”选项。 然后,您将看到新创建的发行版。
While it is being deployed there are few things we need to take care of. Go to your newly created distribution from the list and select Edit in the general tab. You will see an empty box for Alternative Domain Names, enter your website domain in it.
在部署它时,我们需要注意的事情很少。 从列表转到新创建的发行版,然后在常规选项卡中选择编辑 。 您会看到一个空白框,表示备用域名 ,在其中输入您的网站域名。
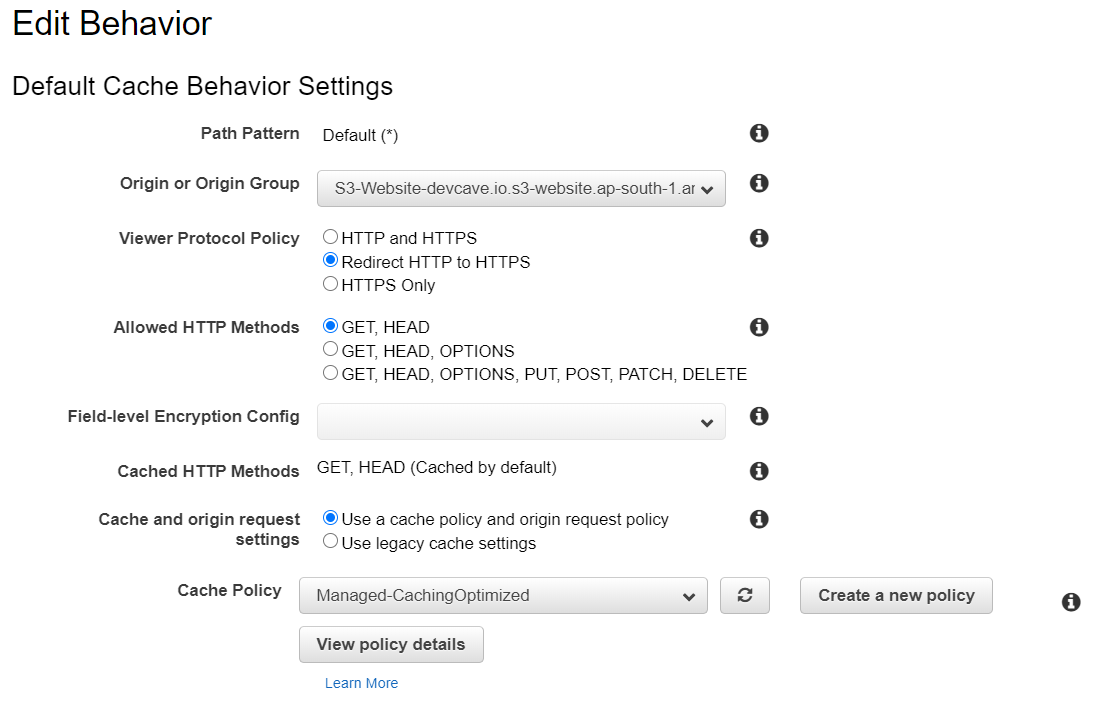
As the final step of distribution creation, Navigate to the behavior tab in your distribution, and change Viewer Protocol Policy to Redirect HTTP to HTTPS.
作为分发创建的最后一步,导航到分发中的“行为”选项卡,然后将“ 查看器协议策略”更改为“ 将HTTP重定向到HTTPS”。
第三步 (Step 3)
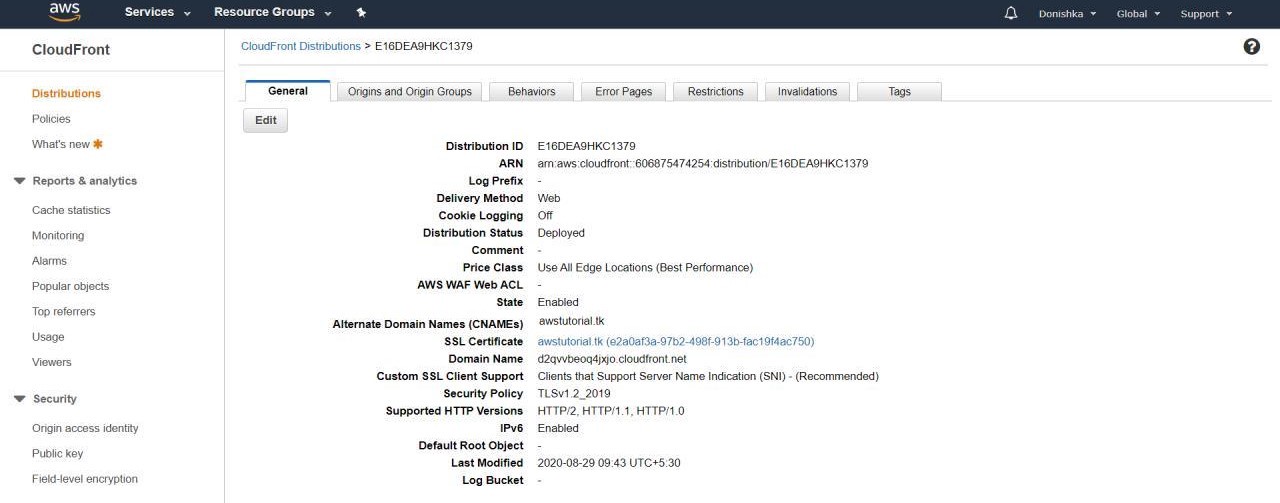
Now search for CloudFront in the services and select the relevant CloudFront distribution for your S3 bucket. You will see a window similar to the below one, which includes Distribution ID, ARN, Domain Names. etc.
现在,在服务中搜索CloudFront并为您的S3存储桶选择相关的CloudFront发行版。 您将看到类似于以下窗口的窗口,其中包括分发ID,ARN,域名。 等等
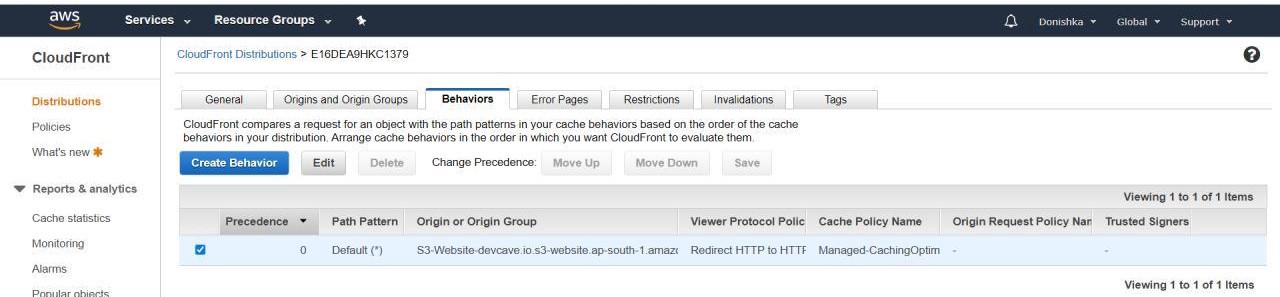
Navigate to the Behavior tab and choose the behavior linked with your S3 bucket.
导航到“行为”选项卡,然后选择与您的S3存储桶链接的行为。
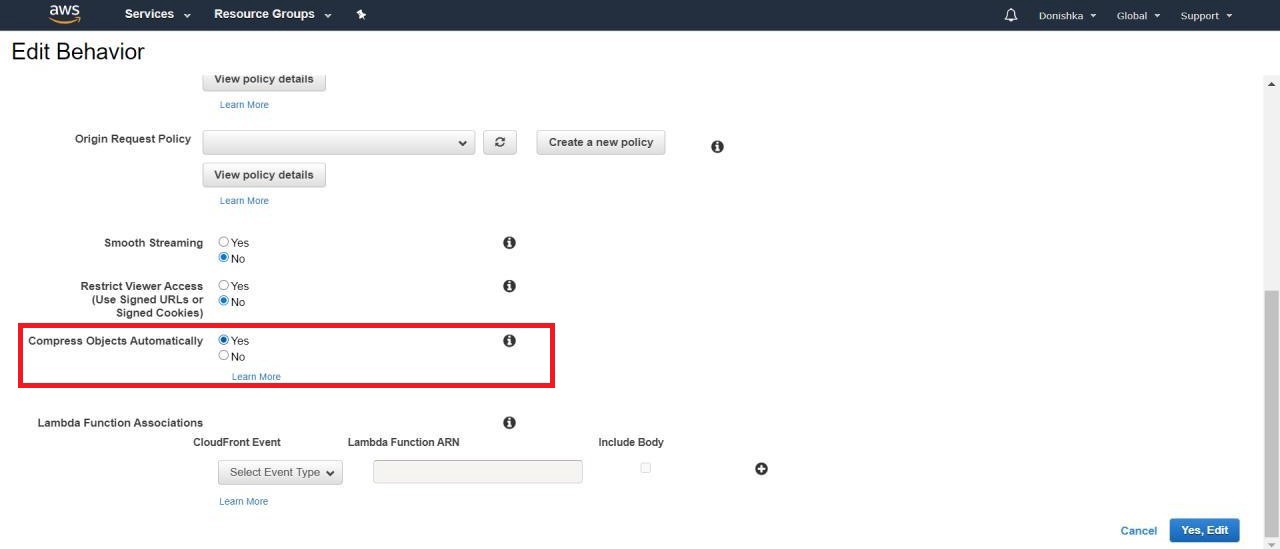
After navigating to the behavior tab, select edit and then you will see some properties of the distribution. You need to change just one setting. So, just scroll down, change the state of property Compress Objects Automatically to Yes and save. (This will take little time to get deployed).
导航到“行为”选项卡后,选择“编辑”,然后您将看到分发的一些属性。 您只需要更改一项设置。 因此,只需向下滚动,将属性自动压缩对象的状态更改为是,然后保存。 (这将花费很少的时间来部署)。
第4步 (Step 4)
After navigating to the behavior tab, select edit and then you will see some properties of the distribution. You need to change only one setting there. So, scroll down, change the state of property Compress Objects Automatically to Yes and save. (This will take little time to get deployed).
导航到“行为”选项卡后,选择“编辑”,然后您将看到分发的一些属性。 您只需要在那里更改一项设置。 因此,向下滚动,将属性自动压缩对象的状态更改为是,然后保存。 (这将花费很少的时间来部署)。
<?xml version=”1.0" encoding=”UTF-8"?>
<CORSConfiguration xmlns=”http://s3.amazonaws.com/doc/2006-03-01/">
<CORSRule>
 <AllowedOrigin>*</AllowedOrigin>
 <AllowedMethod>GET</AllowedMethod>
 <MaxAgeSeconds>3000</MaxAgeSeconds>
 <AllowedHeader>Authorization</AllowedHeader>
 <AllowedHeader>Content-Length</AllowedHeader>
</CORSRule>
</CORSConfiguration>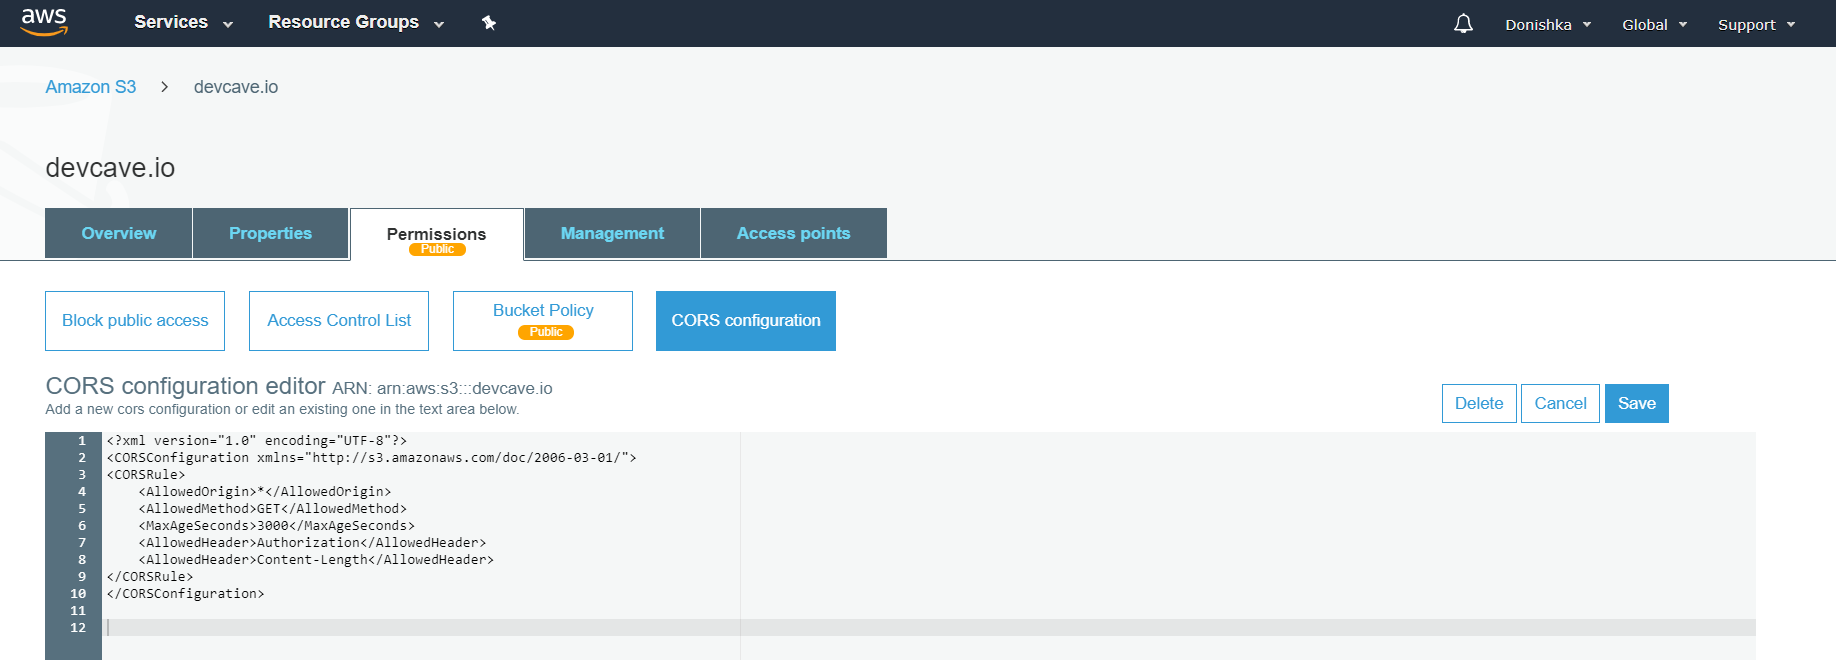
Before proceeding further, check the CloudFront distribution to confirm whether it has been deployed successfully. Once it’s deployed, you can reload your web page and see the request details in the network tab, You will be able to see that download times have been reduced and confirm that GZip has been enabled successfully by checking the Response Header as well.
在继续进行之前,请检查CloudFront分发以确认它是否已成功部署。 部署完成后,您可以重新加载网页并在“网络”选项卡中查看请求的详细信息。您将能够看到下载时间已经减少,并且还可以通过检查响应标题来确认已成功启用GZip。
结论 (Conclusion)
As shown in the comparison, GZip can help you drastically increase your website’s performance and you can easily enable it using AWS CloudFront and AWS S3. So, give it a try with your personal or business websites.
如比较所示,GZip可以帮助您大大提高网站的性能,并且可以使用AWS CloudFront和AWS S3轻松启用它。 因此,请尝试使用您的个人或企业网站。
学到更多 (Learn More)
翻译自: https://blog.bitsrc.io/aws-speed-up-your-static-web-site-using-gzip-and-cdn-383d458b51a3
aws cdn 如何使用


 被折叠的 条评论
为什么被折叠?
被折叠的 条评论
为什么被折叠?
 到【灌水乐园】发言


