


编码器角度控制程序
Angular is all about getting things done quickly. Out-of-the-box features like routing and services make it easy to get up and running with the basic skeleton of your App. Of course, when it comes to the actual content — the HTML, CSS, and TS of your App — you’re on your own. Or are you? In this guide, we’ll explore libraries and features to make it easy to build good looking, maintainable Apps; even if you, like me, suck at design.
Angular就是要快速完成工作。 路由和服务等现成的功能使您可以轻松启动和运行您应用程序的基本框架。 当然,涉及到实际内容(应用程序HTML,CSS和TS)时,您需要靠自己。 还是你 在本指南中,我们将探索库和功能,以简化构建美观,可维护的应用程序的过程; 即使您像我一样精于设计。
Specifically, we’ll look into:
具体来说,我们将研究:
- Angular Material 角材料
- Flex-Layout 弹性布局
- Reactive Forms React形式
- Route Animations 路线动画
角材料 (Angular Material)
Angular Material is a library of beautiful components that follow Google’s Material Design guidelines. Aside from the various buttons, form fields, navigation components, and other styled UI items, it also provides a set of unstyled “behavior primitives” that make it dead simple to build otherwise complex functionality like drag and drop, overlays, and clipboard interactions.
Angular Material是一个漂亮的组件库,它遵循Google的Material Design准则。 除了各种按钮,表单字段,导航组件和其他样式的UI项之外,它还提供了一组无样式的“行为原语”,这使构建其他复杂功能(如拖放,覆盖和剪贴板交互)变得非常简单。
Let’s look at how to install Angular Material, use a component, and specify custom themes, including an automatic dark theme.
让我们看一下如何安装Angular Material,使用组件以及指定自定义主题,包括自动深色主题。
建立 (Setup)
To install the library, run ng add @angular/material inside an Angular project. You’ll be asked a few questions. I recommend choosing the ‘Custom’ theme, then answering ‘Yes’ to the next two questions to enable typography styles and browser animations.
要安装该库,请在Angular项目中运行ng add @angular/material 。 您会被问到几个问题。 我建议选择“自定义”主题,然后对以下两个问题回答“是”,以启用字体样式和浏览器动画。
使用组件 (Using components)
To use any component, you must first add it to the imports array in your app.module.ts file. For example, to use the mat-button:
要使用任何组件,必须首先将其添加到app.module.ts文件中的imports数组中。 例如,使用垫子按钮:
You should then be able to use the component anywhere in the App:
然后,您应该可以在App中的任何位置使用该组件:

Already, we can see the benefit of using this library. The button has a color, drop shadow, click animation, and greyed-out look when disabled — all without having to write a line of CSS!
我们已经看到使用此库的好处。 禁用后,该按钮具有颜色,阴影,单击动画和灰色外观-所有这些都无需编写CSS!
The full list of Angular Material components is available here.
此处提供Angular Material组件的完整列表。
主题化 (Theming)
In the code above, you probably noticed that adding color="primary" to the button made it blue. To keep a consistent look, Angular Material themes use three colors:
在上面的代码中,您可能已经注意到,向按钮添加color="primary"使其变为蓝色。 为了保持一致的外观,Angular Material主题使用三种颜色:
- Primary: The main color of the App. 原色:应用程序的主要颜色。
- Secondary: Complements the primary color and is used to accent some components to keep the App from being dominated by a single color. 次要的:补充主要的颜色,并用于强调某些组件,以防止App被单一颜色所支配。
- Warning: A color, usually red, used for error messages. 警告:通常为红色的颜色,用于显示错误消息。
The App theme is defined in styles.scss or custom-theme.scss, depending on whether or not your App was using SCSS styles before Angular Material was installed.
App主题是在styles.scss或custom-theme.scss ,具体取决于您的App在安装Angular Material之前是否使用SCSS样式。
To define a theme, you first need to define the three colors it will use. Then, create a theme variable using those colors. Finally, use the @include directive that tells the framework to actually use that theme.
要定义主题,您首先需要定义它将使用的三种颜色。 然后,使用这些颜色创建一个主题变量。 最后,使用@include指令,该指令告诉框架实际使用该主题。
The default theme should look something like this (default comments removed, mine added):
默认主题应如下所示(删除默认注释,添加我的注释):
黑暗主题 (Dark theme)
Most OSes have a dark theme feature these days, so it makes sense that any App a person uses should respect the host platform’s dark theme setting.
如今,大多数操作系统都具有深色主题功能,因此人们使用的任何应用程序都应遵守主机平台的深色主题设置,这是有道理的。
Notice that after the Angular theme above is defined, the @include keyword is what actually tells the App to use the theme. This means that we could have any number of themes defined, then dynamically use the @include keyword depending on which theme we want to use at the time.
请注意,在定义了上述Angular主题之后, @include关键字实际上是告诉应用程序使用该主题的内容。 这意味着我们可以定义任意数量的主题,然后根据当时要使用的主题动态使用@include关键字。
Angular Material also has a specific function to use when creating dark themes. This darkens components like the mat-menu.
创建黑暗主题时,Angular Material还具有特定功能。 这会使像菜单一样的组件变暗。
Let’s use these concepts along with the prefers-color-scheme CSS query to implement an automatic dark mode:
让我们将这些概念与prefers-color-scheme CSS查询一起使用,以实现自动暗模式:
Now, the App should switch from an indigo/pink light theme to a purple/green dark theme depending on the user’s device settings!
现在,应用程序应根据用户的设备设置从靛蓝色/粉红色主题切换为紫色/绿色深色主题!
弹性布局 (Flex-Layout)
If you hate having to deal with CSS flexbox or setting media queries to rearrange layouts for different screen sizes, you’ll love the Angular Flex-Layout library.
如果您讨厌不得不处理CSS flexbox或设置媒体查询来针对不同屏幕尺寸重新排列布局,那么您会喜欢Angular Flex-Layout库。
建立 (Setup)
Install Flex-Layout by running npm i @angular/flex-layout @angular/cdk. Then, add it to your imports array in app.module.ts:
通过运行npm i @angular/flex-layout @angular/cdk安装Flex-Layout。 然后,将其添加到app.module.ts的导入数组中:
用法 (Usage)
Using Flex-Layout is very simple. All containers can arrange their children in rows or columns. In either case, all the children can be bunched up at either end of the container, or spaced evenly, or given a percentage of the space on a case by case basis. All these settings can be different depending on if the screen is in one of five size categories.
使用Flex-Layout非常简单。 所有容器都可以将其子级排列成行或列。 在任何一种情况下,所有的孩子都可以在容器的任一端捆扎起来,或者均匀地隔开,或者根据情况分配一定百分比的空间。 所有这些设置可能会有所不同,具体取决于屏幕是否属于五个尺寸类别之一。
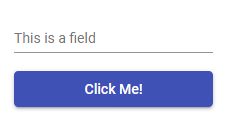
Let’s go through a simple example. Let’s say I have a form field and a button. On large screens, I’d like them to be arranged in a row, but on smaller screens, they should be in a column:
让我们来看一个简单的例子。 假设我有一个表单字段和一个按钮。 在大屏幕上,我希望它们排列成行,但在小屏幕上,它们应该放在一列中:
We’re using the fxLayout attribute to specify that the div should contain rows. Then, we’re using the same attribute with a .lt-sm modifier to specify that it should instead contain columns when the screen is smaller than the threshold for small screens. This is the result:
我们正在使用fxLayout属性指定div应该包含行。 然后,我们将同一属性与.lt-sm修饰符一起使用,以指定当屏幕小于小屏幕的阈值时,它应改为包含列。 结果如下:
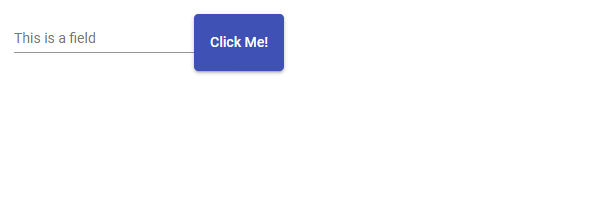
OK, that works, but it looks strange on the larger screen. The button is stretched too tall, and there isn’t enough space between the items. We can use fxLayoutGap and fxLayoutAlign to fix this:
好的,可以,但是在更大的屏幕上看起来很奇怪。 按钮被拉伸得太高,项目之间没有足够的空间。 我们可以使用fxLayoutGap和fxLayoutAlign来解决此问题:
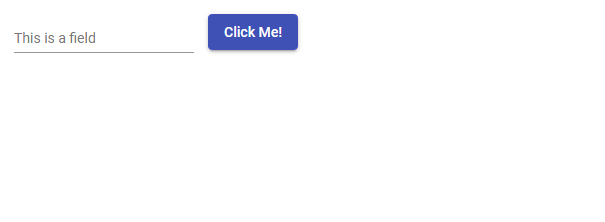
As you can see, we’re now using six flex-layout attributes in the div; three for small screens, and three for all other screens. Aside from looking good on small screens, this is what it now looks like on a large one:
如您所见,我们现在在div中使用六个flex-layout属性。 三个用于小屏幕,三个用于所有其他屏幕。 除了在小屏幕上看起来不错之外,现在在大屏幕上看起来也是如此:
Be sure to look at the detailed documentation to really unlock the power of this system!
请务必查看详细文档以真正释放该系统的功能!
React形式 (Reactive Forms)
Wherever you learned Angular, you were probably taught to use template driven forms with the ngModel directive. The alternative is to use reactive forms. There are a number of differences between the two, but in a nutshell, reactive forms are slightly more difficult to set up but are more flexible and scalable. If your App includes complicated forms, I’d recommend using reactive forms.
无论您在哪里学习Angular,都可能被教导使用ngModel指令使用模板驱动的表单。 替代方法是使用React形式。 两者之间存在许多差异 ,但简而言之,React形式很难设置,但更具灵活性和可扩展性。 如果您的应用程序包含复杂的表格,建议您使用React式表格。
建立 (Setup)
Import the ReactiveFormsModule from @angular/forms and add it to the imports array of app.module.ts, as we’ve done with other modules in previous examples.
从@angular/forms导入ReactiveFormsModule并将其添加到app.module.ts的imports数组中,就像我们在前面的示例中对其他模块所做的那样。
If you’re using Angular Material form fields, also import these and add them to the array:
如果您使用的是Angular Material表单字段,请同时导入这些字段并将其添加到数组中:
用法 (Usage)
Let’s create a simple reactive login form. In the component’s .ts file:
让我们创建一个简单的React式登录表单。 在组件的.ts文件中:
We’ve declared two form controls/inputs in our component and grouped them into a single form called loginForm. Each FormControl can have any number of validators. Although you can write your own custom validator function, we’ve used the built-in required function to make sure neither field can be left empty. We’ve also used the Validators.email function to make sure the user entered an email in the email field.
我们在组件中声明了两个表单控件/输入,并将它们分组为一个名为loginForm表单。 每个FormControl可以具有任意数量的验证器。 尽管您可以编写自己的自定义验证器函数,但我们使用内置的required函数来确保两个字段都不能为空。 我们还使用Validators.email函数来确保用户在电子邮件字段中输入了电子邮件。
Now let’s build the HTML:
现在让我们构建HTML:

As you can see, we use the [formGroup] attribute on the form element to connect the form to the FormGroup we created in the .ts file. Each input element also has a formControlName attribute to connect it to the appropriate FormControl. Note that even though I’m using the Angular Material and Flex-Layout libraries, Reactive Forms don’t depend on them. Also, note that even though we used the validator functions in the FormGroup, we still need to add the required and type="email"/type="password" attributes to the input elements. These are not used for validation but still need to be present for UI reasons, i.e. blocking out password characters and adding the asterisk to required fields.
如您所见,我们使用form元素上的[formGroup]属性将form连接到在.ts文件中创建的FormGroup 。 每个输入元素还具有formControlName属性,以将其连接到适当的FormControl 。 请注意,即使我使用的是Angular Material和Flex-Layout库,但Reactive Forms并不依赖于它们。 另外,请注意,即使我们在FormGroup使用了验证器功能,我们仍然需要向input元素中添加required和type="email" / type="password"属性。 这些不用于验证,但出于UI原因(例如,屏蔽密码字符并将星号添加到必填字段)仍需要显示。
Now, all we need to do is make the form actually submit it’s input when the ‘Submit’ button is clicked. Add the following to the component in its .ts file:
现在,我们需要做的就是在单击“提交”按钮时使表单实际提交其输入。 将以下内容添加到其.ts文件中的组件:
Then, add that function call to an (ngSubmit) attribute on the form element in the HTML as shown:
然后,将该函数调用添加到HTML的form元素上的(ngSubmit)属性中,如下所示:
We’ve told the form to call the submit function whenever the submit button is clicked. The submit button checks the validity of the user’s input, then prints it to the console if the input was valid.
我们告诉表单只要单击“提交”按钮就可以调用“提交”功能。 提交按钮检查用户输入的有效性,如果输入有效,则将其打印到控制台。
Let’s see what happens when I try submitting the form with valid and invalid input.
让我们看看当我尝试使用有效和无效输入提交表单时会发生什么。


As you can see, the input fields turn red when not valid, and the validity of the form is accessible through loginForm.valid at any time for us to check, including when the submit button is clicked. Of course, in the real world, the submit function would connect to some login API rather than just printing to the console.
如您所见,输入字段在无效时变为红色,并且表单的有效性可以随时通过loginForm.valid访问,供我们检查,包括单击提交按钮时。 当然,在现实世界中,submit函数将连接到某些登录API,而不仅仅是打印到控制台。
Reactive forms, especially when combined with Angular Material, have a lot more power than I showed you here. You can show custom error messages, subscribe to value changes, and more. A more in-depth guide is available here.
React形式,尤其是与Angular Material结合使用时,具有比我在这里展示的强大得多的功能。 您可以显示自定义错误消息,订阅值更改等。 此处提供了更深入的指南。
路线动画 (Route Animations)
Route animations are a simple way of adding transitional animations for when the user moves between routes. You can specify specific animations for different route transitions, or re-use the same one for multiple route transitions.
路线动画是在用户在路线之间移动时添加过渡动画的一种简单方法。 您可以为不同的路线过渡指定特定的动画,或者为多个路线过渡重复使用相同的动画。
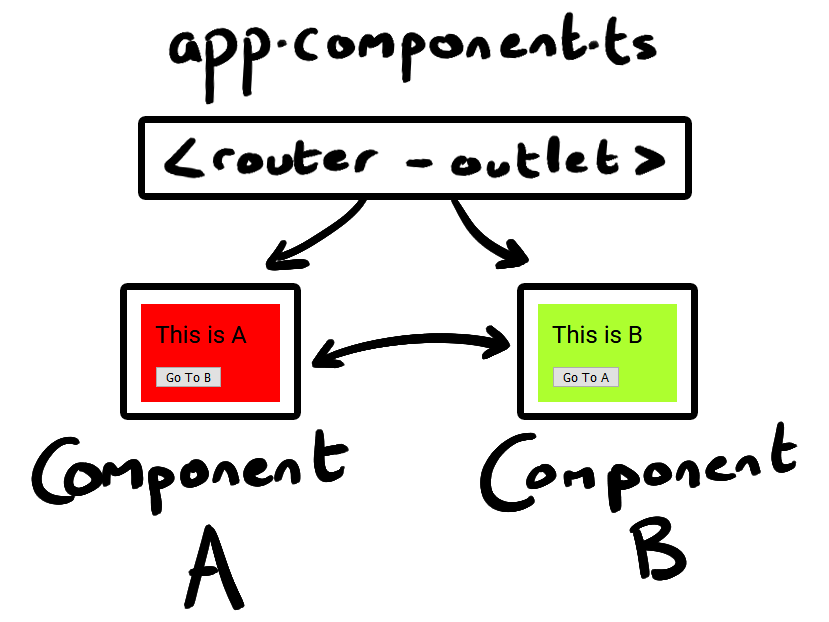
Let’s look at how to set up a simple fade-in animation between two routes. We have an App with two routes, /a and /b, that contain buttons to move between themselves. I’ll assume you’re familiar enough with Angular routing to understand and set up such a demo App.
让我们看一下如何在两条路线之间设置简单的淡入动画。 我们有一个带有两个路由/a和/b的应用程序,其中包含在它们之间移动的按钮。 我假设您对Angular路由非常熟悉,可以理解和设置这样的演示应用程序。
First, make sure that the BrowserAnimationsModule is in the imports array in app.module.ts. If it isn’t, import it from @angular/platform-browser/animations.
首先,确保BrowserAnimationsModule在app.module.ts的imports数组中。 如果不是,请从@angular/platform-browser/animations导入。
Next, we need to add an extra piece of data to each route to identify it for animations later:
接下来,我们需要向每条路线添加一条额外的数据,以便以后为动画标识它:
Next, create a new file called route-animations.ts. This is where we’ll define the actual animations:
接下来,创建一个名为route-animations.ts的新文件。 这是我们定义实际动画的地方:
I won’t go into the details of the animations, but let’s look at a high-level overview. We’re defining a fader variable. Inside it, we’re defining different animations for different route transitions. We’re defining one animation for transitioning from component A to component B (pageA => pageB), and another animation for all other transitions (* <=> *). As you can see, we’re referring to the components by the data strings we added earlier. The animations themselves simply specify a CSS style for the start of the animation, a CSS style for the end of the animation, and the duration and tween for the animation.
我将不介绍动画的详细信息,但让我们看一下高级概述。 我们正在定义一个fader变量。 在其中,我们为不同的路线过渡定义了不同的动画。 我们正在定义一个动画,用于从组件A过渡到组件B( pageA => pageB ),并定义另一个用于所有其他过渡的动画( * <=> * )。 如您所见,我们通过前面添加的数据字符串来引用组件。 动画本身只需为动画的开头指定CSS样式,为动画的结尾指定CSS样式,并为动画指定持续时间和补间 。
OK, we’ve defined the animations and what transitions they should apply to. All that’s left is to actually use them.
好的,我们已经定义了动画及其应应用的过渡。 剩下的就是实际使用它们了。
Import the following into app.component.ts:
将以下内容导入app.component.ts :
In the same file, add a new ‘animations’ item under the @component directive:
在同一文件中,在@component指令下添加一个新的“动画”项:
Then add the following function into the App component:
然后将以下功能添加到App组件中:
Finally, wrap the router-outlet in a div in the app.component.html:
最后,将router-outlet包装在app.component.html中的div中:
That’s it! The animations should work now.
而已! 动画应该可以正常工作了。
This has been a quick look at router animations, but it was more focused on getting things done rather than explaining how it all works under the hood. For a more detailed explanation, check out the official guide.
这是对路由器动画的快速浏览,但它更着重于完成工作,而不是解释其全部工作原理。 有关更详细的说明,请查看官方指南 。
结论 (Conclusion)
I hope this guide helped you take your Angular Apps to the next level. Thanks for reading!
我希望本指南能帮助您将Angular Apps提升到一个新的水平。 谢谢阅读!
翻译自: https://medium.com/better-programming/take-your-angular-apps-to-the-next-level-ee75b9655df4
编码器角度控制程序


 被折叠的 条评论
为什么被折叠?
被折叠的 条评论
为什么被折叠?
 到【灌水乐园】发言


