


tdd 使用详解
In this article, we will build a simple REST API using the Adonisjs framework, including test-driven development and migration practice. As Adonisjs is a Nodejs MVC framework, so, we need to have Nodejs installed.
在本文中,我们将使用Adonisjs框架构建一个简单的REST API,包括测试驱动的开发和迁移实践。 由于Adonisjs是Nodejs MVC框架,因此,我们需要安装Nodejs。
入门 (Getting started)
First, we need to create a product’s model representation for us to use during this section. So, let’s represent it:
首先,我们需要创建一个产品的模型表示形式,供我们在本节中使用。 因此,让我们来代表它:
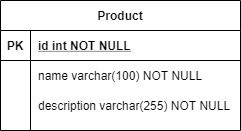
Now that we know what the product’s model looks like we can proceed.
现在我们知道了产品的型号,现在可以继续进行。
安装Adonis (Install Adonis)
We will install Adonis CLI with the command below (you can find more installation options here).
我们将使用下面的命令安装Adonis CLI(您可以在此处找到更多安装选项)。
npm i -g @adonisjs/cli创建一个新的应用程序 (Create a new application)
adonis new product-api --api-onlyAfter the project is created, we can move into our new application directory by executing the commandcd product-api . After that, start the server with adonis serve --dev.
创建项目后,可以通过执行命令cd product-api进入新的应用程序目录。 之后,使用adonis serve --dev启动服务器。
Now, we will install the built-in Adonis testing package by running the following command:
现在,我们将通过运行以下命令来安装内置的Adonis测试软件包:
adonis install @adonisjs/vowOnce Adonis Vow is installed, it will add a vowfile.js to the project root. In this file, remove comments from the following lines of code:
安装Adonis Vow后,它将在项目根目录中添加一个vowfile.js 。 在此文件中,从以下代码行中删除注释:
const ace = require("@adonisjs/ace");await ace.call("migration:run", {}, { silent: true });await ace.call("migration:reset", {}, { silent: true });The line of code for which we removed the comments tells the test runner to run migrations before run tests and resets them after all tests have been completed. Now, we can run adonis test commands to see the result of the first test (which is created automatically).
我们删除了注释的代码行告诉测试运行器在运行测试之前运行迁移,并在所有测试完成后将其重置。 现在,我们可以运行adonis test命令来查看第一个测试(自动创建)的结果。
Now, we will register our VowProvider by adding the script below to start/app.js file into an array calledaceProviders. Now, the aceProviders array into app.js will look like this:
现在,我们将通过将以下脚本添加到start/app.js文件中的aceProviders数组中来aceProviders 。 现在, app.js的aceProviders数组将如下所示:
const aceProviders = ["@adonisjs/lucid/providers/MigrationsProvider","@adonisjs/vow/providers/VowProvider",];Let’s install SQLite3 by running the command npm i sqlite3 for our database connection to run tests.
让我们通过运行命令npm i sqlite3来安装SQLite3 ,以便我们的数据库连接运行测试。
创建迁移 (Creating Migration)
On the terminal, run the command below and choose create table option:
在终端上,运行以下命令,然后选择“ create table选项:
adonis make:migration productsOnce the command above is executed successfully, it will add the product migration file to database/migrations. Now, let’s edit our migration as it is required:
成功执行以上命令后,它将把产品迁移文件添加到database/migrations 。 现在,让我们根据需要编辑迁移:
"use strict";


/** @type {import('@adonisjs/lucid/src/Schema')} */
const Schema = use("Schema");


class ProductsSchema extends Schema {
	up() {
		this.create("products", (table) => {
			table.increments();
			table.string("name", 100).notNullable();
			table.string("description", 255).notNullable();
			table.timestamps();
		});
	}


	down() {
		this.drop("products");
	}
}


module.exports = ProductsSchema;
Once the migration file is created, let’s run it with the following command:
创建迁移文件后,让我们使用以下命令运行它:
adonis migration:runOnce our migration is successful, let’s create a model that will represent our product table by running the following command:
迁移成功后,让我们通过运行以下命令来创建一个代表产品表的模型:
adonis make:model ProductNow, we are ready to create our test cases.
现在,我们准备创建测试用例。
创建测试 (Creating Test)
Now we will create a test case to test our logic for store product info. For that, we will execute adonis make:test Product and we will choose the Functional test option. After the product.spec.js file is created (which is our product test file) we will edit the factory.js file to create dummy data that we will use in our test case. Now let’s edit it as shown below:
现在,我们将创建一个测试用例,以测试用于存储产品信息的逻辑。 为此,我们将执行adonis make:test Product然后选择“ Functional test选项。 创建product.spec.js文件(这是我们的产品测试文件)之后,我们将编辑factory.js文件以创建将在测试用例中使用的伪数据。 现在,如下所示进行编辑:
"use strict";


/*
|--------------------------------------------------------------------------
| Factory
|--------------------------------------------------------------------------
|
| Factories are used to define blueprints for database tables or Lucid
| models. Later you can use these blueprints to seed your database
| with dummy data.
|
*/


/** @type {import('@adonisjs/lucid/src/Factory')} */
const Factory = use("Factory");


Factory.blueprint("App/Models/Product", (faker, i, data = {}) => {
	return {
		name: faker.string({ length: 80 }),
		description: faker.string({ length: 200 }),
		...data,
	};
});
Next, let’s proceed with our test implementation into theproduct.spec.js to test the logic that will store product info into the database. The test script will look like this:
接下来,让我们在product.spec.js进行测试实现,以测试将产品信息存储到数据库中的逻辑。 测试脚本如下所示:
"use strict";
/** @type {typeof import('@adonisjs/lucid/src/Lucid/Model')} */
/** @type {import('@adonisjs/lucid/src/Factory')} */
const Factory = use("Factory");
const { test, trait } = use("Test/Suite")("Product");trait("Test/ApiClient");
trait("DatabaseTransactions");test("it should store product info into database", async ({
 assert,
 client,
}) => {
 let product = await Factory.model("App/Models/Product").create(); product = product.toJSON(); const result = await client.post("/product").send(product).end(); result.assertStatus(201); assert.isDefined(result.body.id);
 assert.isDefined(result.body.name);
 assert.isDefined(result.body.description);
}).timeout(0);
Now, if we run adonis test functional the test will fail. Let’s see the result:
现在,如果我们运行adonis test functional ,测试将失败。 让我们看一下结果:
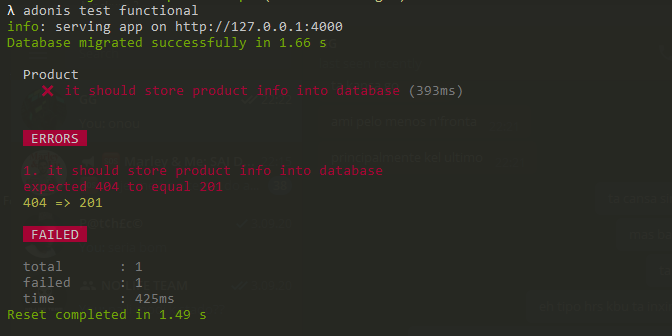
The test fails with 404 status code because we didn’t register the/product endpoint to our routes.js file for the HTTP POST request. But — before we register the route — let’s create the controller with the method for storing the product’s info.
测试失败并显示404状态代码,因为我们没有为HTTP POST请求将/product端点注册到我们的routes.js文件中。 但是-在注册路线之前-让我们使用存储产品信息的方法创建控制器。
创建控制器 (Creating Controller)
adonis make:controller Product --type httpExecuting the command above the ProductController.js will be added to theapp/Controllers/Http folder. Now, we will register the route for the HTTP POST request into the routes.js file by copying and pasting the script below:
在ProductController.js上方执行命令将被添加到app/Controllers/Http文件夹中。 现在,我们将通过复制并粘贴以下脚本,将HTTP POST请求的路由注册到routes.js文件中:
Route.post("/product", "ProductController.store");Now, it’s apparent that the ProductController.store action is bound to the /product endpoint. So, the store method into theProductController.js looks like this:
现在,很明显, ProductController.store操作已绑定到/product端点。 因此, ProductController.js的store方法如下所示:
"use strict";/** @type {typeof import('@adonisjs/lucid/src/Lucid/Model')} */
const Product = use("App/Models/Product");class ProductController {
 async store({ request, response }) {
  const requestData = request.only(["name", "description"]);
  try {
   const result = await Product.create(requestData);   response.status(201).json(result);
  } catch (e) {
   response.status(500);
  }
 }
}module.exports = ProductController;
Now, if we run adonis test functional again it will pass. Let’s see the result below:
现在,如果我们再次运行adonis test functional ,它将通过。 让我们看下面的结果:
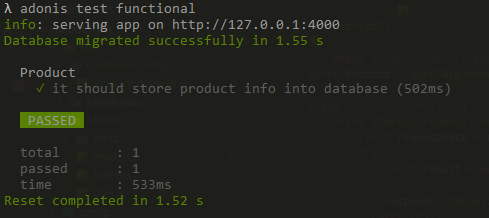
Let’s describe our test result. When we run adonis test functional :
让我们描述一下测试结果。 当我们运行adonis test functional :
First: The server is started on localhost with port 4000;
首先:服务器在本地主机上以端口4000启动;
Second: The migration file is run;
第二:运行迁移文件;
Third: The test is executed and its result is shown;
第三:执行测试并显示其结果;
Fourth: The database migration is reset.
第四:重置数据库迁移。
Now that we have completed this step by step walkthrough of small parts of our API, we can carry out the following:
现在,我们已逐步完成了API的小部分逐步介绍,我们可以执行以下操作:
— On product.spec.js we have to create tests cases for all use case;
—在product.spec.js我们必须为所有用例创建测试用例;
— On routes.js we have to register endpoint for the HTTP GET, PUT and DELETE request;
—在routes.js我们必须为HTTP GET,PUT和DELETE请求注册端点;
— On ProductController.js we have to create a method to list, edit, and delete product info from the database.
—在ProductController.js我们必须创建一种方法来从数据库中列出,编辑和删除产品信息。
First, we will create a test for all use cases. In the end, our test file will look like this:
首先,我们将为所有用例创建一个测试。 最后,我们的测试文件将如下所示:
"use strict";
/** @type {typeof import('@adonisjs/lucid/src/Lucid/Model')} */
/** @type {import('@adonisjs/lucid/src/Factory')} */
const Factory = use("Factory");
const { test, trait } = use("Test/Suite")("Product");


trait("Test/ApiClient");
trait("DatabaseTransactions");


test("it should store product info into database", async ({
	assert,
	client,
}) => {
	let product = await Factory.model("App/Models/Product").create();


	product = product.toJSON();


	const response = await client.post("/product").send(product).end();


	response.assertStatus(201);


	assert.isDefined(response.body.id);
	assert.isDefined(response.body.name);
	assert.isDefined(response.body.description);
}).timeout(0);


test("it should not store product info into the database if name is empty", async ({
	assert,
	client,
}) => {
	let product = await Factory.model("App/Models/Product").create({
		name: "",
	});


	product = product.toJSON();


	const response = await client.post("/product").send(product).end();


	response.assertStatus(400);
}).timeout(0);


test("it should not store product info into the database if description is empty", async ({
	assert,
	client,
}) => {
	let product = await Factory.model("App/Models/Product").create({
		description: "",
	});


	product = product.toJSON();


	const response = await client.post("/product").send(product).end();


	response.assertStatus(400);
}).timeout(0);


test("it should return all stored products", async ({ assert, client }) => {
	const response = await client.get("/product").end();


	response.assertStatus(200);
	assert.isArray(response.body);
}).timeout(0);


test("it should return one product if giving id is valid", async ({
	assert,
	client,
}) => {
	let product = await Factory.model("App/Models/Product").create();
	product = product.toJSON();


	const response = await client.get(`/product/${product.id}`).end();


	response.assertStatus(200);
	response.assertJSONSubset({
		id: product.id,
		name: product.name,
		description: product.description,
	});
}).timeout(0);


test("it should not return the product if giving id is invalid", async ({
	assert,
	client,
}) => {
	const response = await client.get(`/product/123456789`).end();


	response.assertStatus(204);
}).timeout(0);


test("it should update product info if product exist", async ({
	assert,
	client,
}) => {
	let product = await Factory.model("App/Models/Product").create();
	product = product.toJSON();


	const response = await client
		.put(`/product/${product.id}`)
		.send({
			name: "Monitor PHILIPS",
			description: "Monitor PHILIPS (27'' - Full HD - LED IPS)",
		})
		.end();


	response.assertStatus(200);


	assert.isDefined(response.body.id);
	assert.isDefined(response.body.name);
	assert.isDefined(response.body.description);


	assert.equal(response.body.name, "Monitor PHILIPS");
	assert.equal(
		response.body.description,
		"Monitor PHILIPS (27'' - Full HD - LED IPS)"
	);
}).timeout(0);


test("it should not update product info if product does not exist", async ({
	assert,
	client,
}) => {
	const response = await client
		.put(`/product/123456789`)
		.send({
			name: "Monitor PHILIPS",
			description: "Monitor PHILIPS (27'' - Full HD - LED IPS)",
		})
		.end();


	response.assertStatus(204);
}).timeout(0);


test("it should delete the product if giving id is valid", async ({
	assert,
	client,
}) => {
	let product = await Factory.model("App/Models/Product").create();
	product = product.toJSON();


	const response = await client.delete(`/product/${product.id}`).end();


	response.assertStatus(200);
});


test("it should not delete the product if giving id is invalid", async ({
	assert,
	client,
}) => {
	const response = await client.delete(`/product/123456789`).end();


	response.assertStatus(204);
});
Now that we have done all the test script for our use case, let’s run the test and show its result below:
现在我们已经完成了用例的所有测试脚本,让我们运行测试并在下面显示其结果:
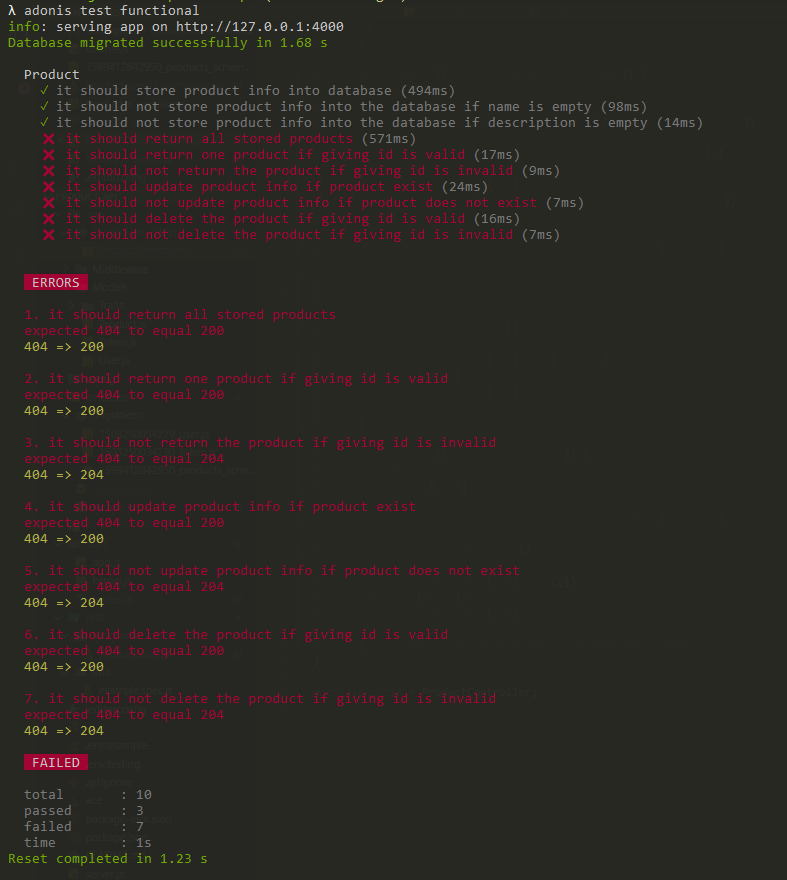
Did you see? Only the test to store product info passed. The other test fails with 404 status code. It’s alright because we didn’t register the endpoint for those tests yet, and the method for that logic is not created yet. So, for now, let’s register all required endpoints into our routes.js file. In the end, it will look like this:
你看到吗? 仅存储产品信息的测试通过了。 另一个测试失败,并显示404状态代码。 没关系,因为我们尚未为这些测试注册端点,并且尚未创建该逻辑的方法。 因此,现在,让我们将所有必需的端点注册到我们的routes.js文件中。 最后,它将如下所示:
"use strict";


/*
|--------------------------------------------------------------------------
| Routes
|--------------------------------------------------------------------------
|
| Http routes are entry points to your web application. You can create
| routes for different URLs and bind Controller actions to them.
|
| A complete guide on routing is available here.
| http://adonisjs.com/docs/4.1/routing
|
*/


/** @type {typeof import('@adonisjs/framework/src/Route/Manager')} */
const Route = use("Route");


Route.post("/product", "ProductController.store");
Route.get("/product", "ProductController.index");
Route.get("/product/:id", "ProductController.show");
Route.put("/product/:id", "ProductController.update");
Route.delete("/product/:id", "ProductController.delete");
Now, it’s time to create our logic for each endpoint inside our ProductController.js file, which will look like this:
现在,是时候为我们的ProductController.js文件中的每个端点创建逻辑了,它看起来像这样:
"use strict";


/** @type {typeof import('@adonisjs/lucid/src/Lucid/Model')} */
const Product = use("App/Models/Product");


class ProductController {
	async store({ request, response }) {
		try {
			const requestBody = request.only(["name", "description"]);


			if (!requestBody.name || !requestBody.description) {
				return response
					.status(400)
					.json({ message: "There are missing params" });
			}


			const result = await Product.create(requestBody);


			response.status(201).json(result);
		} catch (error) {
			response.status(500);
		}
	}


	async index({ response }) {
		try {
			const products = await Product.all();
			response.status(200).json(products);
		} catch (error) {
			response.status(500);
		}
	}


	async show({ params, response }) {
		try {
			const { id } = params;
			const product = await Product.find(id);
			response.status(200).json(product);
		} catch (error) {
			response.status(500);
		}
	}


	async update({ params, request, response }) {
		try {
			const { id } = params;
			const requestBody = request.only(["name", "description"]);


			if (!requestBody.name || !requestBody.description) {
				return response
					.status(400)
					.json({ message: "There are missing params" });
			}


			const product = await Product.findByOrFail("id", id);


			product.name = requestBody.name;
			product.description = requestBody.description;


			await product.save();


			response.status(200).json(product);
		} catch (error) {
			response.status(500);
		}
	}


	async delete({ params, response }) {
		try {
			const { id } = params;


			const product = await Product.findByOrFail("id", id);


			await product.delete();


			response.status(200).json({});
		} catch (error) {
			response.status(500);
		}
	}
}


module.exports = ProductController;
Next, now that we are done with it, let's test our API and see if everything goes as expected:
接下来,既然我们已经完成它,让我们测试我们的API,看看一切是否按预期进行:
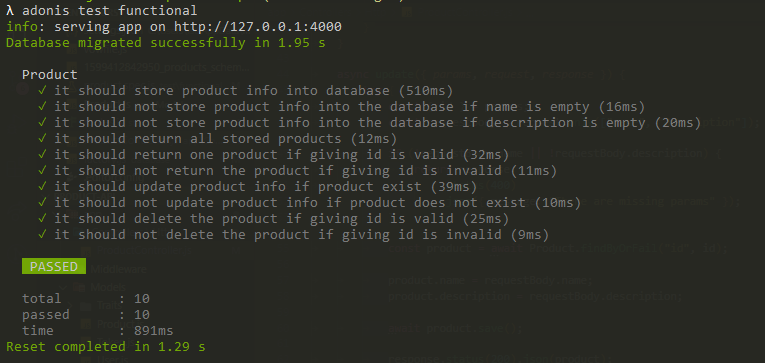
Great!! We have done it and all the test cases passed. Get the full code on my Github. Now, I have to thank you for reading my article and hope that it helps you in your learning! If you enjoy it, I would like to hear from you in the comments section.
大!! 我们已经做到了,所有测试用例都通过了。 在我的Github上获取完整的代码。 现在,我要感谢您阅读我的文章,并希望它对您的学习有所帮助! 如果您喜欢它,我想在评论部分收到您的来信。
翻译自: https://codeburst.io/build-rest-api-with-adonisjs-based-on-tdd-and-migration-management-e3f21469f763
tdd 使用详解


 1875
1875

 被折叠的 条评论
为什么被折叠?
被折叠的 条评论
为什么被折叠?
 到【灌水乐园】发言


