


As a developer, It’s very often we would have used Github accounts to login to a web application. The process would have been so simple. This blog will explain to you how to implement Github authentication with Node and Express JS. To implement this, we will be using a third-party library called Passport JS. Passport JS is authentication middleware for Node and Express JS. Passport JS can be used with any Express JS applications. Passport JS provides 500 + strategies.
作为开发人员,通常我们会使用Github帐户登录Web应用程序。 这个过程是如此简单。 该博客将向您介绍如何使用Node和Express JS实施Github身份验证。 为了实现这一点,我们将使用一个名为Passport JS的第三方库。 Passport JS是Node和Express JS的身份验证中间件。 Passport JS可以与任何Express JS应用程序一起使用。 Passport JS提供500多种策略。
Initializing a Node JS Project
初始化Node JS项目
Initially let’s create a new Node js Project. The below commands create a new folder and then initializes the node to our project.
首先,让我们创建一个新的Node js项目。 以下命令创建一个新文件夹,然后将节点初始化为我们的项目。
mkdir github_passport
cd github_passport/
npm init -y
touch index.js
Now install the required packages.
现在安装所需的软件包。
npm install express cookie-session passport passport-github2 --saveAfter installing, copy the below code to your index.js file.
安装后,将以下代码复制到index.js文件中。
index.js
index.js
const express = require('express')
const app = express()app.get('/',(req,res)=>{
  res.send('Hello world')
})app.listen(8000,()=>{
  console.log('Serve is up and running at the port 8000')
})
Now start the server using node index.js. Then navigate to http://localhost:8000/. You should see Hello world getting displayed in the browser.
现在,使用node index.js启动服务器。 然后导航到http:// localhost:8000 / 。 您应该看到Hello world在浏览器中显示。
2. Creating an OAuth Client ID
2.创建OAuth客户端ID
Before using the passport’s Github Authentication strategy, you should have registered your app or web application with Github. To do that, follow the steps below.
在使用护照的Github身份验证策略之前,您应该已经在Github中注册了您的应用程序或Web应用程序。 为此,请按照以下步骤操作。
Navigate to the below link.
浏览至以下链接。
The link navigates you to Github and then displays a form. After filling the form, hit the register application button which will redirect you to the page where we can get the Client ID and Secret.
该链接将您导航到Github,然后显示一个表单。 填写表格后,点击“注册申请”按钮,该按钮会将您重定向到我们可以获取“客户ID”和“秘密”的页面。
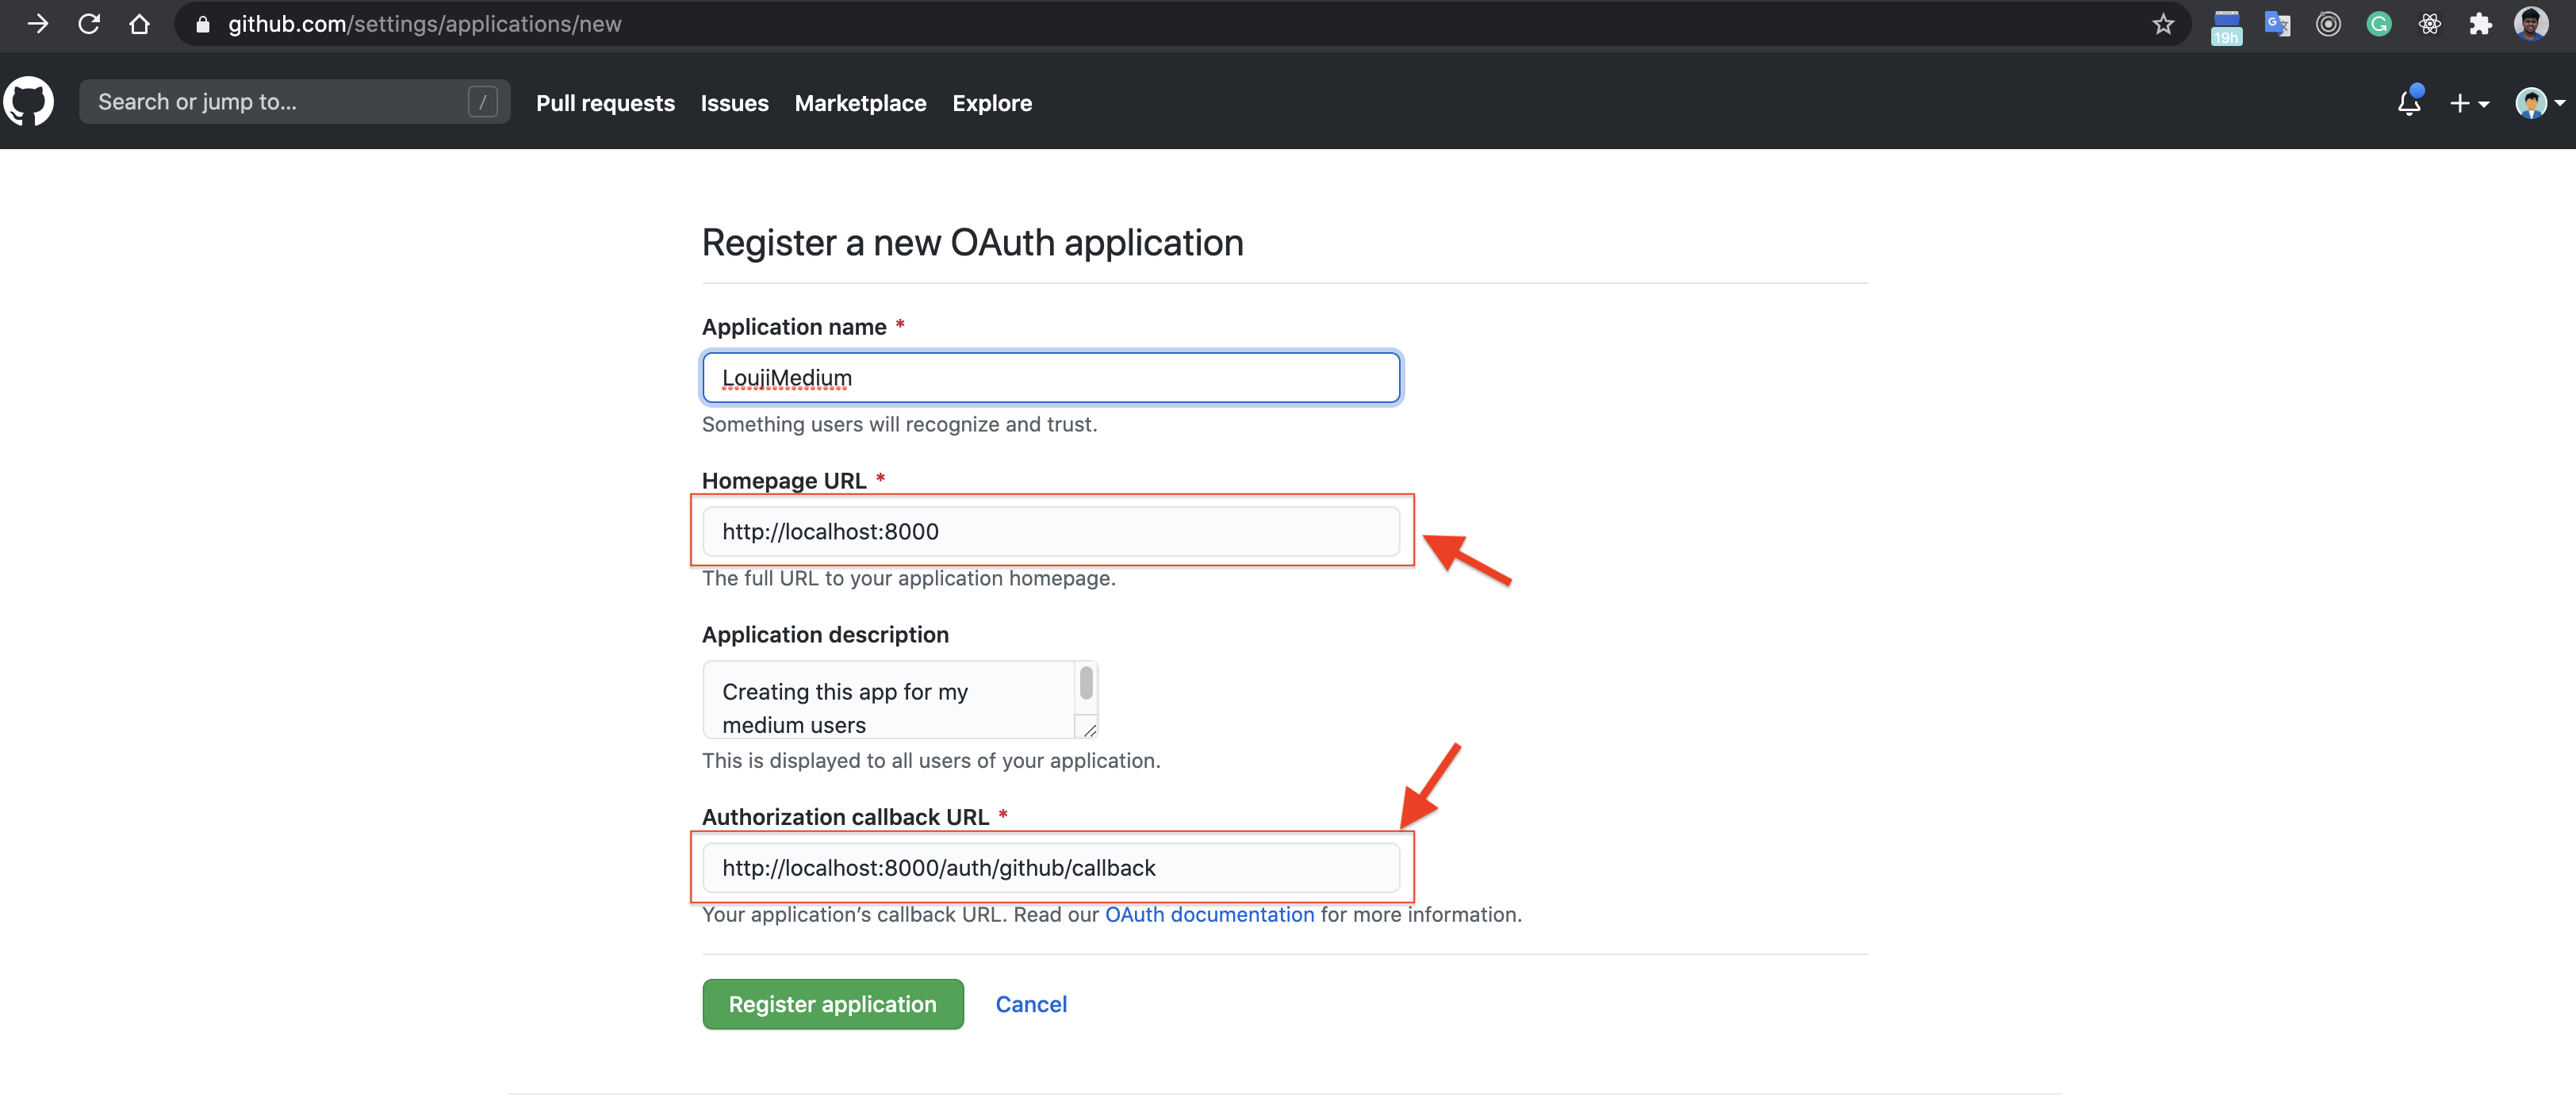
Make a note of the Client ID and the Client Secret.
记下客户端ID和客户端密钥。

3. Configuring Github OAuth
3.配置Github OAuth
Now let’s start integrating Github Authentication with our project. To do that I am creating a new file named passport.js which holds the credentials that we created from the Github’s OAuth page.
现在,让我们开始将Github身份验证与我们的项目集成在一起。 为此,我要创建一个名为passport.js的新文件,其中包含我们从Github的OAuth页面创建的凭据。
passport.js
passport.js
const passport = require('passport');
const GitHubStrategy = require('passport-github2').Strategy;passport.serializeUser(function(user, done) {
  done(null, user);
});passport.deserializeUser(function(user, done) {
  done(null, user);
});passport.use(new GitHubStrategy({
  clientID: "f0*************c6",
  clientSecret: "41**********************************bf",
  callbackURL: "http://localhost:8000/auth/github/callback"
},
function(accessToken, refreshToken, profile, done) {
  return done(null, profile);
}
));
Copy and paste the below code to your index.js file.
将以下代码复制并粘贴到index.js文件中。
The route /auth/github redirects the client to the Github Login Page.
路由/auth/github将客户端重定向到Github登录页面。
The route /auth/github/callback will act as a callback URL which will be called if Github Authentication is Successful.
路由/auth/github/callback将用作回调URL,如果Github身份验证成功,则将调用该URL。
The route /ath/error will be called if any error has occurred during Github Authentication.
如果在Github身份验证期间发生任何错误,则将调用/ath/error路由。
index.js
index.js
const express = require('express')
const app = express()
const cookieSession = require('cookie-session')
const passport = require('passport');
require('./passport')app.use(cookieSession({
  name: 'github-auth-session',
  keys: ['key1', 'key2']
}))
app.use(passport.initialize());
app.use(passport.session());app.get('/',(req,res)=>{
res.send(`Hello world ${req.user.displayName}`)
})app.get('/auth/error', (req, res) => res.send('Unknown Error'))app.get('/auth/github',passport.authenticate('github',{ scope: [ 'user:email' ] }));app.get('/auth/github/callback',passport.authenticate('github', { failureRedirect: '/auth/error' }),
function(req, res) {
  res.redirect('/');
});app.listen(8000,()=>{
console.log('Serve is up and running at the port 8000')
})
Now navigate to http://localhost:8000/auth/github. You will be redirected to Github’s Login page. On logging in to your Github account, you will be redirected back to our webpage and you will see your Github User name getting displayed on our webpage.
现在导航到http:// localhost:8000 / auth / github 。 您将被重定向到Github的登录页面。 登录到Github帐户后,您将被重定向回我们的网页,并且您会看到您的Github用户名显示在我们的网页上。
4. Protecting Route and adding a logout view
4.保护路由并添加注销视图
Now let’s add middleware to find if the user has logged in or not. To do that, I am creating a file named auth.js in the Middleware folder.
现在,让我们添加中间件来查找用户是否已登录。 为此,我在Middleware文件夹中创建了一个名为auth.js的文件。
Middleware/auth.js
Middleware/auth.js
const isLoggedIn = (req, res, next) => {
  if (req.user) {
    next();
  } else {
    res.status(401).send('Not Logged In');
  }
}module.exports = isLoggedIn
Once done, pass the middleware to the route /. Now navigate to the URL http://localhost:8000/. Automatically you will be redirected to the /auth/github route.
完成后,将中间件传递给路由/ 。 现在导航到URL http://localhost:8000/ . 自动将您重定向到/auth/github路由。
Now let’s create a function for logout. Just by calling the function req.logout() you can logout from the Github Account.
现在让我们创建一个注销功能。 只需调用函数req.logout()即可从Github帐户注销。
index.js
index.js
const isLoggedIn = require('./Middleware/auth')app.get('/',isLoggedIn,(req,res)=>{
  res.send(`Hello world ${req.user.displayName}`)
})app.get('/logout', (req, res) => {
  req.session = null;
  req.logout();
  res.redirect('/');
})
Navigate to http://localhost:8000/logout. You will be logged out.
导航到http:// localhost:8000 / logout 。 您将被注销。
Feel free to contact me for any queries.
如有任何疑问,请随时与我联系。
Email: sjlouji10@gmail.com
电子邮件:sjlouji10@gmail.com
Linkedin: https://www.linkedin.com/in/sjlouji/
Linkedin: https : //www.linkedin.com/in/sjlouji/
Complete code on my GitHub:
我的GitHub上的完整代码:
Happy Coding …
快乐编码...
翻译自: https://medium.com/swlh/node-and-passport-js-github-authentication-e33dbd0558c


 2352
2352

 被折叠的 条评论
为什么被折叠?
被折叠的 条评论
为什么被折叠?
 到【灌水乐园】发言


