


以太坊 erc20
Editor Note: This article is for informational and entertainment purposes only and is not intended as financial advice.
编者注:本文仅用于提供信息和娱乐目的,不作为财务建议。
Hi there! It’s been a while now since I wanted to create some projects around blockchain, and I have lately been playing around with Ethereum and how to develop smart contracts using the Solidity programming language. Today I want to share with you what was my first project, the creation, and deployment of an ERC20 token.
嗨,您好! 自从我想围绕区块链创建一些项目以来已经有一段时间了,最近我一直在研究以太坊以及如何使用Solidity编程语言开发智能合约。 今天,我想与您分享我的第一个项目,即ERC20令牌的创建和部署。
In this article, we will provide the code for a simple cryptocurrency as well as all the steps that are necessary to get your token up and running on the Ethereum network. For those interested in a more visual experience, I recorded a full session explaining all the contents of this article and doing the programming and deployment live. You can watch the view here:
在本文中,我们将提供一种简单的加密货币的代码以及在以太坊网络上启动和运行令牌所需的所有步骤。 对于那些对更直观的体验感兴趣的人,我录制了一个完整的会话,解释了本文的所有内容,并实时进行了编程和部署。 您可以在此处观看视图:
Let’s get started!
让我们开始吧!
要求 (Requirements)
There are a few things that we need to prepare in advance before creating our token and are described below.
在创建令牌之前,我们需要提前准备一些事情,下面将对其进行介绍。
选择您的以太坊网络 (Select your Ethereum network)
You probably know Ethereum and its network, however, did you know that there are multiple instances of Ethereum running? Most people are familiar with the main Ethereum network, where all the transactions are running, and where all exchanges operate (or at least should). But there’s more to it, there are alternative networks running the same code as the main instance for example for testing purposes. An example of this is the “Ropsten Test Network” which we will be using today to deploy our code.
您可能知道以太坊及其网络,但是,您是否知道有多个以太坊实例在运行? 大多数人都熟悉以太坊主网络,那里所有交易都在运行,所有交易所都在(或者至少应该)运行。 除此之外,还有其他网络与主要实例运行相同的代码,例如用于测试。 一个例子就是“ Ropsten测试网络”,我们今天将使用它来部署我们的代码。
One of the benefits of using a test network is that, not only we can submit any code we want and test it out, but also we can do it free of charge. Every time a new token is created, it is necessary to register a transaction on the Ethereum network it is running. And this transaction will come with a GAS fee which we will need to pay with Ethereum from the network.
使用测试网络的好处之一是,我们不仅可以提交所需的任何代码并对其进行测试,而且还可以免费进行。 每次创建新令牌时,有必要在正在运行的以太坊网络上注册交易。 这项交易将附带GAS费用,我们需要通过网络与以太坊支付。
If we are on the main network of Ethereum, we would have to use actual money, like EUR or USD, to buy Ethereum first, and then create our token. Not very convenient to just try it out. However, the beauty of the test network is that we can get free Ethereum using applications called faucets. Now, this is just fake ETH, so we can’t sell them to anyone or anything, but it’s good enough to deploy our test tokens.
如果我们在以太坊的主要网络上,我们将不得不使用实际货币(例如欧元或美元)先购买以太坊,然后创建我们的代币。 尝试一下不是很方便。 但是,测试网络的优点在于,我们可以使用名为faucets的应用程序免费获得以太坊。 现在,这只是虚假的ETH,因此我们不能将其出售给任何人或任何东西,但是足以部署我们的测试令牌。
钱包和账户 (Wallet & Account)
Now that we know which network we want to use to build and deploy our token, we need to create a wallet and an account into that network. I strongly recommend that you use MetaMask for this task.
现在我们知道我们要使用哪个网络来构建和部署令牌,我们需要在该网络中创建一个钱包和一个帐户。 我强烈建议您将MetaMask用于此任务。
MetaMask is an extension that runs as an extension on your browser and allows you to create accounts in multiple networks and it has integrations with the deployment interfaces we are going to be using today, making the job much easier than with any other method. So download MetaMask and set it up on your browser creating an account on the Ropsten Test Network. This process is super easy and guided, so I won’t get into many details.
MetaMask是一个扩展程序,可以在您的浏览器上运行,并允许您在多个网络中创建帐户,并且与我们今天将要使用的部署界面集成在一起,这使工作比其他任何方法都容易得多。 因此,请下载MetaMask并在浏览器中进行设置,以在Ropsten测试网络上创建一个帐户。 此过程非常简单且易于指导,因此我不会涉及很多细节。
Next, you will need some fake ETH in your account. For that, you need to run an application called “faucet.” You can use a faucet from MetaMask itself, it’s super easy and it will connect your account automatically and will send you one ETH.
接下来,您的帐户中将需要一些虚假的ETH。 为此,您需要运行一个名为“水龙头”的应用程序。 您可以使用MetaMask本身的水龙头,它非常简单,它将自动连接您的帐户并向您发送一个ETH。
Alternatively, you can simply google “Ethereum Faucet” and select one of the hundreds out there. Normally they will ask you for your account number (public) and with only that information they will transfer you X amount of ETH, normally one, which is more than enough for our purposes.
或者,您可以简单地用Google搜寻“以太坊水龙头”,然后从那里选择数百种水龙头之一。 通常,他们会要求您提供您的帐号(公开),仅凭这些信息,他们就会向您转移X倍的ETH,通常是一个,对于我们的目的而言,这绰绰有余。
代币信息 (Token Information)
Next, we need to think about the cryptocurrency we want to create and what properties it will have. You will need the following information before we actually get started:
接下来,我们需要考虑我们要创建的加密货币及其将具有的属性。 在实际开始之前,您将需要以下信息:
- Token Symbol: This is an identifier for the token, for example, the token for Bitcoin is BTC. You can use from three to five alphanumeric characters for the selection. 令牌符号:这是令牌的标识符,例如,比特币的令牌是BTC。 您可以使用三到五个字母数字字符进行选择。
- Token Name: e.g. Bitcoin or LCS Token 令牌名称:例如比特币或LCS令牌
- Total Supply: How many tokens do we want to be created in total 总供应量:我们希望总共创建多少个代币
- Decimals: How many decimals you can use to break a token, e.g. “0” decimals makes the token binary, either you have a token or you don’t. “2” decimals allows you to fraction a token, being the smaller size 0.01; and you can add up to “18” decimals. 小数:可以使用多少个小数来破坏令牌,例如,“ 0”小数使令牌成为二进制,无论您有令牌还是没有令牌。 “ 2”位小数允许您对令牌进行分数分割,较小的值是0.01; 并且您最多可以添加“ 18”个小数。
- Owner Account: Account in the same network as the token which will receive the tokens upon creation. It can be the same account as the account used to pay for the GAS fee, as we will do in our example below. 所有者帐户:与令牌位于同一网络中的帐户,创建后将接收令牌。 该帐户可以与用于支付GAS费用的帐户相同,就像我们在下面的示例中所做的那样。
码 (Code)
Last but not least, you will need to code which will run our own cryptocurrency. I’ve already prepared for you a sample code that will implement the ERC20 specification and will give you basic cryptocurrency functionality.
最后但并非最不重要的一点是,您将需要运行自己的加密货币的代码。 我已经为您准备了一个示例代码,它将实现ERC20规范并为您提供基本的加密货币功能。
You can download the code here:
您可以在此处下载代码:
更新代码 (Updating the Code)
The first thing you need to do is to update the code, you can either download the file I provided or copy and paste the contents in your favorite text/code editor. Once there you will notice at the beginning of the file something like:
您需要做的第一件事就是更新代码,您可以下载我提供的文件,也可以将内容复制并粘贴到您喜欢的文本/代码编辑器中。 到达该位置后,您会在文件开头注意到以下内容:
pragma solidity ^0.4.24;// ----------------------------------------------------------------------------
// Sample token contract
//
// Symbol        : {{Token Symbol}}
// Name          : {{Token Name}}
// Total supply  : {{Total Supply}}
// Decimals      : {{Decimals}}
// Owner Account : {{Owner Account}}
//
// Enjoy.
//
// (c) by Juan Cruz Martinez 2020. MIT Licence.
// ----------------------------------------------------------------------------
The first line of code is simply required to run any solidity program, but the rest is where it gets interesting. Though it’s actually all commented code, meaning that it has no relevance during execution or compilation, it does contain the variables we discussed we needed before we can actually deploy to the network.
运行任何Solidity程序仅需要第一行代码,而其余的则很有趣。 尽管它实际上是所有注释的代码,这意味着它在执行或编译期间不相关,但是它确实包含我们在实际部署到网络之前讨论过的变量。
What I did to facilitate how to work with the code, is that each of these variables needs to be assigned a value, and once they are all completed, you will have the code ready and this comment section will be a nice description of our token.
我为促进如何使用代码所做的工作是,需要为每个变量分配一个值,一旦它们全部完成,您便已准备好代码,并且此注释部分将很好地描述我们的令牌。
So, how do we go about updating it? For each variable, I assigned a code wrapped in {{ }}. You need to find and replace all occurrences with each one of them. This is very easy to do in any code editor.
那么,我们如何进行更新呢? 对于每个变量,我分配了一个包装在{{ }}的代码。 您需要查找并替换所有出现的事件。 这在任何代码编辑器中都很容易做到。
Let’s start with an example, find and replace all occurrences of {{Token Symbol}} for your token symbol, in my case: LCSTK, no need for quotes here. After replacing it should now look like this:
让我们从一个示例开始,找到并替换所有出现的{{Token Symbol}}作为您的令牌符号,在我的例子中:LCSTK,这里不需要引号。 更换后,它现在应如下所示:
pragma solidity ^0.4.24;// ----------------------------------------------------------------------------
// Sample token contract
//
// Symbol        : LCSTK
// Name          : {{Token Name}}
// Total supply  : {{Total Supply}}
// Decimals      : {{Decimals}}
// Owner Account : {{Owner Account}}
//
// Enjoy.
//
// (c) by Juan Cruz Martinez 2020. MIT Licence.
// ----------------------------------------------------------------------------
And please do the same for the token name.
并且请对令牌名称执行相同的操作。
Next, we need to specify the total supply and the decimals, which go hand in hand. You may be wondering why. Let’s assume an example to explain. Let’s say we want to create a binary token, either I have a token or I don’t, but I can’t have 0.5 of a token, and we also want a total of 1,000 tokens to be created. Then our variables would be replaced as follows:
接下来,我们需要指定总供应量和小数点,两者相辅相成。 您可能想知道为什么。 让我们假设一个例子来解释。 假设我们要创建一个二进制令牌,要么我有一个令牌,要么没有令牌,但是我不能有0.5个令牌,并且我们还希望创建总共1000个令牌。 然后我们的变量将被替换如下:
Total Supply: 1000
Decimals: 0
However if we want to have some decimals, say two, then we would need to modify the total supply, by adding a zero for each decimal at the end of the desired number. Meaning that if we wanted 1,000 to be the total supply, we need to update our code to be 100,000 (1,000 + 00), let’s see how it looks like now:
但是,如果我们想要一些小数,例如两个,那么我们将需要修改总供给量,即在所需数字的末尾为每个小数添加一个零。 这意味着如果我们希望总供应量为1,000,则需要将代码更新为100,000(1,000 + 00),让我们看一下现在的样子:
// ----------------------------------------------------------------------------
// Sample token contract
//
// Symbol        : LCSTK
// Name          : Live Code Stream Token
// Total supply  : 100000
// Decimals      : 2
// Owner Account : {{Owner Account}}
//
// Enjoy.
//
// (c) by Juan Cruz Martinez 2020. MIT Licence.
// ----------------------------------------------------------------------------
Awesome, we are almost there. We now only need to specify the account which will receive all the tokens that get created. Head to MetaMask and copy your account number, and once more, find and replace the variable in all occurrences. At the end your code should look like this:
太好了,我们快到了。 现在,我们只需要指定一个帐户即可接收所有创建的令牌。 转到MetaMask并复制您的帐号,然后再次查找并替换所有出现的变量。 最后,您的代码应如下所示:
// ----------------------------------------------------------------------------
// Sample token contract
//
// Symbol        : LCSTK
// Name          : Live Code Stream Token
// Total supply  : 100000
// Decimals      : 2
// Owner Account : 0x6009f738dcF7194EfddDfc3B13Ce325e21A05175
//
// Enjoy.
//
// (c) by Juan Cruz Martinez 2020. MIT Licence.
// ----------------------------------------------------------------------------
NOTE: It is very important that you use “find and replace all occurrences” or you will have compile errors later in the process. Our file is now ready for deployment, it’s that easy!
注意:使用“查找并替换所有出现的内容”非常重要,否则过程稍后将出现编译错误。 我们的文件现在可以部署了,就这么简单!
部署方式 (Deployment)
The good people from Ethereum provide us with an IDE (integrated development environment) that is fully capable of handling the full process, from editing the files, building, and deploying, among many other things.
以太坊的优秀人才为我们提供了一个IDE(集成开发环境),该IDE完全能够处理整个过程,包括编辑文件,构建和部署等。
This IDE named “Remix” can be accessed easily through the browser. Once there you will see a screen like the following:
可以通过浏览器轻松访问名为“ Remix”的IDE。 到达那里后,您将看到如下屏幕:

The first section we see on the left is our contextual menu, and in the right section, we see the welcome screen. As we are by default on the file explorer the contextual menu shows all the files and folders that are available.
我们在左侧看到的第一部分是上下文菜单,在右侧部分,我们看到了欢迎屏幕。 正如我们默认在文件浏览器中一样,上下文菜单显示所有可用的文件和文件夹。
You will need to create a new file here by clicking on the “+” button near the “browser” folder on the left panel. There are already a few files in there now, but you can ignore them. You can name the file to your likes, it’s not relevant for the process.
您需要在此处通过单击左侧面板上“浏览器”文件夹附近的“ +”按钮来创建一个新文件。 现在已经有一些文件了,但是您可以忽略它们。 您可以按自己的喜好命名文件,该文件与该过程无关。
Once the file is created, simply pass the code that we worked on your text editor. It should look like this:
创建文件后,只需传递我们在文本编辑器上使用的代码即可。 它看起来应该像这样:

Our code is now ready to be compiled. For that, look at the icon bar on the left of the corner. Right now we are on the first icon “File Explorer” but we need to open the second tab “Solidity Compiler”
我们的代码现在可以编译了。 为此,请查看角落左侧的图标栏。 现在,我们在第一个图标“文件资源管理器”上,但是我们需要打开第二个选项卡“ Solidity Compiler”

Once there hit “Compile” and if all is good, you should see some options appearing in the contract drop downfield, one of them being your token contract. (Token Symbol + “Token”)
一旦出现“ Compile”,如果一切顺利,您应该会看到一些选项出现在合约掉落场中,其中之一就是您的代币合约。 (令牌符号+“令牌”)
With everything looking good we just need to deploy the code, head now to the fourth tab on the menu “Deploy & Run Transactions.”
一切看起来都很好,我们只需要部署代码,现在转到菜单“ Deploy&Run Transactions”上的第四个选项卡。
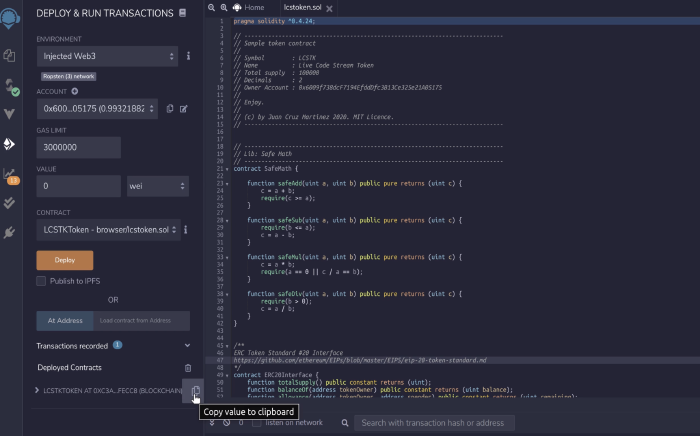
There are here a few things we need to change before we actually hit “Deploy.” The first is, as we are using MetaMask, we need to change the “Environment” from “JavaScript VM” to “Injected Weg3.”
在实际点击“部署”之前,我们需要更改一些内容。 首先是,因为我们正在使用MetaMask,所以我们需要将“环境”从“ JavaScript VM”更改为“ Injected Weg3”。
The moment you do that, MetaMask will prompt you to confirm that you want to connect your MetaMask wallet to Remix, hit confirm. After you do that, your account will automatically populate the “Account” filed below with the account number and your current balance in ether.
当您这样做时,MetaMask将提示您确认您要将MetaMask钱包连接到Remix,然后单击确认。 完成此操作后,您的帐户将自动使用下面的帐号和您当前的余额(以太币)填充下面提交的“帐户”。
Lastly, we need to specify we want to deploy, make sure you select your contract from the “Contract” dropdown field. Your token contract is your token symbol + “Token.” Last, hit “Deploy.”
最后,我们需要指定我们要部署的内容,请确保您从“合同”下拉字段中选择合同。 您的代币合约是您的代币符号+“代币”。 最后,点击“部署”。
The deployment process may take anywhere from a few minutes to up to who knows how many minutes depending on the status of the network at that time. Usually, I found that Ropsten will take two to three minutes, and the maximum wait time I had was ten minutes. After the process is complete you will receive a confirmation on the screen with the information of your deployed contract, including the address where the code got saved.
部署过程可能要花费几分钟到几分钟,直到谁知道多少分钟,这取决于当时的网络状态。 通常,我发现Ropsten将花费两到三分钟,而我的最长等待时间是十分钟。 该过程完成后,您将在屏幕上收到确认,其中包含已部署合同的信息,包括保存代码的地址。
That’s it! Your token is now live. But how do you see it?
而已! 您的令牌现已生效。 但是你怎么看呢?
配置MetaMask以检索我的令牌 (Configuring MetaMask to retrieve my token)
Up to this point, our token already exists in the Ethereum network and can be used to transact, however, how do you access your tokens? Turns out that MetaMask as well as other wallets can already operate with your token as it follows a specification called ERC20.
到目前为止,我们的令牌已经存在于以太坊网络中并且可以用于交易,但是,您如何访问令牌? 事实证明,MetaMask和其他钱包已经可以使用您的令牌运行,因为它遵循名为ERC20的规范。
However, wallets are not yet aware of the existence of your token, so you will have to manually add them. Let’s see how that works on MetaMask, but before we leave Remix, there’s one last thing we need to do.
但是,钱包尚不知道令牌的存在,因此您必须手动添加它们。 让我们看看它在MetaMask上如何工作,但是在离开Remix之前,我们需要做的最后一件事。
When the deployment process completed we ended up with a screen like this:
部署过程完成后,我们看到了如下屏幕:

With a section called “Deployed Contracts” and right bellow our token contract information. One important data on that screen is the address where the code was deployed, please copy that using the copy icon on the right, highlighted in the picture above.
在“部署的合同”部分中,右下方列出了我们的令牌合同信息。 该屏幕上的一个重要数据是代码的部署地址,请使用右图的复制图标复制该地址,如上图所示。
And with that code open MetaMask, and click on “Add Token.” This will pop up a screen with two tabs, switch to the second tab called “Custom Token” and paste the address you copied in the contract address field. This will automatically populate the token symbol and decimals fields.
并用该代码打开MetaMask,然后单击“添加令牌”。 这将弹出一个包含两个标签的屏幕,切换到第二个名为“自定义令牌”的标签,然后将您复制的地址粘贴到合同地址字段中。 这将自动填充令牌符号和小数字段。
After that click “Next” then “Add’ and you are done. You can now see your tokens on your MetaMask wallet.
之后,单击“下一步”,然后单击“添加”,完成操作。 现在,您可以在MetaMask钱包中看到令牌。
结论 (Conclusions)
Today we learned how to build and deploy your own cryptocurrency by following the ERC20 interface and utilizing Remix and MetaMask. The process is super easy, and the code we provided though working is just a minimal example. You can build many great things on top of what we did today, and I hope I can hear from you all the great projects that you build using the power of blockchain.
今天,我们学习了如何通过遵循ERC20接口并利用Remix和MetaMask来构建和部署自己的加密货币。 该过程非常容易,我们通过工作提供的代码只是一个最小的示例。 您可以在我们今天所做的事情的基础上构建许多伟大的事物,希望我能从您那里听到您使用区块链的力量构建的所有伟大项目。
Thanks for reading!
谢谢阅读!
以太坊 erc20


 207
207


 被折叠的 条评论
为什么被折叠?
被折叠的 条评论
为什么被折叠?
 到【灌水乐园】发言


