


Docker has become an essential tool for every software developer. If you haven’t yet heard about Docker, it’s a free, powerful, and reliable tool for creating and deploying containers, available for Linux, macOS, and Windows. From the official Docker documentation:
Docker已成为每个软件开发人员必备的工具。 如果您还没有听说过Docker,那么它是一个免费的,功能强大且可靠的工具,可用于创建和部署容器,可用于Linux,macOS和Windows。 从官方Docker文档中:
“A container is a standard unit of software that packages up code and all its dependencies so the application runs quickly and reliably from one computing environment to another.
“容器是打包代码及其所有依赖项的软件的标准单元,因此应用程序可以从一个计算环境快速可靠地运行到另一个计算环境。
“A Docker container image is a lightweight, standalone, executable package of software that includes everything needed to run an application: code, runtime, system tools, system libraries, and settings.”
“ Docker容器映像是一个轻量级的,独立的,可执行的软件软件包,其中包括运行应用程序所需的一切:代码,运行时,系统工具,系统库和设置。”
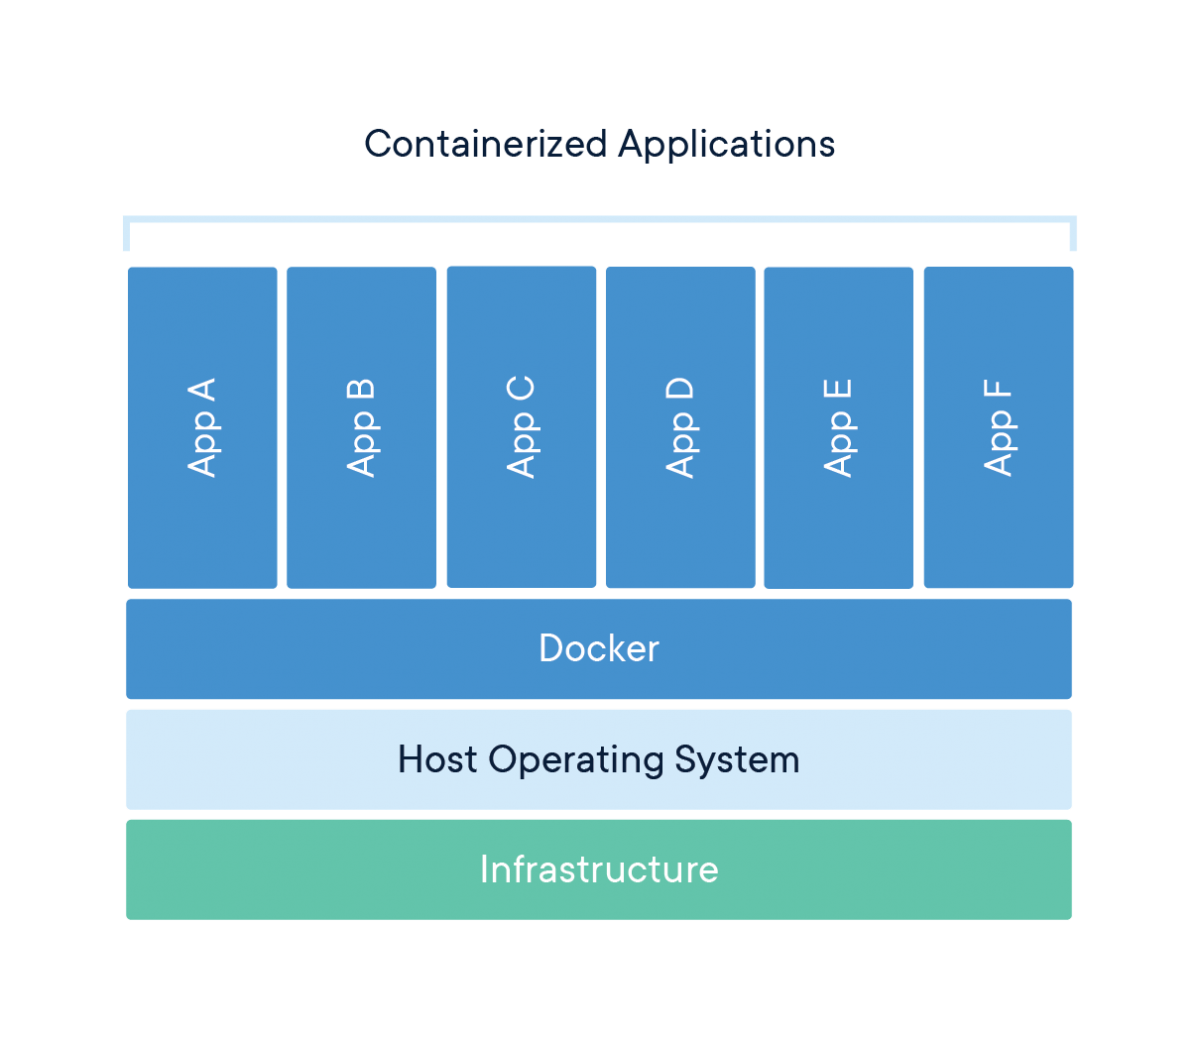
With Docker, developers can forget headaches when trying to deploy their apps. Your application is bundled as an image, and this image is deployed as a container in your server or on the cloud. With Docker Compose, you can even orchestrate the deployment of several services that together constitute an application.
使用Docker,开发人员可以在尝试部署其应用程序时忘记烦恼。 您的应用程序捆绑为映像,并且此映像作为容器部署在服务器或云中。 使用Docker Compose,您甚至可以协调一起构成应用程序的多个服务的部署。
Docker CLI命令(Docker CLI commands)
Docker offers a UI called Docker Dashboard, from where you can do some tasks, but the most usual way to work with Docker is through its CLI, so let’s see here some examples of the most useful and usual commands.
Docker提供了一个名为Docker Dashboard的UI,您可以在其中执行一些任务,但是使用Docker的最常用方法是通过其CLI,因此让我们在这里看到一些最有用和常用命令的示例。
从映像创建并运行容器 (Create and run a container from an image)
To create and run a container called “my_beautiful_container” with an official Ubuntu image, we would just use the docker run command:
要创建并运行带有官方Ubuntu映像的名为“ my_beautiful_container”的容器,我们只需使用docker docker run命令:
docker run -d — name my_beautiful_container ubuntu # run the container as a background processdocker run -it — name my_beautiful_container ubuntu /bin/bash # run the container and launch an interactive shell on itWhen using the run command, we can also map a container port to a host machine port (very important for web servers) for instance:
使用run命令时,例如,我们还可以将容器端口映射到主机端口(对于Web服务器非常重要):
docker run -p 1234:80 ubuntu # map the port 80 in the container to 1234 in the host machineBy their nature, containers don’t offer data persistence. If we need some data inside our container to be persisted after reboots, we have to use volumes, and that means mounting a host machine folder into the container filesystem:
从本质上讲,容器不提供数据持久性。 如果我们需要容器中的某些数据在重新启动后得以保留,则必须使用卷,这意味着将主机文件夹安装到容器文件系统中:
docker run -v ~/my_folder:/root ubuntu # mount the host machine folder ~/my_folder into the /root directory in the container在正在运行的容器中执行命令 (Execute commands in a running container)
If we have a running container called “my_beautiful_container” and we want to run a command on it, we would use the docker exec command:
如果我们有一个正在运行的容器“ my_beautiful_container”,并且想要在其上运行命令,则可以使用docker exec命令:
docker exec -d my_beautiful_container touch /root/hello # execute the command touch /root/hello and finishdocker exec -it my_beautiful_container /bin/bash # open an interactive shell in my_beautiful_container将文件复制到容器或从容器复制文件 (Copy a file to/from a container)
With the docker cp command, you can copy files or folders from your host machine to your container and vice versa:
使用docker cp命令,您可以将文件或文件夹从主机复制到容器,反之亦然:
docker cp ~/myfile.txt my_beautiful_container:/root/myfile.txt #host -> containerdocker cp my_beautiful_container:/root/myfile.txt ~/myfile.txt #container -> host管理容器 (Manage containers)
From the Docker CLI, you can easily list all the containers running in your host machine:
在Docker CLI中,您可以轻松列出主机中运行的所有容器:
docker ps # show all running containersdocker ps -a # show all containersYou can also rename, start, stop, and delete a specific container:
您还可以重命名,启动,停止和删除特定的容器:
# Delete containers
docker rm my_beautiful_container
docker container prune  # remove all stopped containers# Start/stop containers
docker start my_beautiful_container
docker stop my_beautiful_container# Rename a container
docker rename my_beautiful_container my_ugly_container  # my_beautiful_container -> my_ugly_container
Or see its logs, mapped ports, and processes running inside:
或查看其日志,映射的端口以及内部运行的进程:
# Show the logs of a container
docker logs my_beautiful_container# Show the processes inside a container
docker top my_beautiful_container# Show the mapped ports of a container
docker port my_beautiful_container
Curious about how many resources each of your containers is using? Just type this:
好奇每个容器正在使用多少资源? 只需输入:
docker stats管理图片 (Manage images)
Whenever you run a container for the first time, Docker will automatically download all the needed images. To list all the images downloaded in your computer or server:
每当您第一次运行容器时,Docker都会自动下载所有需要的映像。 要列出您的计算机或服务器中下载的所有图像:
docker imagesTo download an image from DockerHub (the official Docker image repository) into your host machine, you can use the docker pull command, and for loading it from a local file, docker load:
要将镜像从DockerHub(官方Docker镜像存储库)下载到主机,您可以使用docker pull命令,并从本地文件docker load加载该镜像:
docker pull ubuntu  # download the image “ubuntu” from DockerHub
docker load -i ubuntu.tar  # load the image stored in the file “ubuntu.tar”
For removing a single image or all the unused ones:
要删除单个图像或所有未使用的图像:
docker rmi ubuntu  # delete the image “ubuntu” from the computer
docker image prune -a  # remove all unused images
管理卷 (Manage volumes)
Volumes are the best way of persisting data, by mapping a container directory to a folder inside the host machine. With the docker volume command, you can easily list all the created volumes, as well as delete those that are not used by any container or one specific.
通过将容器目录映射到主机内部的文件夹,卷是保留数据的最佳方法。 使用docker volume命令,您可以轻松列出所有已创建的卷,以及删除任何容器或一个特定容器未使用的那些卷。
docker volume ls  # list all volumes
docker volume rm my_dirty_volume  # delete a volume called my_dirty_volume
docker volume prune  # delete all unused volumes
使用Dockerfile创建映像 (Create an Image With a Dockerfile)
A Dockerfile is a set of instructions to build a Docker image. In the following example, I’ll show you how to create an image based on Ubuntu:
Dockerfile是用于构建Docker映像的一组指令。 在下面的示例中,我将向您展示如何基于Ubuntu创建映像:
# Use an Ubuntu image as base image
FROM ubuntu:latest


# Metadata for the container
LABEL description="This is a dummy container" author="Guillermo Barreiro"


# Set the working directory inside the container for the following Dockerfile instructions
WORKDIR /root


# Use an argument sent to the "docker build" command inside the Dockerfile
ARG USERNAME
RUN echo ${USERNAME} >> username


# Run several commands in a same line, for avoiding creating intermediate junk images
RUN /bin/bash -c 'apt-get update; apt-get install python3'


# Set environment variables
ENV foo_folder /home


# Copy files to the container
COPY script.py /script.py


# Define a volume (in the Dockerfile you cannot set the location of a volume inside the host machine)
VOLUME /root/shared


# Set the entrypoint for the container, that means, the command to be executed when run
ENTRYPOINT ["python3", "script.py"]
Notice that for each instruction, an intermediate image will be generated, hence the importance of trying to concatenate all commands together when using the run instruction.
请注意,对于每条指令,都会生成一个中间映像,因此在使用run指令时尝试将所有命令连接在一起的重要性。
Now, we’ll build the image giving a value for the argument USERNAME and store it with the name “johndoe/my_awesome_image,” by running the following command in the folder where the Dockerfile is located.
现在,我们将通过在Dockerfile所在的文件夹中运行以下命令,来构建为参数USERNAME提供值的映像并将其存储为名称“ johndoe / my_awesome_image”。
docker build . -t johndoe/my_awesome_image --build-arg USERNAME=john使用Docker Compose部署多个容器 (Deploy Multiple Containers With Docker Compose)
From the official Docker documentation:
“Compose is a tool for defining and running multi-container Docker applications. With Compose, you use a YAML file to configure your application’s services. Then, with a single command, you create and start all the services from your configuration.”
“ Compose是用于定义和运行多容器Docker应用程序的工具。 通过Compose,您可以使用YAML文件来配置应用程序的服务。 然后,只需一个命令,您就可以从配置中创建并启动所有服务。”
In the following example, I’ll show you how to deploy a full-stack web application, both the front end (container frontend) and the back end (containers api and database). The container database uses a MySQL image, api a NodeJS one, and frontend a basic Apache HTTP server. For the database, a volume is set up to ensure persistence (db-data); for the front end, the folder in the host machine with the HTML, JS, and CSS files is mounted to the container.
在以下示例中,我将向您展示如何部署全栈Web应用程序,包括前端(容器frontend )和后端(容器api和database )。 容器database使用一个MySQL映像,一个api一个NodeJS, frontend是一个基本的Apache HTTP服务器。 对于数据库,设置了一个卷以确保持久性( db-data ); 对于前端,将带有HTML,JS和CSS文件的主机中的文件夹安装到容器中。
For the front end, port 80 is mapped to the port 1234 of the host machine, while in the database and the API, is not necessary to open any port since the containers are interconnected through the networks database-api and frontend-api. Notice how for the database, the credentials are set in an external file, called mysql.env.
对于前端,端口80映射到主机的端口1234,而在数据库和API中,则无需打开任何端口,因为容器是通过网络database-api和frontend-api互连的。 请注意,对于数据库,如何在名为mysql.env的外部文件中设置凭据。
version: "3.8"
services:
    database:
        image: mysql:latest
        volumes:
            - db-data:/var/lib/mysql/data
        command: --default-authentication-plugin=mysql_native_password # run this command in the container
        networks:
            - database-api
        restart: always # the container must be always on
        env_file:
            - mysql.env # inject the environment variables defined in the file "mysql.env"

    api:
        build: ./node # use the Dockerfile in the folder "node" for creating the image for this container
        networks:
            - database-api
            - frontend-api
        depends_on: # the container won't be started until the "database" container is running
            - database
        restart: unless-stopped # the container will be always on unless it was manually stopped

    frontend:
        image: httpd
        ports:
            - "1234:80" # map the container port 80 to the host port 1234
        networks:
            - frontend-api
        volumes:
            - ./htdocs:/var/www/html
        depends_on: # the container won't be started until the "api" container is running
            - api
        environment:
            AllowOverride: None # set an environment variable for the container
        restart: unless-stopped # the container will be always on unless it was manually stopped


volumes:
    db-data:


networks:
    database-api:
    frontend-api:
Now, for building the images and deploying the three services, we just have to run in the folder where the docker-compose.yml file is:
现在,为了构建映像并部署这三个服务,我们只需要在docker-compose.yml文件所在的文件夹中运行:
docker-compose build .
docker-compose up
I hope you liked this summary of all the Docker common operations. I’m aware that Docker is a very complex tool, so here I just covered the basic things. For more detailed information, don’t hesitate to search in the official documentation.
希望您喜欢所有Docker通用操作的摘要。 我知道Docker是一个非常复杂的工具,因此在这里我仅介绍了一些基本知识。 有关更多详细信息,请随时搜索官方文档。
资源资源 (Resources)
Install Docker: https://www.docker.com/products/docker-desktop
安装Docker: https : //www.docker.com/products/docker-desktop
DockerHub repository: https://hub.docker.com
DockerHub存储库: https ://hub.docker.com
Docker reference documentation: https://docs.docker.com/reference/
Docker参考文档: https : //docs.docker.com/reference/
Dockerfile reference: https://docs.docker.com/engine/reference/builder/
Dockerfile参考: https ://docs.docker.com/engine/reference/builder/
Docker Compose reference: https://docs.docker.com/compose/compose-file/
Docker Compose参考: https : //docs.docker.com/compose/compose-file/
Sample Dockerfile: https://gist.github.com/gbarreiro/bd39bc15d4f4e5ef118d75a4c038bea3
样本Dockerfile: https ://gist.github.com/gbarreiro/bd39bc15d4f4e5ef118d75a4c038bea3
Sample Docker Compose: https://gist.github.com/gbarreiro/775f111453d88b220d2fb1963e5ab08c
样本Docker Compose: https : //gist.github.com/gbarreiro/775f111453d88b220d2fb1963e5ab08c


 368
368

 被折叠的 条评论
为什么被折叠?
被折叠的 条评论
为什么被折叠?
 到【灌水乐园】发言


