


navisworks前进
Prior to picking up Python during lockdown in 2020, one of my pet peeves for the longest time was how time consuming preparing for the clash detection process can be and my inability to do something about it. I was unaware of the free tools available that could have improved the efficiency and flexibility of the process.
P rior至2020年期间,锁定拿起Python的,我的时间最长的眼中钉之一是如何耗时的冲突检测过程中可以和我不能做一些事情做准备。 我没有意识到可能会提高流程效率和灵活性的免费工具。
This post shows how to create an Autodesk Navisworks clash test XML file, starting with an excel clash detection matrix, with the use of Python. The time it took me to fill in hundreds of excel cells, on top of filling in hundreds of clash rule tests in Navisworks has been greatly reduced.
这篇文章展示了如何使用Python创建一个从Excel冲突检测矩阵开始的Autodesk Navisworks冲突测试XML文件。 除了填写Navisworks中数百个冲突规则测试之外,我填写数百个excel单元所花费的时间已大大减少。
Navisworks XML (Navisworks XML)
XML (Extensible Markup Language) is a markup language for representing structured information via a set of rules that encode a document into a format that can be read by both users and computers. An XML file can be supported by a schema file XSD (XML Schema Definition). The XSD defines and describes the elements of the XML allowing applications to verify and generate the XML. If you have Autodesk Navisworks Manage 2020 installed locally, the schema location for various versions can be found in “C:\Program Files\Autodesk\Navisworks Manage 2020\schemas”.
XML(可扩展标记语言)是一种标记语言,用于通过一组规则来表示结构化信息,这些规则将文档编码为用户和计算机均可读取的格式。 模式文件XSD(XML模式定义)可以支持XML文件。 XSD定义并描述了XML的元素,允许应用程序验证和生成XML。 如果您在本地安装了Autodesk Navisworks Manage 2020,则可以在“ C:\ Program Files \ Autodesk \ Navisworks Manage 2020 \ schemas”中找到各种版本的架构位置。
Python (Python)
This process requires the installation of Python (I recommend version 3.6.1 and above to avoid compatibility issues with the packages used in this article). My preferred code editor is Visual Studio Code (vscode) which supports working with Jupyter Notebooks (.ipynb) natively.
此过程需要安装Python(我建议使用3.6.1及更高版本,以避免与本文中使用的软件包存在兼容性问题)。 我首选的代码编辑器是Visual Studio Code (vscode),它支持本地使用Jupyter Notebooks (.ipynb)。
I recommend setting up a virtual environment for this process, albeit its not absolutely necessary. It is however, good practice since you avoid cluttering your global environment with different packages and versions from different projects, which can complicate testing of applications.
我建议为此过程设置虚拟环境,尽管这不是绝对必要的。 但是,这是一个好习惯,因为您可以避免使用来自不同项目的不同软件包和版本来打乱全局环境,这会使应用程序的测试复杂化。
大熊猫 (Pandas)
Pandas is a data analysis python package that eases analysis of “relational” or “labeled” data. Pandas can be installed via pip from PyPI. You can type the command below into your terminal.
Pandas是一个数据分析python软件包,可简化对“关系”或“标记”数据的分析。 熊猫可以通过以下方式通过pip安装 PyPI 。 您可以在终端中输入以下命令。
pip install pandasFor more information on other installation methods, you can visit; https://pandas.pydata.org/pandas-docs/stable/getting_started/install.html
有关其他安装方法的更多信息,请访问; https://pandas.pydata.org/pandas-docs/stable/getting_started/install.html
xml文件 (lxml)
lxml is a python package for processing XML and HTML. lxml can also be installed via pip from PyPI. You can type the command below into your terminal.
lxml是用于处理XML和HTML的python软件包。 lxml也可以通过PyPI的pip安装。 您可以在终端中输入以下命令。
pip install lxmlFor more information on other installation methods, you can visit; https://lxml.de/installation.html
有关其他安装方法的更多信息,请访问; https://lxml.de/installation.html
Excel冲突矩阵 (Excel Clash Matrix)
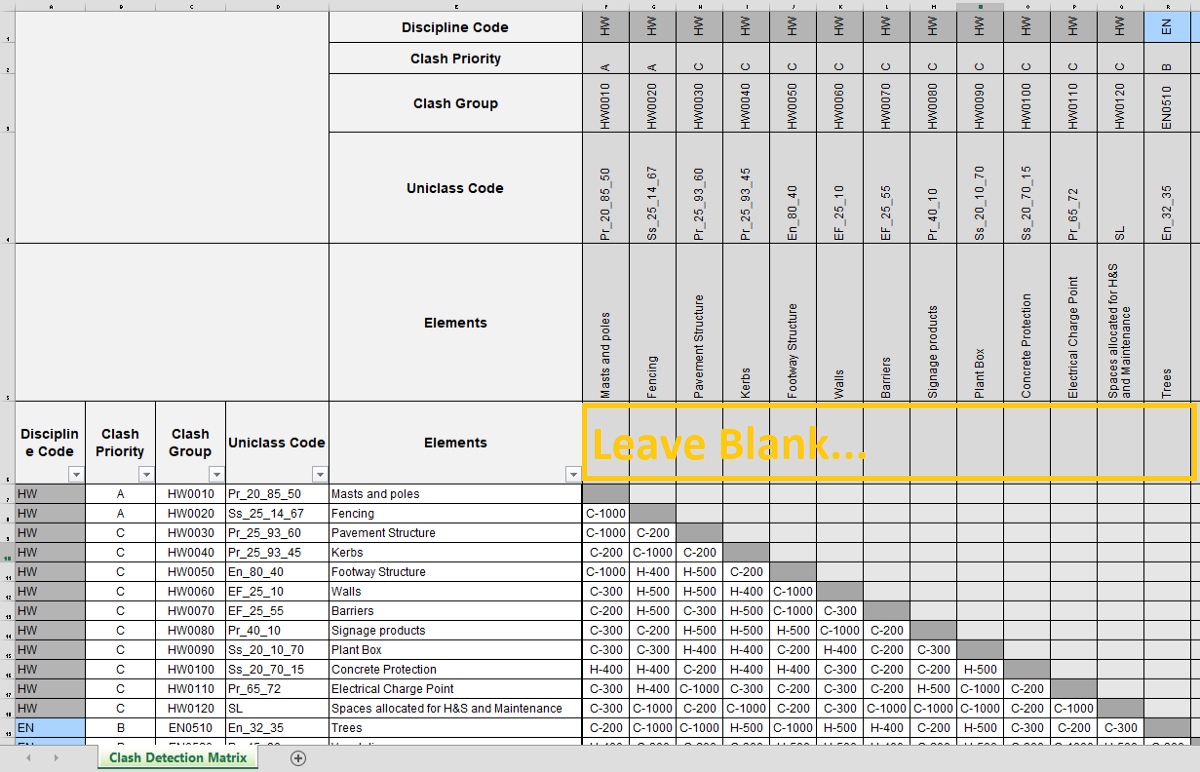
The excel clash detection matrix below is just a sample. The order of your matrix may differ from the one shown below. Therefore please note that the python code in this article will need to be edited to suit your requirements.
下面的excel冲突检测矩阵只是一个示例。 矩阵的顺序可能与下面显示的顺序不同。 因此,请注意,将需要对本文中的python代码进行编辑以满足您的要求。
Note: As highlighted below; from cell F6, the remainder of the row to the right is left blank to avoid getting errors when creating the pandas dataframe. From my testing, this procedure helps to differentiate between the dataframe index and the header.
注意:如下所示; 在单元格F6中,右侧的其余部分留为空白,以避免在创建熊猫数据框时出错。 根据我的测试,此过程有助于区分数据帧索引和标头。
The python code snippet below shows that the index_col and header attributes corresponds to the relevant excel rows and columns in the clash matrix above.
下面的python代码段显示index_col和header属性对应于上方冲突矩阵中的相关excel行和列。
cdm = pd.read_excel("name_of_your_excel_file.xlsx", sheet_name=0, index_col=[0,1,2,3,4], header=[0,1,2,3,4])cdm.head()The output of the code above is shown below. The result is a Pandas DataFrame with a hierarchical indexing (MultiIndex) and a multi-level header.
上面代码的输出如下所示。 结果是带有分层索引(MultiIndex)和多级标题的Pandas DataFrame。
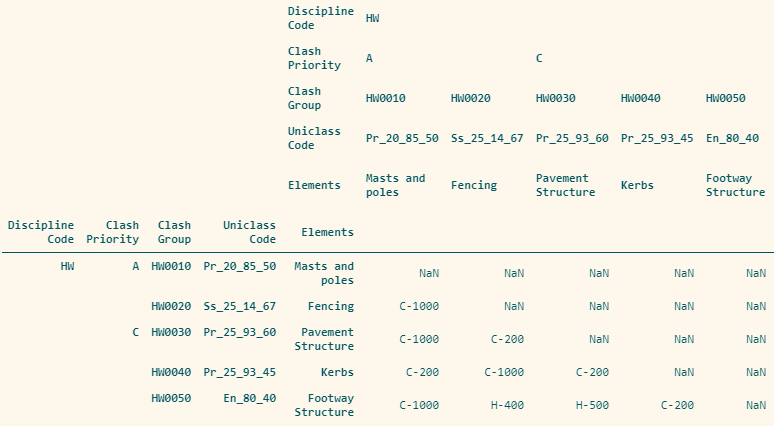
The dataframe generated from the sample clash detection matrix has the following information.
从样本冲突检测矩阵生成的数据帧具有以下信息。
Input: cdm.info()Output:
<class 'pandas.core.frame.DataFrame'> MultiIndex: 127 entries, ('HW', 'A', 'HW0010', 'Pr_20_85_50', 'Masts and poles') to ('SL', 'C', 'SL6110', 'Pr_75_50_52', 'Sensors and detectors') Columns: 127 entries, ('HW', 'A', 'HW0010', 'Pr_20_85_50', 'Masts and poles') to ('SL', 'C', 'SL6110', 'Pr_75_50_52', 'Sensors and detectors') dtypes: float64(1), object(126)
memory usage: 65.5+ KB
放在一起 (Putting It All Together)
Although you can use a python script file (.py) to achieve the same result. If you are not too familiar with python, then I recommend that you use a Jupyter notebook (.ipynb) due to its flexibility and ease of combining code, computational output, text and visualizations into a single document.
尽管您可以使用python脚本文件(.py)来达到相同的结果。 如果您不太熟悉python,则建议您使用Jupyter笔记本(.ipynb),因为它具有灵活性,并且易于将代码,计算输出,文本和可视化文件组合到一个文档中。
碰撞测试 (Clash Tests)
The following are the main items that are required when generating the clash tests portion of the XML.
以下是生成XML的冲突测试部分时所需的主要项目。
- Clash name 冲突名称
Clash type (Clearance “C” or Hard “H”)
碰撞类型(间隙“ C”或硬“ H”)
- Clash tolerance 耐碰撞
- Right locator右定位器
- Left locator左定位器
选择集(Selection Sets)
When generating the selection sets portion of the XML, for this scenario we primarily consider the following;
在生成XML的选择集部分时,对于这种情况,我们主要考虑以下内容:
View folders (specific to discipline)
查看文件夹(特定于学科)
- Selection set name 选择集名称
Conditions (the “contains” condition test is used to create search sets)
条件(“包含”条件测试用于创建搜索集)
整个代码 (Entire Code)
The full code is shown in the gist below.
完整的代码显示在下面的要点中。
To conclude, this post shows how to save time when dealing with the repetitive processes of clash detection specifically, creating clash tests (and setting tolerances), creating selection sets (including organizing search sets into folders) inside Navisworks, etc…
总而言之,这篇文章展示了如何在重复的冲突检测过程中节省时间,特别是在Navisworks内创建冲突测试(和设置公差),创建选择集(包括将搜索集组织到文件夹中)等。
Leave more time for the more important stuff! 🙂
为更重要的内容留出更多时间! 🙂
navisworks前进


 1万+
1万+


 被折叠的 条评论
为什么被折叠?
被折叠的 条评论
为什么被折叠?
 到【灌水乐园】发言


