


In this tutorial, I'm going to help you get started with Ionic-React framework by building a simple Login Authentication app. The video below shows the application we'll be developing together.
在本教程中,我将通过构建一个简单的Login Authentication应用程序来帮助您开始使用Ionic-React框架。 下面的视频显示了我们将一起开发的应用程序。
So, what’s Ionic-React and why use it? Ionic-React is Ionic version of "React Native" for building "native" mobile apps. The framework provides many out-of-the-box mobile UI components for building cool mobile apps. One major advantage of the framework over “React Native” is that it allows you to leverage your existing CSS skills. This means that you can create the entire mobile UI using “everyday” css elements such as buttons, h1 tags, p tags etc. How cool is that!
那么,什么是离子React,为什么要使用它呢? Ionic-React是“ React Native”的Ionic版本,用于构建“本机”移动应用程序。 该框架提供了许多现成的移动UI组件,用于构建出色的移动应用程序。 与“ React Native”相比,该框架的一个主要优点是,它使您可以利用现有CSS技能。 这意味着您可以使用“日常” css元素(例如按钮,h1标签,p标签等)来创建整个移动用户界面。这太酷了!
I am going to assume you have basic React know-how and understand concepts such as components and hooks. I have created an awesome tutorial to help you get started with React and Material UI — yes go have a look! Ionic know-how is not required for this tutorial but nice to have. Also, I have uploaded the complete project source code on Github for you to download and try out.
我将假设您具有基本的React专门知识,并了解诸如组件和挂钩之类的概念。 我创建了一个很棒的教程来帮助您开始使用R eact和Material UI-是的,快来看看! 本教程不需要离子技术,但是很高兴。 另外,我已经在Github上上传了完整的项目源代码,供您下载并试用。
In order to get started with Ionic-React, we need to install it using the command below:
为了开始使用Ionic-React,我们需要使用以下命令进行安装:
npm install -g @ionic/cliNow that we have installed Ionic-React, it's time to create our App using the command below:
现在我们已经安装了Ionic-React,是时候使用以下命令创建我们的App了:
ionic start Auth blank --type=reactThe command creates an Ionic-React app named "Auth" with blank template. We can immediately view the app on the web-browser by running the command below:
该命令使用空白模板创建一个名为“ Auth”的Ionic-React应用。 我们可以通过运行以下命令立即在网络浏览器上查看该应用程序:
ionic serveWhen the web-browser opens, the screenshot in the figure below is displayed.
打开网络浏览器后,将显示下图中的屏幕快照。
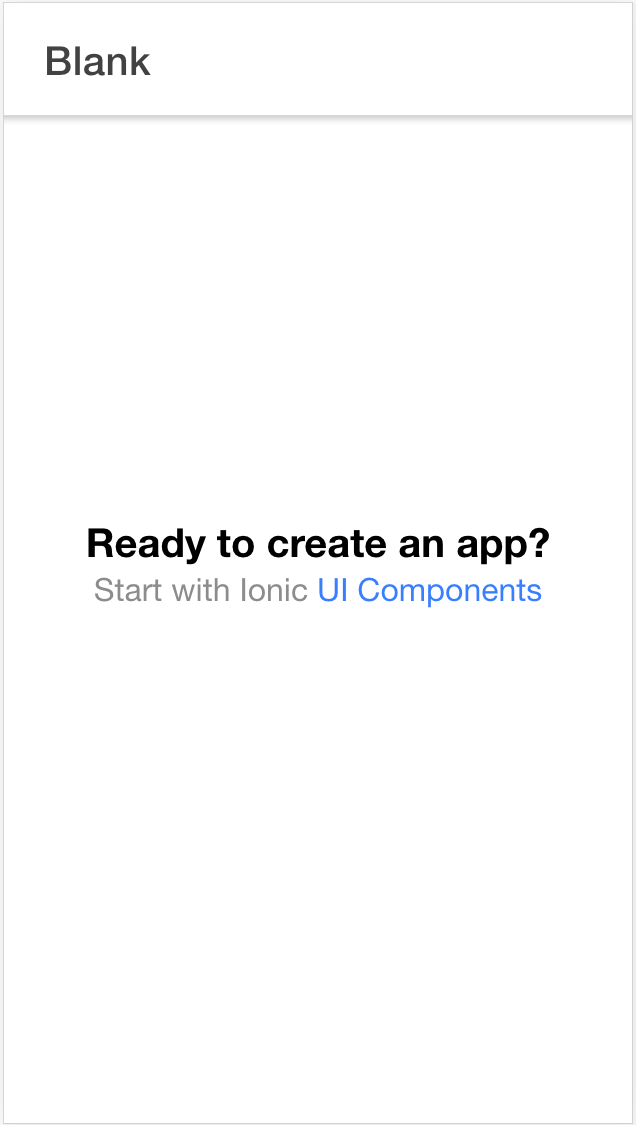
Congratulations! You have created your very first Ionic-React mobile app. Wasn't that easy?☺️ Notice that the page or screen displayed is the default "Home" page that ships in with the Ionic-React boilerplate. The "<Project>/pages" directory contains the source file for the home page i.e. "Home.tsx." Before we start with creating our own page with Ionic-React components, let's first discuss the backend side of our app.
恭喜你! 您已经创建了第一个Ionic-React移动应用程序。 这不是那么容易吗?☺️请注意,显示的页面或屏幕是Ionic-React样板附带的默认“主页”页面。 “ <Project> / pages ”目录包含主页的源文件,即“ Home.tsx”。在开始使用Ionic-React组件创建自己的页面之前,让我们首先讨论应用程序的后端。
后端 (Backend)
Our app uses a free online RESTful API which allows us to abstract away the complexity of developing such an API ourselves. It uses the freely available API provided by Regress. Regres provides many api endpoints which I have found very useful for prototyping. We'll use the /api/login endpoint in order to authenticate users. This endpoint requires two parameters — email and password as show in the code snippet below:
我们的应用程序使用免费的在线RESTful API,使我们能够抽象出自己开发此类API的复杂性。 它使用Regress提供的免费提供的API。 Regres提供了许多api端点,我发现它们对于原型制作非常有用。 我们将使用/ api / login端点来认证用户。 该端点需要两个参数-电子邮件和密码,如下面的代码片段所示:
//request
{
    "email": "eve.holt@reqres.in",
    "password": "cityslicka"
}//success  - Response 200{
    "token": "QpwL5tke4Pnpja7X4"
}//failure - Response 400
{
    "error": "Missing password"
}
So, we get back a response from the server after initiating an api request. In this case, we get back a valid token (which normally stores user details in encrypted form) for a successful server response. Otherwise, we get back an error.
因此,我们在启动api请求后从服务器获取了响应。 在这种情况下,我们将获得有效的令牌(通常以加密形式存储用户详细信息)以成功进行服务器响应。 否则,我们将返回一个错误。
Let's now move on to the frontend side of the application, now that you have a good understanding of the backend process.
现在,您已经对后端流程有了很好的了解,现在让我们进入应用程序的前端。
前端 (Frontend)
Ionic-React framework provides many out-of-the-box mobile UI components such as alerts, toolbar, cards, etc. This allows for setting-up mobile page easily without writing a line of css codes much like Material UI and Bootstrap. However, Ionic-React apps takes on the look and feel of the underlaying platform which can be android or IOS.
Ionic-React框架提供了许多现成的移动UI组件,例如警报,工具栏,卡片等。这使您可以轻松设置移动页面,而无需编写像Material UI和Bootstrap这样CSS代码。 但是,Ionic-React应用具有底层平台的外观,该平台可以是android或IOS。
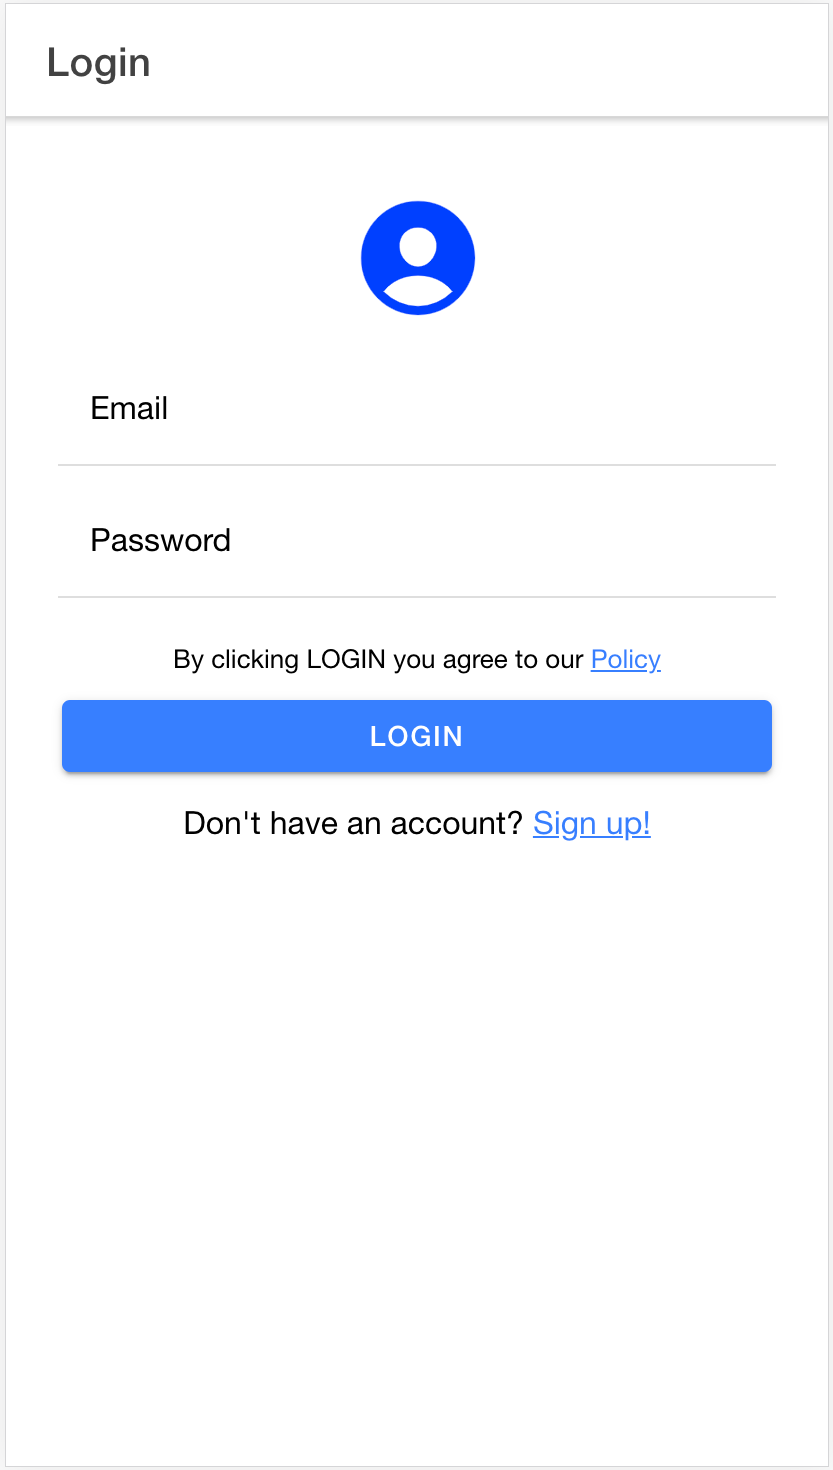
The figure above shows our page login page which is typical of most login page. The page is divided into the header (host the page title i.e. Login) and the page content. Each item on the page is actually an Ionic-React component.
上图显示了我们的页面登录页面,这是大多数登录页面的代表。 该页面分为标题(托管页面标题,即Login)和页面内容。 该页面上的每个项目实际上都是一个离子React组件。
Ionic-React UI components are easy to use and you should have no problem using the components especially if you have worked with other UI framework such as bootstrap. Let's take a look at some of the components used to render the page.
Ionic-React UI组件易于使用,并且使用这些组件应该没有问题,尤其是在使用其他UI框架(例如引导程序)的情况下。 让我们看一下用于呈现页面的一些组件。
<IonHeader>
  <IonToolbar>
    <IonTitle>Login</IonTitle>
  </IonToolbar>
</IonHeader>
The code snippet above is used to render the page title. First, we specify the header section of the page (using IonHeader component) and then use the Iontoolbar component to place the title at the top (header section) of the page. The toolbar component can also be used to place components at the bottom of the page using the IonFooter component as parent.
上面的代码段用于呈现页面标题。 首先,我们指定页面的标题部分(使用IonHeader组件) ,然后使用Iontoolbar组件将标题放置在页面的顶部(标题部分)。 使用IonFooter组件作为父级,也可以使用工具栏组件将组件放置在页面底部。
<IonRow>
  <IonCol>
    <IonIcon
      style={{ fontSize: "70px", color: "#0040ff" }}
      icon={personCircle}
    />
  </IonCol>
</IonRow>
Similar to the most css frameworks, Ionic-React allows us to layout contents in Grid layout i.e. in rows/columns. The code snippet above renders the page icon i.e. the person icon using the IonIcon component. Notice that we can change the icon style using traditional css which is one of the advantage of Ionic-React over the React-Native framework.
与大多数CSS框架类似,Ionic-React允许我们以Grid布局(即行/列)布局内容。 上面的代码段使用IonIcon组件渲染了页面图标,即人物图标。 请注意,我们可以使用传统CSS更改图标样式,这是Ionic-React优于React-Native框架的优势之一。
<IonRow>
  <IonCol>
    <IonItem>
      <IonLabel position="floating"> Email</IonLabel>
      <IonInput
        type="email"
        value={email}
        onIonChange={(e) => setEmail(e.detail.value!)}
        >
      </IonInput>
    </IonItem>
  </IonCol>
</IonRow>
The code snippet above displays the email area of the page using IonLabel (for displaying the label) and IonInput for displaying the actual email input field. Notice that we can specify the input type (text, email, password) similar to traditional css. We change the "email state" object when user enters an email address via the onIonChange function. This is similar to traditional css onChange event for input elements.
上面的代码段使用IonLabel (用于显示标签)和IonInput(用于显示实际的电子邮件输入字段)显示页面的电子邮件区域。 请注意,我们可以指定类似于传统CSS的输入类型(文本,电子邮件,密码)。 当用户通过onIonChange函数输入电子邮件地址时,我们将更改“电子邮件状态”对象。 这类似于输入元素的传统css onChange事件。
<IonRow>
  <IonCol>
    <p style={{ fontSize: "small" }}>
      By clicking LOGIN you agree to our <a href="#">Policy</a
    </p>    <IonButton expand="block" onClick={handleLogin}>
      Login
    </IonButton>    <p style={{ fontSize: "medium" }}>
      Don't have an account? <a href="#">Sign up!</a>
    </p>
  </IonCol>
</IonRow>
The code snippet above displays the helper texts and login button. Notice that we can use the good old css elements to display text and style it to our taste. Ionic-React provides us with the IonButton component for rendering buttons. We have used the "block" property to allow the button span the entire screen width. Notice that the handleLogin function is called when the button is clicked. Let's take a look at this function next.
上面的代码段显示了助手文本和登录按钮。 注意,我们可以使用良好的旧css元素来显示文本并根据自己的喜好对其进行样式设置。 Ionic-React为我们提供了用于渲染按钮的IonButton组件。 我们使用了“ block”属性来允许按钮跨越整个屏幕宽度。 请注意,单击按钮时将调用handleLogin函数。 接下来让我们看一下这个函数。
const handleLogin = () => {
  //validate inputs code not shown  const loginData = {
    email: email,
    password: password,
  };  const api = axios.create({
    baseURL: `https://reqres.in/api`,
  });  api.post("/login", loginData)
    .then((res) => {
      history.push("/dashboard/" + email);
    })
    .catch((error) => {
      setMessage("Auth failure! Please create an account");
      setIserror(true);
    });
};
The handleLogin function code snippet is shown above. First, we validate user inputs (code not shown here for simplicity but available in the project source code). Next, we initiate an api request using the axios package. This package is nice for initiating api calls and can be installed using "npm install axios." Notice that we're doing a post request to our backend api and passing in a JSON object containing the user login credentials i.e. email and password. Next, we process the server (API) response and decide the correct action to perform. If we received an error code (e.g. 400, 401) — it means something went wrong and the server could not authenticate the user. In this case we catch the error and display a nice message to our user. On the other hand, if everything went well, we simply redirect the user to a dashboard screen.
上面显示了handleLogin功能代码段。 首先,我们验证用户输入(为简单起见,此处未显示代码,但在项目源代码中可用)。 接下来,我们使用axios包启动api请求。 该软件包非常适合启动api调用,可以使用“ npm install axios ”进行安装。 请注意,我们正在向后端api发送请求,并传递一个包含用户登录凭据(即电子邮件和密码)的JSON对象。 接下来,我们处理服务器(API)响应并确定要执行的正确操作。 如果我们收到错误代码(例如400、401),则表示出现问题,服务器无法验证用户身份。 在这种情况下,我们会捕获错误并向用户显示一条好消息。 另一方面,如果一切顺利,我们只需将用户重定向到仪表板屏幕即可。
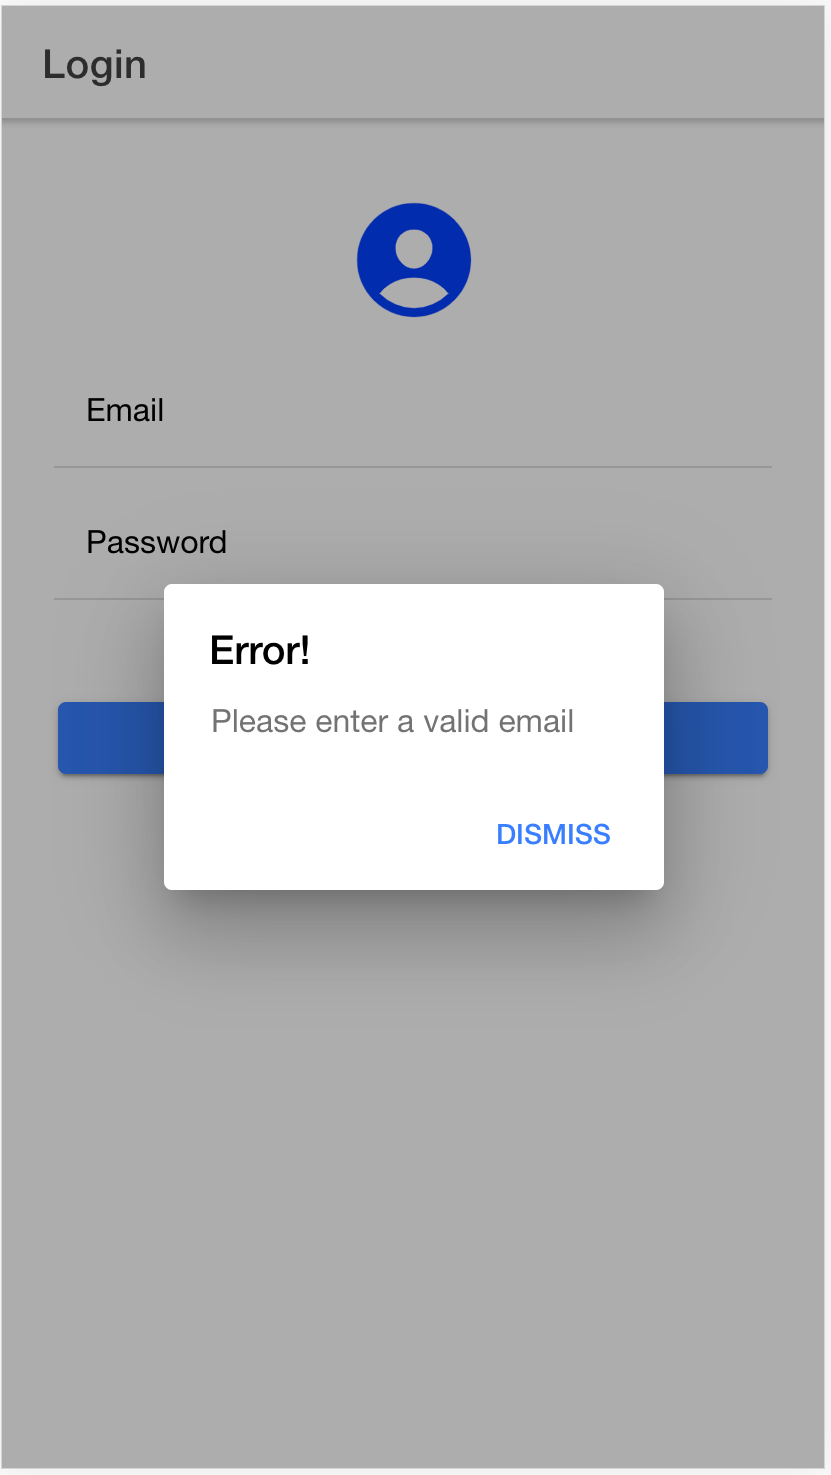
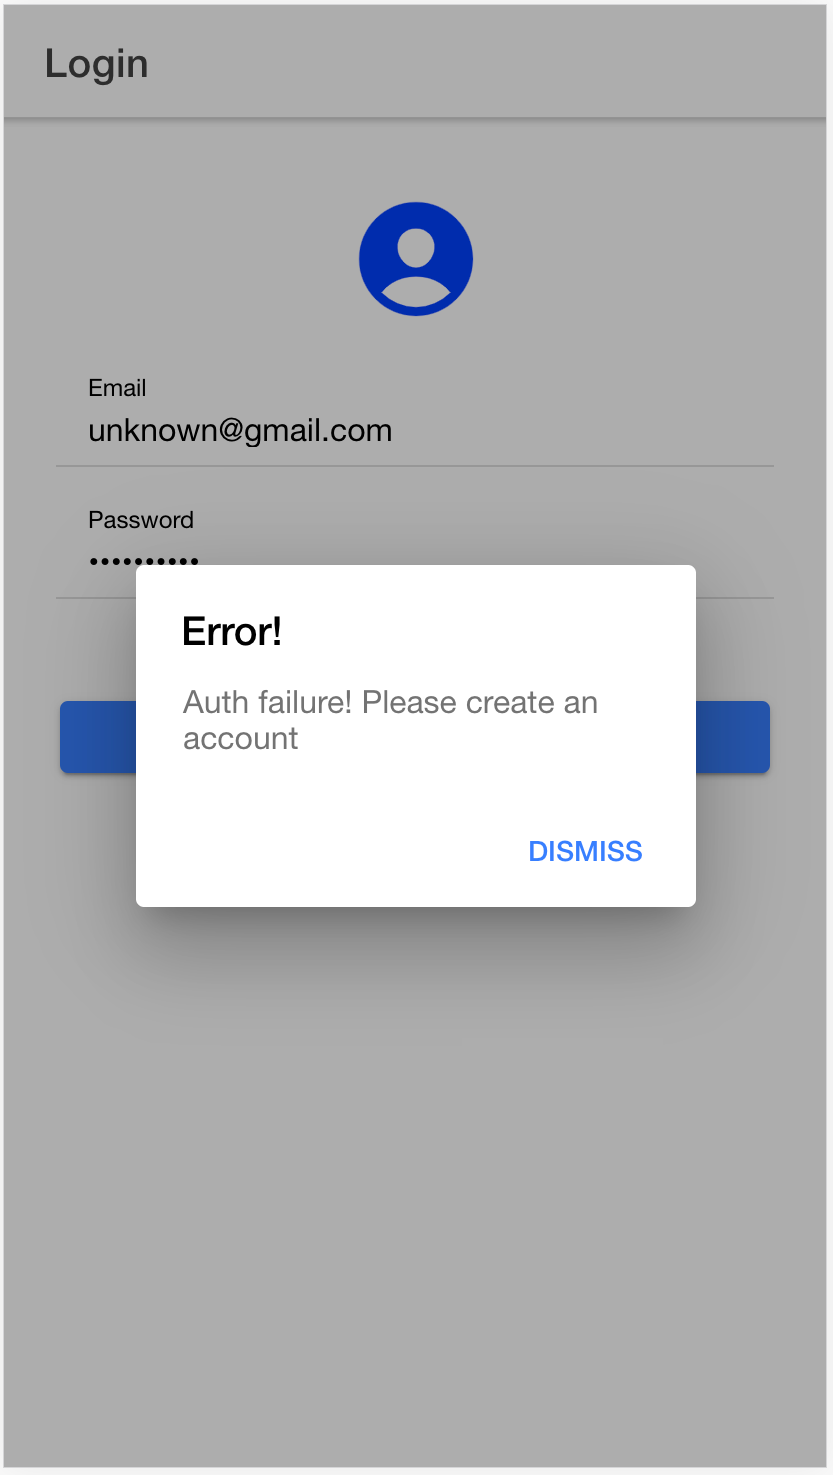
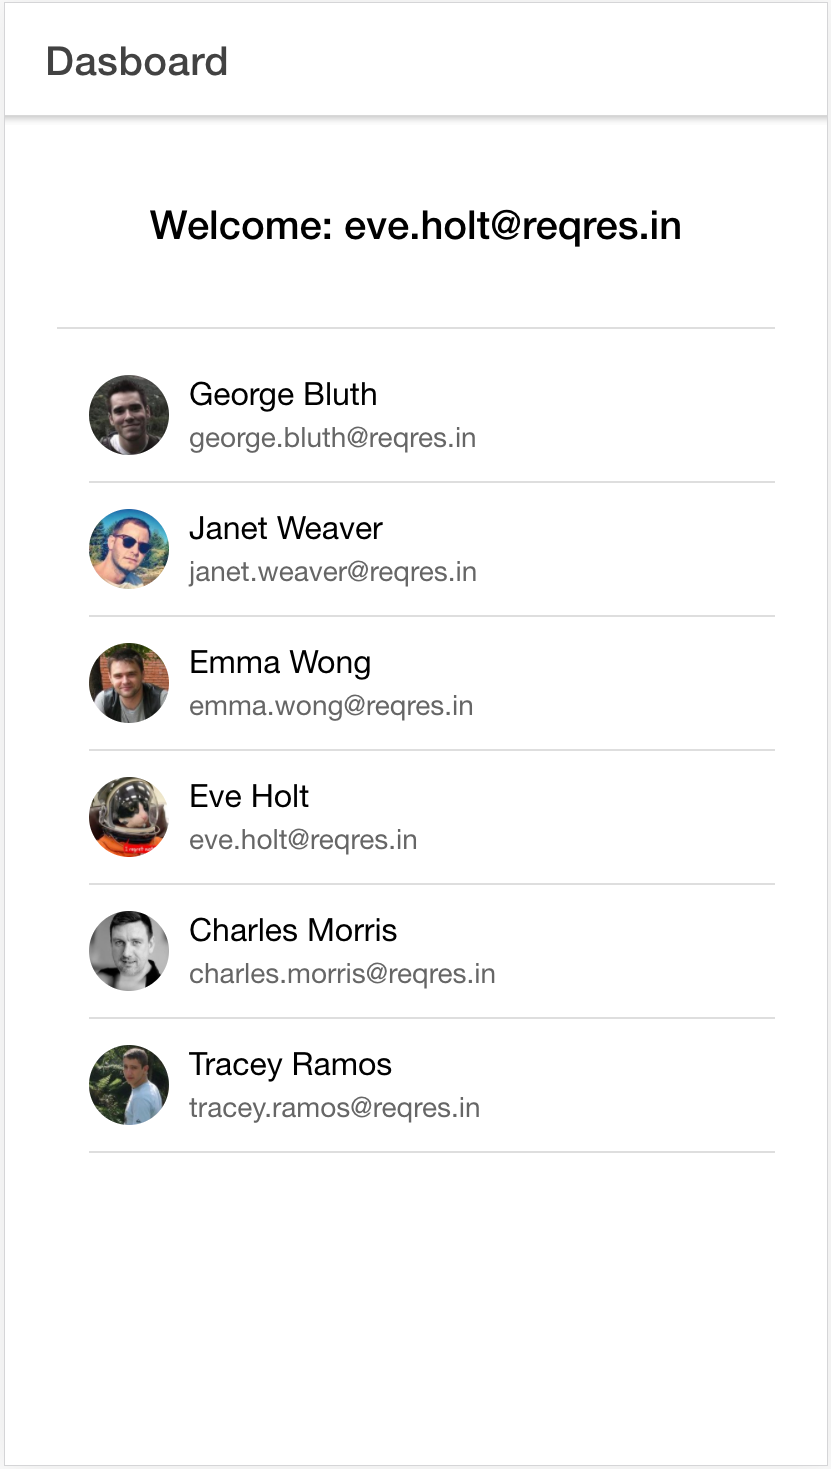
The screenshots above shows some of the cases discussed above. The Dashbord page displays a list of uses fetched from the RESTful API. The data fetched is displayed using IonList components.
上面的屏幕截图显示了上面讨论的一些情况。 Dashbord页面显示了从RESTful API获取的使用列表。 使用IonList组件显示获取的数据。
Summary
概要
I have shown you how to quickly get started with mobile app development using Ion-React component with data from a RESTful API by developing a simple Authentication app. This tutorial illustrates core concepts that can be applied to building other complex mobile apps.
我已经向您展示了如何通过开发简单的身份验证应用程序,使用Ion-React组件以及来自RESTful API的数据来快速开始使用移动应用程序开发。 本教程说明了可应用于构建其他复杂移动应用程序的核心概念。
Ion-React is truly a great frameworks with tons of components for rapid mobile app development. The learning curve is faster compared to React-Native since we can leverage our existing css know-how instead of learning new ways to style components as in React-Native. I'm sure you'll enjoy learning and building cool apps with Ionic-React.
Ion-React确实是一个强大的框架,其中包含大量组件,可用于快速移动应用程序开发。 与React-Native相比,学习曲线更快,因为我们可以利用现有CSS专有技术,而不是像React-Native中那样学习新的样式来设置组件样式。 我相信您会喜欢使用Ionic-React学习和构建出色的应用程序。
I hope you’ve learned something in this tutorial.
希望您在本教程中学到了一些东西。
Feel free to download/clone the project source code on Github.
Check out my other tutorials on React/Material UI and Network game programming in Python if you haven’t☺️
如果没有,请查看我的其他关于Python的React / Material UI和Network游戏编程的教程
Have fun programming!
祝您编程愉快!


 1222
1222


 被折叠的 条评论
为什么被折叠?
被折叠的 条评论
为什么被折叠?
 到【灌水乐园】发言


