


基于vue的组件库
What do React and Angular have in common besides being two of the biggest frontend web development frameworks/libraries out there?
除了作为最大的两个前端Web开发框架/库之外,React和Angular有什么共同点?
They both are component-based!
它们都基于组件!
In this article, we will create a simple frontend library that uses components with good old plain JavaScript. This may help us understand components a bit more and also sharpens our skills in plain JavaScript.
在本文中,我们将创建一个简单的前端库,该库使用具有良好原始JavaScript的组件。 这可以帮助我们更多地了解组件,也可以提高我们在普通JavaScript中的技能。
先决条件 (Prerequisites)
Before we can dive into the JavaScript part of this article we need to set up our project structure. For that we create a new folder called component-library and some more subfolders and files:
在深入研究本文JavaScript部分之前,我们需要建立我们的项目结构。 为此,我们创建了一个名为component-library的新文件夹以及更多子文件夹和文件:
$ mkdir component-library
$ cd ./component-library
$ mkdir lib style components
$ touch index.html index.js ./style/styles.css
Next up we need to fill out our HTML and CSS files like this:
接下来,我们需要像这样填写HTML和CSS文件:
Now we are all set up and ready to write some JavaScript.
现在我们已经准备就绪,可以编写一些JavaScript。
名为Eszett的图书馆 (The library called Eszett)
I like to start by pretending the library already exists. Because of that, the first thing we need to focus on is index.js.
我想从假装库已经存在开始。 因此,我们需要关注的第一件事是index.js。
At the very top of the file we need to import our library and then instantiate a new application:
在文件的最顶部,我们需要导入我们的库,然后实例化一个新的应用程序:
// All our imports are here
import ß from ‘./lib/Eszett.js’;// Initialize app
const app = new ß('app');
This code will throw an error because we did not export anything from our Eszett.js. In this file, we need a class called ß with a constructor that takes in a selector as a string and export it. So first of all we need to create a file like this:
此代码将引发错误,因为我们没有从Eszett.js导出任何内容。 在此文件中,我们需要一个名为ß的类,该类的构造函数将选择器作为字符串并将其导出。 所以首先我们需要创建一个像这样的文件:
$ touch ./lib/Eszett.jsThe content of this file should look like this:
该文件的内容应如下所示:
class ß {
  constructor(selector) {
    this.eszettElement = document.querySelector(`#${selector}`);
    console.log(‘Eszett initialized!’);
  }
}
export default ß;
If you run your application now we won’t get an error anymore and the text ‘Eszett initialized’ should appear in your browser’s console. But so far we don’t do that much with our code. Let’s change that by implementing the possibility to register components in our application.
如果现在运行您的应用程序,我们将再也不会出现错误,并且在浏览器的控制台中应显示文本“ Eszett initialized”。 但是到目前为止,我们对代码没有做太多事情。 让我们通过实现在应用程序中注册组件的可能性来对此进行更改。
组件 (Components)
For this to work we need to implement two things:
为此,我们需要实现两件事:
- a field to store all the registered components 一个用于存储所有已注册组件的字段
a registerComponent method
一个registerComponent方法
First of we add the following line in the constructor right above the console.log:
首先,在console.log上方的构造函数中添加以下行:
this.components = {};The plan is to register all the components in this field as key-value-pairs. To do that we need to add the following method below the constructor:
计划将此字段中的所有组件注册为键值对。 为此,我们需要在构造函数下方添加以下方法:
registerComponent(component {
  this.components[component.name] = component;
}
Now we can register components in our application. The registration will take place in the index.js right below the initialization of our app. Our first component will be a MenuComponent. This will be a two-step process, first, we import the component and then we register it after the initialization of the app.
现在我们可以在应用程序中注册组件。 注册将在应用程序初始化下方的index.js中进行。 我们的第一个组件将是MenuComponent 。 这将分为两个步骤,首先,我们导入组件,然后在应用程序初始化后对其进行注册。
After doing that our index.js should look like this:
完成后,我们的index.js应该如下所示:
// All our imports are here
import ß from ‘./lib/Eszett.js’;
import MenuComponent from ‘./components/MenuComponent.js’;// Initialize app
const app = new ß(‘app’);// Adding our Components to the App
app.registerComponent(MenuComponent)
At the moment our application will throw an error because we don’t have the MenuComponent yet, now we go ahead and create that by adding a new file like this:
目前,我们的应用程序将因为我们还没有MenuComponent而引发错误,现在我们继续添加新文件,如下所示:
$ touch ./components/MenuComponent.jsIn this file, we will import our not yet existing Component.js, so that we can create a new component. After that, we need an HTML-Template and last but not least the component itself. This is how it should look like:
在此文件中,我们将导入尚不存在的Component.js ,以便我们可以创建一个新组件。 之后,我们需要一个HTML模板,最后但并非最不重要的是组件本身。 它应该是这样的:
Let’s take a closer look at the HTML-Template first. It is a function that returns a template literal (template string) and gets the state of the component passed in as a parameter. In line 8 we see that this state gets used to dynamically render the name of the blog.
让我们先仔细看看HTML模板。 它是一个函数,它返回模板文字(模板字符串)并获取作为参数传入的组件的状态。 在第8行中,我们看到此状态用于动态呈现博客的名称。
Taking a look at the component itself we see that it gets passed in three parameters. The first parameter is the name of the component itself, the second parameter is an object with a single attribute called name. This is the state object we pass on to our menuTemplate which is also our last parameter.
看一下组件本身,我们看到它通过三个参数传递。 第一个参数是组件本身的名称,第二个参数是具有单个名为name的属性的对象。 这是我们传递给menuTemplate的状态对象,这也是我们的最后一个参数。
For all of this to work, we need to implement our component.js. First, we need to create a file like this:
为了使所有这些正常工作,我们需要实现我们的component.js 。 首先,我们需要创建一个像这样的文件:
$ touch ./lib/Component.jsThe implementation of our component is straight forward. We need a constructor that takes in three parameters and we need a function that calls our HTML-Template-Function and returns its result. At the end it should look like this:
我们组件的实现很简单。 我们需要一个带有三个参数的构造函数,并且需要一个函数来调用HTML-Template-Function并返回其结果。 最后,它应如下所示:
Now our page won’t show any error but it won’t display our MenuComponent either.
现在,我们的页面将不会显示任何错误,但也不会显示我们的MenuComponent 。
渲染图 (Rendering)
We can create a component and register it in our application but we can’t display the components HTML. Before we tackle this problem I want to add a PostsComponent to our application so that we can render two components at the same time.
我们可以创建一个组件并将其注册到我们的应用程序中,但是我们无法显示该组件HTML。 在解决此问题之前,我想向我们的应用程序添加一个PostsComponent ,以便我们可以同时渲染两个组件。
For that we need to register it like this:
为此,我们需要像这样注册它:
Create it:
创造它:
$ touch ./components/PostsComponent.jsAnd implement it like that:
并像这样实现它:
For the rendering to work we need to update the DOM by calling the view method of our components and inserting the returned HTML into the already defined eszettElement. The described behavior should be one method of our ß class and be called inside our registerComponent method. This is the final implementation of our class:
为了使渲染正常工作,我们需要通过调用view方法来更新DOM 组件并将返回HTML插入到已定义的eszettElement中。 描述的行为应该是我们ß类的一种方法 并在我们的registerComponent方法中调用。 这是我们课程的最终实现:
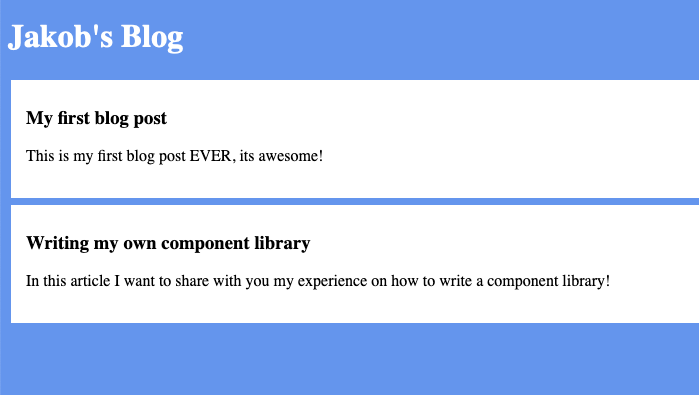
The updateView method first checks if there are any components registered. If that is the case it iterates over all the components and calls the view method of every single one of them. The returned HTML will be merged and set to the innerHTML of the eszettElement. If everything worked out your final page should look like this:
updateView方法首先检查是否注册了任何组件。 如果是这种情况,它将遍历所有组件并调用其中每个组件的view方法。 返回HTML将被合并并设置为eszettElement的innerHTML 。 如果一切顺利,您的最终页面应如下所示:
接下来可能是什么?(What could be next?)
We just created our small library called Eszett. We can create components that contain isolated state and their own HTML-Templates. These components can be registered and rendered at the application level.
我们刚刚创建了一个名为Eszett的小型图书馆。 我们可以创建包含隔离状态及其自己HTML模板的组件。 这些组件可以在应用程序级别注册和呈现。
There are a few more features we could add. For example, a Router that displays certain components on certain routes or the possibility to nest a component inside another component and pass down the state.
我们可以添加更多功能。 例如,一个在某些路由上显示某些组件的路由器,或者将一个组件嵌套在另一个组件内并传递状态的可能性。
Just try out adding new features to this to sharpen your JavaScript skill and while you are at it, have fun!
只需尝试为此添加新功能,以提高您JavaScript技能,就可以尽情玩乐!
As always you can find the code for this project on my GitHub.
与往常一样,您可以在我的GitHub上找到该项目的代码。
升级编码 (Level Up Coding)
Thanks for being a part of our community! Subscribe to our YouTube channel or join the Skilled.dev coding interview course.
感谢您加入我们的社区! 订阅我们的YouTube频道或参加Skilled.dev编码面试课程。
翻译自: https://levelup.gitconnected.com/your-own-component-based-jlibrary-fe67cb5cf771
基于vue的组件库


 3万+
3万+

 被折叠的 条评论
为什么被折叠?
被折叠的 条评论
为什么被折叠?
 到【灌水乐园】发言


