


子组件向父组件传递数据
I recently had a requirement to make sure a PrimeNG Dropdown panel inside a modal with scrolling content was not constrained within the modal, but rather could be seen and interacted with without having to scroll.
我最近有一个要求,以确保具有滚动内容的模态内的PrimeNG Dropdown面板不受该模态的约束,而无需滚动即可看到并与之交互。
Here’s what I’m talking about…
这就是我在说的...
场景 (The Scenario)
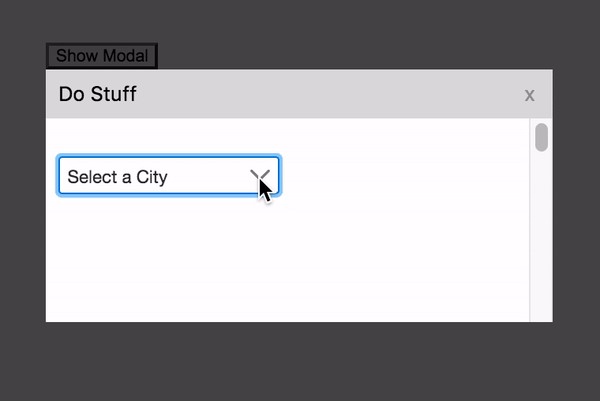
This is the default, and what we don’t want (or, rather, what we shall not deliver):
这是默认设置,也是我们不想要的(或者,我们不应提供的):
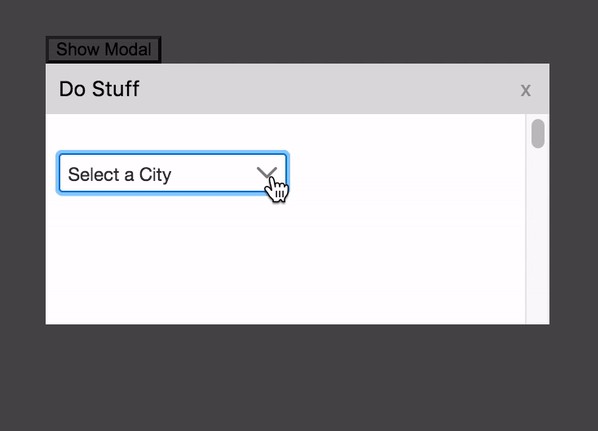
Here’s what we do want:
下面是我们想要的东西:
该方法(The Approach)
Looking at the PrimeNG Dropdown documentation, we can see that the component exposes an appendTo input:
查看PrimeNG Dropdown文档,我们可以看到该组件公开了appendTo输入:

This allows us to tell the dropdown what element to attach the panel to, rather than having it just append the panel to the dropdown element itself. That way, we can attach the panel to an element outside the modal so it can escape the modal boundaries.
这使我们能够告诉下拉菜单将面板附加到哪个元素,而不是让它仅将面板附加到下拉菜单元素本身。 这样,我们可以将面板附加到模态外部的元素上,以便它可以逃脱模态边界。
We just need to pass in an Angular template reference for that target element and watch the magic happen. (We could also just pass in the string 'body' to have it attach the panel to the document body, but that’s easy and boring and not what this article is about. It also didn’t work quite right for my layout but I can’t remember exactly why.)
我们只需要为该目标元素传递一个Angular模板引用,然后观察魔术的发生。 (我们也可以传入字符串'body'以使面板将面板连接到文档主体,但这很简单而且很无聊,而不是本文的目的。它也不适合我的布局,但是我可以不记得是什么原因。)
简单场景 (The Simple Scenario)
Easy, right?
容易吧?
Yep, it would be…provided the target appendTo element lives in the same template as the dropdown, like this:
是的,可以…只要目标appendTo元素与下拉列表位于同一模板中,如下所示:
You can see our p-dropdown spanning lines 7–11, and our .append-target element conveniently residing on line 1 of the same template.
您可以看到我们的p-dropdown跨过第7-11行,而.append-target元素方便地位于同一模板的第1行。
By adding the #myTarget template reference variable to the target element, we can simply add input [appendTo]=”myTarget” to p-dropdown and call it a day.
通过将#myTarget模板引用变量添加到目标元素,我们可以简单地将输入[appendTo]=”myTarget”到p-dropdown并将其命名为day。
But things are rarely that straightforward, and my scenario was, of course, more complicated. Otherwise I wouldn’t be writing this article right now.
但是事情很少那么简单,而我的情况当然更复杂。 否则,我现在不会写这篇文章。
擦 (The Rub)
A more realistic scenario (and precisely my scenario, as luck would have it) is that p-dropdown is nested several layers deep in a component tree from the target element you need the panel to be appended to.
一个更现实的场景(准确地说是我的场景,很幸运)是, p-dropdown嵌套在组件树中距目标元素需要添加面板的几层深处。
Here’s the type of component tree I’m talking about:
这是我正在谈论的组件树的类型:
On line 3, in our app-component’s template, you can see our .append-target in all its glory.
在第3行中,在应用程序组件的模板中,您可以看到.append-target的所有荣耀。
Inside our app-component is our vaguely-named (for demo purposes) child component, app-child, which dutifully contains our grandchild component, app-grandchild (line 9).
在我们的app组件内部是一个名称模糊(出于演示目的)的子组件app-child ,该子组件忠实地包含了我们的孙子组件app-grandchild (第9行)。
Our grandchild component, in turn, contains our modal component, app-modal (line 15).
反过来,我们的孙子组件包含模态组件app-modal (第15行)。
And our modal component, at long last, is where our p-dropdown resides (line 24).
最终,我们的模态组件就是我们的p-dropdown所在的位置(第24行)。
So how do we get that template reference down through those layers to the eagerly awaiting p-dropdown?
那么,如何通过这些层将模板引用向下传递到热切等待的p-dropdown呢?
脆性解决方案 (The Brittle Solution)
One solution would be to pass the template reference down through the tree via component Input()s, like so (keep an eye out for [dropdownAppendTarget]s):
一种解决方案是通过组件Input()将模板引用向下传递到树中,就像这样(注意[dropdownAppendTarget] ):
Every component gets a shiny new dropdownAppendTarget Input() that allows it to pass that template reference from its parent down to the next layer.
每个组件都有一个闪亮的新dropdownAppendTarget Input() ,使它可以将该模板引用从其父级传递到下一层。
Which works just fine…until the day some unsuspecting new developer comes along who knows nothing of this Underground Railroad put in place to ferry that template reference down through each layer of the component tree.
效果很好……直到有一个毫无戒心的新开发人员出现,直到他们都不知道地下铁路的位置,才能将模板引用向下传递到组件树的每一层。
Unsuspecting Dev innocently inserts an extra component layer in the middle without realizing he’s breaking the circuit, and our delicate solution is ruined.
毫不怀疑的开发人员会无意间在中间插入一个额外的组件层,而没有意识到他会破坏电路,因此我们精巧的解决方案被毁了。
更好的解决方案 (The Better Solution)
Since we’re all terrific developers with a keen eye for solutions that are obvious ticking time bombs, we’ll spare Unsuspecting Dev some stress and heartache and come up with a more robust solution.
由于我们都是优秀的开发人员,他们都热衷于寻找显而易见的定时炸弹解决方案,因此我们将为Unsuspecting Dev节省一些压力和心痛,并提出一个更强大的解决方案。
Like all good-hearted Angular developers, we’ll look to Dependency Injection!
像所有善良的Angular开发人员一样,我们将寻求依赖注入!
获取模板参考的指令! (A Directive to Grab the Template Reference!)
A cleaner and simpler way to accomplish this would be to attach to our target element an attribute directive that grabs that element’s template reference, and then Dependency Inject that directive into the downstream component that needs the template reference.
一种更简便的方法是将属性指令附加到我们的目标元素,该指令获取该元素的模板引用,然后从依赖关系中将该指令注入到需要模板引用的下游组件中。
That way, no network of Input()s needs to be built (and maintained) through the component tree, and Unsuspecting Dev can insert as many intermediate layers as his heart desires without breaking anything.
这样,就不需要通过组件树来构建(和维护) Input()的网络,而且毫无怀疑的Dev可以根据自己的意愿插入尽可能多的中间层而不会破坏任何内容。
Nice!!
不错!

Let’s get started…
让我们开始吧…
目标 (The Goal)
So here’s essentially what we’re trying to get to:
因此,这基本上就是我们想要达到的目标:
On line 3, we’ve attached to the target element an attribute directive called appendTarget into which we pass the element’s template reference, myTarget. Nice and clean!
在第3行中,我们在目标元素上附加了名为appendTarget的属性指令,我们将元素的模板引用myTarget传递到该指令中。 干净整洁!
Here’s what AppendTargetDirective looks like:
这是AppendTargetDirective样子:
Super simple!
超级简单!
尝试 (The Attempt)
With that in place, we then just Dependency Inject the directive into our downstream modal component and create a property on the component class called appendTarget that points to the template ref coming in on the directive instance:
设置好之后,我们就可以将依赖项注入到下游模态组件中,并在名为appendTarget的组件类上创建一个属性,该属性指向出现在该指令实例上的模板ref:
And the modal component’s template would look like this:
模态组件的模板如下所示:
On line 8 we’ve added [appendTo]="appendTarget" to our p-dropdown.
在第8行,我们将[appendTo]="appendTarget"到了我们的p-dropdown 。
Let’s watch the magic happen!
让我们观看魔术的发生!


失败 (The Fail)
I’m including this section describing my debugging effort because I learned some interesting and valuable things about Angular in the process, so I thought it worthwhile to include.
我之所以包括这一部分来描述我的调试工作,是因为在此过程中我学到了一些有关Angular的有趣且有价值的知识,因此我认为值得将其包括在内。
If, however, you would just like to see the final, working solution, feel free to skip directly to The Working Solution.
但是,如果您只想查看最终的有效解决方案,请随时直接跳至The Working Solution 。
(误导)修复尝试 (The (Misguided) Fix Attempt)
Upon seeing the No provider for… error (one I’m very familiar with), my thought was:
看到No provider for…错误(我很熟悉)时,我的想法是:
Of course, dummy! Just add your directive to the app-component’s
providersarray so the DI system knows about it, just like you would for a service!当然是假人! 只需将指令添加到应用程序组件的
providers数组中,这样DI系统就可以知道该指令,就像您要获得服务一样!
So here’s what I did:
所以这就是我所做的:
I added AppendTargetDirective to the providers array in app.component.ts (line 8).
我将AppendTargetDirective添加到app.component.ts(第8行)中的providers数组。
Those of you familiar with Angular’s DI system are probably either laughing right now or shaking your head in disappointment and disgust.
那些熟悉Angular的DI系统的人可能要么现在正在笑,要么在失望和厌恶中摇了摇头。
This was a big mistake that sent me into a world of pain. A world…of pain.
这是一个很大的错误,使我陷入痛苦的世界。 一个痛苦的世界。
It eliminated the No provider for… error but it didn’t make my scenario work, and plunged me into days of frustrating troubleshooting.
它消除了No provider for…错误,但没有使我的方案起作用,并且使我陷入了令人沮丧的故障排除日。
调查 (The Investigation)
After much debugging, I discovered that my directive was being instantiated twice: one instance was getting a hold of my append-target, but the other was not.
经过大量调试后,我发现我的指令被实例化了两次:一个实例持有我的append-target,而另一个实例没有。
And the one being injected into my modal component was the one not getting a hold of the append-target, so its appendTarget property was undefined.
被注入到我的模式组件中的是没有抓住append-target的那个,因此其appendTarget属性是undefined 。
寻求帮助 (The Reach for Help)
After struggling for a while, I finally posted a question on StackOverflow asking “What gives?”
经过一段时间的努力,我终于在StackOverflow上发布了一个问题,问“有什么用?”
Fortunately, the ubiquitous, super-helpful Angular guru Alexey Zuev (yurzui) posted this answer almost immediately:
幸运的是,无处不在,超级有用的Angular大师Alexey Zuev(yurzui)几乎立即发布了以下答案:
His main bullet point was this:
他的主要要点是:
You NEVER [should] be adding Angular directives to
providersarray. Angular will treat them as services which are separated instances of directive classes and not tied to template structure at all.您永远[不应]将Angular指令添加到
providers数组。 Angular将它们视为服务,它们是指令类的单独实例,完全不依赖于模板结构。
So Angular was creating two instances of my directive:
因此Angular正在创建我的指令的两个实例:
Instance #1: Because it was in the
providersarray of app-component, Angular instantiated it as if it were a service, so just another class with no connection to the template structure.实例1:因为它位于应用程序组件的
providers数组中,所以Angular实例化了它,就好像它是一项服务一样,因此只有另一个类与模板结构没有连接。- Instance #2: Because it was attached to the append-target element as an attribute directive, Angular instantiated it as a proper directive connected to the template, and therefore getting a hold of the append-target. 实例2:因为它是作为属性指令附加到append-target元素的,所以Angular将其实例化为连接到模板的适当指令,因此可以保留append-target。
The instance being injected into the modal component was, of course, Instance #1, the one with no DOM connection, rather than #2, the one I needed.
当然,注入到模式组件中的实例是实例1,它是没有DOM连接的实例,而不是实例2,即我需要的实例。
说明 (The Explanation)
The reason my directive was not found during the DI resolution process (the reason I was getting the No provider for… error) was that it was not part of the modal component’s DOM tree branch.
在DI解析过程中未找到我的指令的原因(我得到No provider for…错误)的原因是它不属于模式组件的DOM树分支。
Looking back at my directive placement:
回顾我的指令放置:
you can see that I placed it on a sibling element to app-child.
您会看到我将其放在app-child的同级元素中。
This puts it outside the path that Angular DI takes as it walks up the DOM tree from modal component like so:
这使它脱离了Angular DI从模态组件沿DOM树走的路径,如下所示:
4. app-root
      ^
3. app-child
      ^
2. app-grandchild
      ^
1. app-modal
looking for the directive on those elements.
寻找关于这些元素的指令。
app-child is in the DI resolution path; the sibling div.append-target element is not.
app-child位于DI解析路径中; 兄弟div.append-target元素不是。
工作解决方案 (The Working Solution)
The fix, it turned out, was quite simple: just move the directive from div.append-target to app-child:
事实证明,此修复非常简单:只需将指令从div.append-target移至app-child :
(Huge thanks again to Alexey, who provided the solution, ending days of frustration for me.)
(再次感谢Alexey提供了解决方案,结束了我的无奈之日。)
It’s still within the app-component template so it still has access to myTarget, but this places it in the Angular DI resolution path and fixes everything.
它仍然在app-component模板中,因此它仍然可以访问myTarget ,但这会将其放置在Angular DI解析路径中并修复了所有问题。
Goody!!
天啊!

Here’s a StackBlitz with the full working implementation:
这是具有完整工作实现的StackBlitz:
得到教训 (Lessons Learned)
I learned some valuable nuggets in this process that have made me a better Angular developer:
我在此过程中学到了一些有价值的块,这些块使我成为了更好的Angular开发人员:
- Make sure your directive is in the DI resolution path. 确保您的指令位于DI解析路径中。
Do not add your directive to a
providersarray if you’re using it to interact with the DOM because Angular will instantiate it as just another class, with no connection to the DOM.不要你的指令添加到一个
providers,如果你用它来与DOM交互,因为角将实例,把它当成另一个类,没有连接到DOM阵列。
Thanks for sharing in my journey! I hope this saves at least one person some pain and frustration someday.
感谢您分享我的旅程! 我希望这一天至少可以为一个人节省一些痛苦和沮丧。
子组件向父组件传递数据


 1645
1645


 被折叠的 条评论
为什么被折叠?
被折叠的 条评论
为什么被折叠?
 到【灌水乐园】发言


