


npm包 发布
Easily create and publish an npm module to npm repository
轻松创建npm模块并将其发布到npm存储库
介绍 (Introduction)
In this tutorial, you will create your own npm package and publish it to the npm repository.
在本教程中,您将创建自己的npm软件包并将其发布到npm存储库。
By doing this, you will understand:
通过这样做,您将了解:
- How to create an npm package 如何创建一个npm包
- How to install it locally before publishing to test its functionality 在发布以测试其功能之前如何在本地安装它
- How to install and use the published package using ES6 import syntax or using Node.js require statement 如何使用ES6导入语法或Node.js require语句安装和使用已发布的软件包
- How to manage semantic versioning of the package 如何管理软件包的语义版本控制
- How to update the package with the new version and publish it again 如何使用新版本更新软件包并再次发布
To be precise, you will build a package that will return a list of GitHub repositories of the specified username sorted by the number of stars for each repository.
确切地说,您将构建一个程序包,该程序包将返回指定用户名的GitHub存储库列表,并按每个存储库的星数排序。
先决条件 (Prerequisites)
You will need the following to complete this tutorial:
您将需要以下内容才能完成本教程:
- A valid installation of Git version control 有效安装Git版本控制
Node.js installed locally, which you can do by following the instructions given on this page
Node.js在本地安装,您可以按照此页面上的说明进行操作
This tutorial was verified with Node v13.14.0, npm v6.14.4, and axios v0.20.0
本教程已通过Node v13.14.0,npm v6.14.4和axios v0.20.0进行了验证
第1步-初始设置 (Step 1 — Initial Setup)
Create a new folder with the name github-repos-search and initialize a package.json file
创建一个名为github-repos-search的新文件夹并初始化package.json文件
mkdir github-repos-search
cd github-repos-search
npm init -y
Initialize the current project as a git repository by running the following command from github-repos-search folder:
通过从github-repos-search文件夹中运行以下命令,将当前项目初始化为git存储库:
git init .Create a .gitignore file to exclude the node_modules folder. Add the following contents inside .gitignore file
创建一个.gitignore文件以排除node_modules文件夹。 在.gitignore文件中添加以下内容
node_modulesInstall the axios package that you will use to make a call to the GitHub API.
安装用于调用GitHub API的axios软件包。
npm install axios@0.20.0Your package.json will look like this now:
您的package.json现在看起来像这样:
{
  "name": "github-repos-search",
  "version": "1.0.0",
  "description": "",
  "main": "index.js",
  "dependencies": {
    "axios": "^0.20.0"
  },
  "devDependencies": {},
  "scripts": {
    "test": "echo \"Error: no test specified\" && exit 1"
  },
  "keywords": [],
  "author": "",
  "license": "ISC"
}
Inside the
package.jsonfile, the value for name isgithub-repos-search. So our package name after publishing to npm repository will becomegithub-repos-search. Also, the name has to be unique on the npm repository so first check if such npm repository already exists or not by navigating tohttps://www.npmjs.com/package/<your_repository_name_from_package_json>. Otherwise you will get an error while publishing the package to the npm repository if the name already exists.在
package.json文件中,name的值为github-repos-search。 因此,发布到npm存储库后的包名称将变为github-repos-search。 另外,该名称在npm存储库中必须是唯一的,因此请首先通过导航到https://www.npmjs.com/package/<your_repository_name_from_package_json>来检查该npm存储库是否已经存在 。 否则,如果名称已经存在,则在将软件包发布到npm存储库时会出现错误。
第2步-编写代码 (Step 2 — Writing the code)
Create a new file with the name index.js and add the following contents inside it:
创建一个名为index.js的新文件,并在其中添加以下内容:
const axios = require('axios');
const getRepos = async ({
  username = 'myogeshchavan97',
  page = 1,
  per_page = 30
} = {}) => {
  try {
    const repos = await axios.get(
      `https://api.github.com/users/${username}/repos?page=${page}&per_page=${per_page}&sort=updated`
    );
    return repos.data
      .map((repo) => {
        return {
          name: repo.name,
          url: repo.html_url,
          description: repo.description,
          stars: repo.stargazers_count
        };
      })
      .sort((first, second) => second.stars - first.stars);
  } catch (error) {
    return [];
  }
};getRepos().then((repositories) => console.log(repositories));
Let’s understand the code first.
首先让我们了解代码。
You have created a
getReposfunction that accepts an optional object withusername,pageandper_pageproperties.您已经创建了一个
getRepos函数,该函数接受具有username,page和per_page属性的可选对象。- Then you used object destructuring syntax for getting those properties out of the object. 然后,您使用对象解构语法从对象中获取那些属性。
- Passing an object to the function is optional so we have initialized it to default values if the object is not passed to the function like this: 将对象传递给函数是可选的,因此,如果未将对象传递给函数,则我们已将其初始化为默认值:
{
  username = 'myogeshchavan97',
  page = 1,
  per_page = 30
} = {}
The reason for assigning an empty object
{}is to not get an error while destructuringusernamefrom the object if the object is not passed. Check out my previous article to learn about destructuring in detail.分配空对象
{}的原因是,如果未传递该对象,则在从该对象中解构username不会出错。 查看我的上一篇文章 ,详细了解解构。- Then inside the function, you are making a call to the GitHub API by passing the required parameters to get the repositories of the specified user sorted by the updated date. 然后在函数内部,通过传递必需的参数来调用GitHub API,以获取按更新日期排序的指定用户的存储库。
const repos = await axios.get(
      `https://api.github.com/users/${username}/repos?page=${page}&per_page=${per_page}&sort=updated`
    );
Here, you are using async/await syntax so the
getReposfunction is declared as async.在这里,您使用的是异步/等待语法,因此
getRepos函数被声明为异步。Then you are selecting only the required fields from the response using the Array
mapmethod然后,您将使用Array
map方法从响应中仅选择必填字段
repos.data
  .map((repo) => {
    return {
      name: repo.name,
      url: repo.html_url,
      description: repo.description,
      stars: repo.stargazers_count
    };
  })
Then that result is sorted by descending order of stars so the first element in the list will be with the highest stars
然后,该结果将按照星的降序进行排序,因此列表中的第一个元素将具有最高的星
.sort((first, second) => second.stars - first.stars);- If there is any error, you are returning an empty array in the catch block. 如果有任何错误,则在catch块中返回一个空数组。
As the
getReposfunction is declared asasync, you will get back a promise so you are using.thenhandler to get the result of thegetReposfunction call and printing to the console.由于
getRepos函数被声明为async,因此您将获得一个getRepos,因此您将使用.then处理程序来获取getRepos函数调用的结果并打印到控制台。
getRepos().then((repositories) => console.log(repositories));第3步-执行代码 (Step 3 — Executing the code)
Now, run the index.js file by executing the following command from the command line:
现在,通过从命令行执行以下命令来运行index.js文件:
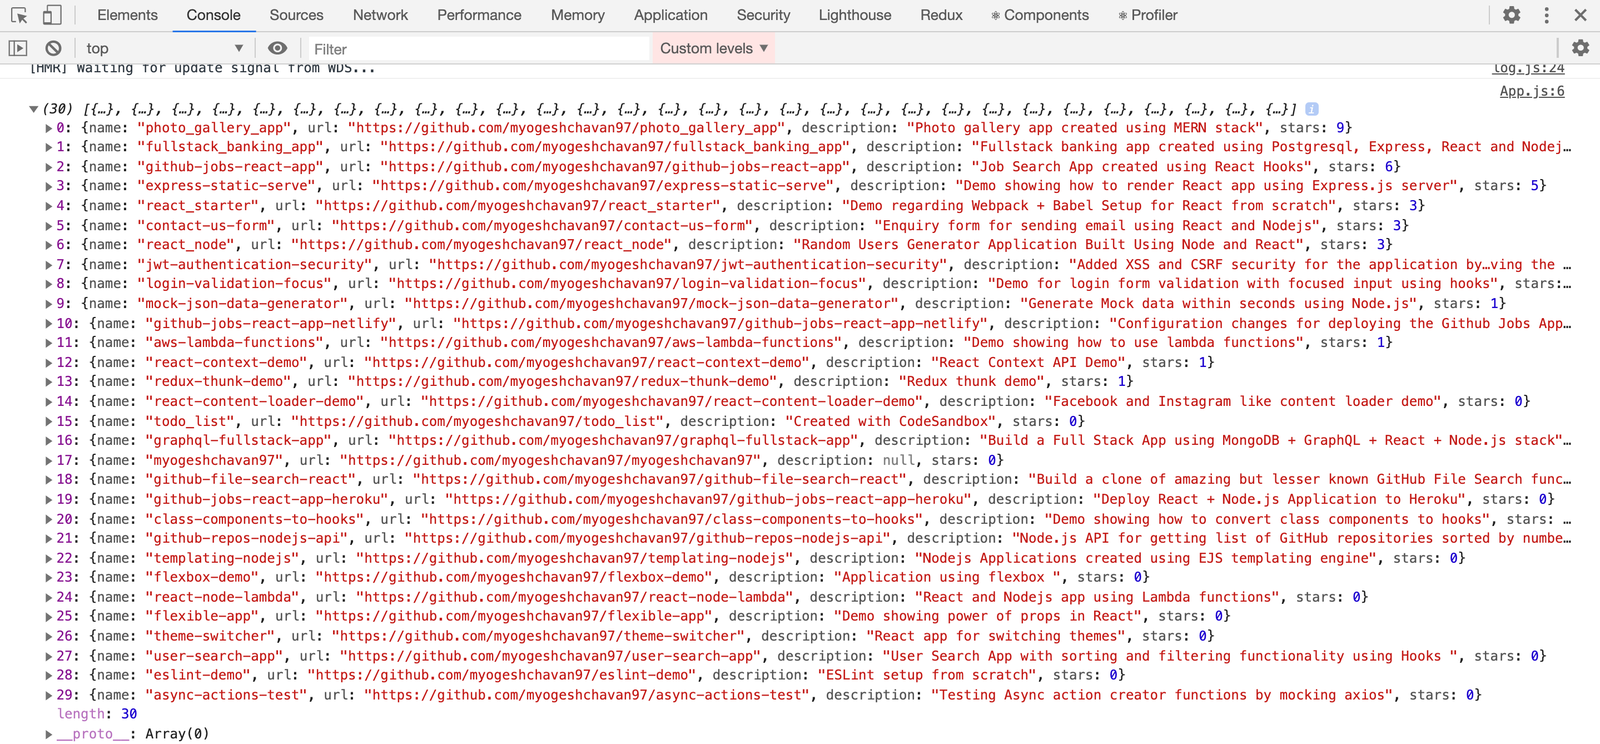
node index.jsYou will see the following output with the first 30 repositories:
您将看到前30个存储库的以下输出:
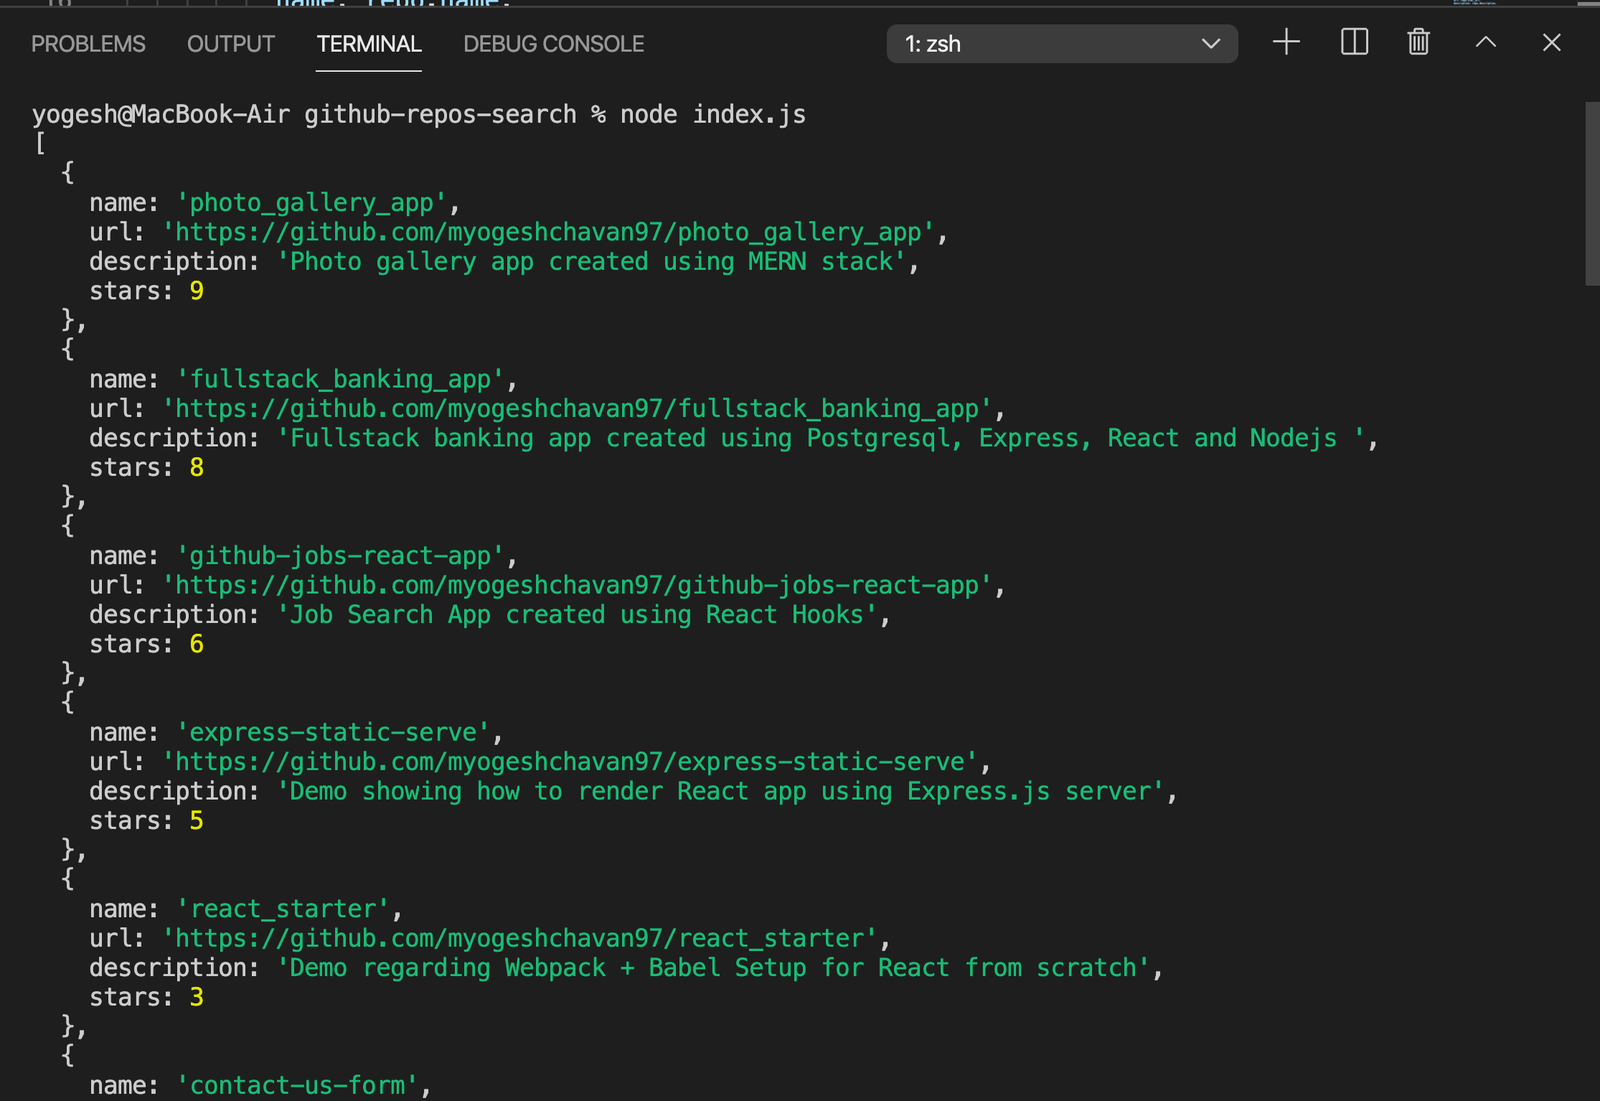
In the file, you have not provided the username so by default my repositories are displayed.Let’s change that to the following code:
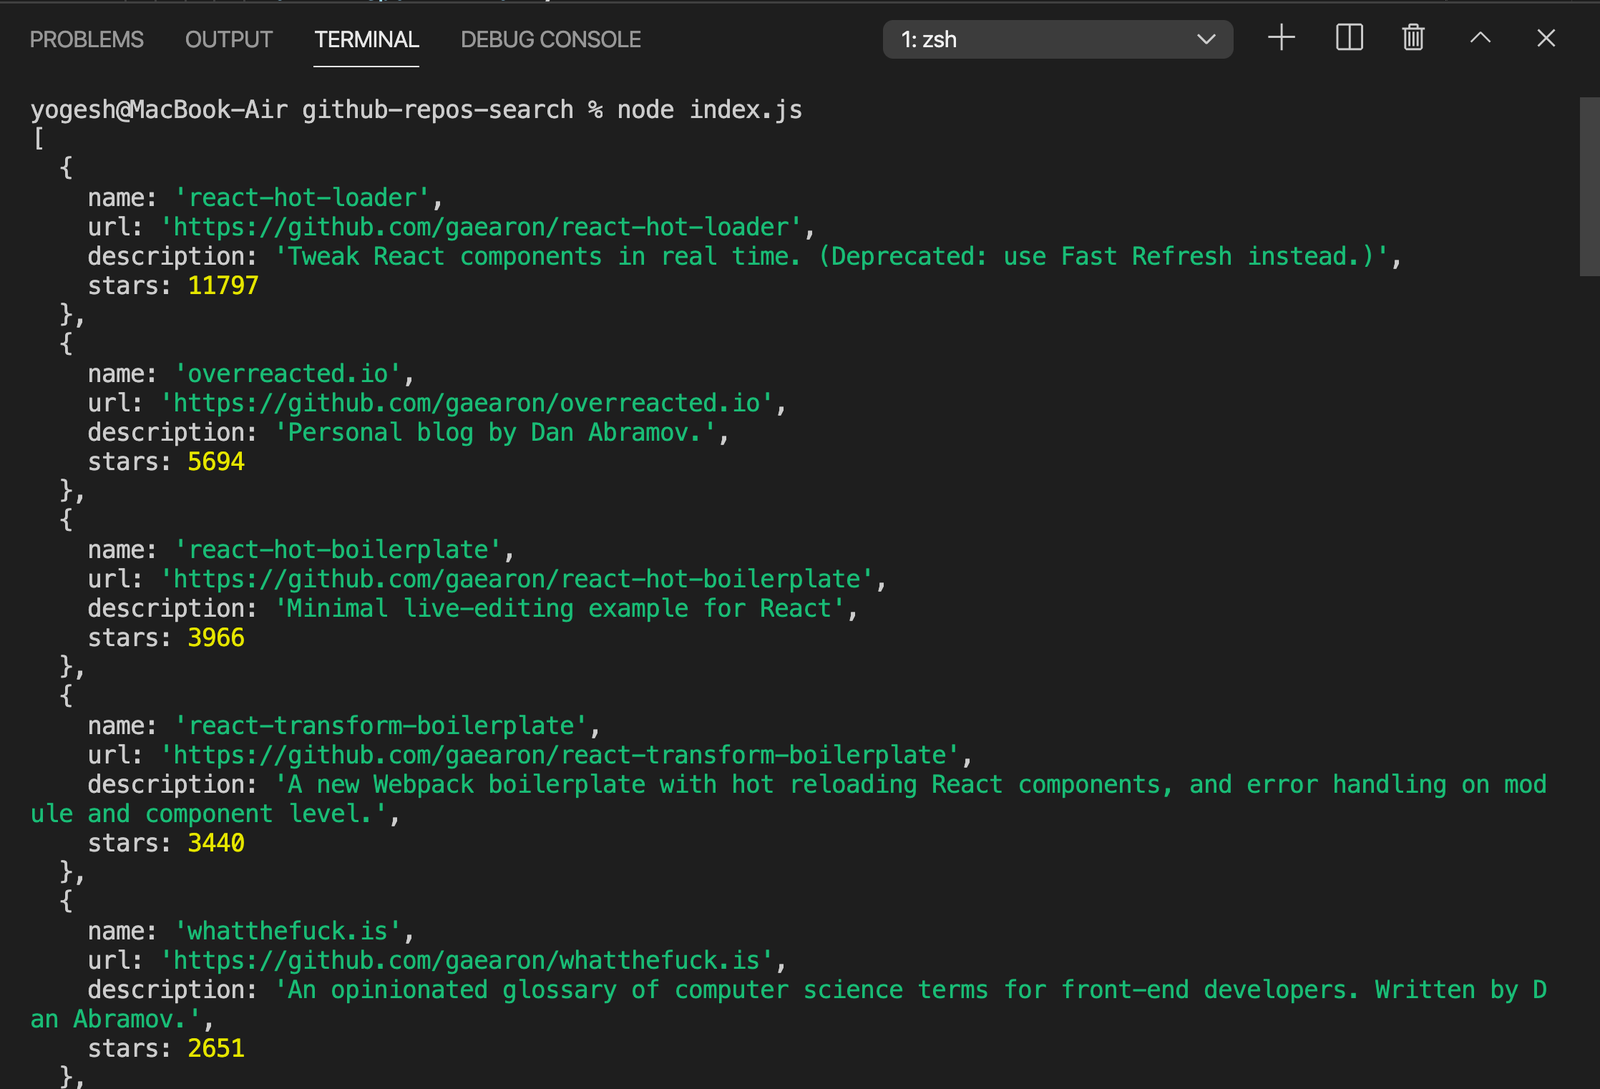
在文件中,您没有提供用户名,因此默认情况下会显示我的存储库,让我们将其更改为以下代码:
getRepos({
  username: 'gaearon'
}).then((repositories) => console.log(repositories));
Run the file again by executing node index.js command and you will see the following output:
通过执行node index.js命令再次运行该文件,您将看到以下输出:
You can choose to pass the page and per_page properties to change the response to get the first 50 repositories.
您可以选择传递page和per_page属性来更改响应以获取前50个存储库。
getRepos({
  username: 'gaearon',
  page: 1,
  per_page: 50
}).then((repositories) => console.log(repositories));
Now, you know that the functionality is working. Let’s export this module so you can call this getRepos method from any other file.
现在,您知道该功能正在运行。 让我们导出此模块,以便您可以从任何其他文件调用此getRepos方法。
So remove the below code from the file
因此,从文件中删除以下代码
getRepos({
  username: 'gaearon',
  page: 1,
  per_page: 50
}).then((repositories) => console.log(repositories));
and add the below line instead
并添加以下行
module.exports = { getRepos };Here, you are exporting the getRepos function as a property of the object so later if you want to export any other function you can easily add it to the object.
在这里,您getRepos函数导出为对象的属性,因此以后如果您要导出任何其他函数,可以轻松地将其添加到对象中。
So the above line is the same as
所以上面的线与
module.exports = { getRepos: getRepos };步骤4 —使用require语句测试创建的npm包 (Step 4 — Testing the created npm package using require statement)
Now, you are done with creating the npm package but before publishing it to the npm repository, you need to make sure it works when you use it using require or import statement.
现在,您已经完成了创建npm包的工作,但是在将其发布到npm存储库之前,需要确保在使用require或import语句使用它时可以正常使用。
There is an easy way to check that. Execute the following command from the command line from inside the github-repos-search folder:
有一个简单的方法来检查。 从github-repos-search文件夹内的命令行执行以下命令:
npm link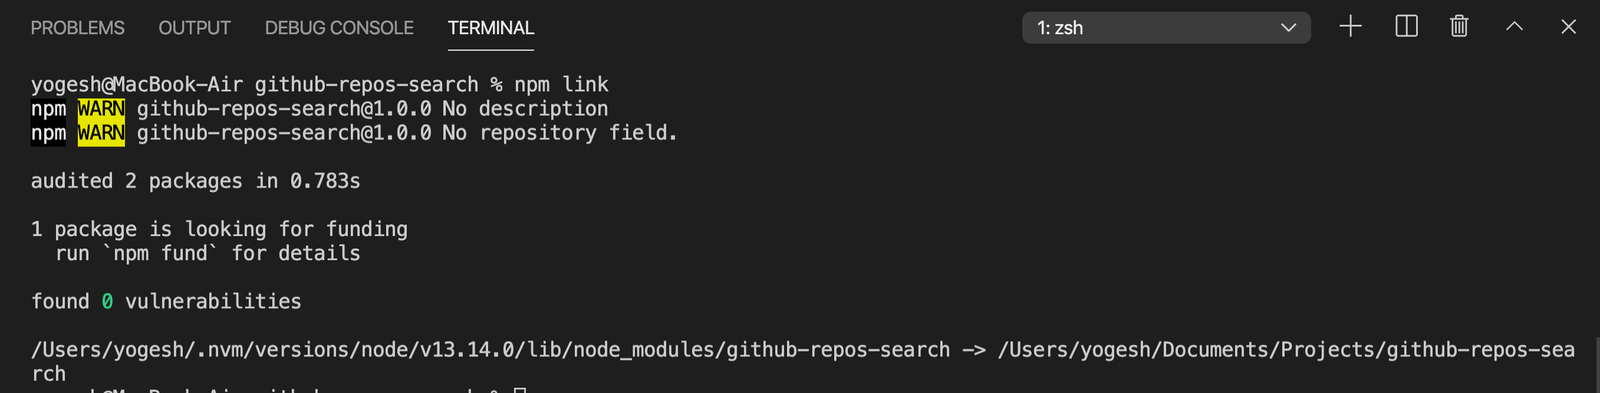
Executing npm link command creates a symbolic link for your current package inside the global npm node_modules folder (The same folder where our global npm dependencies get installed)
执行npm link命令会在全局npm node_modules文件夹(与安装我们的全局npm依赖node_modules文件夹相同)中为当前包创建一个符号链接。
So now you can use your created npm package inside any project.
因此,现在您可以在任何项目中使用创建的npm包。
Now, create a new folder on your desktop with any name for example test-repos-library-node and initialize a package.json file so you can confirm that the package is installed correctly:
现在,在桌面上使用任何名称(例如test-repos-library-node创建一个新文件夹,并初始化package.json文件,以便您可以确认该软件包已正确安装:
cd ~/Desktop
mkdir test-repos-library-node
cd test-repos-library-node
npm init -y
If you remember, the name property in our package’s package.json file was github-repos-search so you need to require the package using the same name.
如果您还记得的话,我们程序包的package.json文件中的name属性是github-repos-search因此您需要使用相同名称的程序包。
Now, execute the following command from inside the test-repos-library-node folder to use the package you created:
现在,从test-repos-library-node文件夹中执行以下命令以使用您创建的包:
npm link github-repos-search
Create a new file with the name index.js and add the following code inside it:
创建一个名为index.js的新文件,并在其中添加以下代码:
const { getRepos } = require('github-repos-search');getRepos().then((repositories) => console.log(repositories));Here, you have imported the package directly from the node_modules folder( This was only possible because you linked it using npm link)
在这里,您已经直接从node_modules文件夹中导入了软件包(这仅是因为您使用npm link进行了链接)
Now, run the file by executing it from the command line:
现在,通过从命令行执行文件来运行文件:
node index.jsYou will see the correct output displayed:
您将看到显示的正确输出:
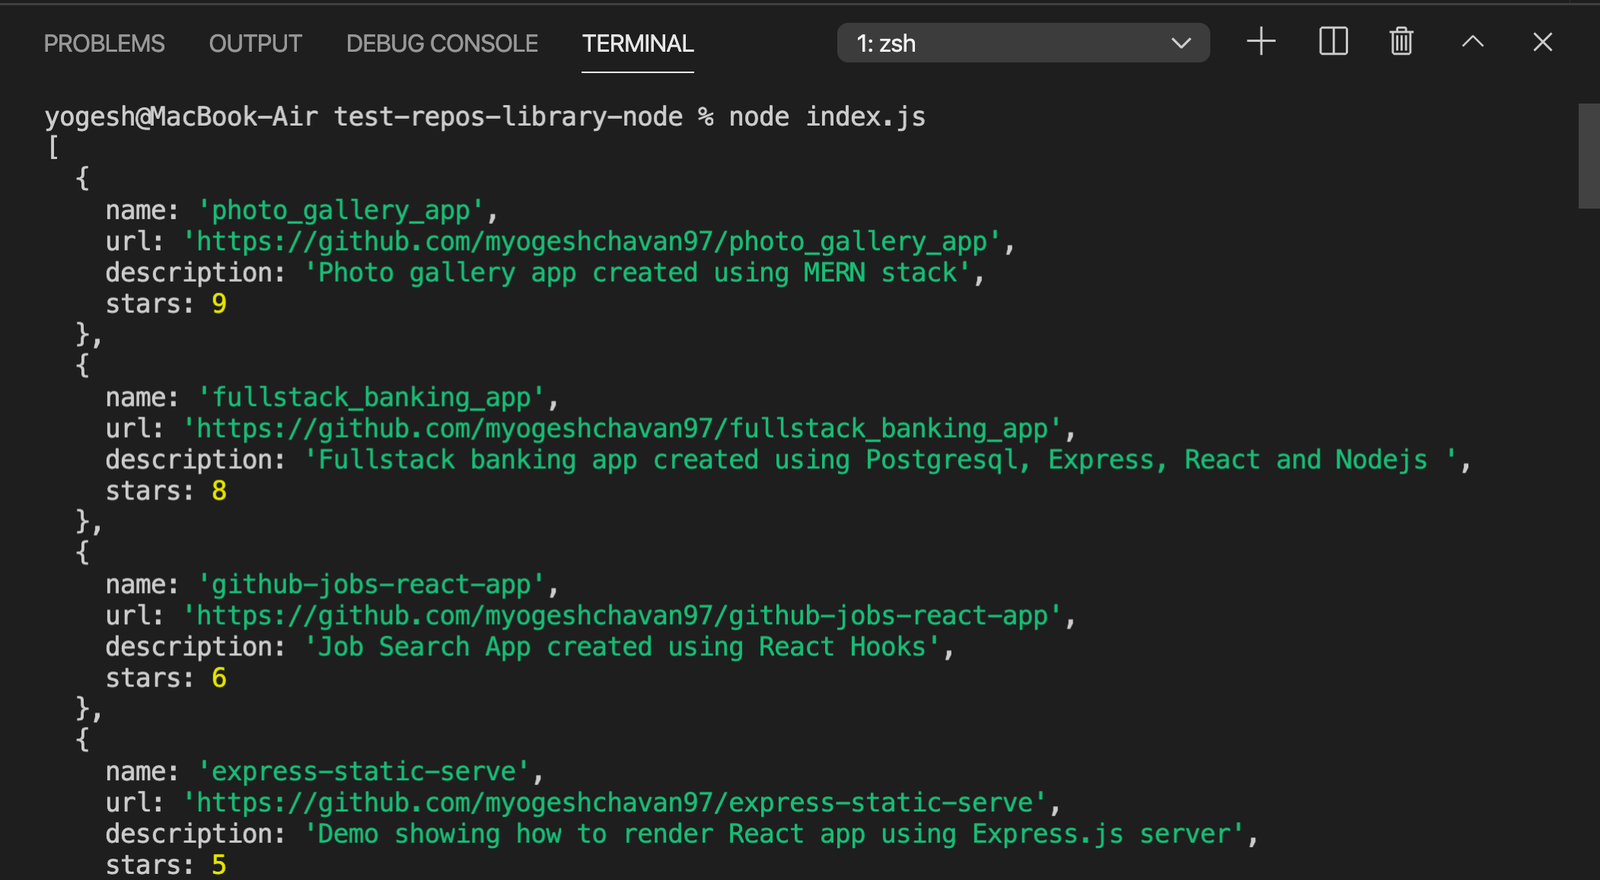
This proves that when you publish the npm package on the npm repository, anyone can use it by installing it and using the require statement.
这证明了,当您在npm存储库上发布npm软件包时,任何人都可以通过安装它并使用require语句来使用它。
第5步—使用导入语句测试创建的npm软件包 (Step 5 — Testing the created npm package using the import statement)
You have verified that the package works by using the require statement. Let’s verify it by using the ES6 import statement.
您已经使用require语句验证了该程序包可以工作。 让我们通过使用ES6 import语句来验证它。
Create a new React project by executing the following command from your desktop folder:
通过从桌面文件夹执行以下命令来创建新的React项目:
cd ~/Desktop
npx create-react-app test-repos-library-react
Now, execute the following command from inside the test-repos-library-react folder to use the package you created:
现在,从test-repos-library-react文件夹中执行以下命令以使用您创建的包:
npm link github-repos-searchNow, open src/App.s file and replace it with the following content:
现在,打开src/App.s文件并将其替换为以下内容:
import { getRepos } from 'github-repos-search';
import React from 'react';
import './App.css';function App() {
  getRepos().then((repositories) => console.log(repositories));  return (
    <div className="App">
      <h2>Open browser console to see the output.</h2>
    </div>
  );
}
export default App;
Start the React app by executing the following command from the terminal:
通过从终端执行以下命令来启动React应用程序:
yarn startIf you check the browser console, you will see the output as expected:
如果检查浏览器控制台,将看到预期的输出:
This proves that when you publish the npm package on npm repository, anyone can use it by installing it and using import statement.
这证明了,当您在npm存储库上发布npm软件包时,任何人都可以通过安装它并使用import语句来使用它。
第6步-发布到npm存储库 (Step 6 — Publish to the npm repository)
Now, you have verified that the package is working fine.It’s time to publish it to the npm repository.
现在,您已经确认该软件包可以正常工作了,是时候将其发布到npm存储库中了。
Switch back to the github-repos-search project folder where you have created the npm package.
切换回创建了npm包的github-repos-search项目文件夹。
Let’s add some metadata in the package.json file to display some more information about the package
让我们在package.json文件中添加一些元数据以显示有关该软件包的更多信息
Here is the final package.json file:
这是最终的package.json文件:
{
  "name": "github-repos-search",
  "version": "1.0.0",
  "description": "",
  "main": "index.js",
  "homepage": "https://github.com/myogeshchavan97/github-repos-search",
  "repository": {
    "type": "git",
    "url": "git+https://github.com/myogeshchavan97/github-repos-search.git"
  },
  "dependencies": {
    "axios": "^0.20.0"
  },
  "devDependencies": {},
  "scripts": {
    "test": "echo \"Error: no test specified\" && exit 1"
  },
  "keywords": [
    "github",
    "repos",
    "repositories",
    "sort",
    "stars"
  ],
  "author": "Yogesh Chavan <myogeshchavan97@gmail.com>",
  "license": "ISC"
}
You have added homepage, repository, keywords and author for more information(These are optional). Make changes as per your GitHub repository.
您已经添加了homepage , repository , keywords和author以获取更多信息(这些是可选的)。 根据您的GitHub存储库进行更改。
Create a new GitHub repository HERE and push github-repos-search repository to GitHub. Navigate to https://www.npmjs.com/ and create a new account If you don’t already have an account.
在此处创建一个新的GitHub存储库,并将github-repos-search存储库推送到GitHub。 导航到https://www.npmjs.com/并创建一个新帐户(如果您还没有帐户)。
Open the terminal and from inside the github-repos-search folder, execute the following command:
打开终端,然后从github-repos-search文件夹中执行以下命令:
npm loginand enter your npm credentials to log in.
并输入您的npm凭据登录。

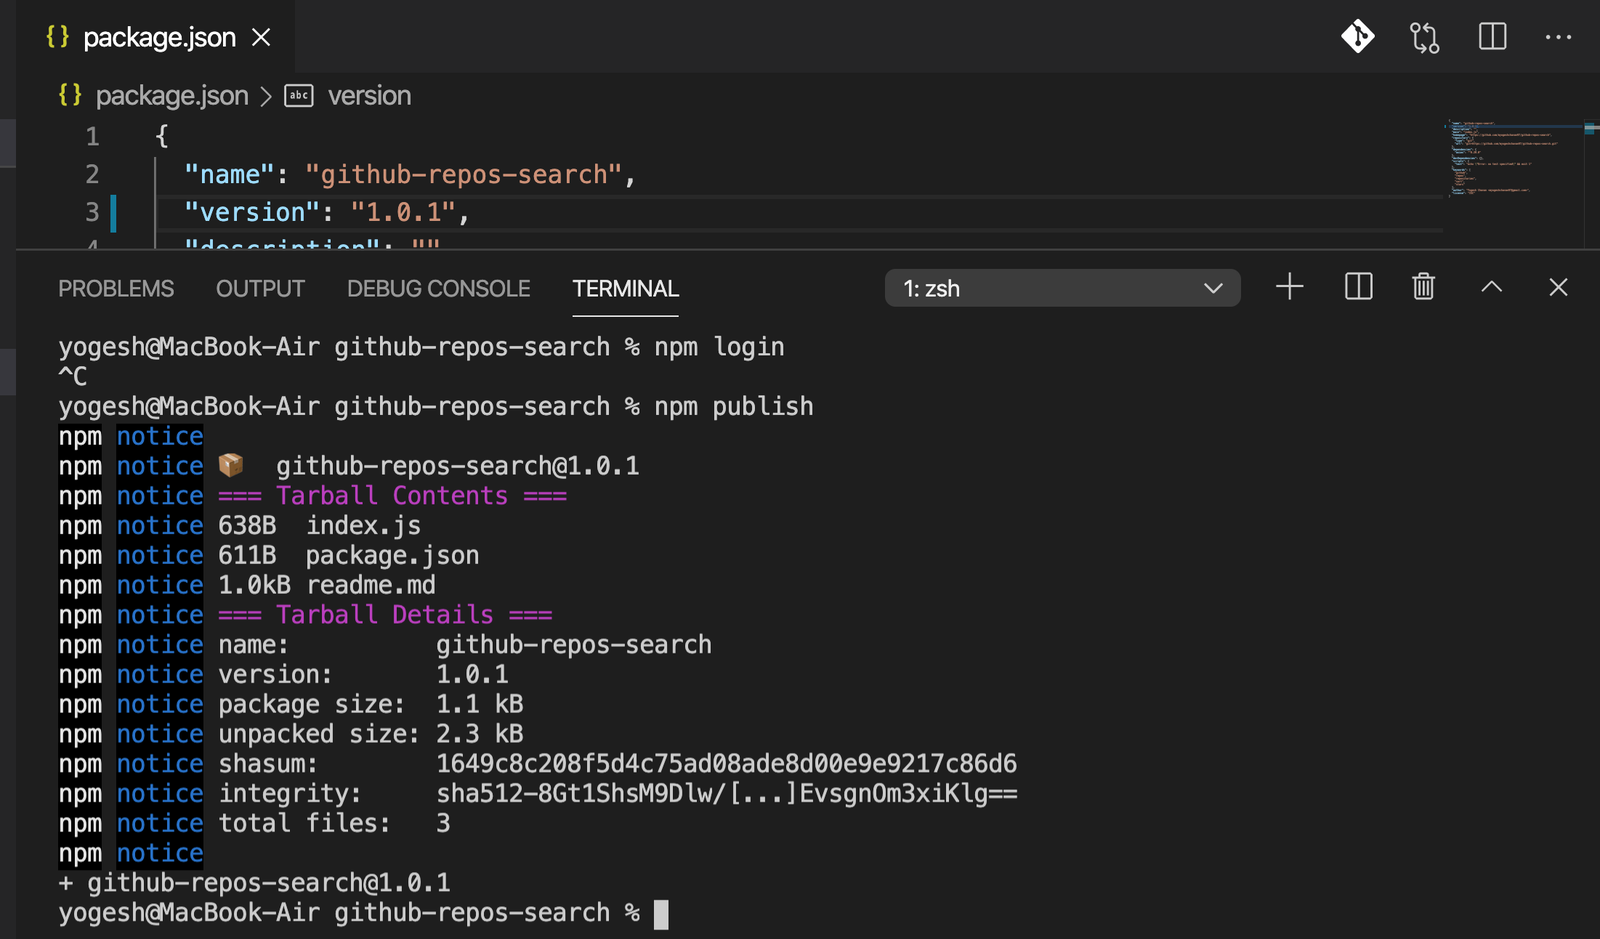
Now, to publish it to the npm repository run the following command:
现在,要将其发布到npm存储库,请运行以下命令:
npm publish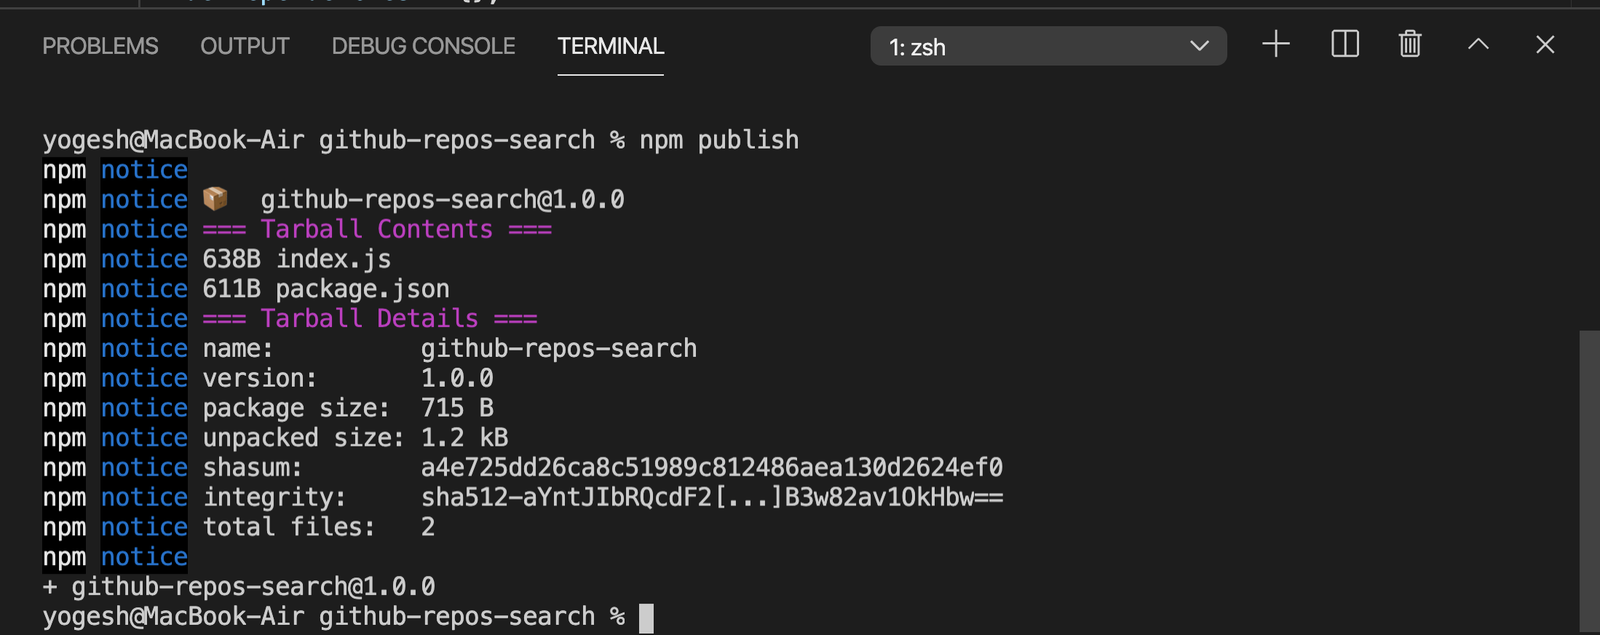
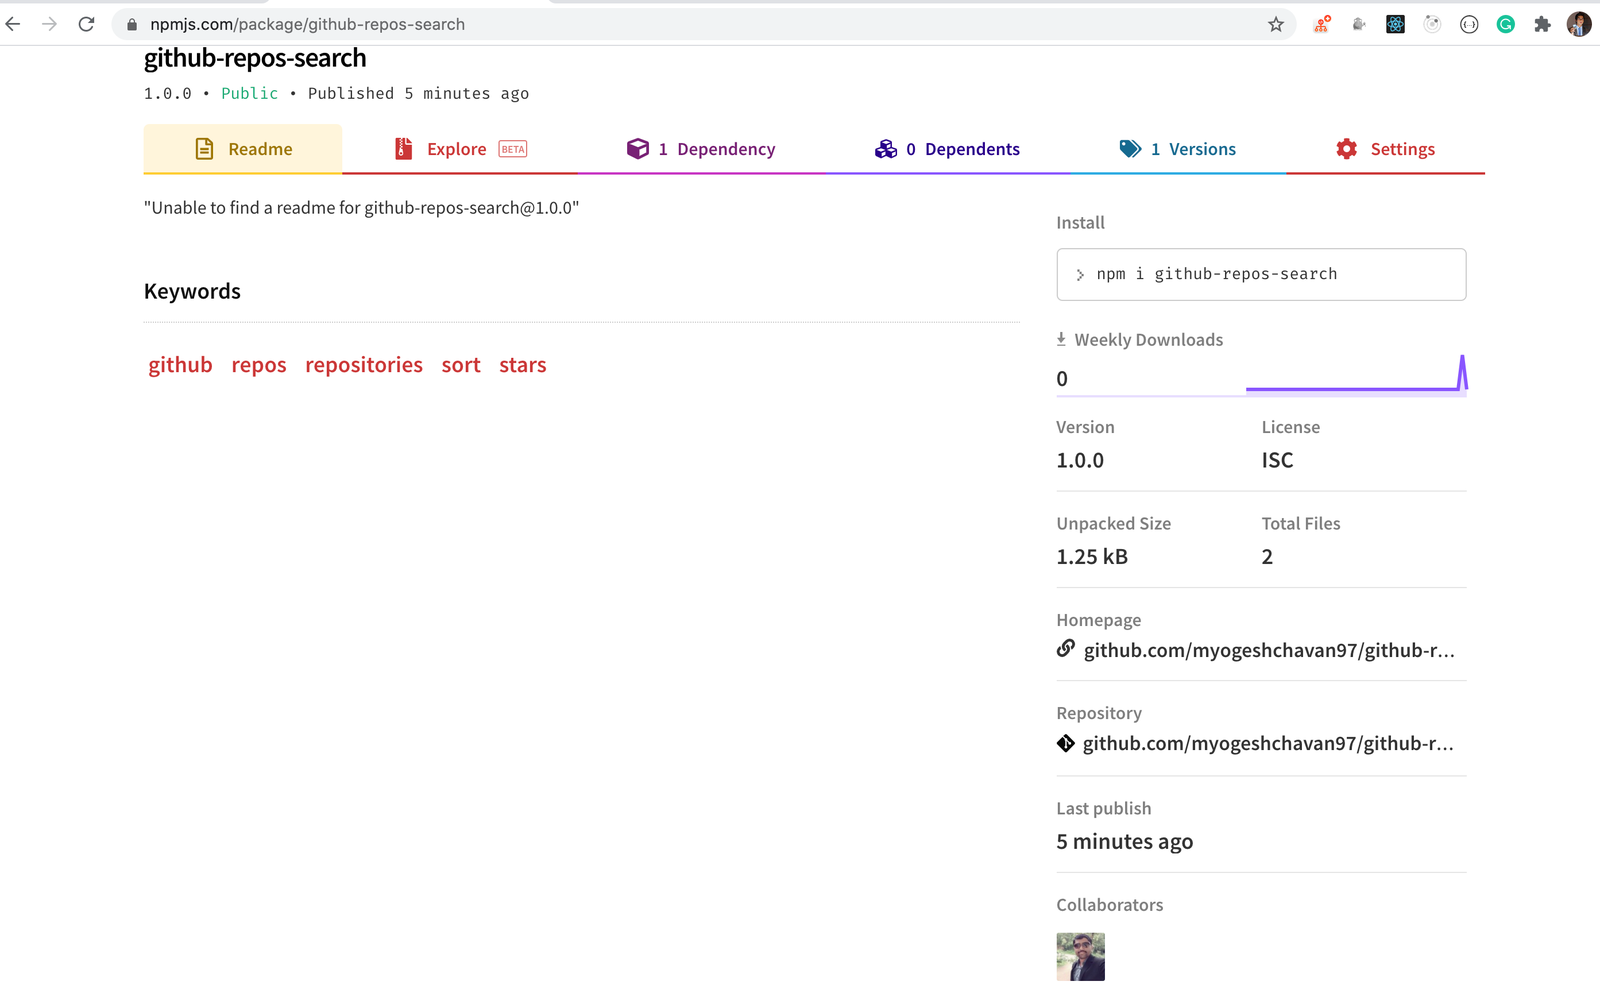
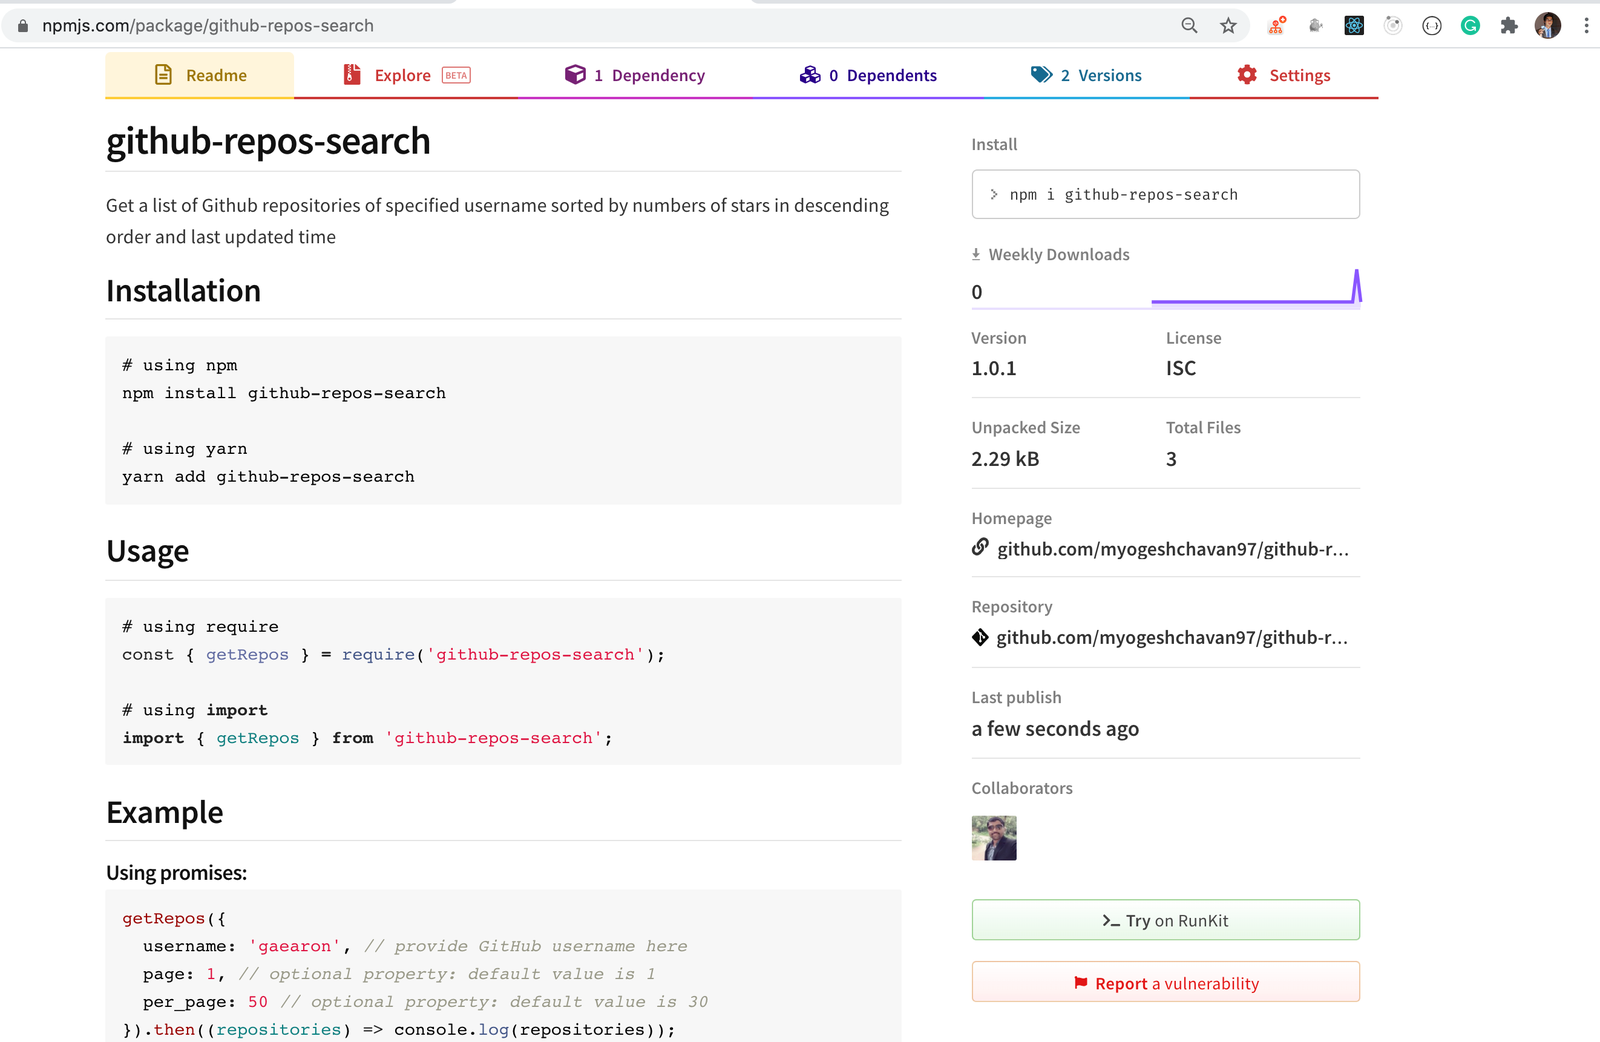
If you navigate to https://www.npmjs.com/package/github-repos-search in the browser, you will see your published package:
如果您在浏览器中导航到https://www.npmjs.com/package/github-repos-search ,您将看到已发布的软件包:
Now, let’s add a readme.md file for displaying some information regarding the package.
现在,让我们添加一个readme.md文件,以显示有关该软件包的一些信息。
Create a new file with the name readme.md inside the github-repos-search folder with the contents from here
在github-repos-search文件夹中创建一个名为readme.md的新文件,其内容来自此处
Let’s try to publish it again using the npm publish command.
让我们尝试使用npm publish命令再次发布它。
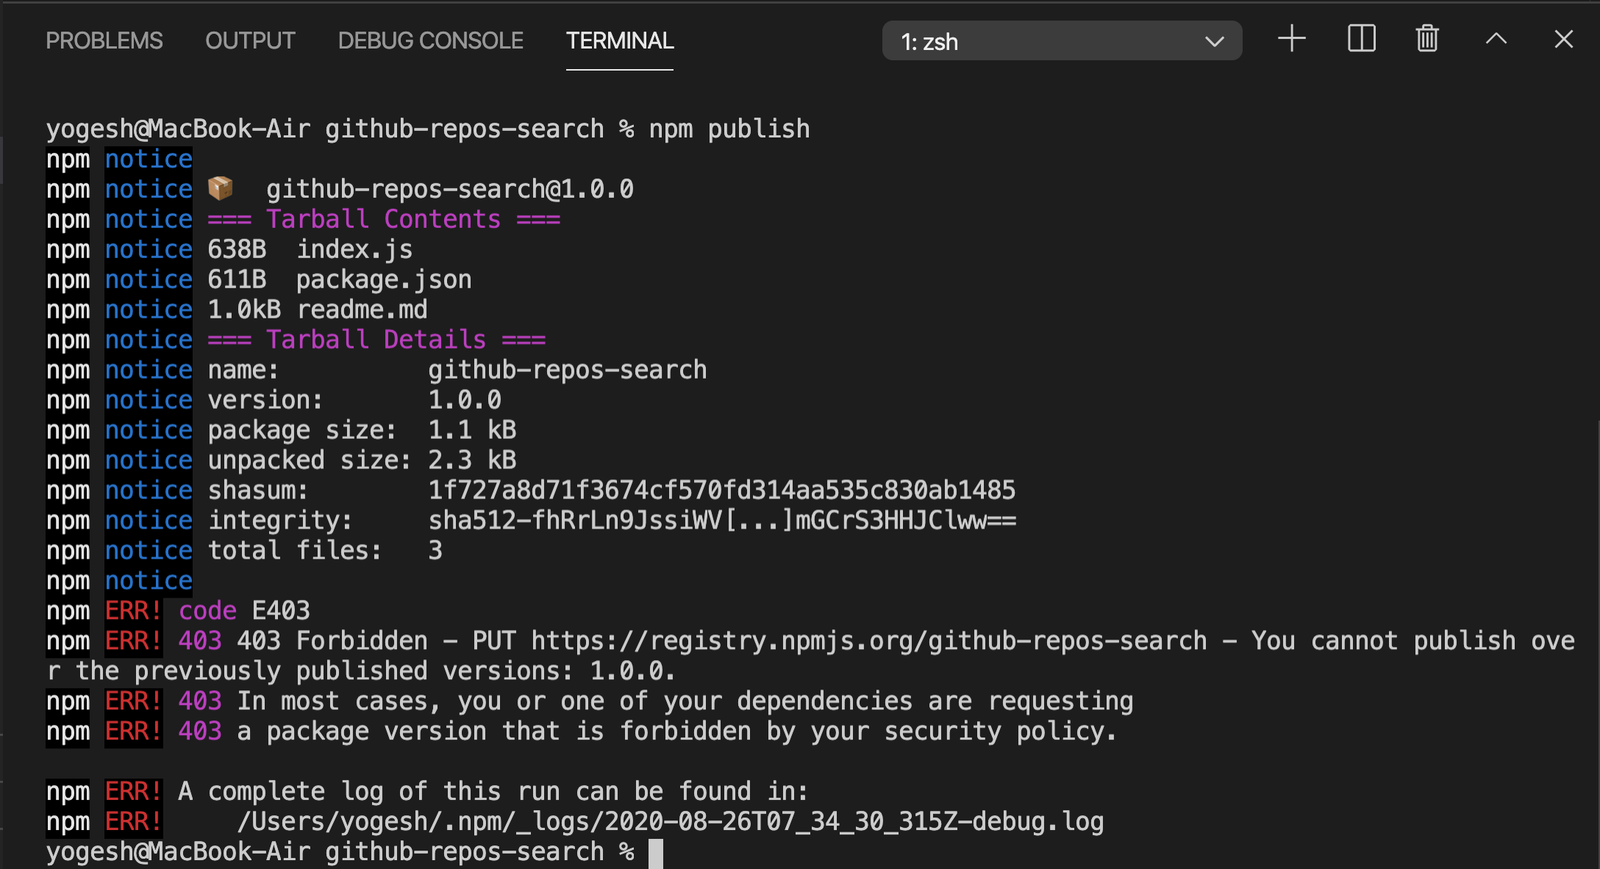
You will get an above error. This is because you are publishing the module with the same version again.
您将收到上述错误。 这是因为您要再次发布具有相同版本的模块。
If you check our package.json file, you will see that the version mentioned in the file is 1.0.0You need to increment it every time publishing a new change. So what should you increment to? For that, you need to understand the semantic versioning concept.
如果检查我们的package.json文件,您会看到文件中提到的版本是1.0.0每次发布新更改时,都需要对其进行递增。 那么您应该增加什么呢? 为此,您需要了解语义版本控制概念。
第7步-npm中的语义版本控制 (Step 7 — Semantic versioning in npm)
The version value is a combination of 3 digits separated by dot operator. Let’s say the version is a.b.c
版本值是由dot运算符分隔的3位数字的组合。 假设版本是abc
First value (
aina.b.c) specifies the major version of the package — It means this version has Major code changes and it might contain breaking API changes.第一个值(
a在abc)指定软件包的主要版本-这意味着这个版本有重大更改代码,它可能包含断裂API的变化。Second value (
bina.b.c) specifies the minor version which contains minor changes but will not contain breaking API changes.第二个值(
abcb)指定次要版本,该次要版本包含次要更改,但不会包含重大的API更改。Third value (
cina.b.c) specifies the patch version which usually contains bug fixes.第三个值(
abcc)指定修补程序版本,该版本通常包含错误修复程序。
In our case, you just added a readme.md file which is not an API change so you can increment the patch version which is the last digit by 1.
在我们的例子中,您只是添加了一个readme.md文件,该文件不是API更改,因此您可以将最后一位的补丁程序版本增加1。
So change the version inside package.json file from 1.0.0 to 1.0.1 and run the npm publish command again.
因此,将package.json文件中的版本从1.0.0更改为1.0.1 ,然后再次运行npm publish命令。
If you check the npm package now, you will see the updated npm package live here
如果您现在检查npm软件包,您将在此处看到更新的npm软件包
To learn in detail about semantic versioning check out my previous article
要详细了解semantic versioning请查看我以前的文章
结论 (Conclusion)
In this tutorial, you created an npm package and published it to the npm repository.
在本教程中,您创建了一个npm软件包并将其发布到npm存储库。
For the complete source code of this tutorial, check out the github-repos-search repository on GitHub. You can also see the published npm module here
有关本教程的完整源代码,请查看GitHub上的github-repos-search存储库。 您还可以在此处查看已发布的npm模块
Don’t forget to subscribe to get my weekly newsletter with amazing tips, tricks and articles directly in your inbox here.
不要忘记订阅,直接在 这里 的收件箱中获取我的每周新闻,其中包含惊人的提示,技巧和文章 。
翻译自: https://medium.com/swlh/how-to-create-and-publish-an-npm-package-17b5e1744f26
npm包 发布


 6194
6194


 被折叠的 条评论
为什么被折叠?
被折叠的 条评论
为什么被折叠?
 到【灌水乐园】发言


