


pytorch混合精度训练
TLDR: the torch.cuda.amp mixed-precision training module in PyTorch 1.6 delivers on its promise, delivering speed-ups of 50–60% in large model training jobs with just a handful of new lines of code.
TLDR:PyTorch 1.6中的torch.cuda.amp混合精度培训模块实现了其承诺,仅需少量新代码,即可在大型模型培训工作中提高50-60%的速度。
One of the most exciting additions expected to land in PyTorch 1.6, coming soon, is support for automatic mixed-precision training.
预计即将推出的PyTorch 1.6最激动人心的功能之一就是支持自动混合精度训练。
Mixed-precision training is a technique for substantially reducing neural net training time by performing as many operations as possible in half-precision floating point, fp16, instead of the (PyTorch default) single-precision floating point, fp32. Recent generations of NVIDIA GPUs come loaded with special-purpose tensor cores specially designed for fast fp16 matrix operations.
混合精度训练是用于通过执行如在半精度浮点,许多操作尽可能大幅度降低神经网络训练时间的技术fp16 ,代替(PyTorch默认)单精度浮点, fp32 。 新一代NVIDIA GPU装有专门为快速fp16矩阵运算而设计的专用张量内核。
However, up until now these tensor cores have remained difficult to use, as it has required writing reduced precision operations into your model by hand. This is where the automatic in automatic mixed-precision training comes in. The recently released torch.cuda.amp API will allow you to implement mixed precision training into your training scripts in just five lines of code!
但是,到目前为止,这些张量核心仍然难以使用,因为它需要手动将精度较低的运算写入模型中。 这是在自动混合精度训练自动用武之地。最近发布的torch.cuda.amp API可以让你实现在短短五年的行代码混合精度训练到你的训练脚本!
This post is a developer-friendly introduction to mixed precision training. We will:
这篇文章是对开发人员友好的混合精度培训的介绍。 我们会:
- Take a deep dive into mixed-precision training as a technique. 深入研究混合精度训练作为一种技术。
- Introduce tensor cores: what they are and how they work. 介绍张量核心:它们是什么以及它们如何工作。
Introduce the new PyTorch
ampAPI.介绍新的PyTorch
ampAPI。Benchmark three different networks trained using
amp.对使用
amp训练的三个不同网络进行基准测试。Discuss which network archetypes will benefit the most from
amp.讨论哪种网络原型将从
amp受益最大。
混合精度如何工作 (How mixed precision works)
Before we can understand how mixed precision training works, we first need to review a little bit about floating point numbers.
在我们了解混合精度训练的工作原理之前,我们首先需要回顾一下浮点数。
In computer engineering, decimal numbers like 1.0151 or 566132.8 are traditionally represented as floating point numbers. Since we can have infinitely precise numbers (think π), but limited space in which to store them, we have to make a compromise between precision (the number of decimals we can include in a number before we have to start rounding it) and size (how many bits we use to store the number).
在计算机工程中,传统上将十进制数(如1.0151或566132.8)表示为浮点数。 由于我们可以具有无限精确的数字(认为π),但是存储它们的空间有限,因此我们必须在精度(必须先舍入到数字之前将其包括在数字中)中的小数位数和大小之间做出折衷(我们用来存储数字的位数)。
The technical standard for floating point numbers, IEEE 754 (for a deep dive I recommend the PyCon 2019 talk “Floats are Friends: making the most of IEEE754.00000000000000002”), sets the following standards:
浮点数的技术标准IEEE 754(为深入探讨,我建议PyCon 2019演讲“ Floats are Friends:充分利用IEEE754.00000000000000002 ”)设置了以下标准:
fp64, aka double-precision or “double”, max rounding error of ~2^-52fp64,又称双精度或“双精度”,最大舍入误差为fp64^ -52fp32, aka single-precision or “single”, max rounding error of ~2^-23fp32,又称单精度或“单”,最大舍入误差为〜2 ^ -23fp16, aka half-precision or “half”, max rounding error of ~2^-10fp16,又称半精度或“一半”,最大舍入误差为fp16^ -10
Python uses fp64 for the float type. PyTorch, which is much more memory-sensitive, uses fp32 as its default dtype instead.
Python将fp64用作float type 。 PyTorch对内存更敏感,它使用fp32 as其默认dtype 。
The basic idea behind mixed precision training is simple: halve the precision (fp32 → fp16), halve the training time.
后面的混合精密训练的基本思想很简单:减半精度( fp32 → fp16 ),减半训练时间。
The hard part is doing so safely.
困难的部分是安全地这样做。
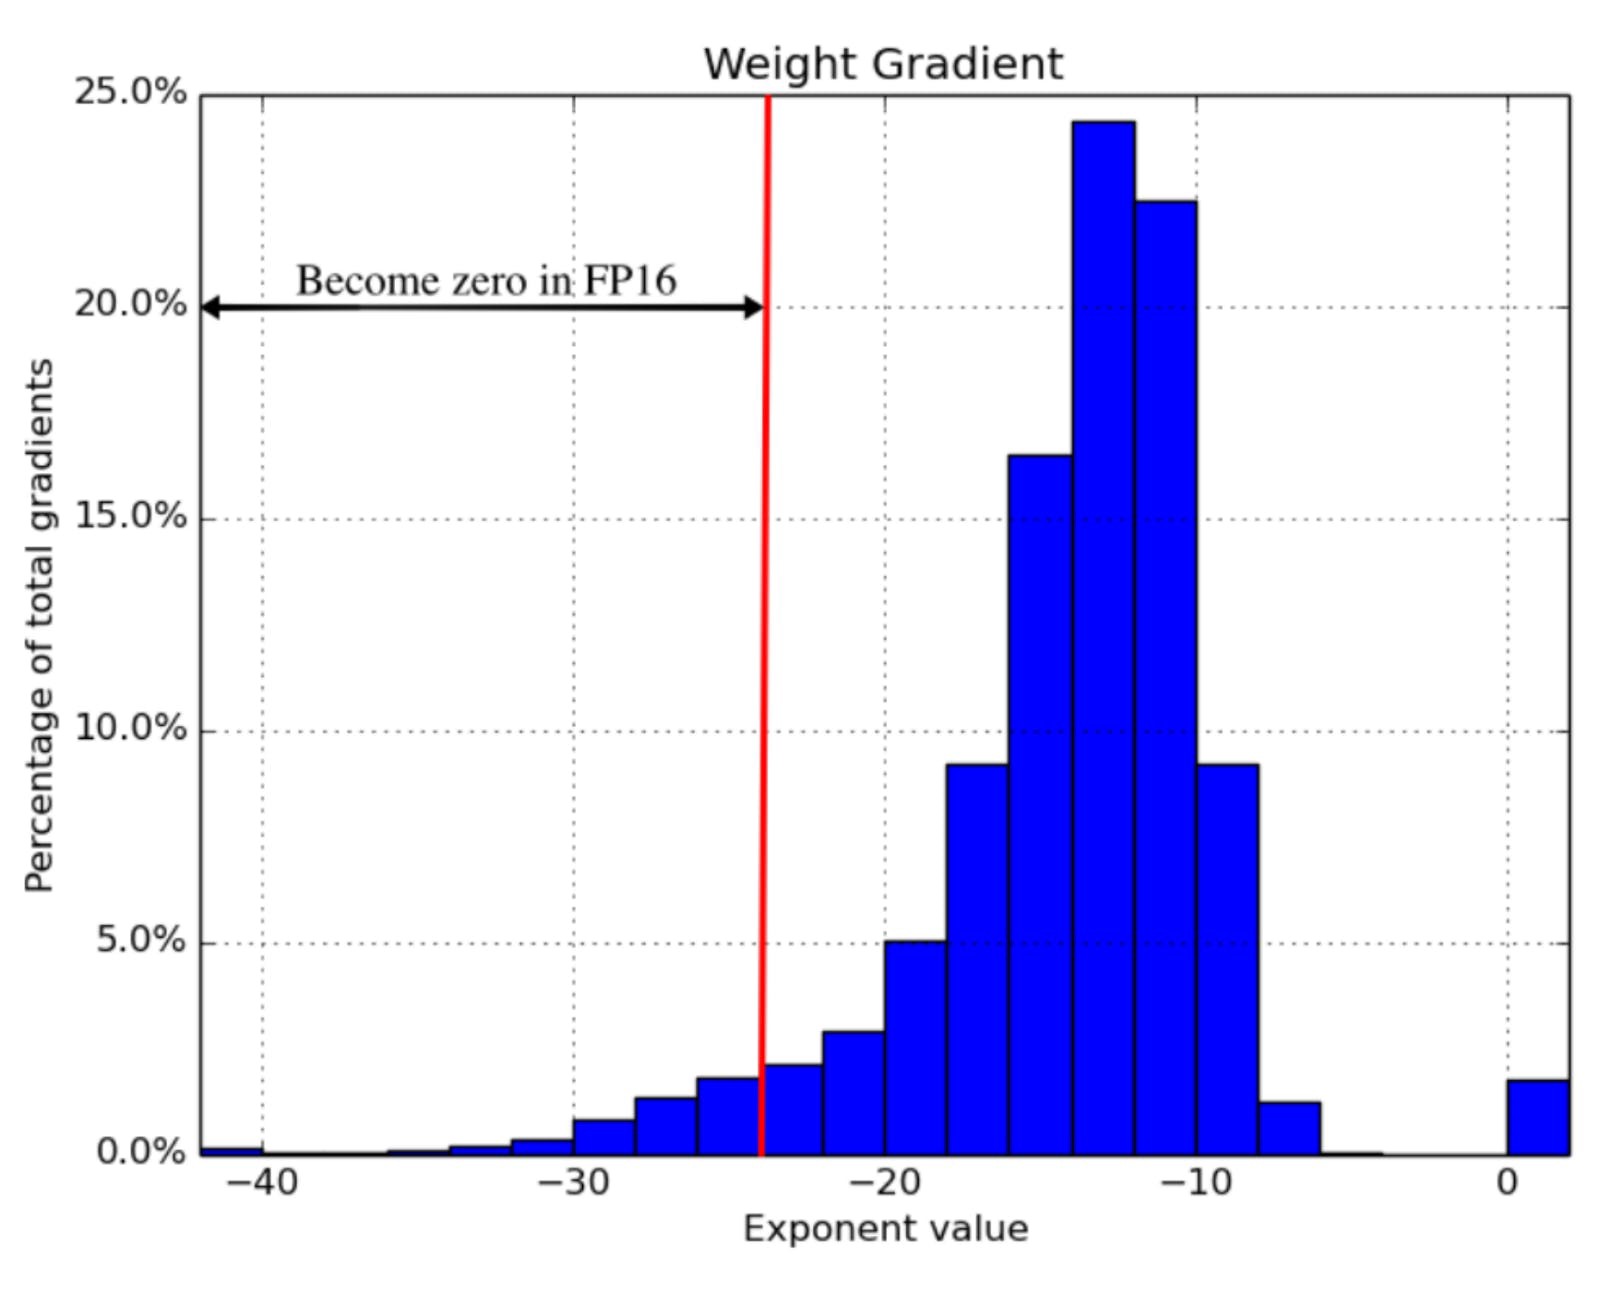
Notice that the smaller the floating point, the larger the rounding errors it incurs. Any operation performed on a “small enough” floating point number will round the value to zero! This is known as underflowing, and it’s a problem because many to most gradient update values created during backpropogation are extremely small but nevertheless non-zero. Rounding error accumulation during backpropogation can turn these numbers into zeroes or nans; this creates inaccurate gradient updates and prevents your network from converging.
注意,浮点越小,舍入误差越大。 对“足够小”的浮点数执行的任何操作均会将值四舍五入! 这被称为下溢,这是一个问题,因为在反向传播过程中创建的许多到大多数梯度更新值都非常小,但非零。 反向传播期间的舍入误差累积会将这些数字变为零或nan。 这会导致梯度更新不准确,并阻止您的网络融合。
The 2018 ICLR paper Mixed Precision Training found that naively using fp16 everywhere “swallows” gradient updates smaller than 2^-24 in value — around 5% of all gradient updates made by their example network:
2018年ICLR论文《混合精度训练》发现,天真地在所有地方使用fp16 “吞噬”小于2 ^ -24的渐变更新,大约是其示例网络进行的所有渐变更新的5%:
Mixed precision training is a set of techniques which allows you to use fp16 without causing your model training to diverge. It’s a combination of three different techniques.
混合精度训练是一组技术,可让您使用fp16而不会导致模型训练发散。 它是三种不同技术的组合。
One, maintain two copies of the weights matrix, a “master copy” in fp32, and a half-precision copy of it in fp16. Gradient updates are calculated using the fp16 matrix but applied to the fp32 matrix. This makes applying the gradient update much safer.
一,保持权重矩阵,“主副本”中的两个副本fp32 ,并在它的半精度副本fp16 。 梯度更新所使用的计算fp16矩阵,但应用到fp32矩阵。 这使得应用渐变更新更加安全。
Two, different vector operations accumulate errors at different rates, so treat them differently. Some operations are always safe in fp16, but others are only reliable in fp32. Instead of running the entire neural network in fp16, run some parts in halves and others in singles. This mixture of dtypes is why this technique is called “mixed precision”.
两个不同的向量运算会以不同的速率累积错误,因此请区别对待。 有些操作始终处于安全的fp16 ,但其他人只有在可靠的fp32 。 与其在fp16中运行整个神经网络, fp16将它们的某些部分分成两半运行,而另一些fp16运行。 dtype的这种混合是为什么将此技术称为“混合精度”的原因。
Three, use loss scaling. Loss scaling means multiplying the output of the loss function by some scalar number (the paper suggests starting with 8) before performing back-propagation. Multiplicative increases in the loss values create multiplicative increases in gradient update values, “lifting” many gradient update values above the 2^-24 threshold for fp16 safety. Just make sure to undo the loss scaling before applying the gradient update, and don’t pick a loss scaling so large that it produces inf weight updates (overflowing), causing the network to diverge in the other direction.
第三,使用损耗定标。 损耗定标意味着在执行反向传播之前,将损耗函数的输出乘以某个标量(本文建议从8开始)。 损失值的乘法增加会导致梯度更新值的乘法增加,从而将许多梯度更新值“提升”到fp16安全性的2 ^ -24阈值以上。 只需确保在应用梯度更新之前撤消损耗定标,并且不要选择太大的损耗定标以至于它会产生inf权重更新(溢出),从而导致网络朝另一个方向发散。
Combining these three techniques in tandem allowed the authors to train a variety of networks to convergence in significantly expedited time. For benchmarks, I recommend reading the paper — it’s only 9 pages long!
结合使用这三种技术,使作者能够训练各种网络,从而在相当短的时间内收敛。 对于基准测试,我建议您阅读该论文-只有9页!
张量核心如何工作 (How tensor cores work)
While mixed precision training saves memory everywhere (an fp16 matrix is half the size of a fp32 one), it doesn’t provide a model training speedup without special GPU support. There needs to be something on the chip that accelerates half-precision operations. In recent generations of NVIDIA GPUs, there is: tensor cores.
虽然混合精度训练处处节省内存(一个fp16矩阵是一个尺寸的一半fp32一个),它不提供无特殊GPU支持模式训练加速。 芯片上必须有某种东西可以加速半精度运算。 在近代的NVIDIA GPU中,有:张量内核。
Tensor cores are a new type of processing unit that’s optimized for a single very specific operation: multiplying two 4 x 4 fp16 matrices together and adding the result to a third 4 x 4 fp16 or fp32 matrix (a “fused multiply add”).
张量内核是一种新的类型的处理单元的一个专门针对单个非常具体的操作而优化:两个4×4相乘fp16矩阵在一起并把结果加到三分之一4×4 fp16或fp32矩阵(“融合乘法添加”)。
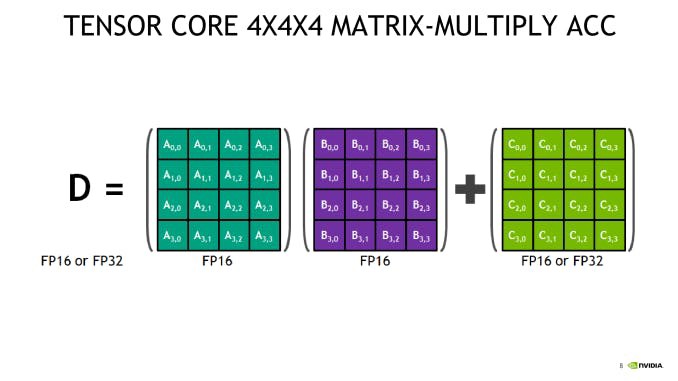
Larger fp16 matrix multiplication operations can be implemented using this operation as their basic building block. And since most of backpropagation boils down to matrix multiplication, tensor cores are applicable to almost any computationally intensive layer in the network.
较大的fp16矩阵乘法运算可以使用此运算作为其基本构造块来实现。 而且由于大多数反向传播归结为矩阵乘法,因此张量核心可应用于网络中几乎所有计算密集型层。
The catch: the input matrices must be in fp16. If you’re training on a GPU with tensor cores and not using mixed precision training, you’re not getting 100% out of your card! A standard PyTorch model defined in fp32 will never land any fp16 math onto the chip, so all of those sweet, sweet tensor cores will remain idle.
问题是:输入矩阵必须在fp16 。 如果您正在使用具有张量核心的GPU进行训练,而不是使用混合精度训练,那么您将不会从卡中获得100%的收益! 在定义的标准PyTorch模型fp32永远土地的fp16运算到芯片上,因此所有的那些甜蜜,甜蜜的张芯将保持空闲。
Tensor cores were introduced in late 2017 in the last-gen Volta architecture, saw improvement in current-gen Turing, and will see further refinements in the still-forthcoming Ampere. The two GPUs generally available on the cloud that support are the V100 (5120 CUDA cores, 600 tensor cores) and the T4 (2560 CUDA cores, 320 tensor cores).
Tensor内核于2017年底在上一代Volta架构中引入,在当前一代的Turing中得到了改进,并将在即将面世的Ampere中进行进一步的改进。 云上通常可用的两个支持的GPU是V100 (5120个CUDA内核,600张量内核)和T4 (2560个CUDA内核,320张量内核)。
One other piece of the puzzle worth keeping in mind is firmware. Although all versions of CUDA 7.0 or higher supports tensor core operations, early implementations are reputedly very buggy, so it’s important to be on CUDA 10.0 or higher.
值得牢记的另一难题是固件。 尽管所有版本的CUDA 7.0或更高版本都支持张量核心操作,但据说早期的实现非常容易出错,因此使用CUDA 10.0或更高版本很重要。
PyTorch自动混合精度的工作原理 (How PyTorch automatic mixed precision works)
With that important background out of the way, we’re finally ready to dig into the new PyTorch amp API.
有了重要的背景知识,我们终于可以开始研究新的PyTorch放大器API。
Mixed precision training has technically been possible forever: run sections of your network in fp16 manually and implement loss scaling yourself. The exciting thing in automatic mixed-precision training is the “automatic” part. There’s just a couple of new API primitives to learn: torch.cuda.amp.GradScalar and torch.cuda.amp.autocast. Enabling mixed precision training is as simple as slotting these into the right places in your training script!
混合精度培训从技术上讲永远是可能的:手动在fp16运行网络的fp16部分,并fp16实现损耗扩展。 自动混合精度训练中令人兴奋的事情是“自动”部分。 仅需学习几个新的API原语: torch.cuda.amp.GradScalar和torch.cuda.amp.autocast 。 启用混合精确度训练就像将它们放入训练脚本中的正确位置一样简单!
To demonstrate, here’s an excerpt of the training loop for a network using mixed-precision training. # NEW marks spots where new code got added.
为了演示,这是使用混合精度训练的网络训练循环的摘录。 # NEW标记添加新代码的位置。
self.train()
X = torch.tensor(X, dtype=torch.float32)
y = torch.tensor(y, dtype=torch.float32)optimizer = torch.optim.Adam(self.parameters(), lr=self.max_lr)
scheduler = torch.optim.lr_scheduler.OneCycleLR(
    optimizer, self.max_lr,
    cycle_momentum=False,
    epochs=self.n_epochs,
    steps_per_epoch=int(np.ceil(len(X) / self.batch_size)),
)
batches = torch.utils.data.DataLoader(
    torch.utils.data.TensorDataset(X, y),
    batch_size=self.batch_size, shuffle=True
)# NEW
scaler = torch.cuda.amp.GradScaler()for epoch in range(self.n_epochs):
    for i, (X_batch, y_batch) in enumerate(batches):
        X_batch = X_batch.cuda()
        y_batch = y_batch.cuda()
        optimizer.zero_grad()        # NEW
        with torch.cuda.amp.autocast():
            y_pred = model(X_batch).squeeze()
            loss = self.loss_fn(y_pred, y_batch)        # NEW
        scaler.scale(loss).backward()
        lv = loss.detach().cpu().numpy()
        if i % 100 == 0:
            print(f"Epoch {epoch + 1}/{self.n_epochs}; Batch {i}; Loss {lv}")        # NEW
        scaler.step(optimizer)
        scaler.update()

        scheduler.step()
The new PyTorch GradScaler object is PyTorch’s implementation of loss scaling. Recall from the section “How mixed precision works” that some form of loss scaling is necessary to keep gradients from rounding down to 0 during training. The optimal loss multiplier is one sufficiently high to retain very small gradients, but not so high that it causes very large gradients to round up to inf, creating the opposite problem.
新的PyTorch GradScaler对象是PyTorch的损耗缩放实现。 回顾“混合精度的工作原理”部分,必须采取某种形式的损耗定标,以防止训练期间将梯度舍入为0。 最佳损耗乘数足够高,可以保留很小的梯度,但又不能太高,以至于会导致很大的梯度舍入为inf,从而产生相反的问题。
However, there is no one loss multiplier that will work for every network. The optimal multiplier is also very likely to change over time, as gradients are typically much larger at the start of training than at the end. How do you find the optimal loss multiplier without giving the user another hyperparameter that they have to tune?
但是,没有一个损耗乘数适用于每个网络。 最佳乘数也很可能随时间而变化,因为梯度通常在训练开始时要比结束时大得多。 您如何找到最佳损耗乘数而不给用户他们必须调整的另一个超参数?
PyTorch uses exponential backoff to solve this problem. GradScalar starts with a small loss multiplier, which every so often it doubles. This gradual doubling behavior continues until GradScalar encounters a gradient update containing inf values. GradScalar discards this batch (e.g. the gradient update is skipped), halves the loss multiplier, and resets its doubling cooldown.
PyTorch使用指数补偿来解决此问题。 GradScalar从一个小的损耗乘数开始,每隔一倍它就会翻倍。 这种逐渐加倍的行为一直持续到GradScalar遇到包含inf值的渐变更新为止。 GradScalar放弃该批次(例如,跳过梯度更新),将损失乘数减半,并重置其倍增冷却时间。
Stepping the loss multiplier up and down in this way allows PyTorch to approximate the appropriate loss multiplier over time. Readers familiar with TCP congestion control should find the core ideas here very familiar! The exact numbers used by the algorithm are configurable, and you can read the defaults right out of the docstring:
以这种方式逐步增加和减少损耗乘数,PyTorch可以随时间近似适当的损耗乘数。 熟悉TCP拥塞控制的读者应该在这里发现非常熟悉的核心思想! 该算法使用的确切数字是可配置的,您可以直接从文档字符串中读取默认值:
torch.cuda.amp.GradScaler(
    init_scale=65536.0, growth_factor=2.0, backoff_factor=0.5,
    growth_interval=2000, enabled=True
)
GradScalar needs to exert control over the gradient update calculations (to check for overflow) and over the optimizer (to turn discarded batches into a no-op) to implement its behavior. This is why loss.backwards() is replaced with scaler.scale(loss).backwards() and optimizer.step() is replaced with scaler.step(optimizer).
GradScalar需要控制渐变更新计算(以检查溢出)和优化器(将废弃的批次转换为无操作),以实现其行为。 这就是为什么将loss.backwards()替换为scaler.scale(loss).backwards()并将optimizer.step()替换为scaler.step(optimizer) 。
It’s notable that GradScalar will detect and stop overflows (because inf is always bad), but it has no way to detect and stop underflows (because 0 is often a legitimate value). If you pick an init_scale that’s too low and a growth_interval that’s too high, your network may underflow and diverge before GradScalar can intervene. For this reason it’s probably a good idea to pick a very large starting value, and with default init_scale=65536 (²¹⁶) that does seem to be the approach that PyTorch is following.
值得注意的是GradScalar将检测并停止溢出(因为inf总是很糟糕),但是它无法检测和停止下溢(因为0通常是合法值)。 如果您选择的init_scale太低,而growth_interval太高,则在GradScalar进行干预之前,您的网络可能会下溢和分散。 因此,最好选择一个很大的起始值,并且默认init_scale=65536 (²¹⁶)似乎是PyTorch遵循的方法。
Finally, note that GradScalar is a stateful object. Checkpointing a model using this feature will require writing it to and reading it from disk in alongside your model weights. This is easy to do using the state_dict and load_state_dict object methods (covered here in the PyTorch docs).
最后,请注意GradScalar是有状态的对象。 使用此功能检查模型时,需要将其写入模型并从模型权重中读取到磁盘中。 使用state_dict和load_state_dict对象方法(在PyTorch文档中已在此处找到)很容易做到。
The other half of the automatic mixed-precision training puzzle is the torch.cuda.amp.autocast context manager. Autocast implements fp32 -> fp16 behavior. Recall from “How mixed precision works” that, because different operations accumulate errors at different rates, not all operations are safe to run in fp16. The following screenshots taken from the amp module documentation covers how autocast treats the various operations available in PyTorch:
自动混合精度训练难题的另一半是torch.cuda.amp.autocast上下文管理器。 自动播送可实现fp32 -> fp16行为。 回想一下“混合精度的工作原理”,因为不同的操作以不同的速率累积错误,所以并非所有操作都可以安全地在fp16运行。 以下从amp模块文档中截取的屏幕截图涵盖了自动autocast如何处理PyTorch中可用的各种操作:

This list predominantly consists of two things, matrix multiplication and convolutions. The simple linear function is also present.
该列表主要由两部分组成,矩阵乘法和卷积。 还存在简单的线性函数。

These operations are safe in fp16, but have up-casting rules to ensure that they don’t break when given a mixture of fp16 and fp32 input. Note that this list includes two other fundamental linear algebraic operations: matrix/vector dot products and vector cross products.
这些操作是在安全fp16 ,但有多达铸造规则,以确保所提供的混合物时,只要不破fp16和fp32输入。 请注意,此列表还包括其他两个基本的线性代数运算:矩阵/向量点积和向量叉积。
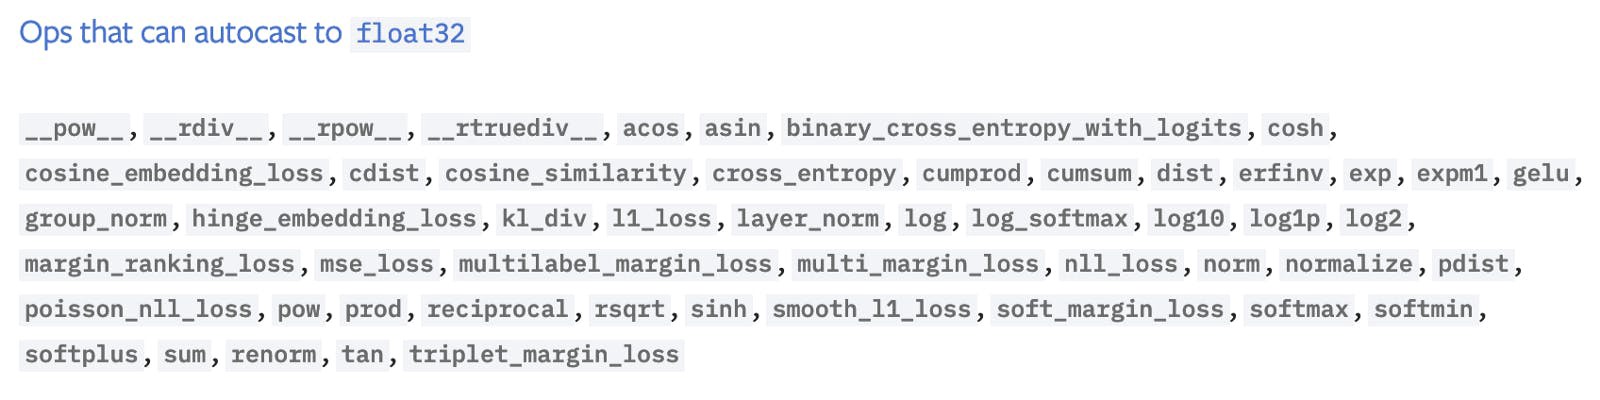
Logarithms, exponents, trigonometric functions, normal functions, discrete functions, and (large) sums are unsafe in fp16 and must be performed in fp32.
对数,指数,三角函数,正常功能,离散函数,和(大)和数是不安全的fp16 ,并且必须在执行fp32 。
Looking through the list, it seems to me that most layers would benefit from autocasting, thanks to their internal reliance on fundamental linear algebra operations, but most activation functions would not. Convolutional layers stand out as potentially the biggest winner.
从列表中看,在我看来,大多数层都将受益于自动广播,这是由于它们内部依赖于基本的线性代数运算,但是大多数激活函数却不会。 卷积层可能是最大的赢家。
Enabling autocasting is dead simple. All you need to do is wrap the forward pass of your model using the autocast context manager:
启用自动广播非常简单。 您需要做的就是使用自动广播上下文管理器包装模型的前向传递:
with torch.cuda.amp.autocast():
    y_pred = model(X_batch).squeeze()
    loss = self.loss_fn(y_pred, y_batch)
Wrapping the forward pass in this way automatically enables autocasting on the backwards pass (e.g. loss.backwards()) as well, so you don’t need to call autocast twice.
以这种方式包装正向传递会自动启用向后传递的自动广播(例如, loss.backwards() ),因此您无需调用自动广播两次。
So long as you follow best practices for using PyTorch (avoiding in-place operations, for example), autocasting basically “just works”. It even works out-of-the-box with the multi-GPU DistributedDataParallel API (so long as you follow the recommended strategy of using one process per GPU). It works with the DataParallel multi-GPU API too, with one small adjustment. The “Working with multiple GPUs” section of the Automatic Mixed Precision Examples page in the PyTorch docs is a handy reference on this subject. The one major “gotcha” (IMO) to keep in mind: “prefer binary cross entropy with logits over binary cross entropy”.
只要您遵循使用PyTorch的最佳实践(例如,避免就地操作),自动广播就基本上“可行”。 它甚至可以与多GPU DistributedDataParallel API配合使用(只要遵循建议的策略,即每个GPU使用一个进程)即可。 DataParallel调整,它也可以与DataParallel多GPU API一起使用。 PyTorch文档中“自动混合精度示例”页面的“使用多个GPU”部分是有关此主题的方便参考。 要牢记的一个主要“陷阱”(IMO):“相对于二进制交叉熵,更喜欢带对数的二进制交叉熵”。
绩效基准 (Performance benchmarks)
At this point we’ve learned what mixed precision is, what tensor cores are, and how the PyTorch API implementing automatic mixed precision behaves. The only thing left is looking at some real-world performance benchmarks!
至此,我们已经了解了什么是混合精度,张量核心是什么以及实现自动混合精度的PyTorch API的行为。 剩下的唯一事情就是查看一些实际的性能基准!
I trained three very different neural networks once with automatic mixed precision and once without, using V100s (last-gen tensor cores) and T4s (current-gen tensor cores) via the Spell API. I used AWS EC2 instances, p3.2xlarge and g4dn.xlarge respectively, a recent PyTorch 1.6 nightly, and CUDA 10.0. All of the models converged equally, e.g. none of the models saw any difference in training loss between the mixed precision and vanilla network. The networks trained were:
我通过Spell API使用V100(上一代张量核)和T4(当前代张量核)训练了三个完全不同的神经网络,一次具有自动混合精度,一次没有。 我分别使用了AWS EC2实例, p3.2xlarge和g4dn.xlarge ,最近的PyTorch 1.6每晚和CUDA 10.0。 所有模型均收敛,例如,没有一个模型看到混合精度和香草网络之间的训练损失有任何差异。 训练的网络是:
Feedforward, a feedforward neural network trained on data from the Rossman Store Samples competition on Kaggle. Get the code here.
前馈神经网络(前馈神经网络)是根据Kaggle的Rossman Store Samples竞赛中的数据训练的。 在这里获取代码。
UNet, a medium-sized vanilla UNet image segmentation net trained on the Segmented Bob Ross Images corpus. Get the code here.
UNet,经过分段Bob Bob Images语料库训练的中型香草UNet图像分割网。 在这里获取代码。
BERT, a large NLP transformer model using the bert-base-uncased model backbone (via huggingface) and data from the Twitter Sentiment Extraction competition on Kaggle. Get the code here.
BERT,这是一个大型的NLP变压器模型,它使用了基于bert-base的模型主干(通过huggingface )和来自Kaggle的Twitter情感提取竞赛的数据。 在这里获取代码。
The results:
结果:
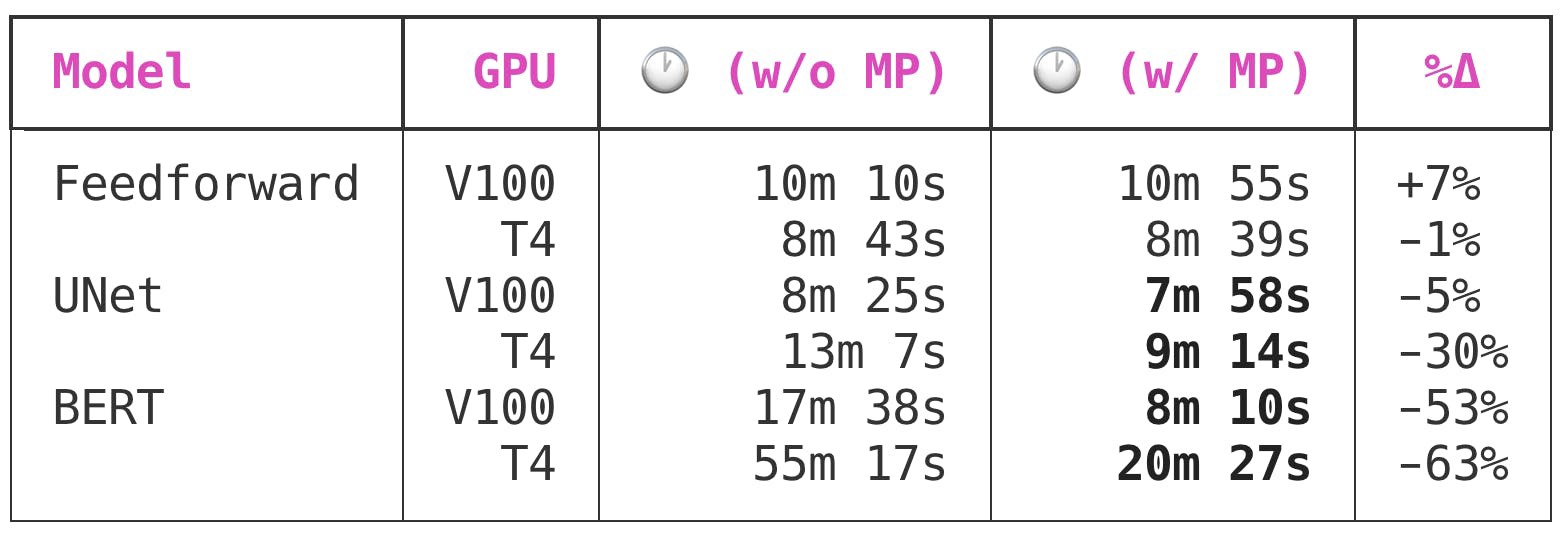
Because the feedforward network is very small, it gets no benefit from mixed precision training.
由于前馈网络非常小,因此无法从混合精度培训中受益。
UNet, a medium-sized convolutional model with 7,703,497 total parameters, sees significant benefits from enabling mixed precision training. Interestingly, though the V100 and T4 both benefit from mixed precision training, the benefit to the T4 is much greater: a 5% time save versus a whopping 30% time save.
UNet是一个具有7,703,497个总参数的中型卷积模型,它从启用混合精度训练中受益匪浅。 有趣的是,尽管V100和T4都受益于混合精度训练,但T4的好处却更大:节省5%的时间,而节省的时间却高达30%。
BERT is a large model, and it’s where the time savings of using mixed precision training go from “nice” to “must-have”. Automatic mixed precision will cut training time for large models trained on Volta or Turing GPU by 50 to 60 percent! 🔥
BERT是一个大型模型,使用混合精确训练可以节省很多时间,从“好”到“必备”。 自动混合精度可将在Volta或Turing GPU上训练的大型模型的训练时间减少50%到60%! 🔥
This is a huge, huge benefit, especially when you take into account the minimal complexity required — just four or five LOC to your model training script. In my opinion:
这是一个巨大的巨大好处,尤其是当您考虑到所需的最小复杂性时-模型训练脚本只有四个或五个LOC。 在我看来:
Mixed precision should be one of the first performance optimization you make to your model training scripts.
混合精度应该是您对模型训练脚本进行的首批性能优化之一。
那记忆力呢? (What about memory?)
As I explained in the section “How mixed precision works”, a fp16 matrix is half the size of a fp32 matrix in memory, so another purported advantage of mixed precision training is memory usage. GPU memory is much less of a bottleneck than GPU compute, but it’s still pretty valuable to optimize. The more efficient your memory usage, the larger the batch sizes you can fit on the GPU.
正如我在“如何混合精密工程”,一个解释fp16矩阵是尺寸的一半fp32在存储矩阵,这样的混合精度训练另一个声称优点是内存使用情况。 GPU内存比GPU计算少了很多瓶颈,但是优化仍然非常有价值。 内存使用效率越高,可以在GPU上容纳的批处理大小就越大。
PyTorch reserves a certain amount of GPU memory at the beginning of the model training process and holds onto that memory for the duration of the training job. This keeps other processes from reserving too much GPU memory mid-training, forcing the PyTorch training script to crash with an OOM error.
PyTorch在模型训练过程开始时会保留一定数量的GPU内存,并在训练工作期间保留该内存。 这样可以避免其他进程在培训中保留过多的GPU内存,从而迫使PyTorch培训脚本因OOM错误而崩溃。
Here is the impact that enabling mixed precision training has on the PyTorch memory reservation behavior:
这是启用混合精度训练对PyTorch内存保留行为的影响:
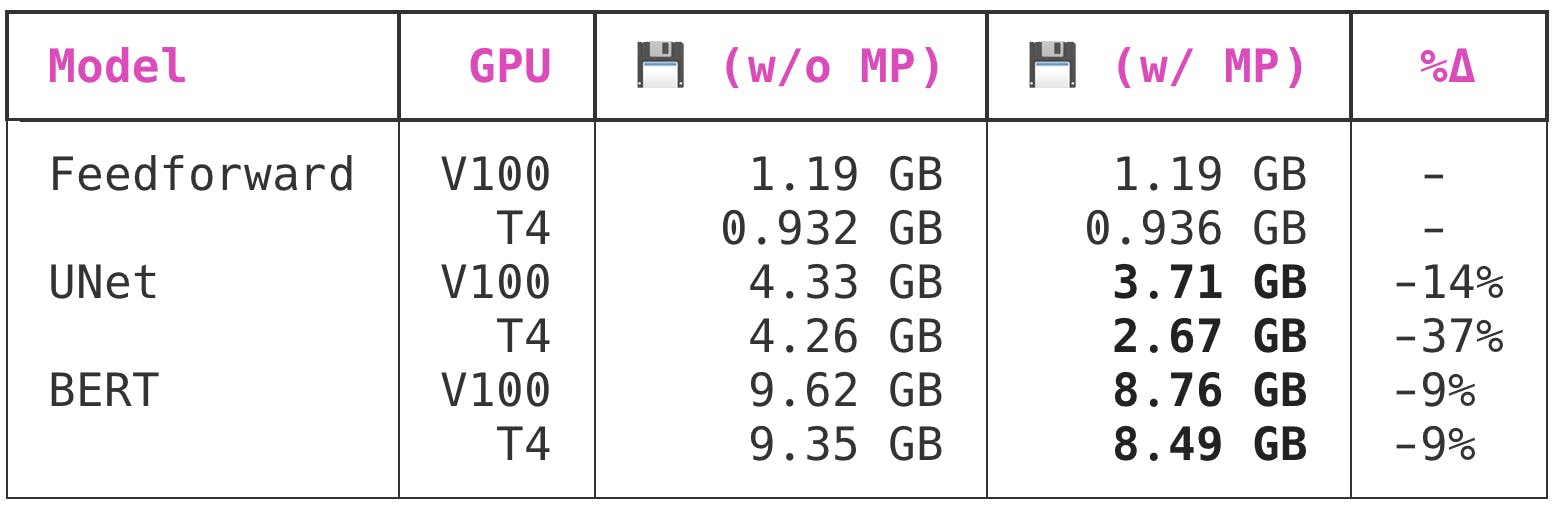
Interestingly enough, while both of the larger models saw benefit from the swap to mixed precision, UNet benefited from the swap a lot more than BERT did. PyTorch memory allocation behavior is pretty opaque to me, so I have no insight into why this might be the case.
有趣的是,虽然两个较大的模型都受益于交换到混合精度,但是UNet受益于交换的好处比BERT多得多。 PyTorch内存分配行为对我来说是不透明的,因此我不了解为什么会这样。
结论 (Conclusion)
Automatic mixed precision training is an easy-to-use and powerful new feature in the forthcoming PyTorch 1.6 release which promises to speed up larger-scale model training jobs running on recent NVIDIA GPUs by up to 60%. 🔥
自动混合精度训练是即将发布的PyTorch 1.6版本中易于使用且功能强大的新功能,有望在最近的NVIDIA GPU上运行的大型模型训练工作最多可加快60%。 🔥
While this technique has been around for a while (see e.g. Chip Huyen’s notes on scaling) it’s not been very accessible to the average user because it’s never had a native PyTorch API — until now.
尽管这项技术已经存在了一段时间(例如,参见Chip Huyen的缩放说明),但对于普通用户而言却不是很容易使用,因为到目前为止,它从来没有原生的PyTorch API。
To learn more about mixed precision training directly from the source, see the automatic mixed precision package and automatic mixed precision examples pages in the PyTorch master docs.
要直接从源代码中了解有关混合精度训练的更多信息,请参阅PyTorch主文档中的自动混合精度软件包和自动混合精度示例页面。
Want to replicate these benchmarks yourself? All model source code is available on GitHub in the spellrun/feedforward-rossman, spellrun/unet-bob-ross, and spellrun/tweet-sentiment-extraction repositories.
是否想自己复制这些基准? 所有模型源代码都可以在GitHub上的spellrun / feedforward-rossman , spellrun / unet-bob-ross和spellrun / tweet-sentiment-extraction存储库中找到。
To learn more about machine learning engineering on the cloud, check out some of these other posts from the Spell blog:
要了解有关云上机器学习工程的更多信息,请查看Spell博客中的其他一些文章:
pytorch混合精度训练


 1078
1078


 被折叠的 条评论
为什么被折叠?
被折叠的 条评论
为什么被折叠?
 到【灌水乐园】发言


