


ios ui自动化测试
Many of today’s mobile applications display customized content to user, base on dynamic parameters. The Azimo application is no different.
当今的许多移动应用程序都基于动态参数向用户显示自定义内容。 Azimo应用程序没有什么不同。
With our mobile platform, our customers can transfer money to almost every country all over the world. There are literally thousands of combinations of sending and receiving countries, payments, and delivery methods.
借助我们的移动平台,我们的客户可以将资金转账到全世界几乎每个国家。 实际上,发送国和接收国,付款方式和交付方式有成千上万种组合。
Combinations of these parameters can be a big challenge for the QA engineering team. Ideally, every possible case should be covered. That’s why It’s not the best idea to test this type of functionality manually. We need to write test automation not to do this tedious work over and over again. Read more about why “Automated testing will set your engineering team free.”
这些参数的组合对于质量检查工程团队可能是一个巨大的挑战。 理想情况下,应涵盖所有可能的情况。 这就是为什么手动测试这种功能不是最好的主意。 我们需要编写测试自动化程序,以免一遍又一遍地完成这项繁琐的工作。 阅读更多有关为什么“自动测试将使您的工程团队自由的信息。 ”
In this article, I will show how we approach writing automation tests for functionalities with dynamic content while trying to create the most flexible and readable code.
在本文中,我将展示如何尝试编写具有动态内容的功能的自动化测试,同时尝试创建最灵活和易读的代码。
1.我们要测试什么? (1. What are we going to test?)
The Azimo app helps our customers to transfer money around the world. To ensure that the user experience is at the highest possible level, we introduced a functionality called “How it works.” It explains what to do to send money to the customer’s recipient, with the selected delivery method. Let’s prepare the testing automation for it together.
Azimo应用程序可帮助我们的客户在世界各地转移资金。 为了确保用户体验达到最高水平,我们引入了一项名为“工作原理”的功能。 ”说明了如何使用选定的付款方式向客户的收款人汇款。 让我们一起准备测试自动化。
Here are the structure of the functionality and the expected test result. From a technical point of view, this feature is a bottom sheet containing a four-step explanation of how to create a transfer and additional information about the selected destination country.
这是功能的结构和预期的测试结果。 从技术角度来看,此功能是底页,其中包含有关如何创建转帐的四步说明以及有关所选目的地国家/地区的其他信息。
It looks like this:
看起来像这样:
Navigation bar:
导航栏:
- name of the country to which we want to send money, 我们要汇款的国家/地区的名称,
- short description 简短的介绍
Content:
内容:
- header, 标头
four steps to send a transfer, each including:
发送转帐的四个步骤,每个步骤包括:
- title,
-标题,
- description
-说明
Now, I want to implement tests that are comparing data of two objects. It’s a standard assertion, where the first object contains expected data, and the second is fetched from the application (so this is what users see on the screen).
现在,我想实现比较两个对象数据的测试。 这是一个标准的断言,其中第一个对象包含预期的数据,第二个对象从应用程序中获取(因此这是用户在屏幕上看到的内容)。
This is how the assertion looks like:
断言如下所示:
AssertEqual(ObjectWIthExpectedData, ObjectWithFetchedData)
AssertEqual ( ObjectWIthExpectedData , ObjectWithFetchedData )
First thing — we have to consider whether each of the above elements will be present for every single test case. In our case, the answer is “yes”. It means that for each country + delivery method combination, we display the name of the country, short description, header, and four steps.
第一件事–我们必须考虑是否每个单独的测试用例都存在上述每个元素。 在我们的情况下,答案是“是”。 这意味着对于每个国家/地区+交付方式的组合,我们将显示国家/地区的名称,简短说明,标头和四个步骤。
If this isn’t true (e.g., some configurations have fewer or more steps), we would need to set some parameters as optional. In that situation, we would need to find the boundary conditions (a minimum and a maximum number of steps) and set everything except the minimum/maximum number of steps as optional.
如果不正确(例如,某些配置具有更少或更多的步骤),则需要将一些参数设置为可选。 在这种情况下,我们需要找到边界条件(最小和最大步数),并将除最小/最大步数以外的所有内容设置为可选。
2.导航到底部表格 (2. Navigate to the bottom sheet)
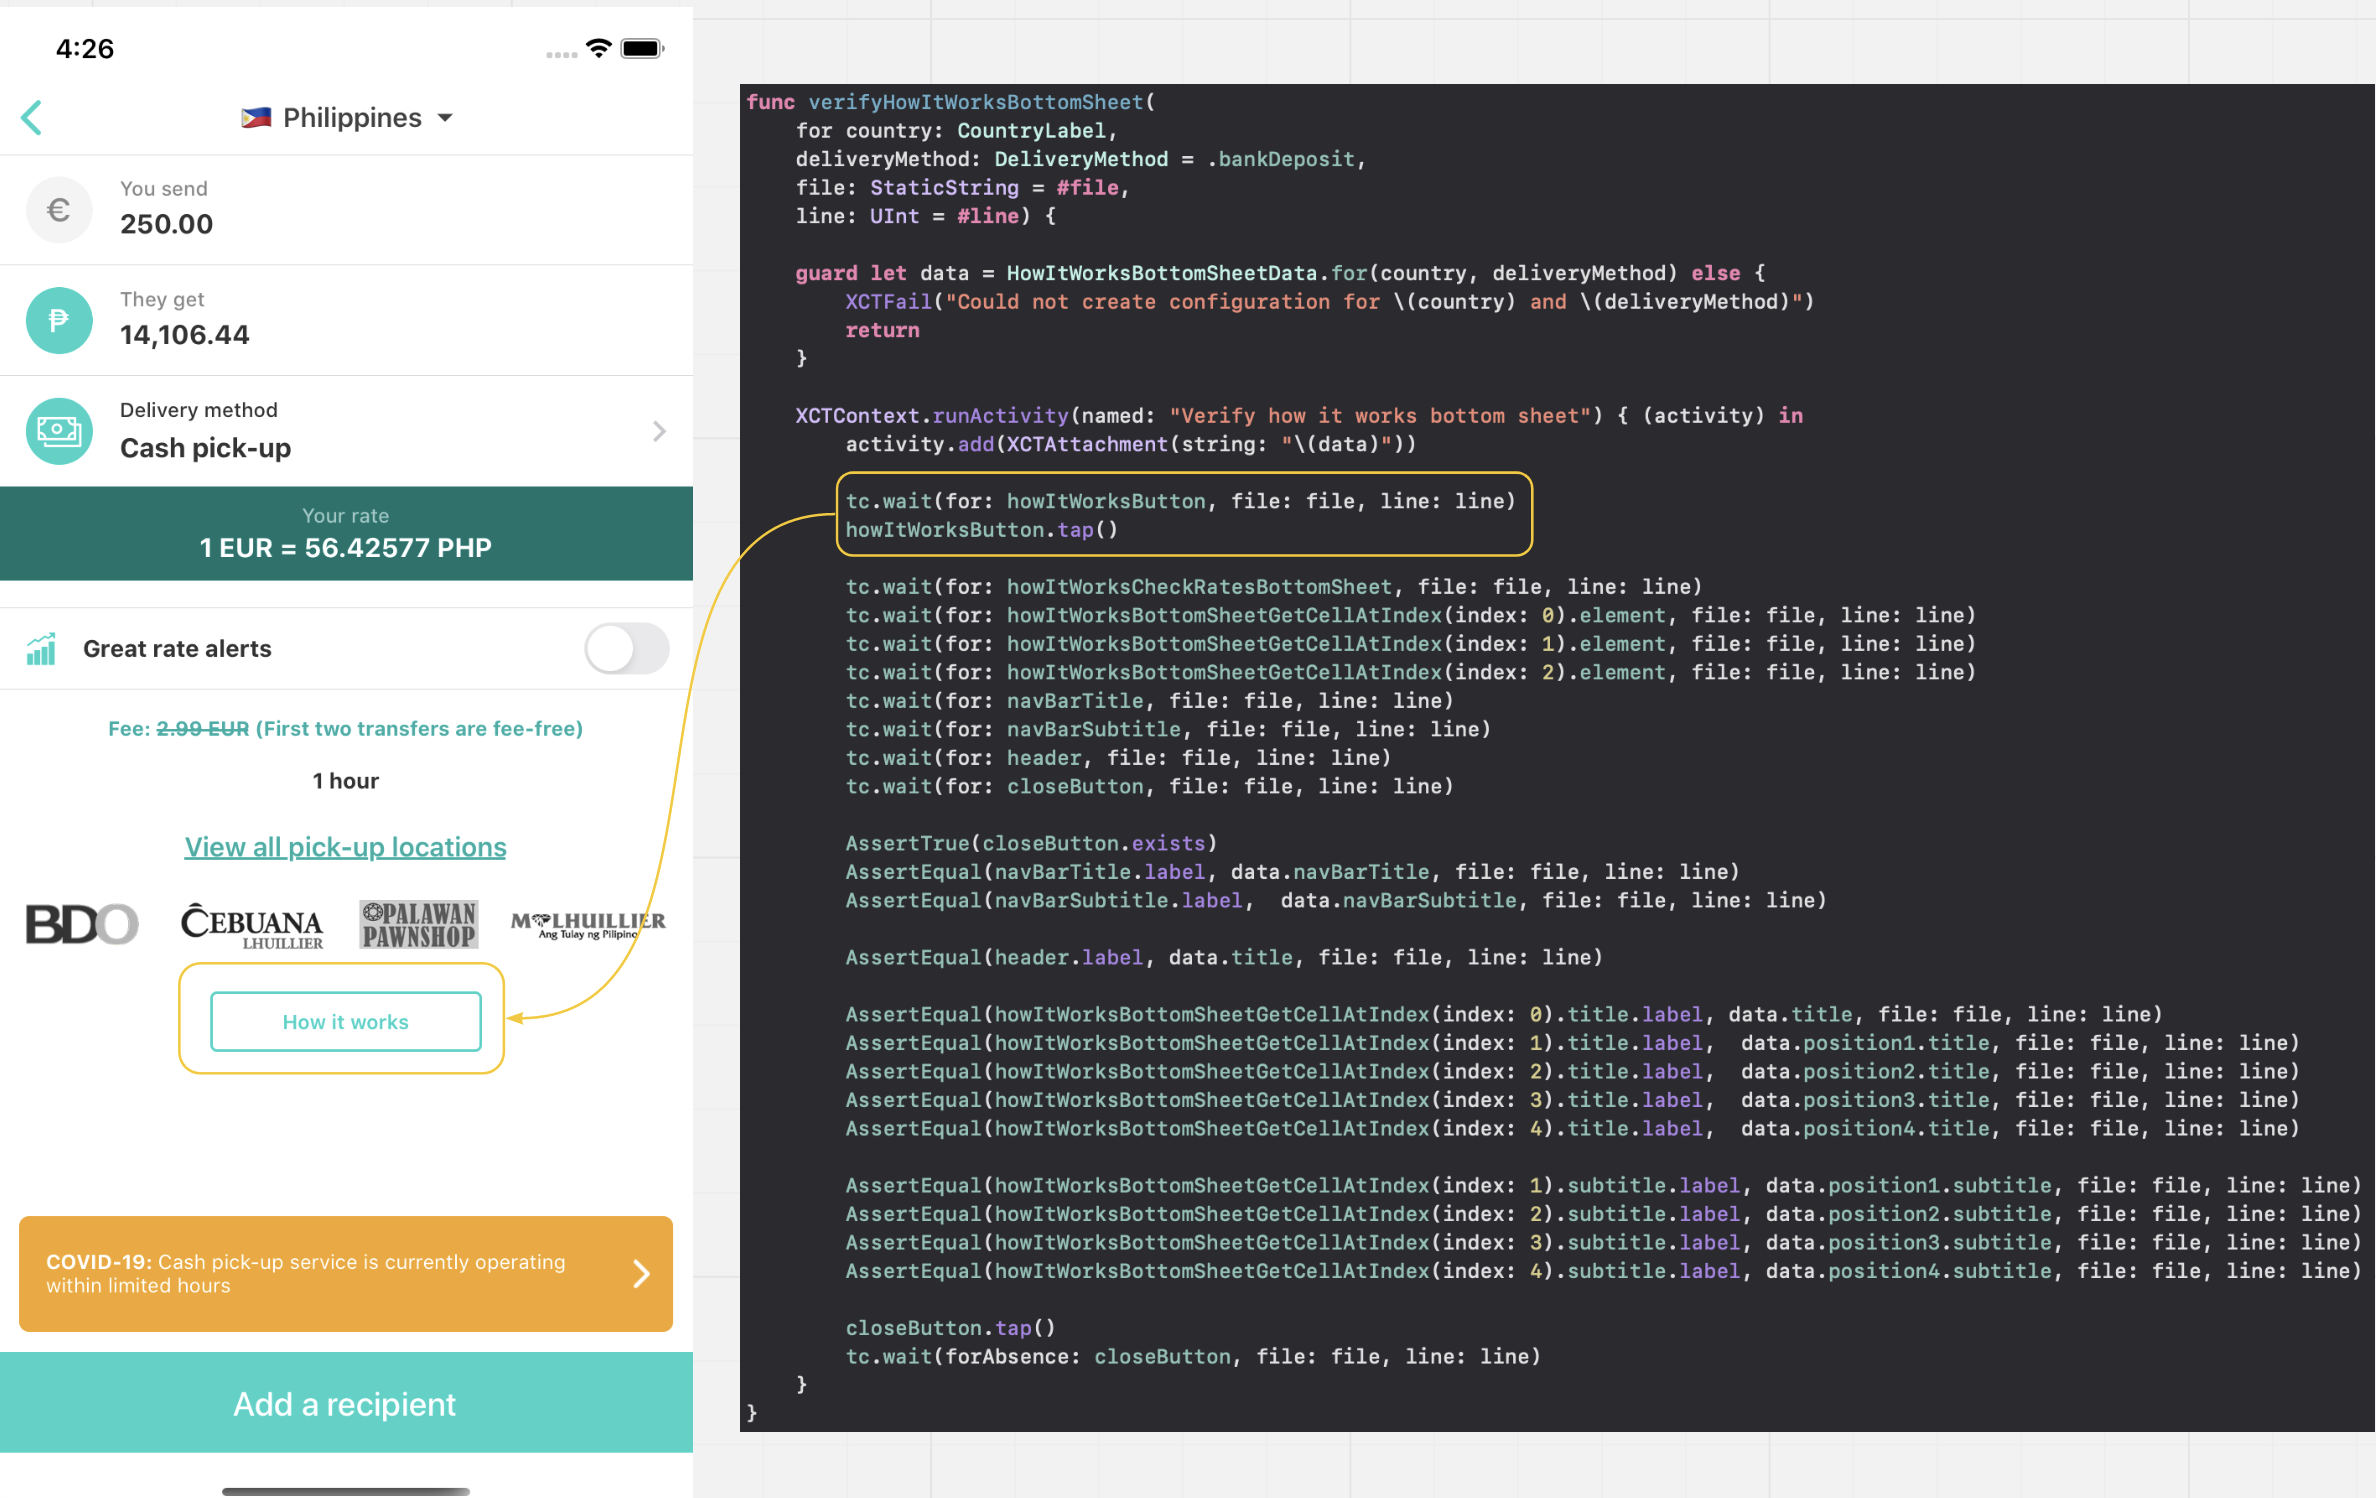
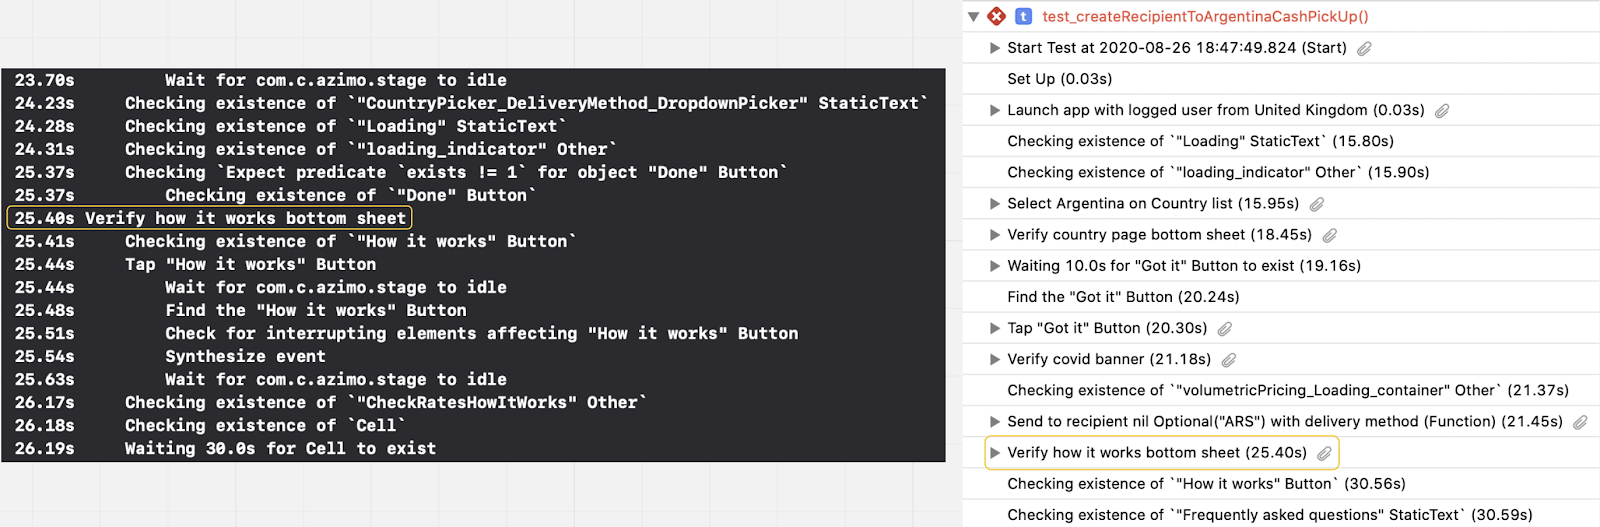
Let’s start by navigating to the How it works bottom sheet in the app. In the verifyHowItWorksBottomSheet() function, wait until the How it works button appears and click on it to start verifying the correctness of the displayed data (the description of the entire function is presented later in this article).
让我们从导航至应用程序底部的工作原理开始。 在verifyHowItWorksBottomSheet()函数中,等待直到“如何工作”按钮出现,然后单击它以开始验证所显示数据的正确性(整个功能的描述将在本文后面提供)。
3.创建一个对象,该对象收集屏幕上可见的数据 (3. Create an object that collects data visible on the screen)
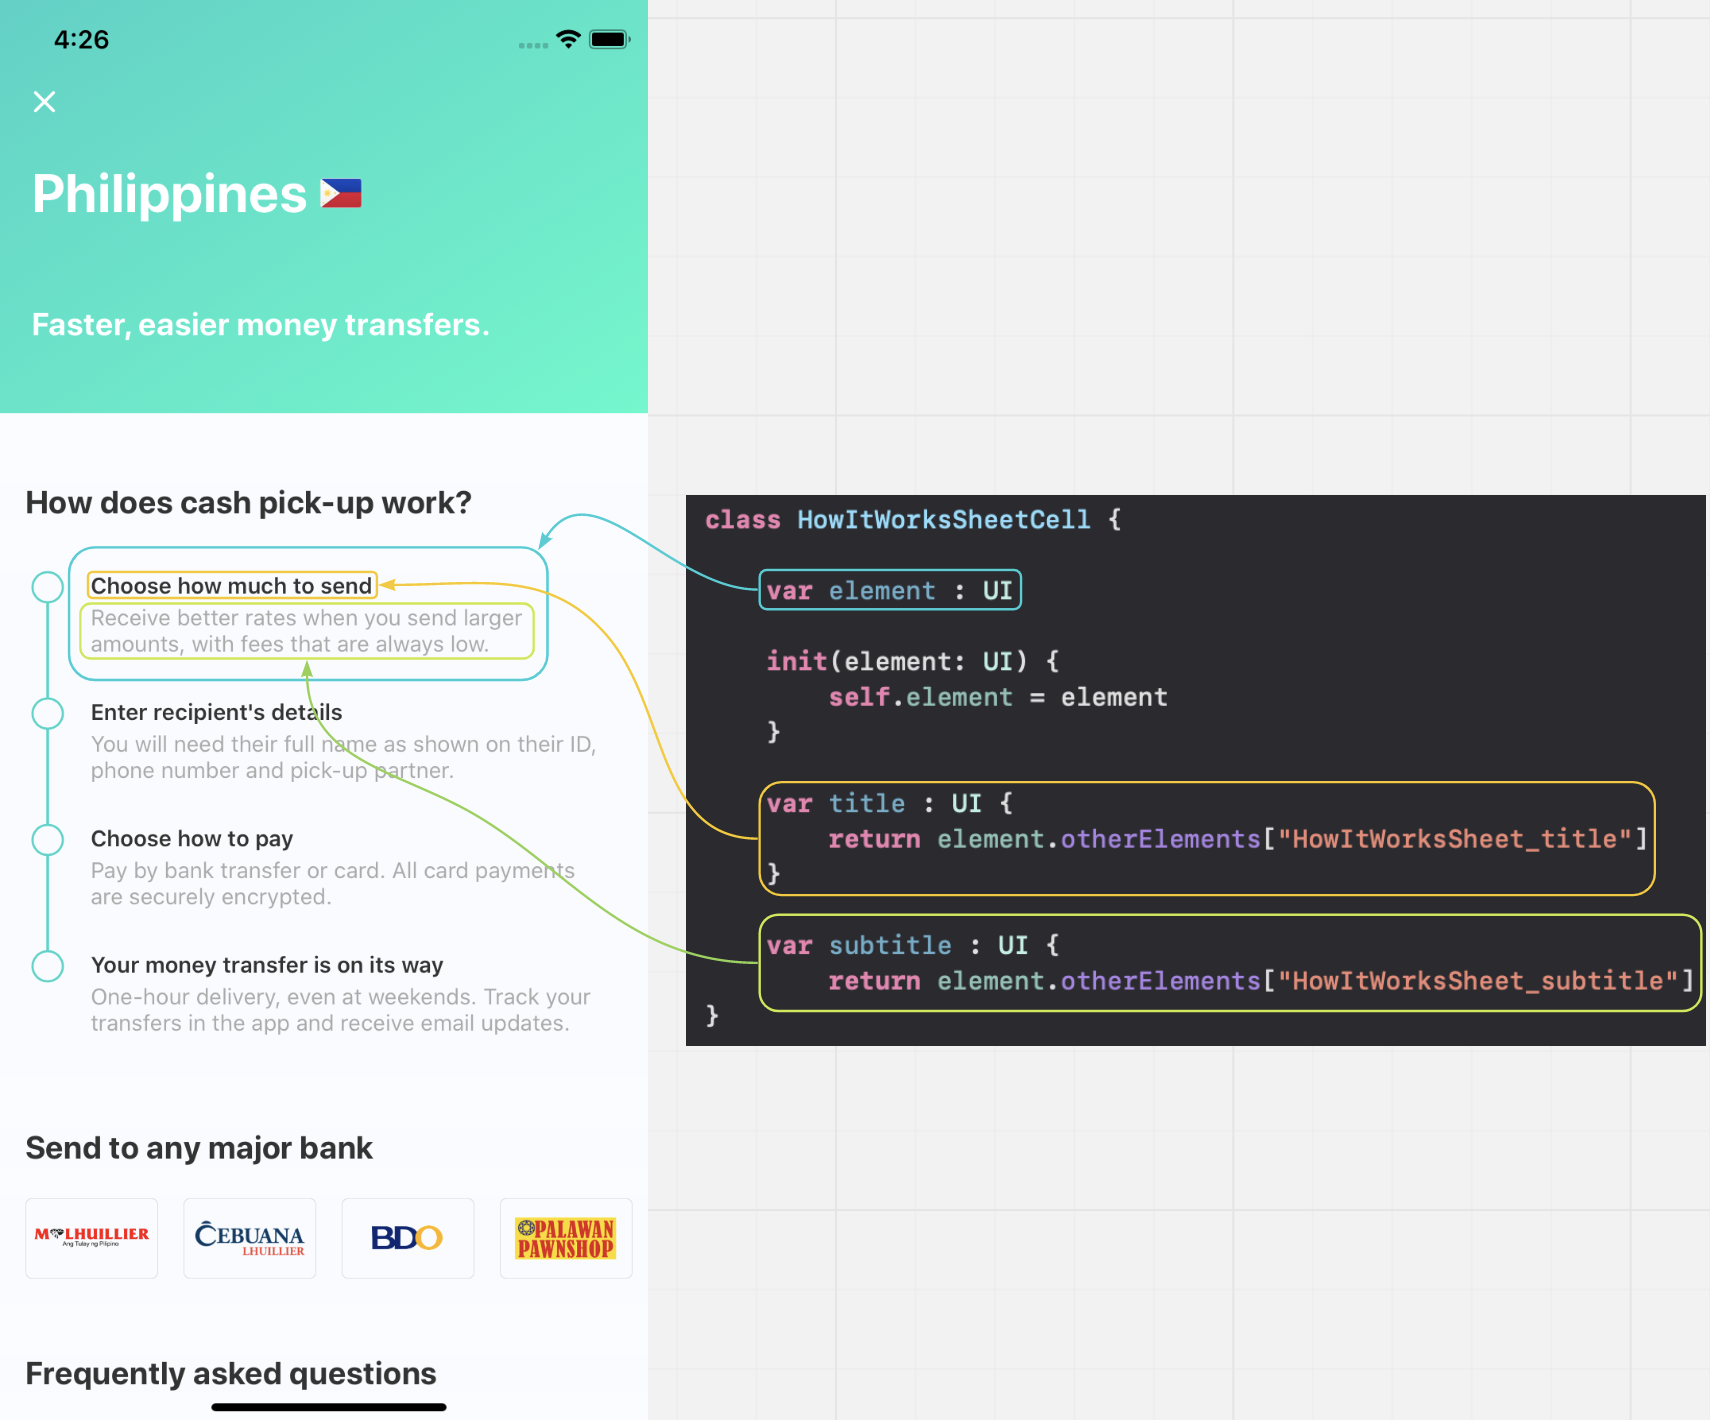
As I mentioned in the previous point, each step in the instruction contains a title and a short description. So we create a new HowItWorksBottomSheetCell — the class responsible for getting this data from the screen. To simplify and unambiguous searching for elements in the DOM tree, I added appropriate identifiers for them. The title is marked with the HowItWorksSheet_title identifier, while the description is HowItWorksSheet_subtitle.
正如我在前面提到的那样,指令中的每个步骤都包含一个标题和简短描述。 因此,我们创建了一个新的HowItWorksBottomSheetCell-该类负责从屏幕上获取此数据。 为了简化和明确地搜索DOM树中的元素,我为它们添加了适当的标识符。 标题标记有HowItWorksSheet_title标识符,而描述则是HowItWorksSheet_subtitle 。
4.创建一个包含预期数据的对象 (4. Create an object containing the expected data)
Now let’s move on to creating an object with data that we expect to be displayed in the application for a specific country + delivery method combination.
现在,让我们继续创建一个对象,该对象具有我们预期将在特定国家/地区和交付方式组合的应用程序中显示的数据。
We create two structures HowItWorksBottomSheetData and Cell with parameters:
我们使用参数创建两个结构HowItWorksBottomSheetData和Cell :
- title 标题
- navbar Title导航栏标题
- navBarSubtitlenavBarSubtitle
position1, position2, position3, position4, which will be of the Cell type and contain parameters:
position1,position2,position3,position4,将属于Cell类型,并包含以下参数:
- title
-标题
- subtitle
-字幕
Because the title, the description in the navigation bar, and the title in the content section will be the same for each step, we provide them only once for the entire object. However, the content (title, description) of individual steps will be different.
因为每个步骤的标题,导航栏中的描述和内容部分中的标题都是相同的,所以我们为整个对象仅提供一次。 但是,各个步骤的内容(标题,描述)将有所不同。
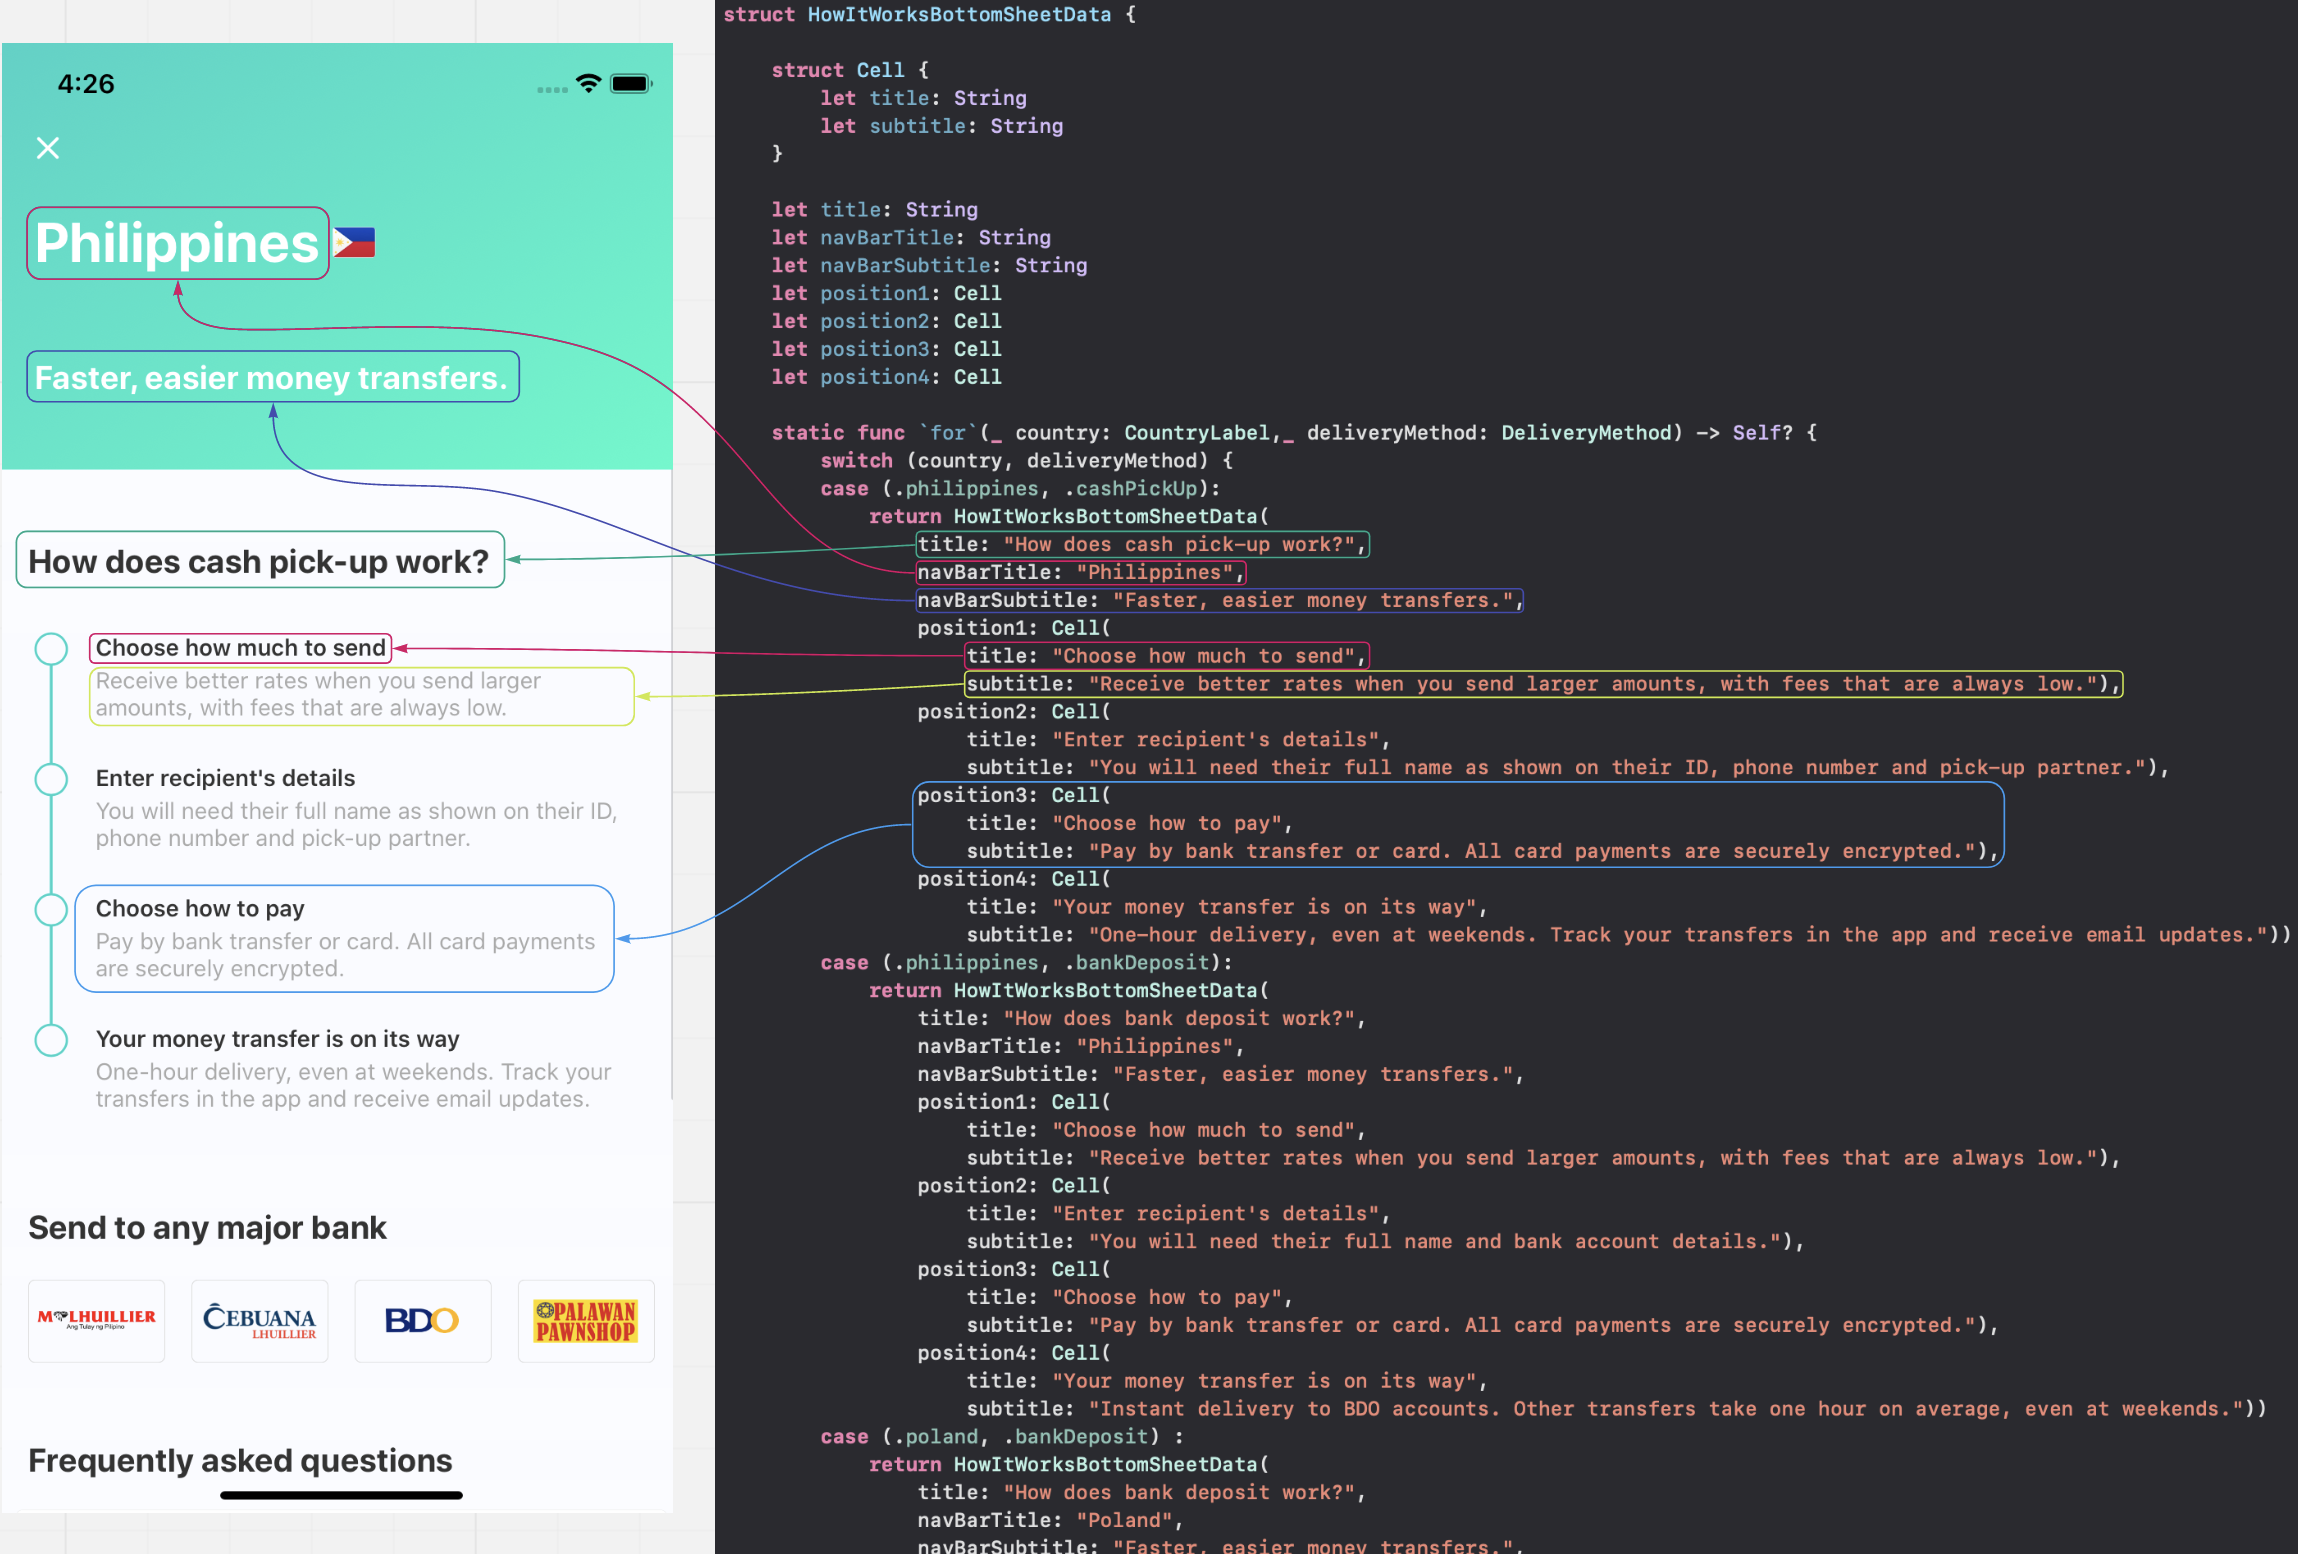
As for different combinations, we expect different output, using the parameters passed in the function for(country, deliveryMethod) and the conditional statement switch, I will be able to choose the option we are interested in and extract the necessary data from it.
对于不同的组合,使用for(country,deliveryMethod)函数中传递的参数和条件语句开关,我们期望得到不同的输出,我将能够选择我们感兴趣的选项并从中提取必要的数据。
The for function takes two parameters, which are enums:
for函数采用两个参数,它们是枚举:
country type: CountryLabel
国家类型: CountryLabel
deliveryMethod type: DeliveryMethod
deliveryMethod类型: DeliveryMethod
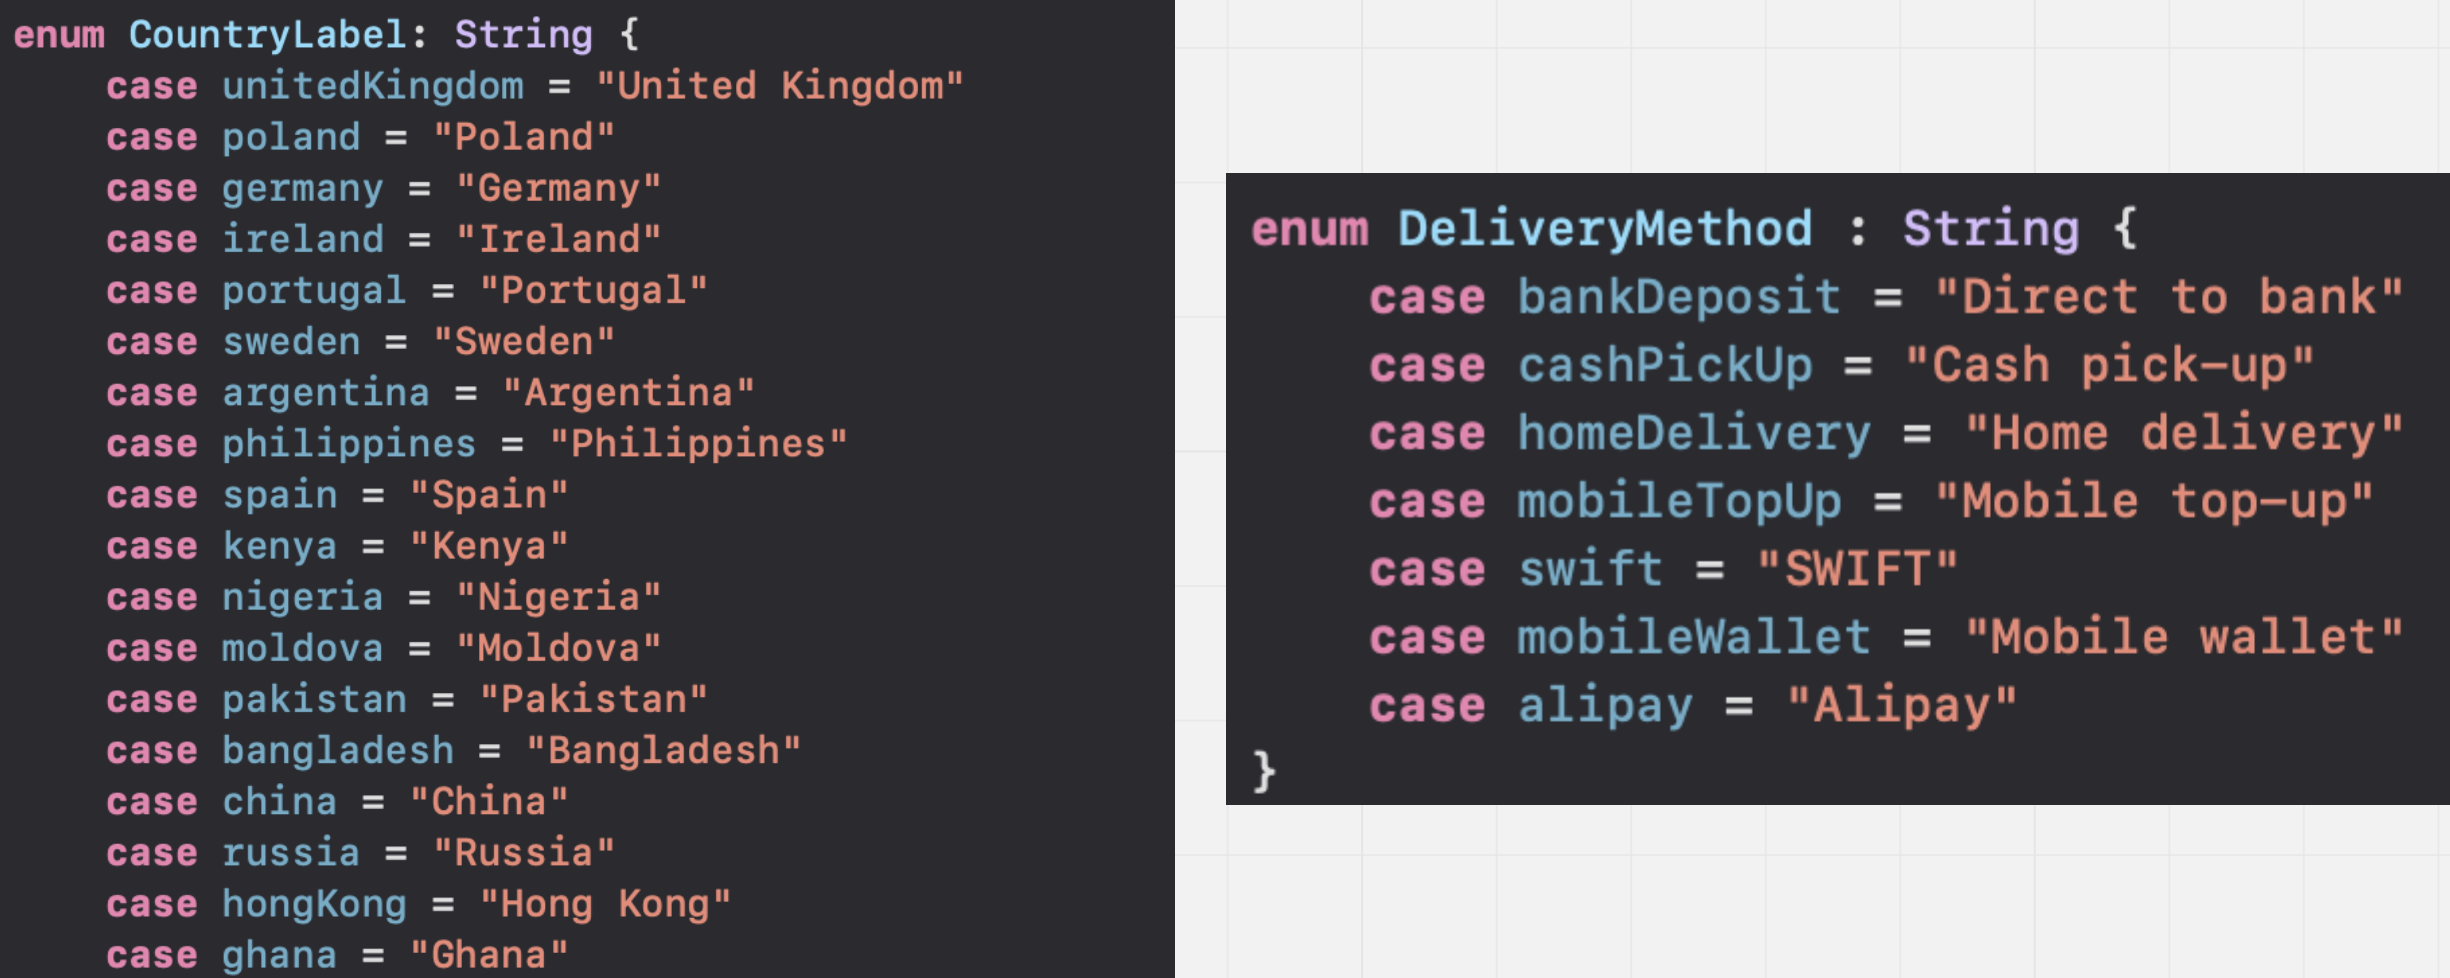
For example, for country Philippines and delivery methods Cash pick-up we will select accordingly:
例如,对于菲律宾国家/地区和交付方式现金提取,我们将相应选择:
case(.philippines, .cashPickUp).
case(.philippines,.cashPickUp) 。
Remember to cover all the most critical test cases. If some of them overlap, i.e., we expect the same data, we can group them.
记住要涵盖所有最关键的测试用例。 如果其中一些重叠,即我们期望相同的数据,则可以将它们分组。
5.创建一个比较两个对象的数据的函数 (5. Create a function comparing the data of both objects)
Now, when we have an object with expected data and the one with data taken from the app, we need to compare them. For this purpose, we will write the function verifyHowItWorksBottomSheet(), which takes two parameters: country and deliveryMethod.
现在,当我们有一个对象具有预期数据,而一个对象具有从应用程序获取的数据时,我们需要将它们进行比较。 为此,我们将编写函数verifyHowItWorksBottomSheet() ,该函数带有两个参数: country和deliveryMethod 。
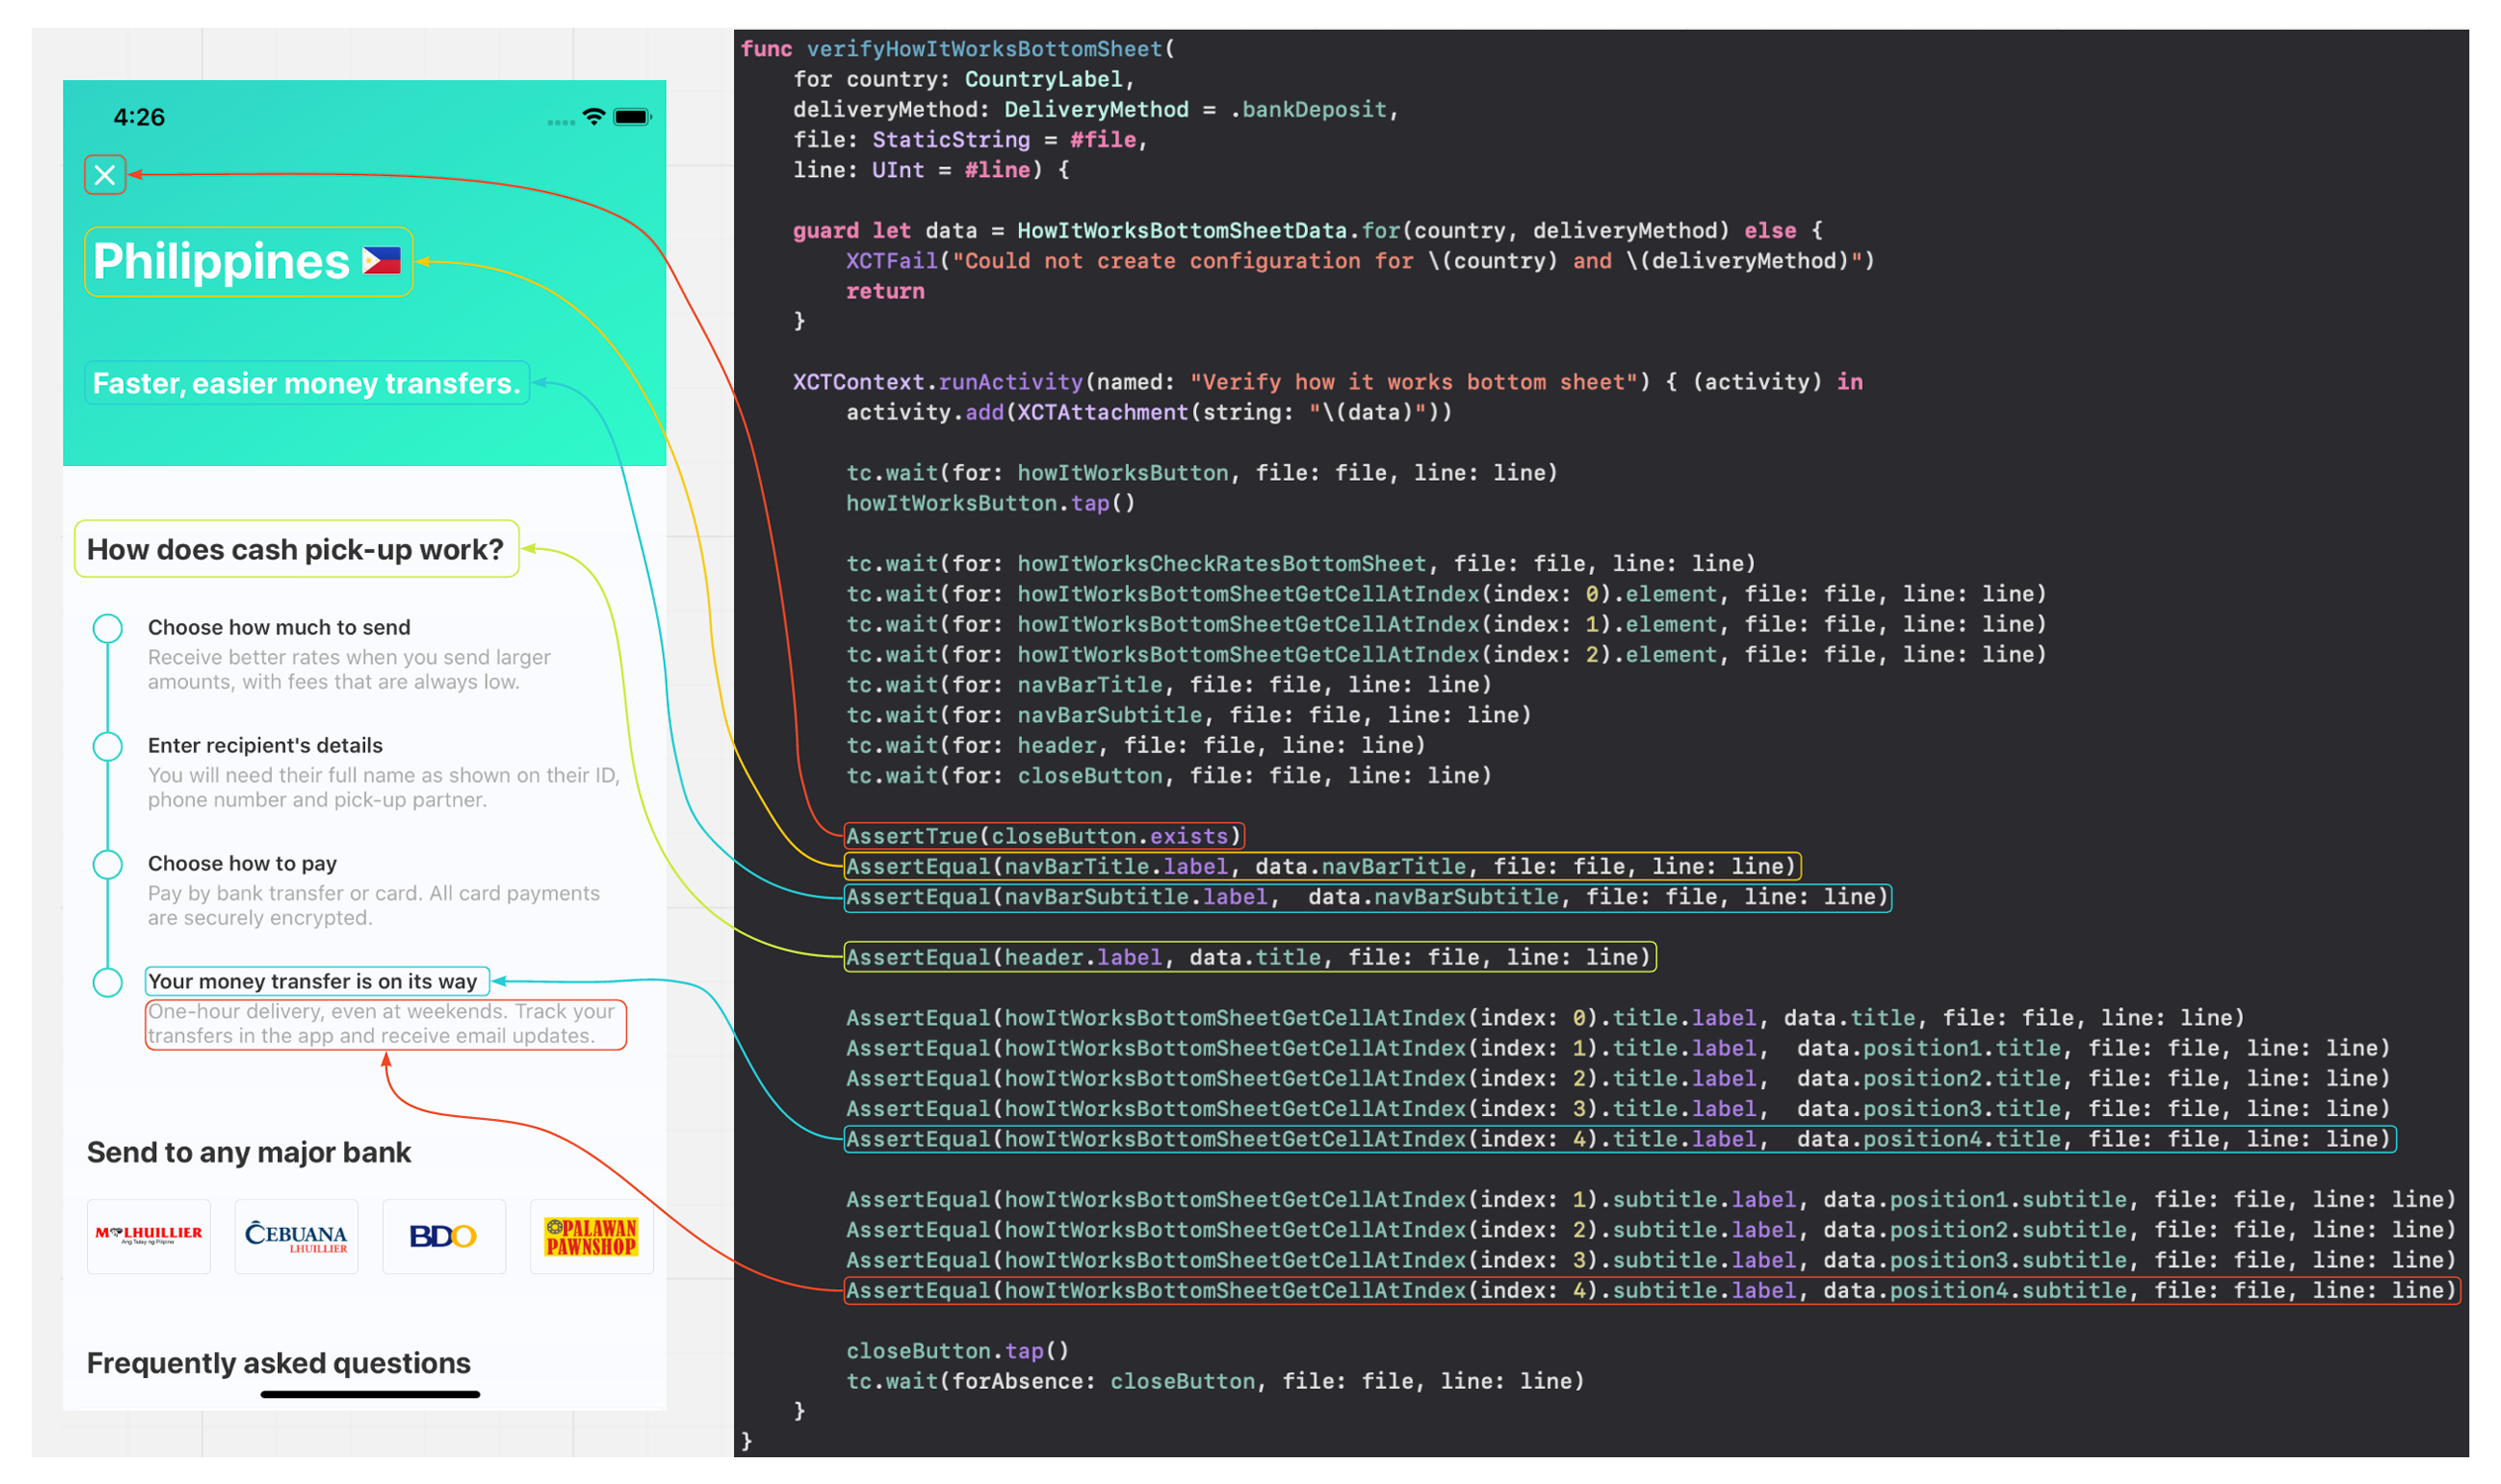
As you can see in the above screenshot, we also use the howItWorksBottomSheetGetCellAtIndex() function, which returns a HowItWorksSheetCell (step) object in the appropriate position (index). The implementation is:
如您在上面的屏幕快照中所见,我们还使用了howItWorksBottomSheetGetCellAtIndex()函数,该函数在适当的位置( index )返回一个HowItWorksSheetCell (步骤)对象。 实现是:

We retrieved all expected data for a specific country + delivery method to the data variable.
我们检索了特定国家/地区的所有预期数据+数据变量的投放方式。
In case you cannot download data to the data object, the test will fail with appropriate information about the error in the logs.
如果无法将数据下载到数据对象,则测试将失败,并提供有关日志中错误的适当信息。
The closeButton, navBarTitle, navBarSubtitle, and header variables only appear once on the screen, so there is no need to create a separate class for them as they will not be reused. We can declare them as variables in the base class and compare the contents like the rest to the data object’s parameters.
closeButton , navBarTitle , navBarSubtitle和header变量仅在屏幕上出现一次,因此无需为它们创建单独的类,因为它们不会被重用。 我们可以在基类中将它们声明为变量,并将其余内容与数据对象的参数进行比较。
This is how we call the comparison function in the test:
这就是我们在测试中调用比较函数的方式:

To make the logs in the console and test logs in Xcode more transparent, I use XCTActivity, making it clear and legible for me to see when the bottom sheet was verified:
为了使控制台中的日志和Xcode中的测试日志更加透明,我使用XCTActivity ,使我可以清楚,清晰地看到何时验证了底部表单:
6.总结 (6. Summary)
Here are the advantages of the presented solution:
以下是本解决方案的优点:
- In the case of changes to the application code or translations, we have to change only one place in the tests, not in each test case separately. 在更改应用程序代码或翻译的情况下,我们只需要在测试中更改一个位置,而不必在每个测试用例中单独更改。
- We have clear and transparent code even for non-technical people. 即使对于非技术人员,我们也拥有清晰透明的代码。
- We cover all expected test scenarios. 我们涵盖了所有预期的测试方案。
- The solution is easy to maintain and extend. 该解决方案易于维护和扩展。
- We have great control over data from the test level. 我们对测试级别的数据有很好的控制。
I hope the solution I have presented will allow you to look at writing automated tests from a different perspective. I highly encourage you to implement it in your project and let me know how it goes. If you have any questions or suggestions, feel free to leave a comment or contact us directly.
希望我提出的解决方案可以让您从不同的角度看待编写自动化测试。 我强烈鼓励您在项目中实施它,并让我知道它的进展。 如果您有任何疑问或建议,请随时发表评论或直接与我们联系。
翻译自: https://medium.com/azimolabs/ui-tests-on-ios-a7883ca72358
ios ui自动化测试


 1549
1549

 被折叠的 条评论
为什么被折叠?
被折叠的 条评论
为什么被折叠?
 到【灌水乐园】发言


