


 本文介绍了如何在Firebase项目中结合SwiftUI实现Apple登录功能,详细阐述了配置和使用流程。
firebase使用
快速应用开发 (Rapid Application Development)
This article is part of a series of articles that explores building a real-world application using SwiftUI, Firebase, and a couple of other technologies.
本文是一系列文章的一部分,这些文章探讨了使用SwiftUI,Firebase和其他两种技术构建真实应用程序的过程。
Here is an overview of the series and what we’re going to build:
以下是该系列的概述以及我们将要构建的内容:
In part 1 of the series, we focussed on building the UI with SwiftUI, using a simple data model.
在本系列的第1部分中,我们重点介绍了使用简单数据模型通过SwiftUI构建UI。
In part 2, we connected the application to Firebase, and synchronized the user’s tasks with Cloud Firestore
在第2部分中 ,我们将应用程序连接到Firebase,并将用户的任务与Cloud Firestore同步
In part 3 (which you are reading right now), we’re going to implement Sign in with Apple, allowing users to sign in from multiple devices to access their data, and laying the groundwork for advanced features such as sharing tasks with your family and co-workers
在第3部分(您现在正在阅读)中,我们将实现“ 使用Apple登录” ,允许用户从多个设备登录以访问其数据,并为诸如与家人共享任务之类的高级功能奠定基础。和同事
So, let’s get started!
所以,让我们开始吧!
我们为什么这样做呢? (Why are we doing this?)
Before we dive into implementing Sign in with Apple, let’s take a step back and look at what we did in the past episode. So far, users of our application can enter new tasks, mark them as done, or modify them. All tasks the user enters are synchronised with Cloud Firestore.
在我们深入实施与Apple登录时,让我们退后一步,看看我们在上一集中所做的事情。 到目前为止,我们应用程序的用户可以输入新任务,将其标记为已完成或进行修改。 用户输入的所有任务都将与Cloud Firestore同步。
We’re using Firebase Anonymous Authentication to get a unique ID for each user to make sure we can store data per user, and don’t accidentally mix up the tasks of person A and B (I’m pretty sure my kids would love to see their chores end up on my task list, but generally, this is not how task lists work — sorry to break the bad news to you…).
我们正在使用Firebase匿名身份验证为每个用户获取唯一的ID,以确保我们可以存储每个用户的数据,并且不会意外地混淆了A和B人的任务(我很确定我的孩子很乐意看到他们的琐事最终出现在我的任务列表上,但是总的来说,这不是任务列表的工作方式-很抱歉向您发出坏消息…)。
Now you might be wondering how Anonymous Auth determines this unique user ID, and some of you might suspect Firebase is using the device ID or some other user- or device-specific feature to compute the user ID. For a number of reasons, this is not what Firebase does. Instead, when you ask Firebase Auth to sign in a user anonymously, the SDK calls an API endpoint that returns a globally unique ID. This ID will then be stored in the local keychain, to make it easier to transparently sign in the user when they return to the app.
现在,您可能想知道匿名身份验证如何确定此唯一用户ID,并且您中有些人可能会怀疑Firebase正在使用设备ID或某些其他用户或特定于设备的功能来计算用户ID。 由于多种原因,这不是Firebase所做的。 相反,当您要求Firebase Auth匿名登录用户时,SDK会调用返回全球唯一ID的API终结点 。 然后,此ID将存储在本地钥匙串中,以使用户返回应用程序时更容易透明地登录。
This works great for users who only use one device, but it has one significant drawback: you will be assigned a new user ID every time you sign in to the app on a new device. Why is that?
这对于仅使用一台设备的用户非常有用,但是它有一个明显的缺点:每次在新设备上登录应用程序时,都会为您分配一个新的用户ID。 这是为什么?
Essentially, what happens is this: when calling Auth.auth().signInAnonymously(), the Firebase SDK will check the iOS keychain to see if the user has already signed in. If so, it will use this ID to sign in the user transparently. If not, it will call the API endpoint to generate a new user ID.
本质上,这是什么情况:当调用Auth.auth().signInAnonymously() ,Firebase SDK将检查iOS钥匙串以查看用户是否已经登录。如果已登录,它将使用此ID登录用户。透明地。 如果没有,它将调用API端点以生成新的用户ID。
This means: you will appear to be a new user whenever you launch the app on a different device. That’s bad news for all of us who would like to use multiple devices to manage their tasks, e.g. their iPhone when they’re on the go, or their iPad when chilling out at home (I hear WFH seems to be rather popular these days…).
这意味着:每当您在其他设备上启动该应用程序时,您似乎都会是新用户。 对于我们所有人想要使用多种设备来管理任务的所有人来说,这是个坏消息,例如,他们在旅途中使用iPhone或在家中闲逛时使用iPad(我听说WFH在这些天似乎很受欢迎…… )。
Thankfully, with Firebase it is easy to upgrade an anonymous user to a permanent user, making it possible to support use cases like:
幸运的是,借助Firebase,可以轻松地将匿名用户升级为永久用户,从而可以支持以下用例:
- accessing the same data from different devices (and, of course, operating systems) 从不同的设备(当然还有操作系统)访问相同的数据
- sharing tasks with other users (e.g. to set up a shared shopping list) 与其他用户共享任务(例如,设置共享的购物清单)
- sending users an email every morning with an overview of their due tasks 每天早上向用户发送一封电子邮件,其中概述了他们应做的任务
Firebase Authentication supports a wide range of sign-in providers, such as Email/Password, Phone Number, Google Sign-in, Facebook Login, Twitter Login, or Sign in with Apple. If none of the default providers match your needs, you can even implement your own provider and plug it into Firebase Auth using Custom Auth.
Firebase身份验证支持各种登录提供程序,例如电子邮件/密码,电话号码,Google登录,Facebook登录,Twitter登录或使用Apple登录。 如果没有默认的提供程序符合您的需求,您甚至可以实施自己的提供程序,并使用“ 自定义身份验证”将其插入Firebase Auth 。
我们要涵盖的内容 (What we’re going to cover)
In this article, we’re going to specifically look into how to implement Sign in with Apple and how to connect it to Firebase Authentication. I will show how to integrate with other Sign-in providers in subsequent articles. A lot has been written about Sign in with Apple already, so we will gloss over some of the basic parts, but I will link to other articles in the resources section, so if you would like to read up on the basics, I’d encourage you to do so.
在本文中,我们将专门研究如何实现使用Apple登录以及如何将其连接到Firebase身份验证。 在后续文章中,我将展示如何与其他登录提供程序集成。 已经有很多有关使用Apple登录的文章,因此我们将介绍一些基本部分,但是我将链接到参考资料部分中的其他文章,因此,如果您想阅读这些基础知识,鼓励您这样做。
Integrating Sign in with Apple with SwiftUI (which is the UI technology I decided to use for our demo app) has a number of challenges which we will cover in this article.
将Apple登录与SwiftUI(这是我决定用于演示应用程序的UI技术)集成到Apple中将带来许多挑战,我们将在本文中介绍。
Specifically, we’ll look at the following:
具体来说,我们将看以下内容:
- How to implement the Sign in with Apple button in SwiftUI 如何在SwiftUI中实现使用Apple登录按钮
How to handle the authorization flow and how to implement
ASAuthorizationControllerDelegatein a SwiftUI application如何处理授权流程以及如何在SwiftUI应用程序中实现
ASAuthorizationControllerDelegate- How to upgrade an anonymous user to a permanent user 如何将匿名用户升级为永久用户
- What happens with the user’s data when upgrading an anonymous user 升级匿名用户时,用户数据会如何处理
- What happens if you’re trying to link to an account that has already been upgraded 如果您尝试链接到已升级的帐户,会发生什么情况?
基本设定 (Basic setup)
If you’re following along, check out the tag
stage_4/sign_in_with_apple/startand openMakeItSo.xcworkspacein thefinalfolder.如果要继续,请签出标记
stage_4/sign_in_with_apple/start并在final文件夹中打开MakeItSo.xcworkspace。
To use Sign in with Apple with Firebase Auth, there are a few preliminary steps you need to take:
要使用带Firebase Auth的Apple登录功能,您需要执行一些初步步骤:
- First of all, add the Sign in with Apple capability to your Xcode project 首先,将“使用Apple登录”功能添加到您的Xcode项目中

- In the Firebase Console, enable Sign in with Apple in the Authentication section 在Firebase控制台中,在“身份验证”部分中启用“使用Apple登录”
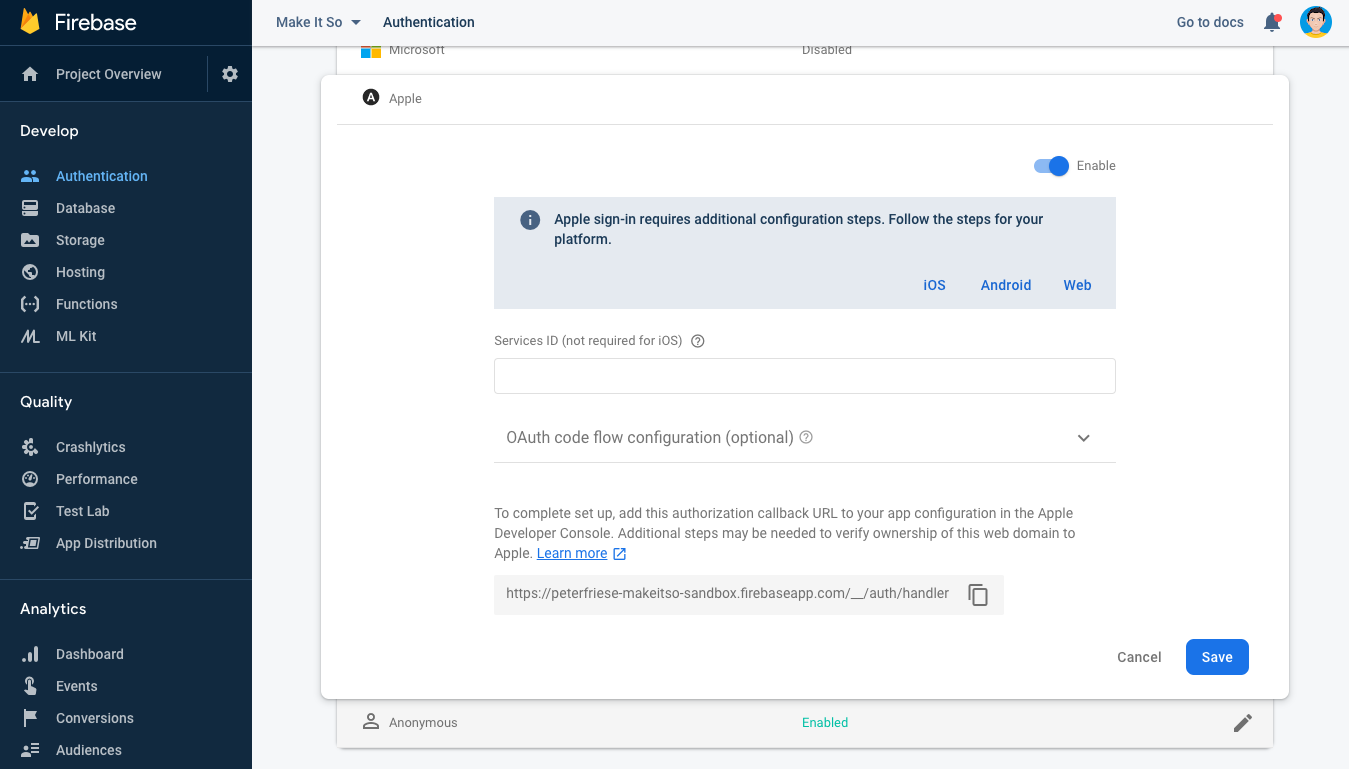
(In case you haven’t already done this) make sure to add your iOS app to your Firebase project. We already did this in part 2 of the series, which also contains a link to a video I made about this. Check it out here.
(如果您尚未执行此操作),请确保将iOS应用添加到Firebase项目中。 我们已经在该系列的第2部分中进行了此操作,该部分还包含指向我为此制作的视频的链接。 在这里查看 。
With that out of the way, let’s write some code!
有了这些,让我们编写一些代码!
实施“使用Apple登录”按钮 (Implementing the Sign in with Apple button)
Apple is very specific about how the Sign in with Apple button should look like (see the HIG). To make things easier, they’ve provided ASAuthorizationAppleIDButton, which goes a long way: for example, the button uses Apple-approved fonts and icons, maintains ideal content dimensions, and (maybe most importantly) supports internationalisation right out of the box. So instead of creating a custom button (which is explained in the same HIG document a bit further down), let's use the Apple-provided class.
Apple非常详细地介绍了“使用Apple登录”按钮的外观(请参见HIG )。 为了使事情变得更容易,他们提供了ASAuthorizationAppleIDButton ,它有很长的路要走:例如,按钮使用Apple认可的字体和图标,保持理想的内容尺寸,并且(也许最重要的是)开箱即用地支持国际化。 因此,让我们使用Apple提供的类,而不是创建自定义按钮 (在同一HIG文档中对此进行了进一步说明)。
However, there is no SwiftUI equivalent of ASAuthorizationAppleIDButton, so we'll have to use UIViewRepresentable to wrap it. We'll also want to make sure that the button automatically adjusts to light/dark mode.
但是,没有与ASAuthorizationAppleIDButton等效的ASAuthorizationAppleIDButton ,因此我们必须使用UIViewRepresentable进行包装。 我们还要确保按钮自动调整为亮/暗模式。
Create a new file SignInWithAppleButton.swift and paste the following code:
创建一个新文件SignInWithAppleButton.swift并粘贴以下代码:
A few quick remarks about this specific implementation:
关于此特定实现的一些简短说明:
We subscribe to the current
colorSchemeusing anEnvironmentobject (1)我们使用
Environment对象(1)订阅当前的colorScheme- This allows us to force SwiftUI to re-create the button whenever the color scheme changes — see (2) 这使我们能够在颜色方案更改时强制SwiftUI重新创建按钮-参见(2)
SignInWithAppleButtonInternalis the class that actually implementsUIViewRepresentable(3)SignInWithAppleButtonInternal是实际实现UIViewRepresentable(3)的类。In
makeUIView, we create an instance ofASAuthorizationAppleIDButtonaccording to the current colorScheme (4, 5, 6)在
makeUIView,我们根据当前的colorScheme(4,5,6)创建一个ASAuthorizationAppleIDButton的实例。As we don’t expose any properties that would require us to update the button whenever they change, there is no need to implement
updateUIView.由于我们没有公开任何在按钮更改时需要更新按钮的属性,因此无需实现
updateUIView。
We can now use the Sign in with Apple button like any other SwiftUI view. Let’s create a simple sign-up screen that explains the benefits of signing up to the user, and add the Sign in with Apple button to the bottom of the screen. In a later episode in this series, we’ll add more buttons to allow the user to sign in with other authentication providers.
现在,我们可以像使用其他任何SwiftUI视图一样使用“使用Apple登录”按钮。 让我们创建一个简单的注册屏幕,向用户解释注册的好处,并将“使用Apple登录”按钮添加到屏幕底部。 在本系列的下一集中,我们将添加更多按钮,以允许用户使用其他身份验证提供程序登录。
When the user taps (1) on the Sign in with Apple button, we will kick off (2) the authentication flow. Once the flow finishes, we will dismiss the sign-in view and return to the parent view (3).
当用户点击(1)使用Apple登录按钮时,我们将启动(2)身份验证流程。 流程完成后,我们将关闭登录视图并返回到父视图(3)。
All this isn’t terribly exciting yet, so let’s take a closer look at the sign-in flow itself.
所有这些还不是很令人兴奋,所以让我们仔细看看登录流程本身。
使用Apple Flow处理登录 (Handling the Sign in with Apple flow)
Handling the Sign in with Apple flow is a three-step process:
使用Apple Flow处理登录过程分为三个步骤:
First, we need to create an
ASAuthorizationAppleIDRequestthat contains the scopes we're interested in as well as some security-specific fields首先,我们需要创建一个
ASAuthorizationAppleIDRequest,其中包含我们感兴趣的范围以及一些特定于安全性的字段Next, we need to create an
ASAuthorizationController, pass in the request, and callperformRequests()接下来,我们需要创建一个
ASAuthorizationController,传入请求,然后调用performRequests()ASAuthorizationControllerwill do all the heavy lifting of interacting with the user. Once it has navigated the user through the process of signing in, it will invoke one of the callbacks:ASAuthorizationController将ASAuthorizationController与用户交互的所有繁重工作。 一旦在登录过程中导航了用户,它将调用回调之一:1)
1)
didCompleteWithAuthorization: if things went welldidCompleteWithAuthorization:如果一切顺利2)
2)
didCompleteWithError: if there was an issuedidCompleteWithError:如果有问题
Let’s dive in a little deeper and see what’s going on in each of these steps!
让我们更深入地研究一下每个步骤中发生的事情!
协调登录流程 (Coordinating the Sign-in Flow)
In a UIKit application, you might put most of the code for handling Sign in with Apple in a view controller. With SwiftUI, this isn’t possible, as we do not have a view controller. This actually is a good thing (tm), as it will prevent us from ending up with a Massive View Controller (MVC). Instead, let’s create a class SignInWithAppleCoordinator and a couple of extensions to organize the code in a more maintainable way.
在UIKit应用程序中,您可能会将用于处理“使用Apple登录”的大部分代码放在视图控制器中。 使用SwiftUI,这是不可能的,因为我们没有视图控制器。 这实际上是一件好事(tm),因为它将阻止我们最终使用Massive View Controller (MVC)。 相反,让我们创建一个SignInWithAppleCoordinator类和几个扩展,以更易于维护的方式组织代码。
Let me explain the code:
让我解释一下代码:
AuthenticationService(1) is a class we implemented in part 2 of this series - it manages the sign-in flow and keeps track of the currently signed in user.AuthenticationService(1)是我们在本系列的第2部分中实现的类-它管理登录流程并跟踪当前登录的用户。We define a callback (2) that we store in
onSignedInso that we can inform the caller when the user has signed in.我们定义了一个回调(2),它存储在
onSignedIn以便我们可以在用户登录时通知调用方。currentNonce(3) holds a cryptographic nonce - a value that can be used exactly once to prove that the request was actually sent by the current client. More on this in a minute.currentNonce(3)拥有一个加密的随机数 -该值可以精确地使用一次以证明该请求实际上是由当前客户端发送的。 一分钟内将对此进行更多介绍。We hold on to the
windowthat owns the current view - we will need to return this in our implementation ofASAuthorizationControllerPresentationContextProviding.我们保留拥有当前视图的
window-我们将需要在我们的ASAuthorizationControllerPresentationContextProviding实现中返回该ASAuthorizationControllerPresentationContextProviding。
创建请求 (Creating the request)
ASAuthorizationController is the core class handling the authorization flow for Sign in with Apple. Since it is capable of handling different types of authorization flows (password, single sign-on, and signing in with an Apple ID), it needs to be configured using an ASAuthorizationRequest.
ASAuthorizationController是处理使用Apple登录的授权流程的核心类。 由于它能够处理不同类型的授权流(密码,单点登录和使用Apple ID登录),因此需要使用ASAuthorizationRequest对其进行配置。
We do this in a helper method, appleIDRequest, by creating ASAuthorizationAppleIDRequest (which is a subclass of ASAuthorizationRequest):
我们通过创建ASAuthorizationAppleIDRequest (它是ASAuthorizationRequest的子类),在辅助方法appleIDRequest中ASAuthorizationRequest :
After creating the request using ASAuthorizationAppleIDProvider.createRequest() (1), we configure a couple of things:
在使用ASAuthorizationAppleIDProvider.createRequest() (1)创建请求之后,我们配置了两件事:
First, we indicate that we’re interested in the user’s full name and their email address by providing the
.fullNameand.emailscopes (2).首先,我们通过提供
.fullName和.email范围(2)来表明我们对用户的全名及其电子邮件地址.fullName。We also pass in a
SignInState(3) - this is an enum that indicates which type of authorization flow we're using (signing up, logging in, re-authenticating).我们还传递一个
SignInState(3)-这是一个枚举,指示我们正在使用哪种类型的授权流程(注册,登录,重新认证)。As briefly mentioned above, the
nonce(4) is a one-time key: we will compare the nonce in the private fieldcurrentNonceto the nonce we receive indidCompleteWithAuthorizationto verify that it was actually us who sent the request.如上文所述,
nonce(4)是一次性密钥 :我们将私有字段currentNonce中的随机数与在didCompleteWithAuthorization收到的随机数进行didCompleteWithAuthorization以验证发送请求的实际上是我们。
Here is the code to generate the nonce and compute it’s secure hash code (using the SHA-256 algorithm):
这是生成随机数并计算其安全哈希码的代码(使用SHA-256算法 ):
登录或链接,这就是问题 (To sign in or to link, that is the question)
Usually, when you authenticate a user, you will use Auth.auth().signIn() to sign them in to Firebase.
通常,在对用户进行身份验证时,您将使用Auth.auth().signIn()将他们登录到Firebase。
In our case, however, we’re in a different situation: the user already signed in — using Firebase Anonymous Authentication! This means we already have a User instance, and the user potentially already has created a number of to-do items that are associated with the anonymous user's userID in our Cloud Firestore instance. If we were to use the signIn() method to sign in to another account, we'd end up with orphaned data, i.e. all those documents would still be stored in Firestore, but they'd be assigned to an anonymous account that no longer can sign in to. Thus, the user would lose access to them.
但是,在本例中,我们处于另一种情况:用户已经登录-使用Firebase匿名身份验证! 这意味着我们已经有一个User实例,并且该用户可能已经在Cloud Firestore实例中创建了许多与匿名用户的userID关联的待办事项。 如果我们使用signIn()方法登录到另一个帐户,则最终将得到孤立的数据,即所有这些文档仍将存储在Firestore中,但它们将被分配给不再使用的匿名帐户可以登录。 因此,用户将无法访问它们。
Instead, we will use a Firebase Authentication feature called Account Linking to upgrade the user’s anonymous account into a permanent account based on their Apple ID.
相反,我们将使用称为帐户链接的Firebase身份验证功能,根据用户的Apple ID将用户的匿名帐户升级为永久帐户。
Now I should give you a word of warning: Apple requires that you get the user’s consent when you’re linking their Apple ID with any directly identifiable personal information such as their email address or phone number. This applies when you’re linking to an authentication provider such as Facebook Login, Google Sign-in, or Email/Password Auth. However, as an anonymous user is anonymous (duh) and doesn’t contain any personal identifiable information, there’s no need for us to get the user’s consent.
现在,我要提醒您一句:将用户的Apple ID与任何可直接识别的个人信息(例如电子邮件地址或电话号码)链接在一起时,Apple要求您征得用户的同意。 当您链接到身份验证提供程序(例如Facebook登录名,Google登录或电子邮件/密码身份验证)时,此方法适用。 但是,由于匿名用户是匿名用户(duh)并且不包含任何个人身份信息,因此我们无需获得用户的同意。
To kick off the linking flow, we call the link() method on our SignInWithAppleCoordinator class:
为了启动链接流程,我们在SignInWithAppleCoordinator类上调用link()方法:
We’re storing the callback (which is implemented as a trailing closure) in the onSignedIn property (1) so we can inform the caller about the result of the authentication flow. Also note that both the delegate (2) and the presentationContextProvider (3) are set to self, so we can handle all of ASAuthorizationController's callbacks in one spot.
我们将回调(作为尾随闭包实现)存储在onSignedIn属性(1)中,因此我们可以将验证流程的结果告知调用者。 还要注意, delegate (2)和presentationContextProvider (3)都设置为self ,因此我们可以一次处理所有ASAuthorizationController的回调。
处理回调 (Handling the callbacks)
Depending on the events that happen while the user interacts with the ASAuthorizationController, we will receive some callbacks. Let's take a look at what might happen.
根据用户与ASAuthorizationController交互时发生的事件,我们将收到一些回调。 让我们看看会发生什么。
First of all, we’ll need to perform some sanity and security checks:
首先,我们需要执行一些健全性和安全性检查:
- Does the credential contain a nonce (1)? 凭证是否包含随机数(1)?
- Does the authorization response contain an ID token (2)? 授权响应中是否包含ID令牌(2)?
- Does the authorization response contain the state we sent (3)? 授权响应是否包含我们发送的状态(3)?
If all of the above holds true, we can continue by requesting Firebase’s OAuthProvider to mint a credential based on the authentication provider ( apple.com), the ID token and the nonce:
如果以上所有条件均成立,我们可以继续请求Firebase的OAuthProvider基于身份验证提供程序( apple.com ),ID令牌和随机数来创建一个凭据:
Depending on the type of authorization flow we’re interested in, we will then either perform a regular sign-in by calling Auth.auth().signIn(), or link the anonymous user account with the freshly minted credential by calling Auth.auth().currentUser.link().
然后,根据我们感兴趣的授权流程的类型,我们将通过调用Auth.auth().signIn()进行常规登录,或者通过调用Auth.auth().currentUser.link()将匿名用户帐户与新创建的凭据关联起来Auth.auth().currentUser.link() 。
Let’s look at the code for the linking flow:
让我们看一下链接流程的代码:
That’s quite a bit, so let’s take a closer look at what’s happening.
相当多,所以让我们仔细看看发生了什么。
As we decided to upgrade the existing anonymous user to a permanent user (based on their Apple ID credentials), we’re calling
currentUser.link(with: credential)(1)当我们决定将现有匿名用户升级为永久用户(基于他们的Apple ID凭据)时,我们正在调用
currentUser.link(with: credential)(1)- The result of that call either is an upgraded user or an error (2). 该调用的结果是用户升级或错误(2)。
- The most common cause for an error is if the user is trying to link with an Apple ID that they’ve already linked to. As developers, we will run into this situation all of the time, as we’re obviously linking to the Apple ID of our own account or a test account (should you have one). I’ll show you how to unlink your Apple ID from your application below to help you test all scenarios, but we need to gracefully deal with this situation. We’ve got a couple of options, such as telling the user they cannot do this (bad), or signing in to the already linked account (better), or signing in to the already linked account and migrating any data the user might have in the anonymous user they’re currently using (best). Because this is a rather involved topic, we’re going to cover this is a separate post. 导致错误的最常见原因是用户是否尝试使用其已链接的Apple ID进行链接。 作为开发人员,我们会一直遇到这种情况,因为我们显然要链接到我们自己的帐户或测试帐户的Apple ID(如果您有)。 我将在下面显示如何从您的应用程序断开Apple ID的链接,以帮助您测试所有情况,但是我们需要妥善处理这种情况。 我们提供了两种选择,例如告诉用户他们不能执行此操作(不好),或登录到已链接的帐户(更好),或登录到已链接的帐户并迁移用户可能拥有的所有数据在他们当前正在使用的匿名用户中(最佳)。 因为这是一个涉及很深的话题,所以我们将在单独的帖子中介绍。
If all goes well (i.e. the user hadn’t linked their Apple ID before), the result of
currentUser.link(with: credentials)is a signed-inUserinstance, representing the user's Apple ID. In this case, we can go ahead and call the callback provided when the caller kicked off the sign-in process (3).如果一切顺利(即用户之前未链接其Apple ID),则
currentUser.link(with: credentials)的结果将是一个已登录的User实例,代表该用户的Apple ID。 在这种情况下,我们可以继续并调用呼叫者启动登录过程时提供的回调(3)。
取消您的Apple ID与使用“使用Apple登录”的应用程序的链接 (Unlinking your Apple ID from an app that uses Sign in with Apple)
Once you’ve signed in to your app, you cannot repeat the sign-in flow, which makes testing a bit of a challenge. To get back to the initial state, you need to disconnect your Apple ID from your app. Here is how:
登录您的应用后,您将无法重复登录流程,这给测试带来了一些挑战。 要恢复到初始状态,您需要从应用程序断开Apple ID的连接。 方法如下:
Go to https://appleid.apple.com and sign in using your Apple ID
转到https://appleid.apple.com并使用您的Apple ID登录
In the Security section, find Apps & Websites using Apple ID and click on Manage…
在“ 安全性”部分中,找到使用Apple ID的应用程序和网站 ,然后单击“ 管理…”。
- You will see a pop-up dialog that shows you all apps that are connected to your Apple ID 您将看到一个弹出对话框,显示与您的Apple ID连接的所有应用程序

- Click on the name of the app you want to disconnect 点击您要断开连接的应用的名称
- The following dialog will tell you when you first started using your Apple ID with this application 以下对话框将告诉您什么时候首次开始在此应用程序中使用Apple ID

Click on Stop using Apple ID to disconnect this app from your Apple ID
单击停止使用Apple ID断开此应用与Apple ID的连接
The next time you open that app, you will need to sign in again.
下次打开该应用时,您需要再次登录。
检索用户的显示名称 (Retrieving the user’s display name)
Many apps provide a more personalised experience for their signed in users, for example by displaying their name on the profile screen.
许多应用程序都为登录用户提供了更加个性化的体验,例如通过在配置文件屏幕上显示其名称。
Sign in with Apple will provide the user details you requested using the scopes only the first time a user signs in to your app with their Apple ID. This is a design decision Apple made to ensure developers take privacy concerns seriously.
使用Apple登录仅在用户第一次使用Apple ID登录到您的应用程序时,才使用范围提供您请求的用户详细信息。 这是Apple做出的一项设计决策,旨在确保开发人员认真对待隐私问题。
Firebase automatically stores the opaque user identifier Apple provides in the Firebase user that is created when you invoke currentUser.link() or Auth.auth().signIn(). The same applies to the user's email address. Keep in mind that if the user decides to use Apple's anonymous email relay, the user's email address will look like this: <random-identifier>@privaterelay.appleid.com.
Firebase会自动将Apple提供的不透明用户标识符存储在您调用currentUser.link()或Auth.auth().signIn()时创建的Firebase用户中。 用户的电子邮件地址也是如此。 请记住,如果用户决定使用Apple的匿名电子邮件中继,则用户的电子邮件地址将如下所示: <random-identifier>@privaterelay.appleid.com 。
The user’s full name is not automatically stored in the user object that Firebase creates for a linked user. This is a design decision that the Firebase team made to prevent developers from accidentally violating Apple’s anonymised data requirements.
用户的全名不会自动存储在Firebase为链接用户创建的用户对象中。 这是Firebase团队做出的一项设计决策,旨在防止开发人员意外违反Apple的匿名数据要求。
As our to-do-list app does not support linking with any other identity provider other than Sign in with Apple, we won’t be running into this situation. So let’s store the user’s full name into the Firebase user object ourselves:
由于我们的待办事项应用程序不支持与Apple登录以外的任何其他身份提供者链接,因此我们不会遇到这种情况。 因此,让我们将用户的全名自己存储到Firebase用户对象中:
We first retrieve the user’s full name from the ASAuthorizationAppleIDCredential we received when the Sign in with Apple flow completed successfully (1). Then, in AuthenticationService.updateDisplayName (2), we create a UserProfileChangeRequest (3), set the user name, and commit the changes to Firebase Authentication (4).
当使用Apple登录流程成功完成时,我们首先从收到的ASAuthorizationAppleIDCredential检索用户的全名(1)。 然后,在AuthenticationService.updateDisplayName (2)中,创建一个UserProfileChangeRequest (3),设置用户名,并将更改提交给Firebase Authentication(4)。
At this stage, we’ve got an authentication solution for our app that will allow users to start using the app without having to sign in. Once they want to use their to-do list on a second device, they can sign in to the app on the first device using Sign in with Apple. At this point, their anonymous user will be converted into a permanent account that is connected to the user’s Apple ID via Sign in with Apple.
在此阶段,我们为我们的应用程序提供了一个身份验证解决方案,该解决方案将使用户无需登录即可开始使用该应用程序。一旦他们想在第二台设备上使用待办事项列表,就可以登录使用使用Apple登录功能在第一台设备上运行该应用程序。 此时,他们的匿名用户将被转换为永久帐户,该帐户通过“使用Apple登录”连接到该用户的Apple ID。
As their Firebase user ID hasn’t changed by this upgrade, all data they have previously entered using their anonymous account is still stored in Cloud Firestore, but is now accessible to their new, permanent account.
由于此升级未更改其Firebase用户ID,因此他们以前使用匿名帐户输入的所有数据仍存储在Cloud Firestore中,但现在可供其新的永久帐户访问。
This means they can now sign in to their account on a different device and access the same data. Thanks to Cloud Firestore’s realtime capabilities, any change the users makes on one device will be synchronised to any other device they are signed in to and will be visible almost instantaneously.
这意味着他们现在可以在其他设备上登录自己的帐户并访问相同的数据。 借助Cloud Firestore的实时功能,用户在一个设备上所做的任何更改都将同步到他们登录的任何其他设备上,并且几乎可以即时看到。
Here is a screencast showing two simulators side by side showing how this looks like:
这是一个截屏,显示了两个模拟器并排显示的样子:
Get the completed source code for the app by checking out the tag stage_4/sign_in_with_apple/end and opening MakeItSo.xcworkspace in the final folder.
通过检出标签stage_4/sign_in_with_apple/end并在final文件夹中打开MakeItSo.xcworkspace ,获取应用程序的完整源代码。
有关为您的应用实施身份验证的建议 (Recommendation for implementing authentication for your app)
User on-boarding is a critical moment in an app’s lifecycle, and it’s easy to screw up and lose users instead of retaining them. One of the biggest mistakes is to ask users to register for using your app before you’ve given them the opportunity to experience the app and properly understand its value proposition. Asking users to sign in before they can start using your app puts up a pretty serious speed bump, and your potential users will ask themselves if they want to make a commitment to your app. If you haven’t given them an incentive, they are very likely going to uninstall your app.
用户入门是应用程序生命周期中的关键时刻,很容易搞砸和失去用户而不是保留他们。 最大的错误之一是要求用户注册使用您的应用程序,然后再让他们有机会体验该应用程序并正确理解其价值主张。 在开始使用您的应用程序之前要求用户登录会带来很大的速度障碍,您的潜在用户会问自己是否要对您的应用程序做出承诺。 如果您没有给他们任何激励,他们很可能会卸载您的应用程序。
Implementing a local data storage solution that allows users to work locally first and only later synchronise their data with your backend (which requires asking them to sign in) is a serious piece of work, and it’s easy to see why a lot of developers would rather try to avoid having to implement this.
实施一个本地数据存储解决方案,允许用户先在本地工作,然后再将其数据与您的后端同步(这需要要求他们登录),这是一项严肃的工作,很容易看出为什么很多开发人员宁愿这样做尝试避免必须执行此操作。
By using Firebase Anonymous Authentication to transparently create a Firebase user account, and storing the users’ data in Firebase Realtime Database or Cloud Firestore, it becomes a lot easier to implement such a solution:
通过使用Firebase匿名身份验证透明地创建Firebase用户帐户,并将用户的数据存储在Firebase Realtime数据库或Cloud Firestore中,实现这种解决方案变得容易得多:
- Use Firebase Anonymous Auth to sign in the user transparently 使用Firebase匿名身份验证透明地登录用户
- Use their anonymous user ID to store data in Firebase RTDB or Cloud Firestore 使用其匿名用户ID将数据存储在Firebase RTDB或Cloud Firestore中
- Once the user has understood the value proposition of your application, suggest creating an account 用户了解您应用程序的价值主张后,建议创建一个帐户
- Use one of the identity providers that Firebase supports (such as Sign in with Apple, Google Sign-in, or Facebook Login), or Email/Password authentication to let the user sign in 使用Firebase支持的身份提供程序之一(例如,使用Apple登录,Google登录或Facebook登录)或电子邮件/密码身份验证来让用户登录
- The anonymous user will be upgraded to a permanent user with the same user ID. This means all existing data is safe and can now be used by the user on any of the devices they sign in to using their preferred authentication mechanism. 匿名用户将升级为具有相同用户ID的永久用户。 这意味着所有现有数据都是安全的,并且用户现在可以在他们使用首选身份验证机制登录的任何设备上使用它们。
Firebase supports a number of authentication mechanisms, and you can mix and match which one you’d like to support in your app. Please keep in mind though, that you absolutely must support the same set of authentication mechanisms on all platforms your app is available on.
Firebase支持多种身份验证机制,您可以混合和匹配您希望在应用程序中支持的身份验证机制。 不过请记住,您绝对必须在应用可用的所有平台上支持相同的身份验证机制集。
Otherwise, users might sign in using Apple on iOS, and later be stuck when they try to sign in to your application on Android, but you only support Google Sign-in on Android. Or worse — they signed in using an identity provider on one platform, but you only support Email/Password sign-in on your other platforms. How should they sign in to their (existing) account using a password if they didn’t even choose a password in the first place?
否则,用户可能会在iOS上使用Apple登录,后来又在尝试登录Android上的应用程序时陷入困境,但您仅支持Android上的Google登录。 或更糟糕的是,他们在一个平台上使用身份提供程序登录,但您仅在其他平台上支持电子邮件/密码登录。 如果他们甚至根本没有选择密码,他们应该如何使用密码登录(现有)帐户?
结论 (Conclusion)
In this article, you saw how to
在本文中,您了解了如何
- Implement Sign in with Apple 使用Apple实施登录
- Upgrade anonymous users to permanent users by using a mechanism called account linking 通过使用一种称为帐户链接的机制,将匿名用户升级为永久用户
- Learned about some guiding principles to ensure a great UX for your on-boarding and authorisation flow 了解了一些指导原则,以确保您的入门和授权流程具有出色的用户体验
Implementing a solid authentication solution can be a challenging task, but I hope you have seen how Firebase can make this a lot easier for you by providing a solid framework for implementing authorisation solutions.
实施可靠的身份验证解决方案可能是一项艰巨的任务,但我希望您已经了解Firebase如何通过提供用于实施授权解决方案的可靠框架使您轻松得多。
Over the course of the past three articles, we’ve managed to implement a fully functional to-do list application, but there is still a lot to do. Here are a couple of ideas for things that we will look into in the next episodes:
在过去的三篇文章中,我们设法实现了一个功能齐全的待办事项列表应用程序,但仍有许多工作要做。 这里有一些想法,我们将在下一集中进行探讨:
- Migrating an anonymous user’s data in case they already signed in with Apple on another device 如果匿名用户的数据已经在另一台设备上与Apple登录,则迁移他们的数据
- Showing the user’s due tasks in a Today Extension 在今日扩展中显示用户应有的任务
- Allowing users to add new tasks via a Siri Extension 允许用户通过Siri扩展程序添加新任务
- Sharing lists with other users 与其他用户共享列表
- Uploading attachments to tasks 将附件上传到任务
- Properly implementing due dates (and sending users a notification for any tasks due today) 正确实施到期日(并向用户发送有关今天到期的任何任务的通知)
If you’ve got any features you’d like to see me implement, please let me know by sending me a tweet or filing an issue on the project’s repository on GitHub.
如果您希望看到我实现的任何功能,请给我发送一条推文或在GitHub上的项目存储库中提交问题,以告知我。
Thanks for reading!
谢谢阅读!
资源资源 (Resources)
翻译自: https://medium.com/firebase-developers/sign-in-with-apple-using-swiftui-and-firebase-10b7760aba60
firebase使用


 249
249

 被折叠的 条评论
为什么被折叠?
被折叠的 条评论
为什么被折叠?
 到【灌水乐园】发言


