


firefly
The Adobe I/O Runtime is a serverless platform, which allows you to deploy an application that can to respond to events and then take action. It is integrated with both Adobe I/O Events and API Gateway, which means that it’s very easy to subscribe to events dispatched by Adobe solutions and then subsequently communicate with a wide range of Adobe APIs. You’re not only limited to Adobe APIs though; for example, I could subscribe to the Privacy Service Job Complete event and then set up a simple application that e-mails the information to relevant stakeholders.
Adobe I / O运行时是一个无服务器平台,可让您部署可以响应事件并采取措施的应用程序。 它与Adobe I / O事件和API网关集成在一起,这意味着很容易订阅Adobe解决方案发送的事件,然后与各种Adobe API进行通信。 但是,您不仅限于Adobe API。 例如,我可以订阅“隐私服务工作完成”事件,然后设置一个简单的应用程序,将该信息通过电子邮件发送给相关的利益相关者。
A while ago I wrote an article about building a GDPR UI using the Privacy Service APIs and AWS Lambda. I mentioned wanting to create a similar UI using Adobe’s IO Runtime platform, in order to see how they compare. It’s been quite a long time in the making but this article will go through all of the main steps required to create a fully functioning GDPR UI in the Runtime environment, as well drawing some comparisons with the Lambda-based build.
不久前,我写了一篇有关使用隐私服务API和AWS Lambda构建GDPR UI的文章 。 我提到要使用Adobe的IO Runtime平台创建类似的UI,以查看它们之间的比较。 编写过程已经花了很长时间,但是本文将介绍在运行时环境中创建功能全面的GDPR UI所需的所有主要步骤,并与基于Lambda的构建进行一些比较。
Note: Adobe IO Runtime (Project Firefly) is currently running in beta, so you will need to request access to join.
注意:Adobe IO运行时(Firefly项目)当前正在beta中运行,因此您需要请求访问权限才能加入。
#1设计概述 (#1 Design Overview)
The requirements are very similar to the previous GDPR UI but here’s a quick re-cap of what we’re trying to achieve.
要求与以前的GDPR UI非常相似,但是这里是我们要达到的目标的快速概述。
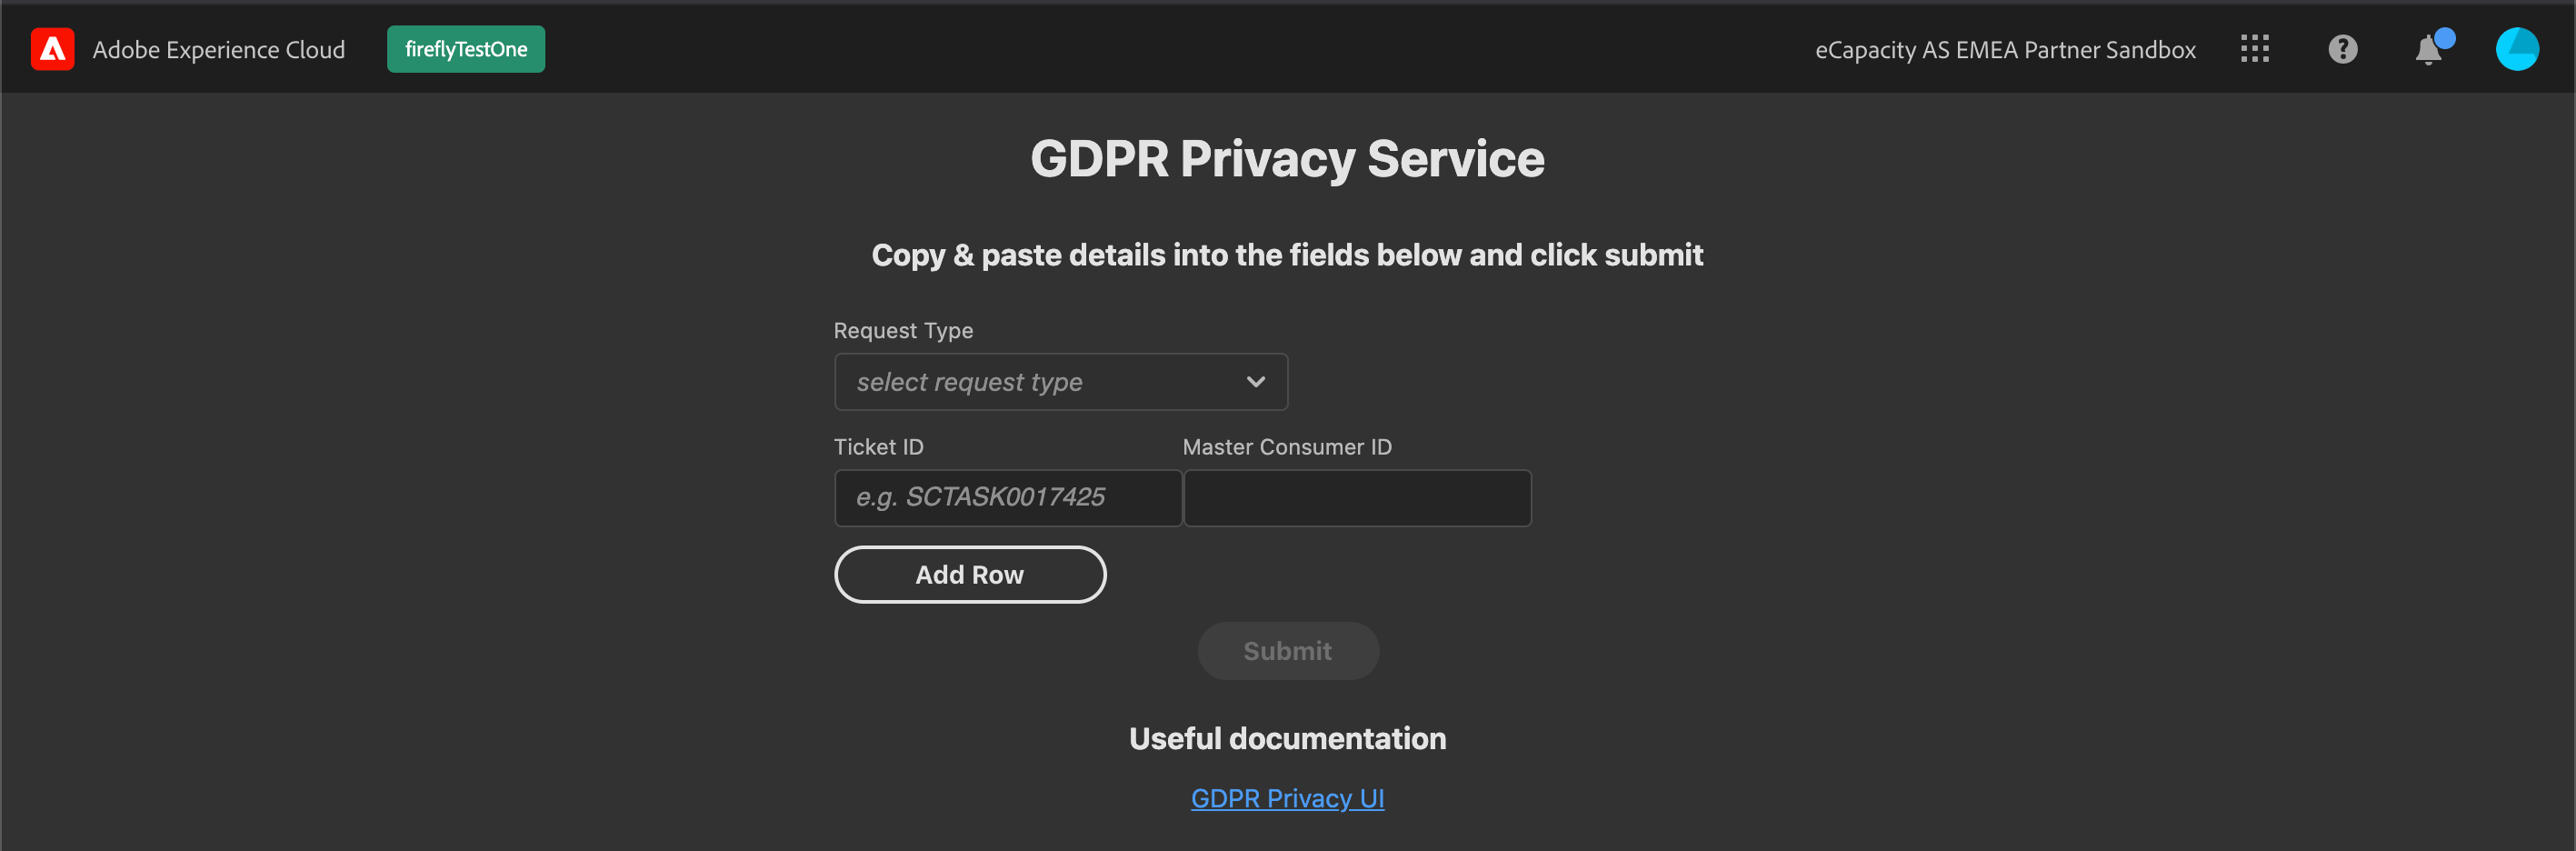
The requirements for the UI are that the user can:i) specify whether it is an “Access” or a “Delete” requestii) add a Ticket ID for internal recordsiii) add one or more declared IDs (used as the custom key for each request)iv) receive confirmation when the requests are registered successfully
UI的要求是用户可以:i)指定是“访问”请求还是“删除”请求ii)添加内部记录的票证ID iii)添加一个或多个声明的ID(用作每个ID的自定义密钥) iv)成功注册请求后收到确认
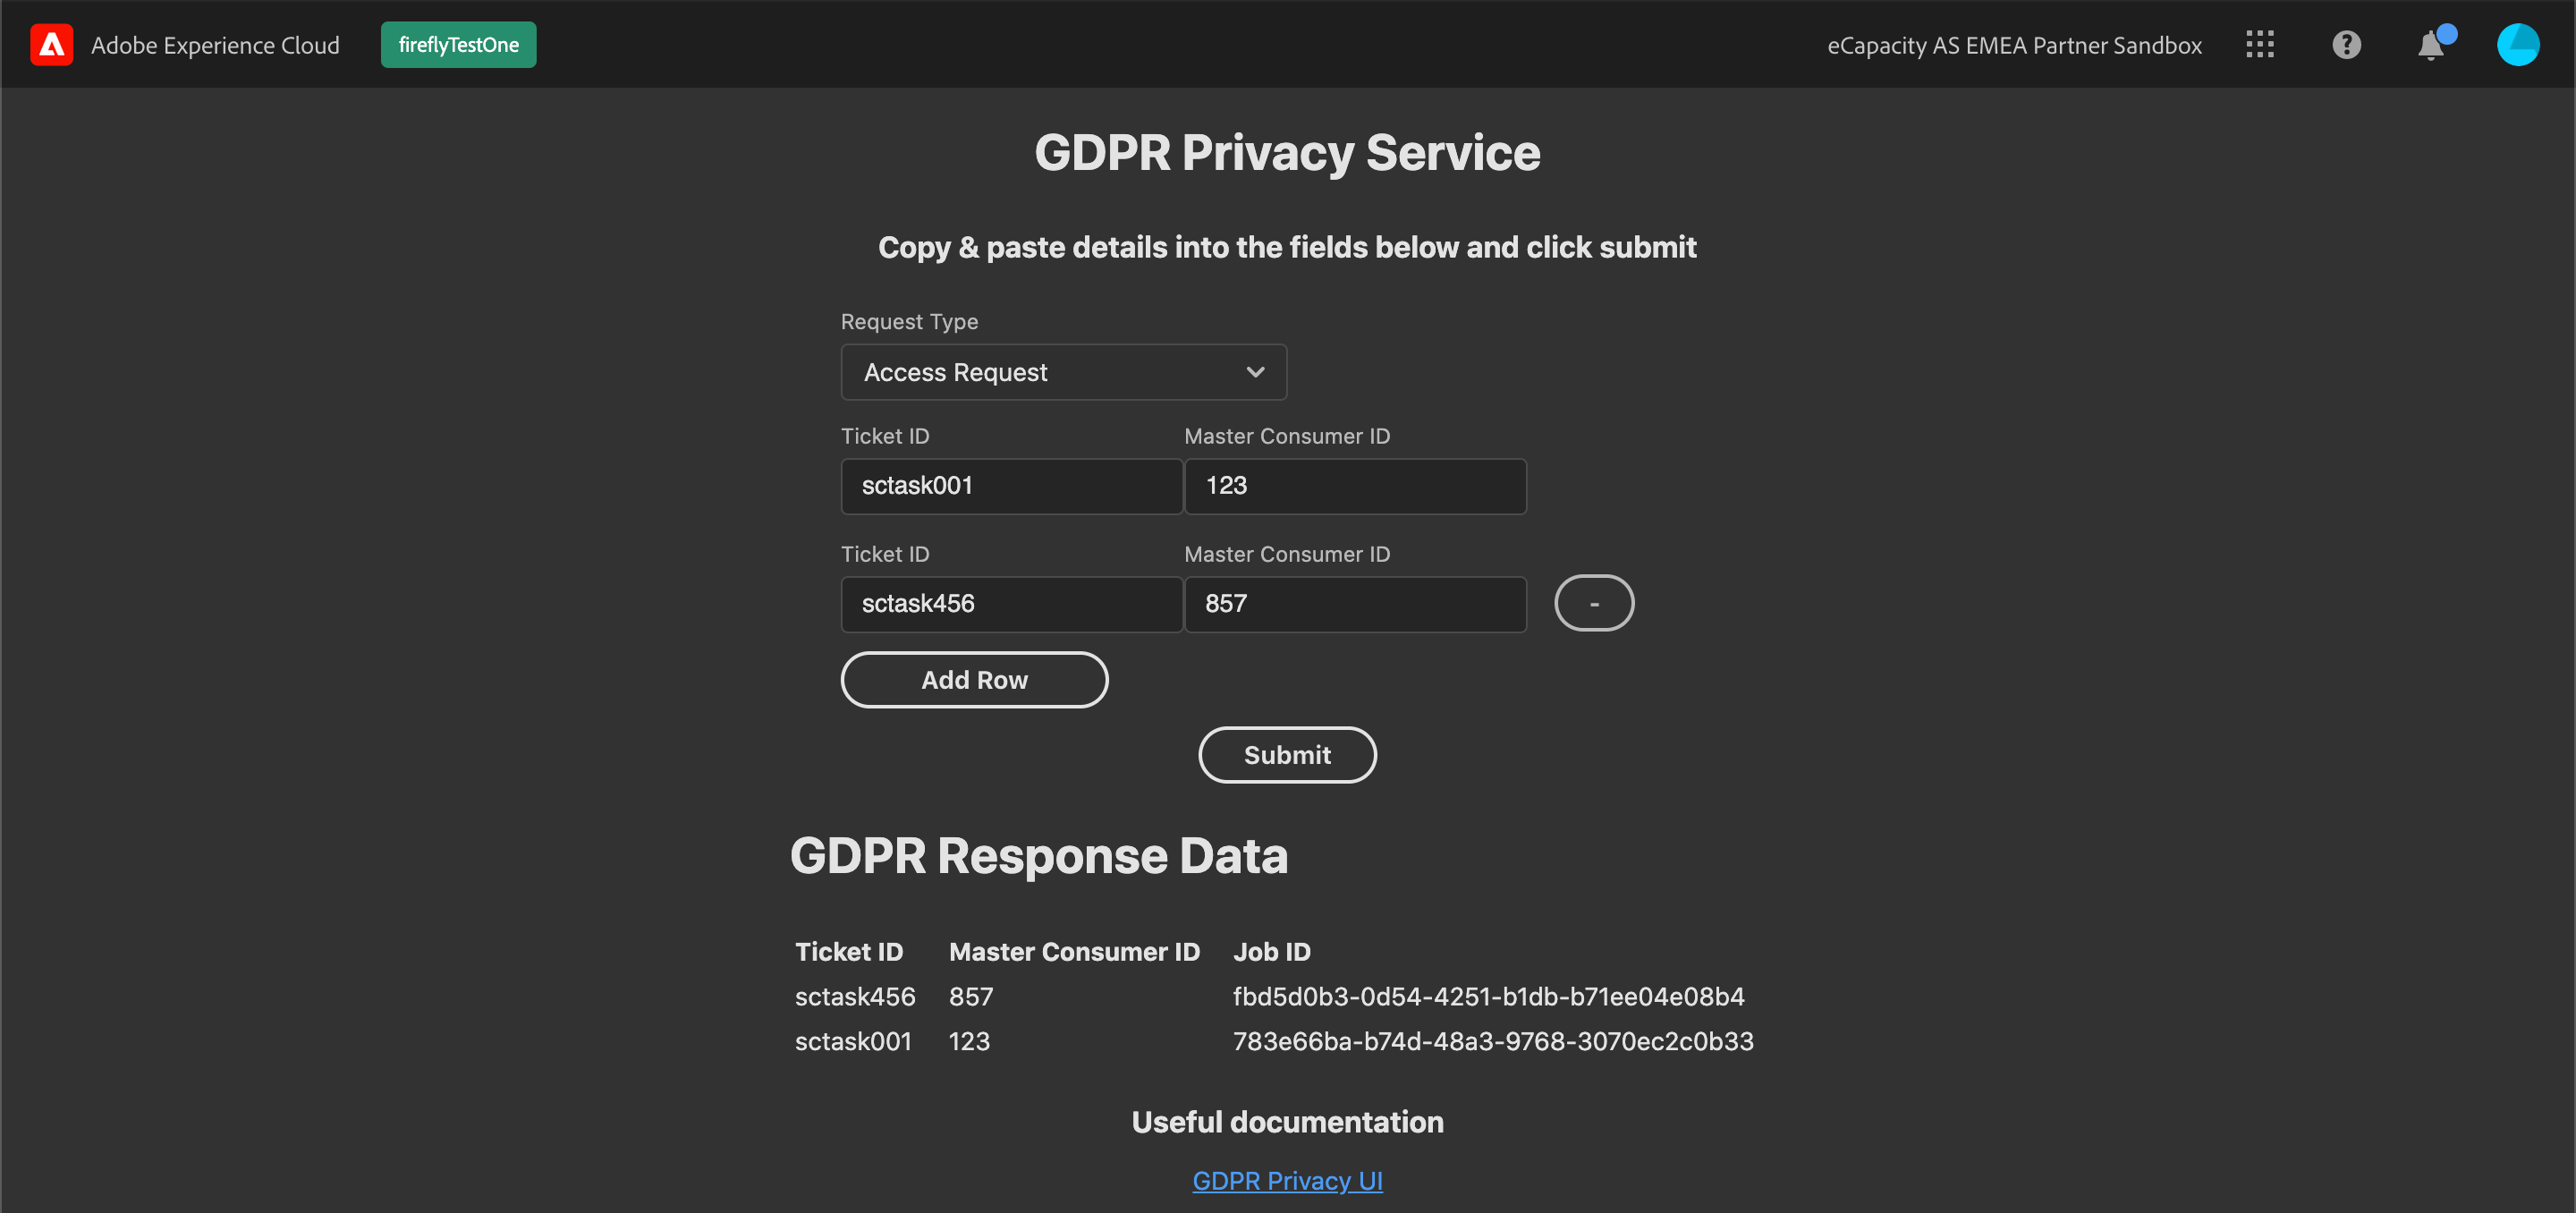
The end result should look something like this:
最终结果应如下所示:
#2环境与项目设置 (#2 Environment & Project Set Up)
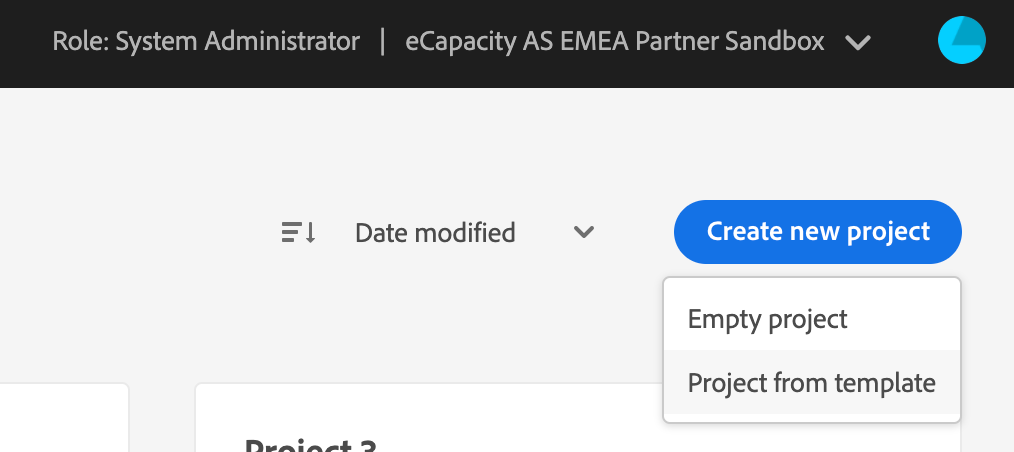
Once you have Runtime access, the environment set up is very straightforward, just follow the steps listed here in the “Local Environment Set Up” section. The next step is to create a project; if you’re familiar with Adobe IO then you’ve probably been creating from “Empty project” but for Runtime we’ll choose the “Project from template” option:
一旦你运行的访问,设置环境非常简单,只要按照列出的步骤这里的“地方环境设置”部分。 下一步是创建一个项目; 如果您熟悉Adobe IO,则可能是从“空项目”创建的,但对于运行时,我们将选择“从模板中提取项目”选项:
Then select Project Firefly:
然后选择Project Firefly:

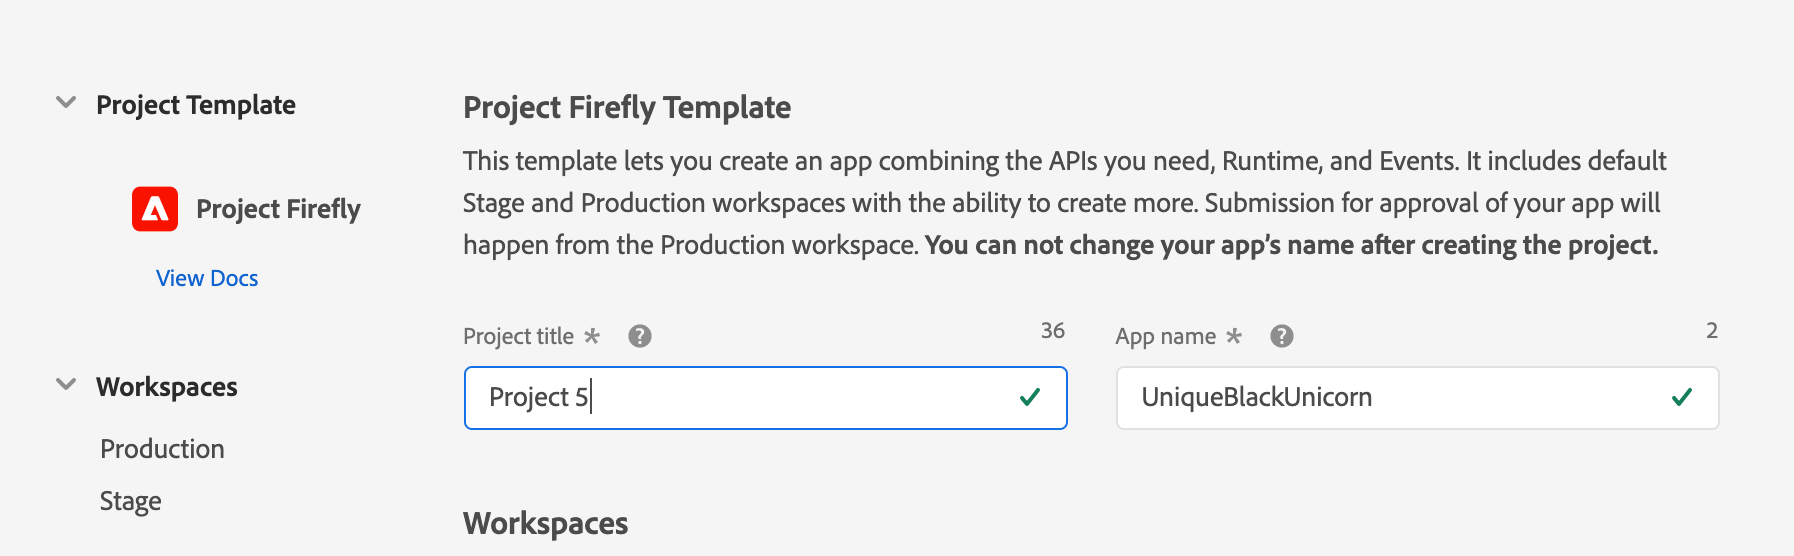
Choose a Project title and App name:
选择项目标题和应用名称:
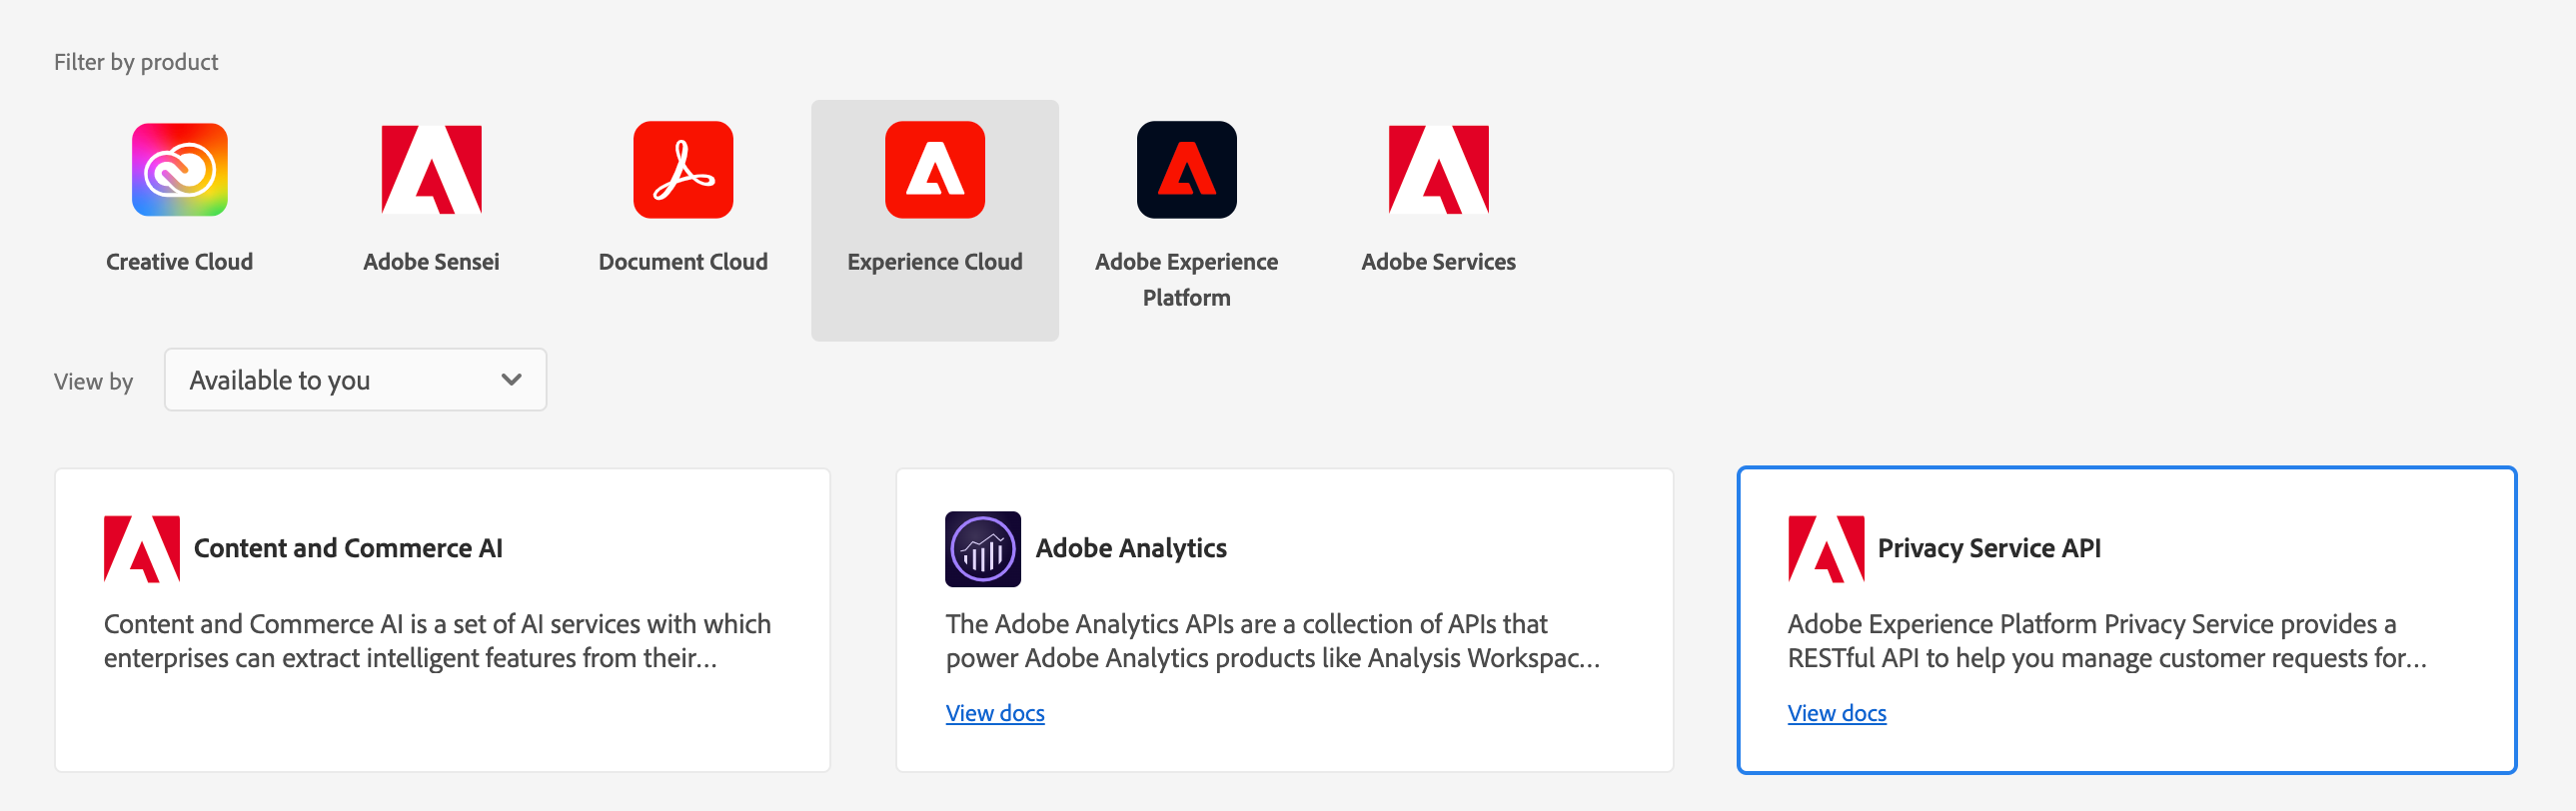
Navigate into the Stage workspace (Stage & Production workspaces are created by default but you can add more if you need to), click “Add service” and select API. There is a wide range of APIs available but we’ll go ahead and select the Privacy Service:
导航到舞台工作区(默认情况下会创建“舞台和生产”工作区,但您可以根据需要添加更多工作区),单击“添加服务”并选择API。 有很多可用的API,但是我们将继续选择“隐私权服务”:
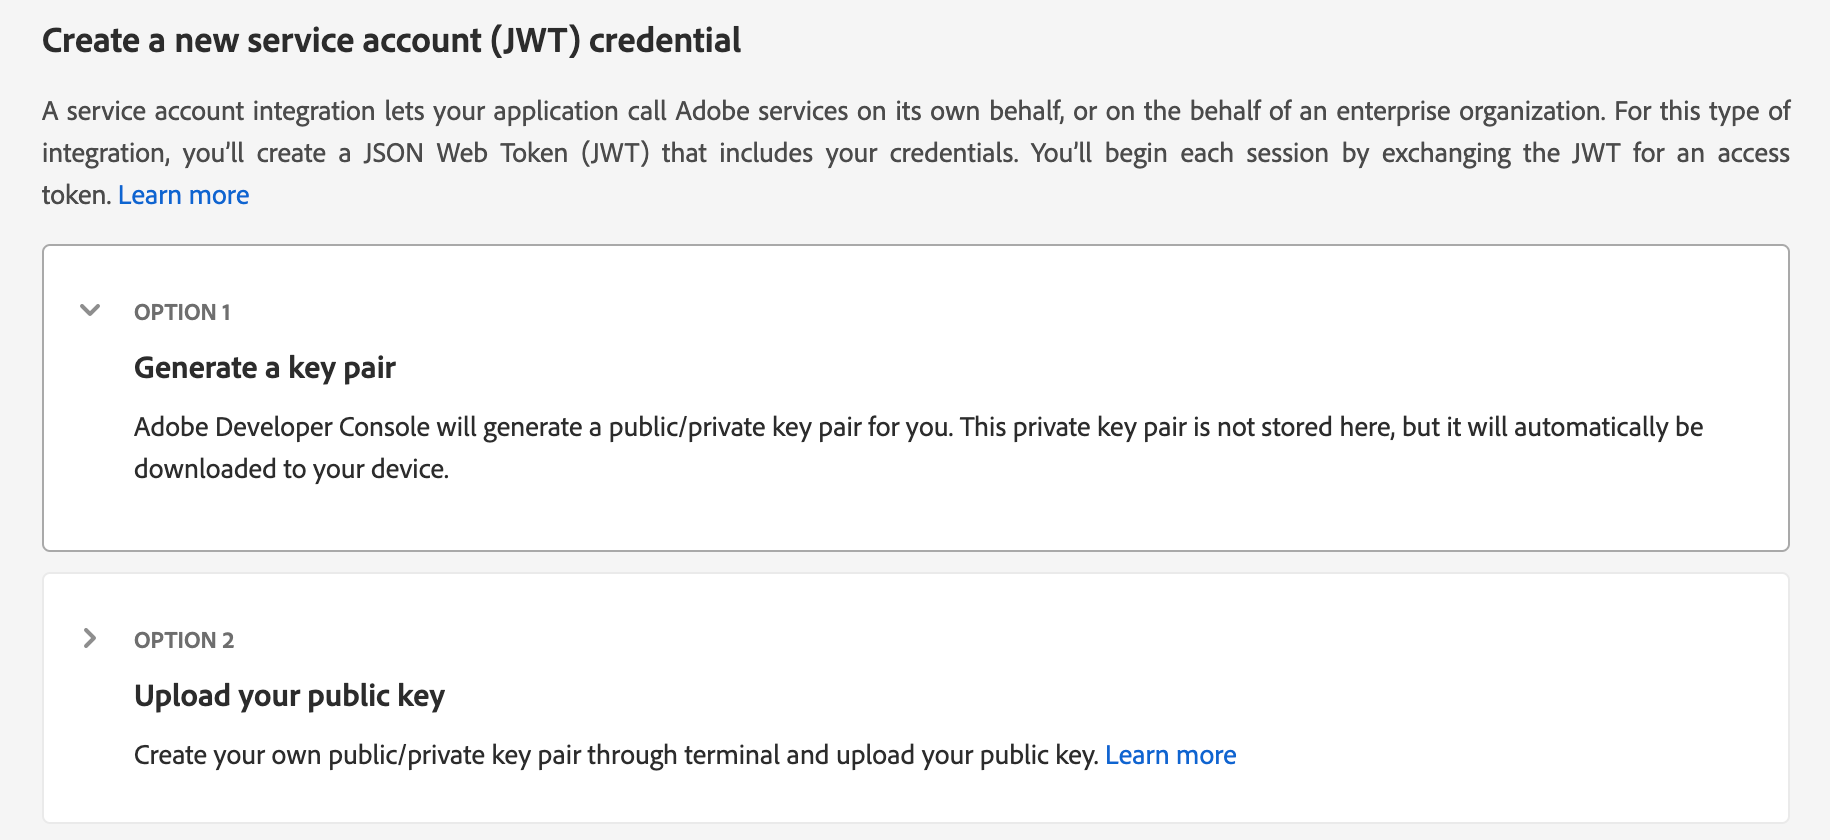
The next step is to create the jwt for the service account — a nice, (relatively) new feature in Adobe I/O is the option to have Adobe generate the key pair for you, which saves a little bit of time:
下一步是为服务帐户创建jwt-Adobe I / O的一个不错的(相对)新功能是Adobe可以为您生成密钥对的选项,这样可以节省一些时间:
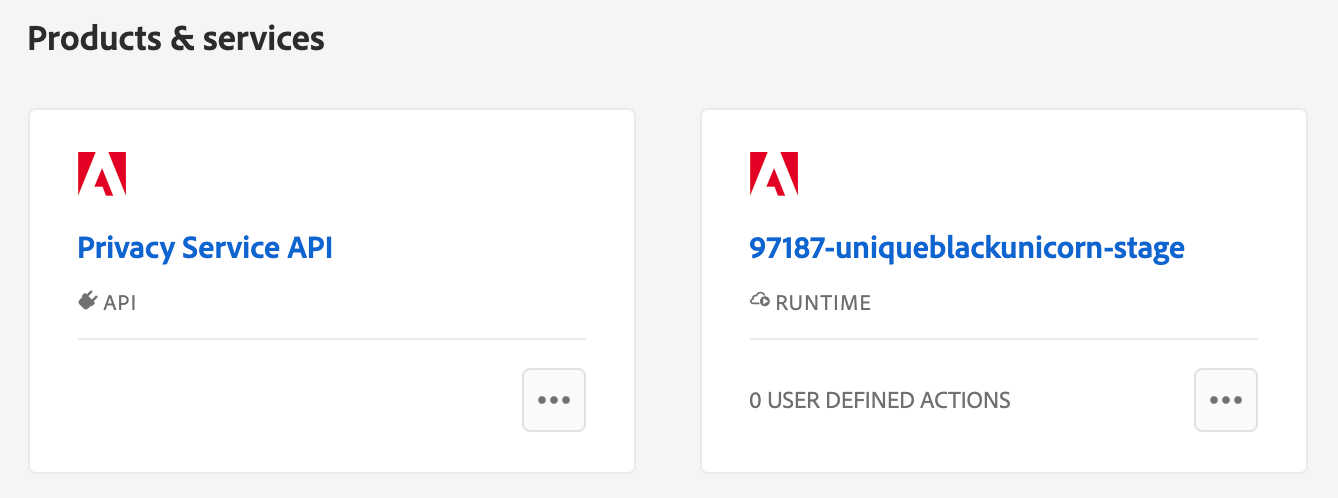
Once the step above is completed, the public/private keys will be downloaded to your device. The Privacy Service API should now be listed in the Stage workspace of the project, however, there won’t be any user defined actions:
完成上述步骤后,公钥/私钥将下载到您的设备上。 现在应该在项目的Stage工作区中列出Privacy Service API,但是,不会有任何用户定义的操作:
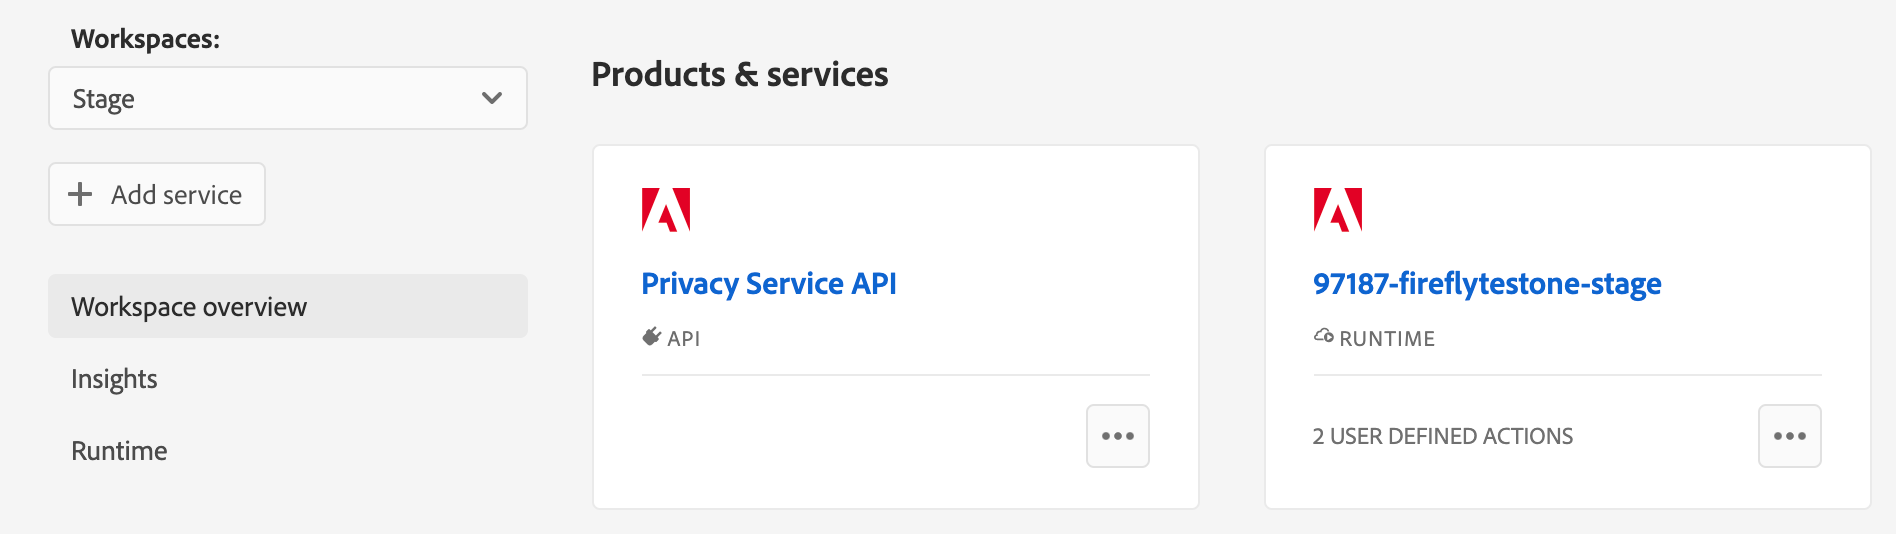
To generate an action we need to switch across to the Terminal; the Runtime documentation describes what’s required, so I won’t recreate them here, just follow the steps in the help guide, starting from the section called “3. Signing in from CLI”. Once those steps are complete, the Stage workspace should show that some actions have been defined:
要生成动作,我们需要切换到终端; 运行时文档描述了所需的内容,因此,在这里我不会重新创建它们,只需按照帮助指南中的步骤进行操作,即从“ 3.开始”部分开始。 从CLI登录”。 完成这些步骤后,舞台工作区应显示已定义一些操作:
#3 App UI开发 (#3 App UI Development)
The completed build includes a sample app as a starting point, which provides useful signposting for any custom code additions. We can now use the “aio app run” command in the Terminal to start up the development server and take a look at the sample app. I won’t go through every component part of the build but there are a few parts that are worth pointing out.
完成的构建包括一个示例应用程序作为起点,它为添加任何自定义代码提供了有用的路标。 现在,我们可以在终端中使用“ aio app run”命令来启动开发服务器,并查看示例应用程序。 我不会遍历构建的每个组件部分,但是有一些部分值得指出。
The first part to mention is that the sample app is built using React; you don’t necessarily need to create your UI using React — you could quite easily store your API response(s) in a window variable and use jQuery if you really wanted to — but if you want to achieve the Adobe look and feel then it’s a good idea to make use of the React Spectrum libraries.
首先要提到的是示例应用程序是使用React构建的。 您不一定需要使用React来创建UI-您可以很容易地将API响应存储在窗口变量中,如果确实愿意,可以使用jQuery-但是如果您想要获得Adobe的外观,那么您可以使用React Spectrum库的好主意。
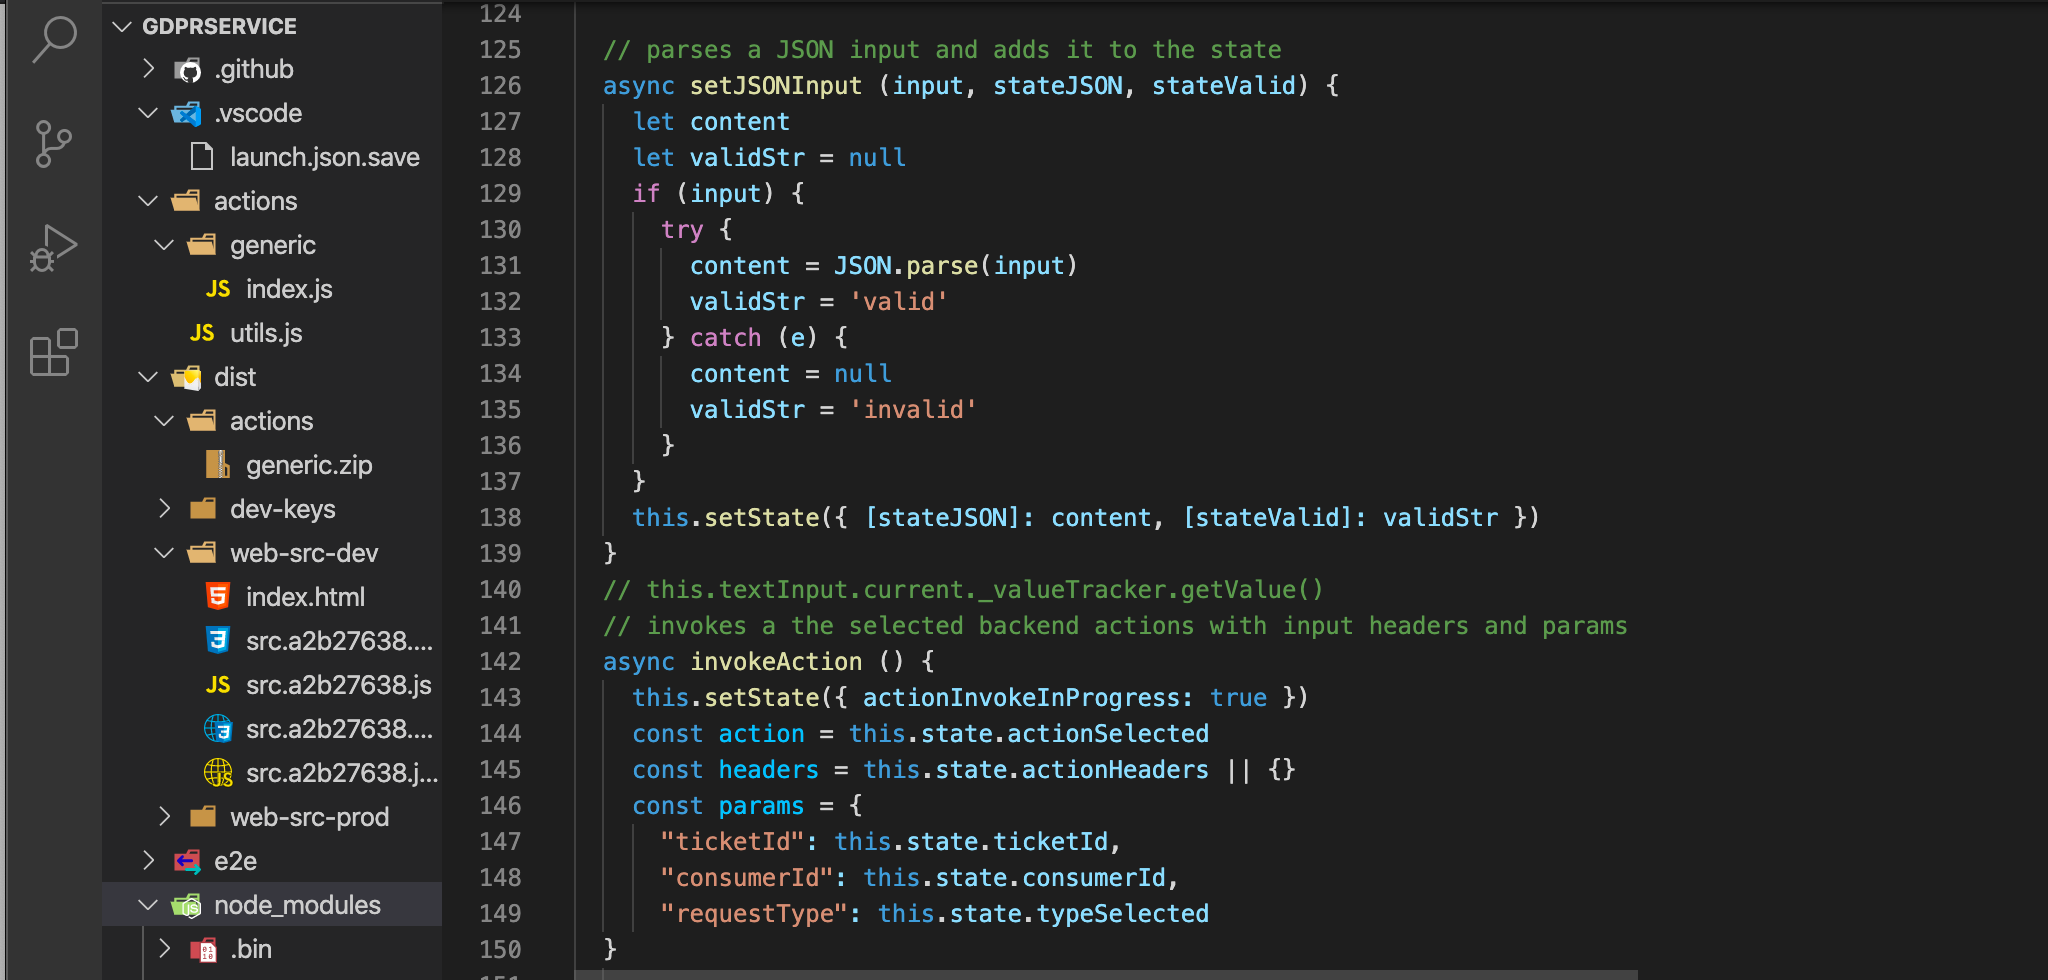
The second piece of the puzzle is the App.js file, which has two main parts to it. The first part provides some helper functions, such as invokeAction, which allows you to send data from the UI to your backend action:
难题的第二部分是App.js文件,其中有两个主要部分。 第一部分提供了一些帮助程序功能,例如invokeAction,它允许您将数据从UI发送到后端操作:
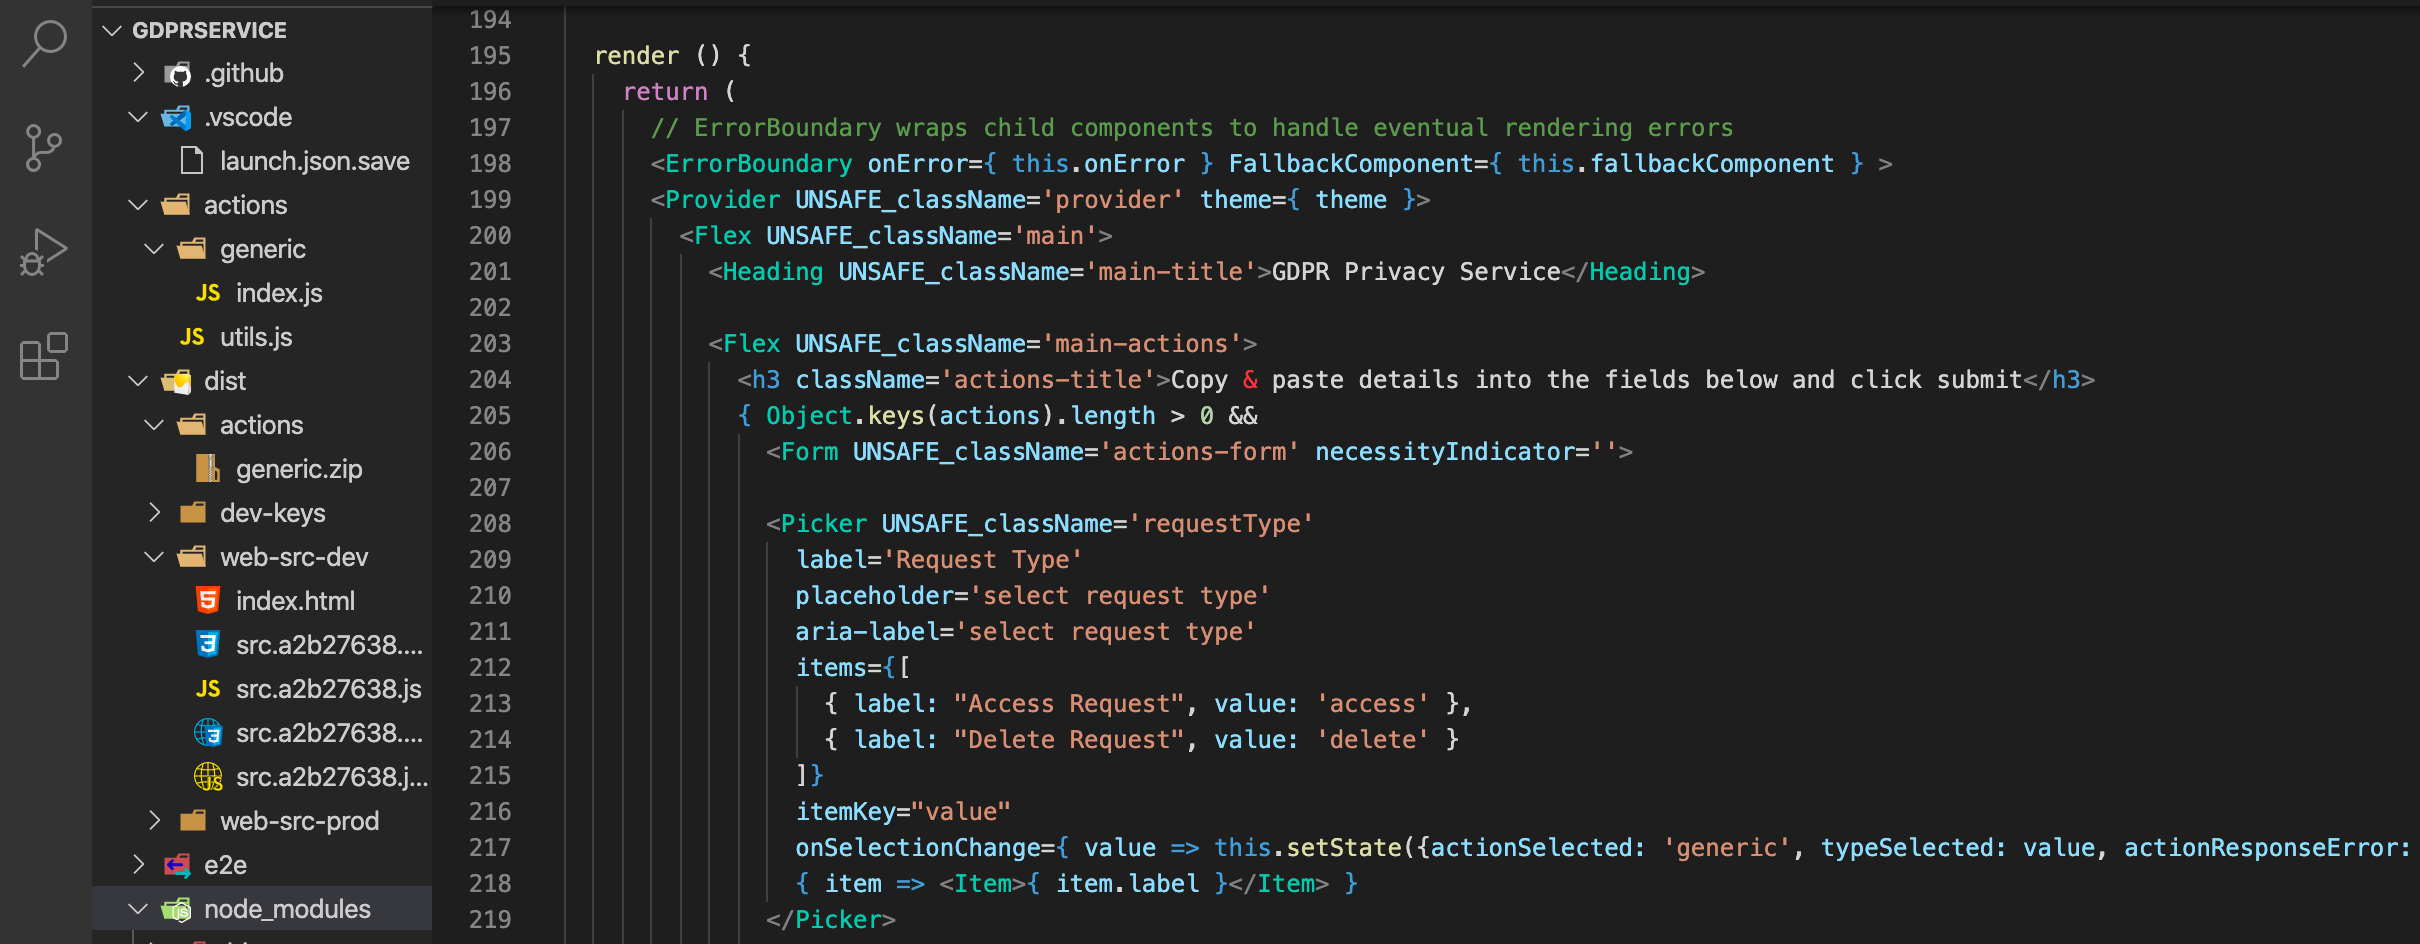
The other, equally important, part of App.js is the render() method; I’m not going to dwell on this part too much because this is definitely not a React tutorial but all you need to know is that it’s this block of code that renders the UI elements:
App.js的另一个同样重要的部分是render()方法; 我不会在这方面过多介绍,因为这绝对不是React教程,但您需要知道的是渲染UI元素的代码块是:
Most of the UI is really simple but I think it’s worth going over how each component is created:
大多数UI确实很简单,但我认为值得探讨如何创建每个组件:
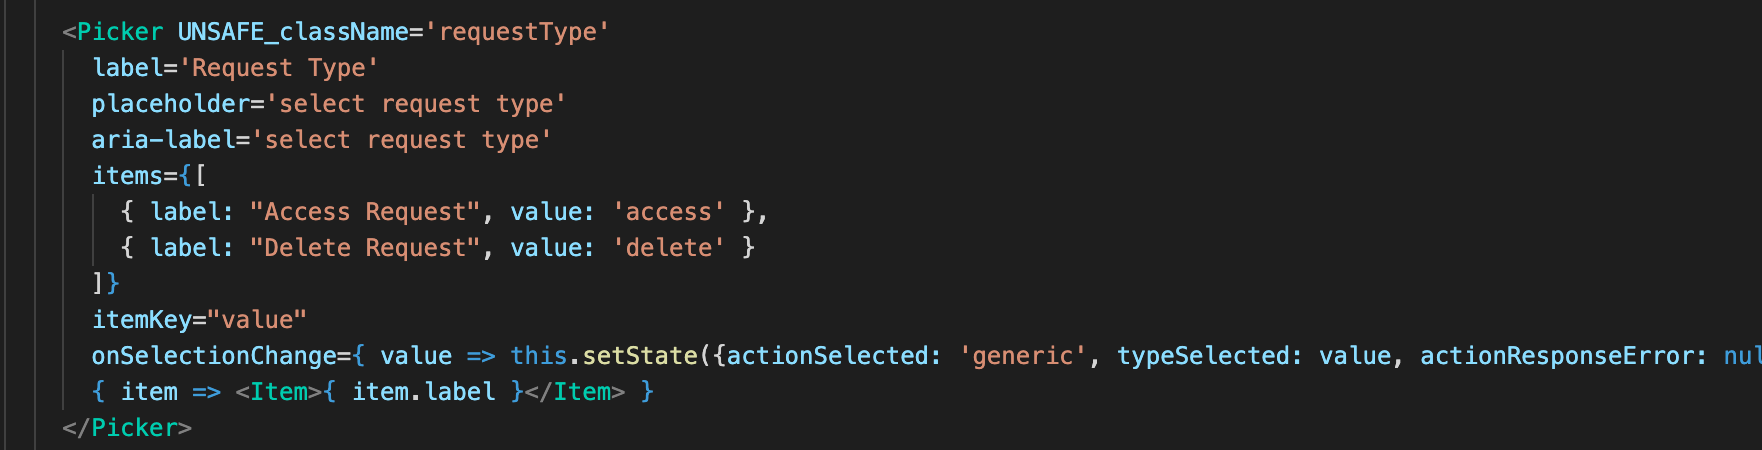
The first part is a dropdown that allows the user to specify if it is an Access or Delete request, which translates into the code below:
第一部分是一个下拉菜单,允许用户指定是访问还是删除请求,它转换为以下代码:
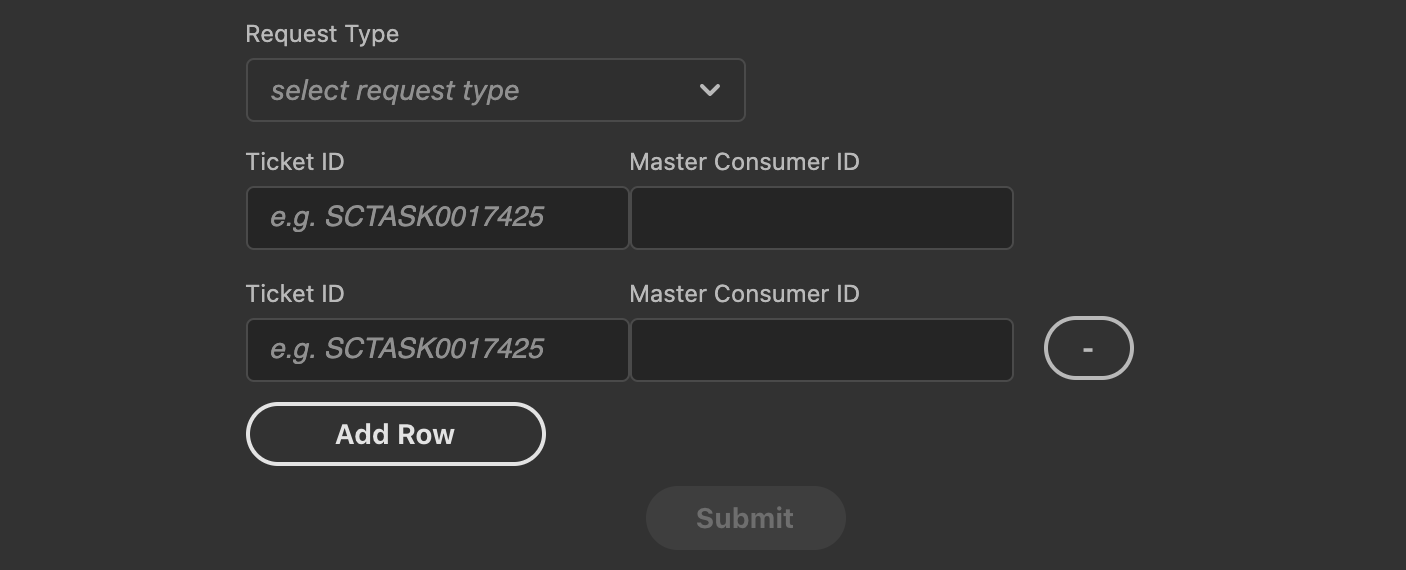
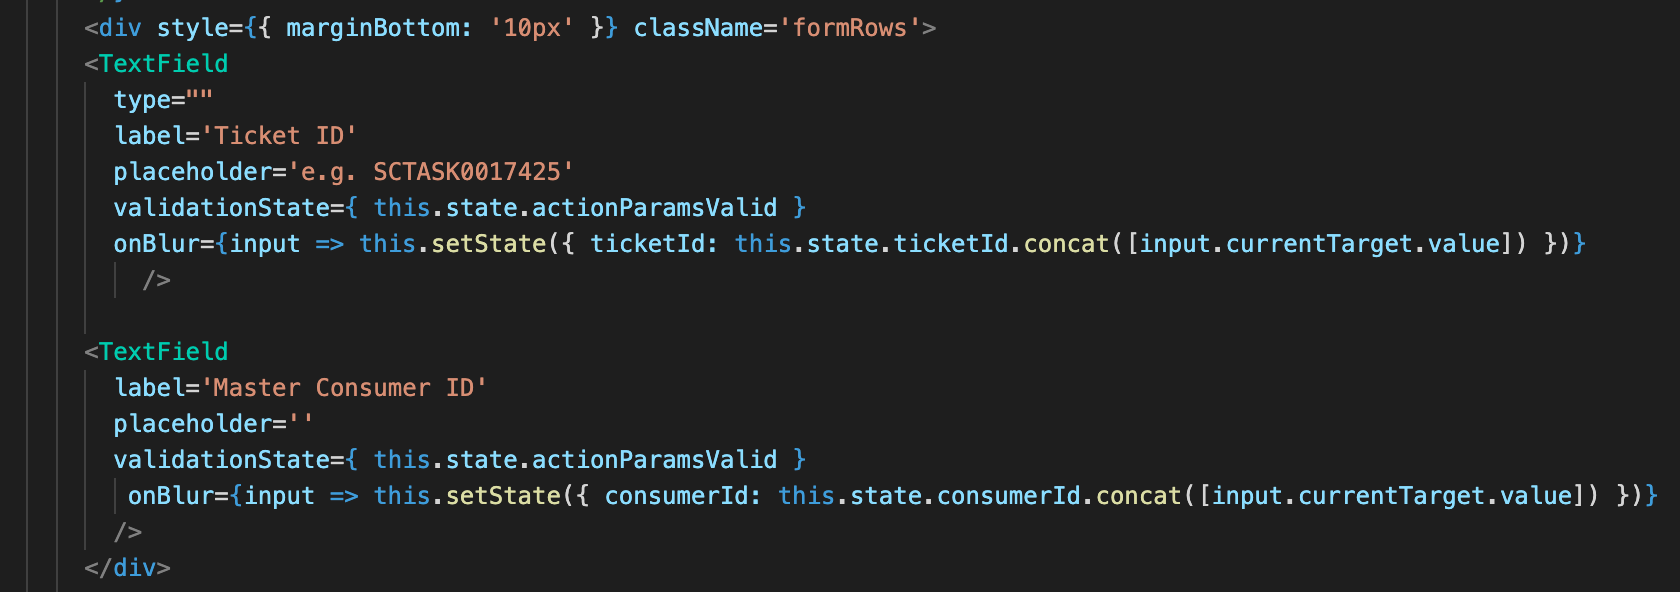
The first Ticket ID / Master Consumer ID row displays when the app is loaded and looks like this:
加载应用程序后,将显示第一个票证ID /主消费者ID行,如下所示:
The most complex part is dynamically adding & removing rows based on user interaction. Fortunately, I found this really nice codepen example, which is a very good fit. I don’t think it is an exact copy & paste but it’s not too far off:
最复杂的部分是根据用户交互动态添加和删除行。 幸运的是,我发现了这个非常不错的codepen 示例 ,非常适合。 我不认为这是确切的复制粘贴,但距离不太远:
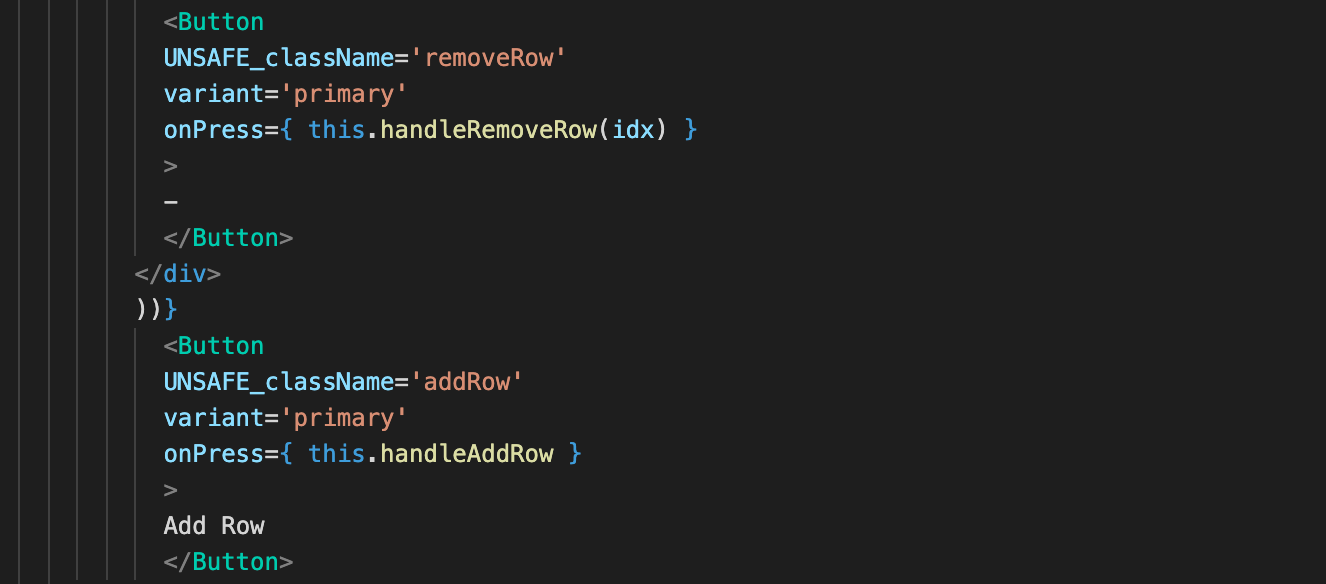
Finally, the Submit button looks like this:
最后,“提交”按钮如下所示:

#4将数据发送到后端操作 (#4 Sending data to the backend action)
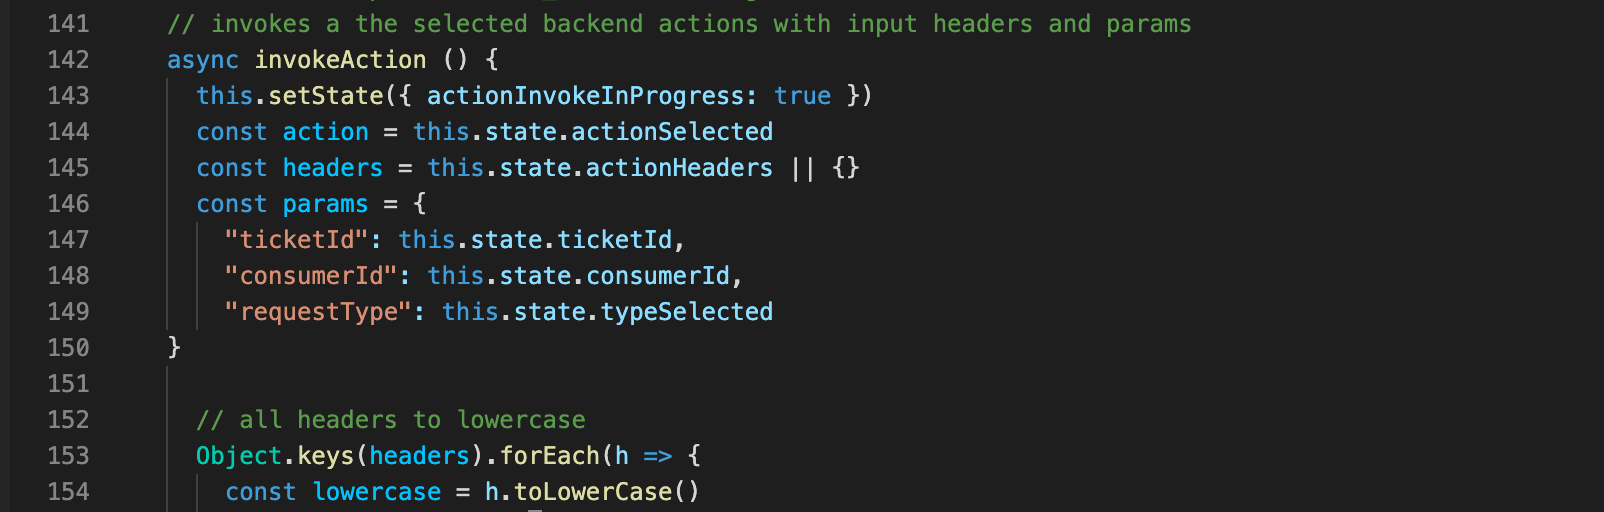
The invokeAction function is included as part of the sample app build, so it is a straightforward task to make some minor updates to include the data needed for the API requests. The params object forms the request body, so needs to include the ticketID, consumerId & requestType variables that the Privacy API expects. Note that invokeAction is just triggering the backend action and passing data to it, it’s not calling the Privacy API directly:
invokeAction函数包含在示例应用程序构建的一部分中,因此,进行一些较小的更新以包含API请求所需的数据是一项直接的任务。 params对象形成请求主体,因此需要包括Privacy API期望的ticketID,consumerId和requestType变量。 请注意,invokeAction只是触发后端操作并将数据传递给它,而不是直接调用Privacy API:
The screenshot below shows another part of the invokeAction function; this is also included in the sample app build, so it’s just a question of being aware that the API response will be stored in actionResponse:
下面的屏幕快照显示了invokeAction函数的另一部分; 这也包含在示例应用程序构建中,因此仅是意识到API响应将存储在actionResponse中的问题:
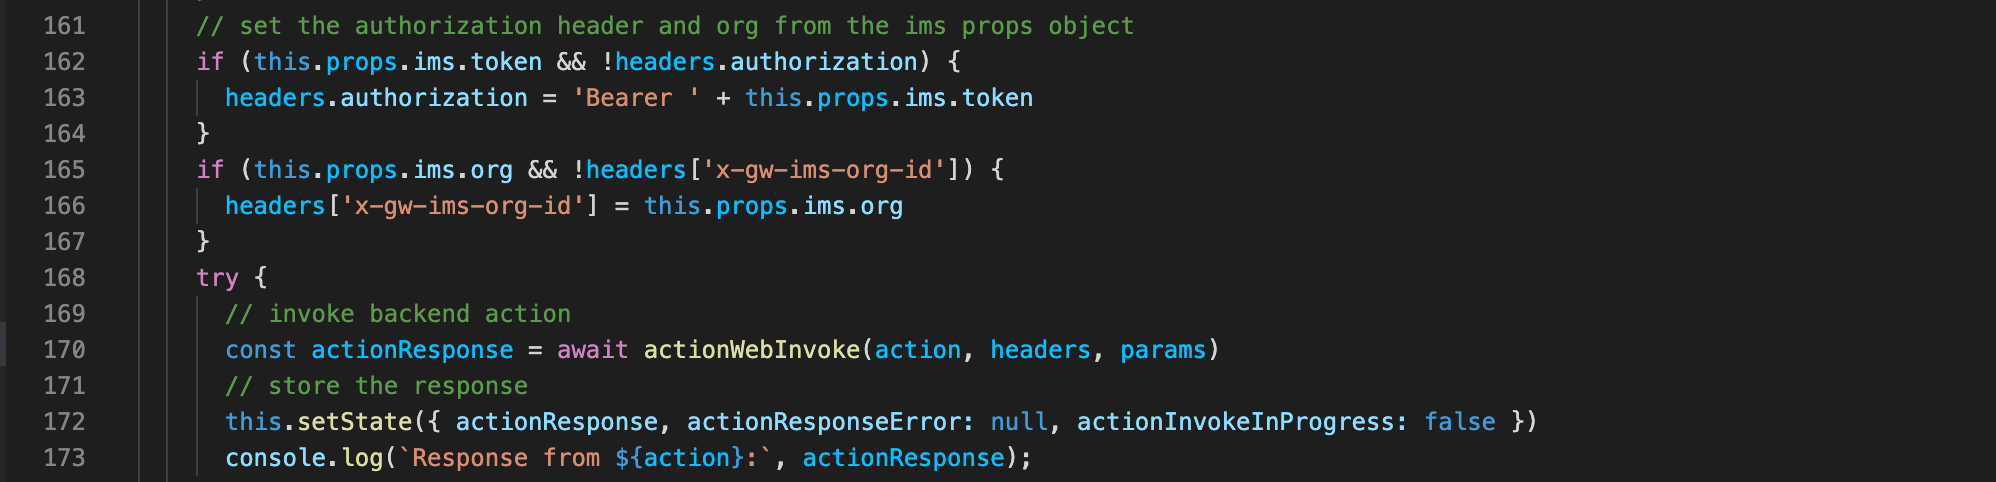
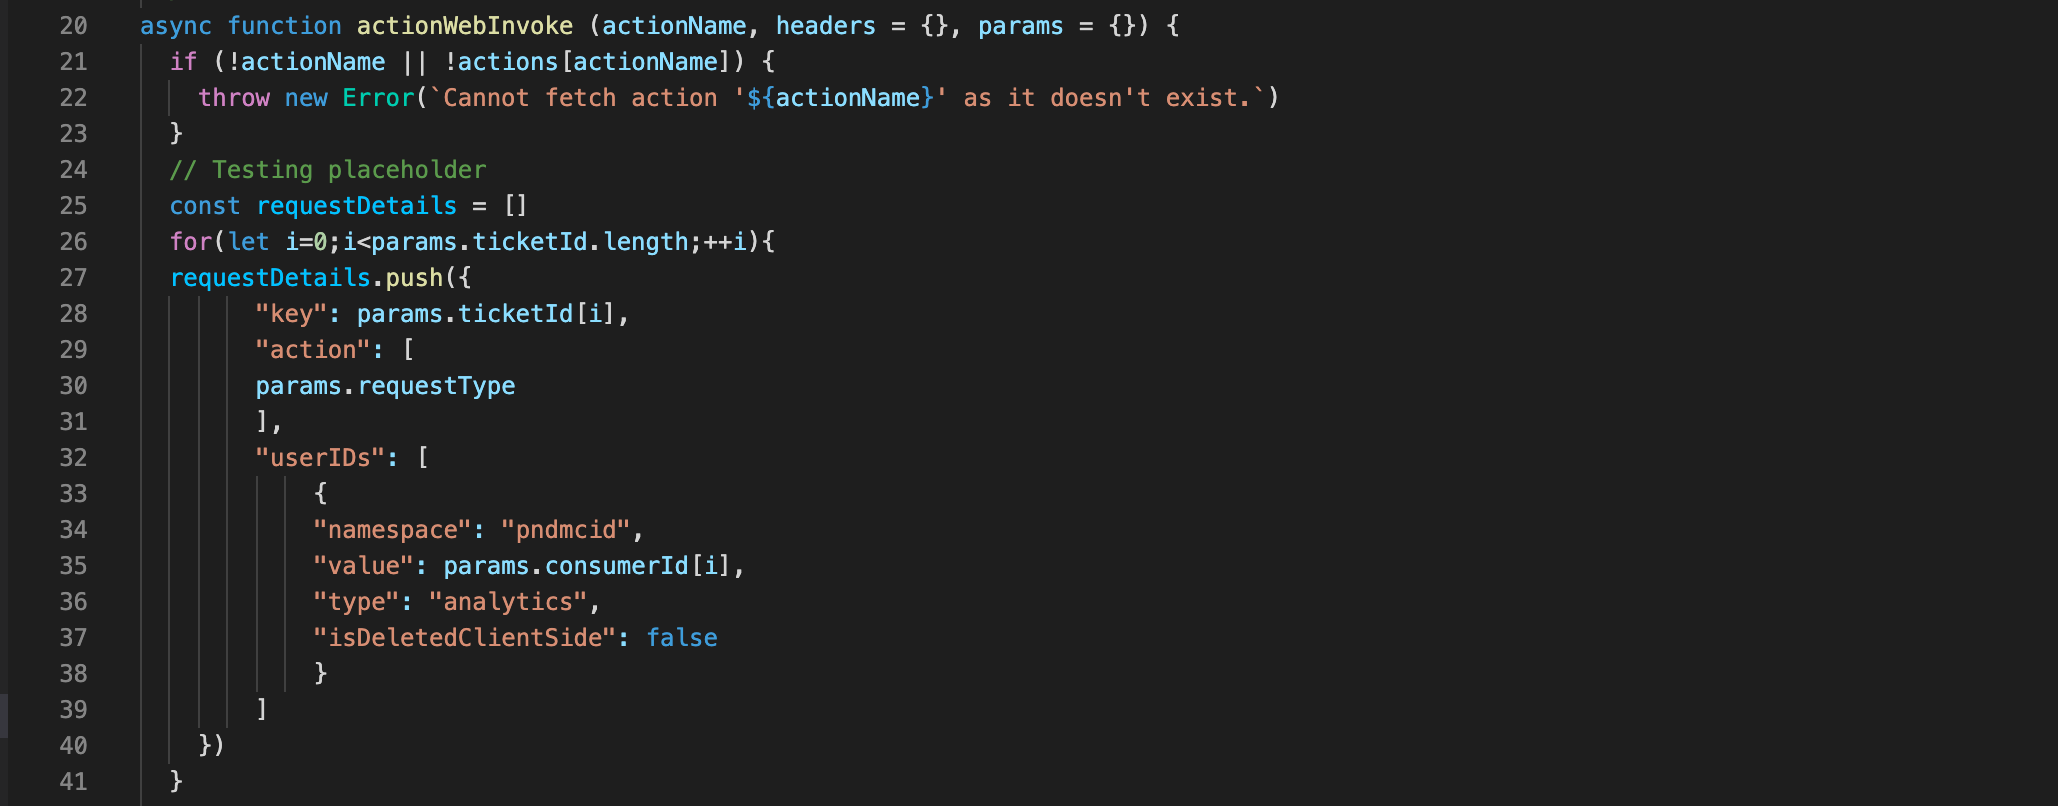
Part of the invokeAction function includes a call to actionWebInvoke, which is what ultimately triggers the backend action. The main thing here is to ensure that the requestDetails structure fits with what the Privacy Service API is expecting, otherwise you will see an error response:
invokeAction函数的一部分包括对actionWebInvoke的调用,这最终会触发后端操作。 此处的主要目的是确保requestDetails结构与Privacy Service API期望的结构相符,否则您将看到错误响应:
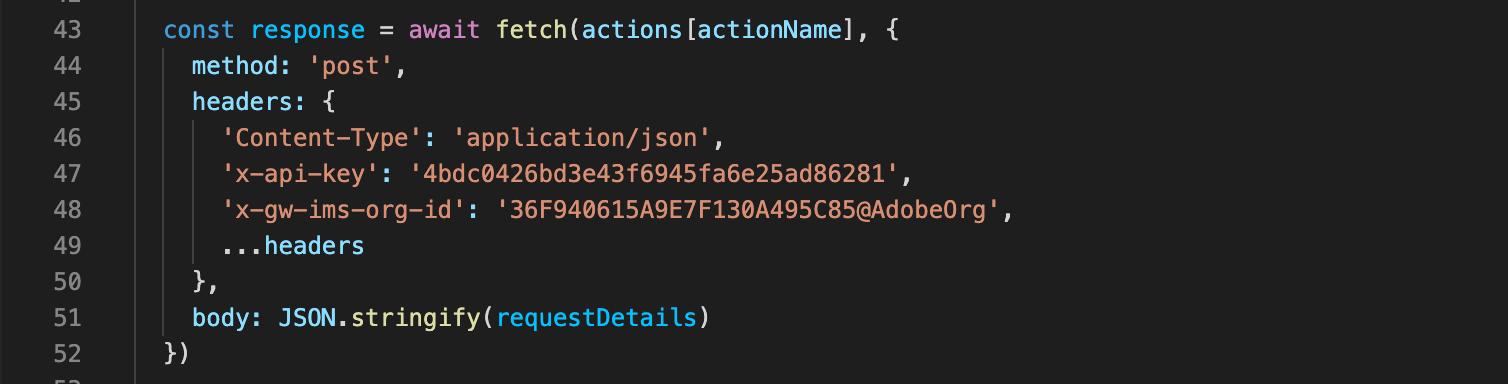
When you execute “aio app run” in the Terminal, you have the choice to view the app on localhost or in the Experience Cloud shell. If you choose localhost you will need to ensure that you generate & pass the access token in the API request header. However, if you choose the shell option, the access token is generated automatically and passed into the request header. As shown below, the actionWebInvoke request sets new headers but also includes anything else that might already be in the headers object (i.e. the access token) via the …headers statement:
在终端中执行“ aio app run”时,您可以选择在localhost或Experience Cloud shell中查看该应用程序。 如果选择localhost,则需要确保在API请求标头中生成并传递访问令牌。 但是,如果选择shell选项,则访问令牌将自动生成并传递到请求标头中。 如下所示,actionWebInvoke请求设置了新的标头,但是还通过…headers语句包括了标头对象中可能已经存在的其他任何内容(即访问令牌):
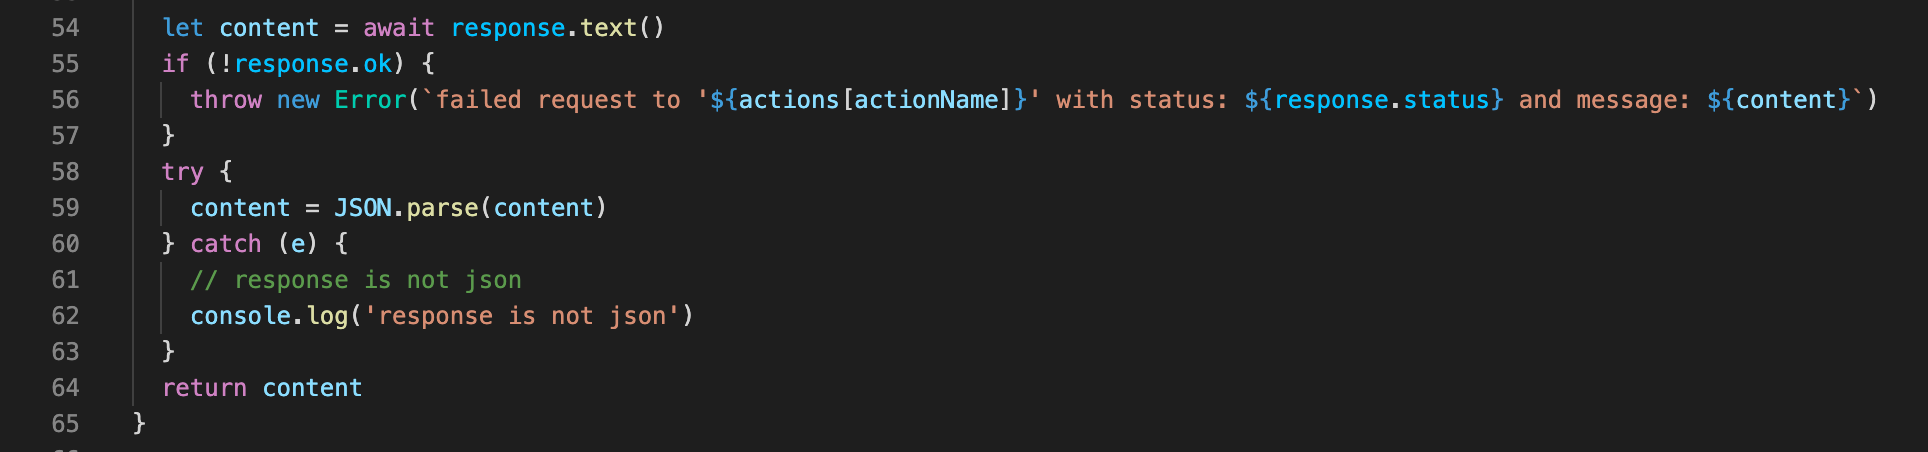
The final part of actionWebInvoke handles the response that is returned from the backend action:
actionWebInvoke的最后一部分处理后端操作返回的响应:
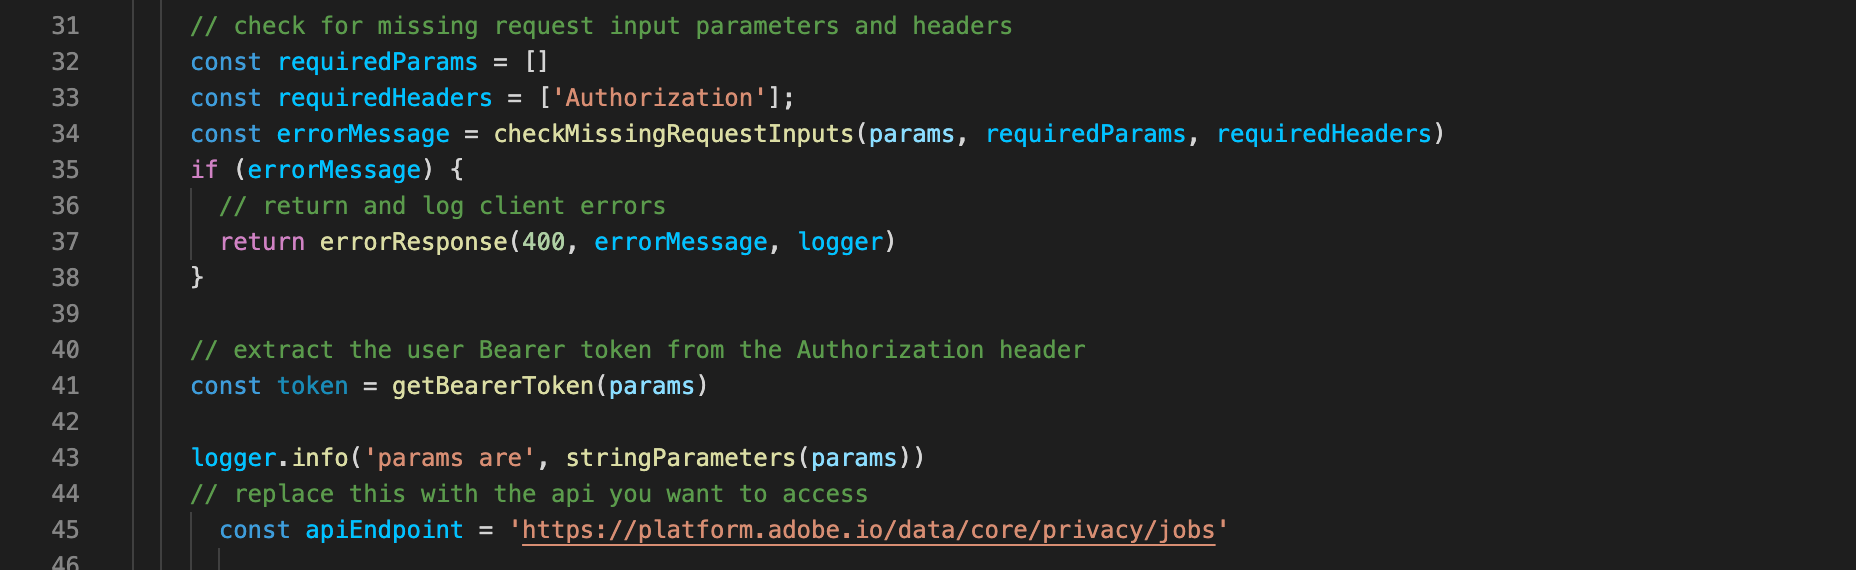
#5隐私服务API请求 (#5 Privacy Service API requests)
The last step in the sequence is to make the request to the Privacy Service API, which is done in the index.js file:
序列的最后一步是向Privacy Service API发出请求,该请求在index.js文件中完成:
This part is pretty straightforward, you just need to ensure that the final structure of the request body meets the API requirements:
这部分非常简单,您只需要确保请求主体的最终结构满足API要求即可:
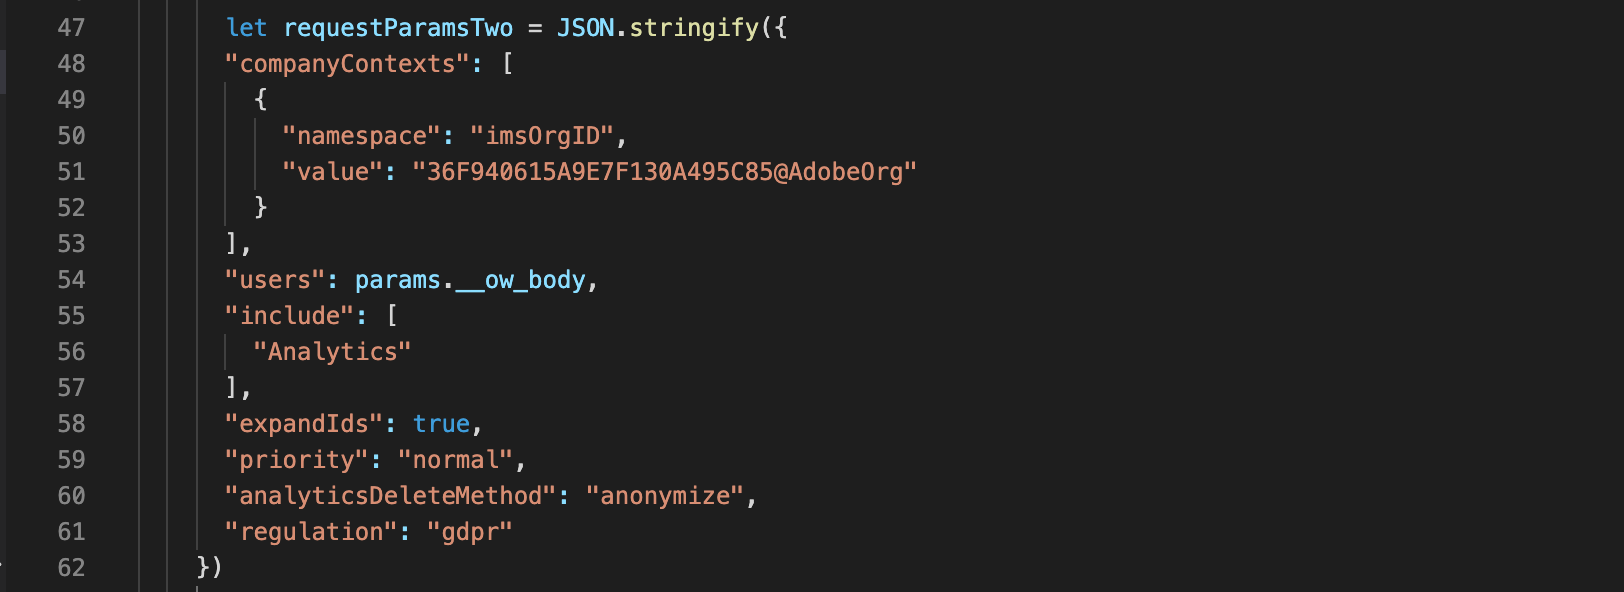
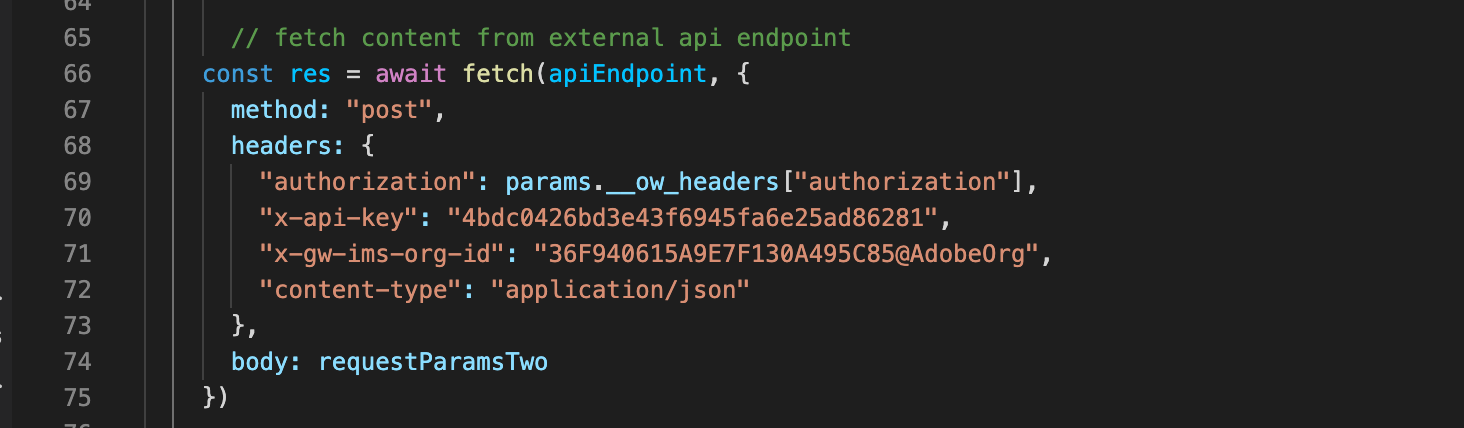
Anything that’s included in the actionWebInvoke request can be referenced by using the params.__ow_ prefix, which you can see examples of in the screenshots above and below:
可以使用params .__ ow_前缀引用actionWebInvoke请求中包含的所有内容,您可以在上方和下方的屏幕截图中查看示例:
The final part is to return the API response, which will ultimately find its way back to the actionResponse object:
最后一部分是返回API响应,该响应最终将返回到actionResponse对象:

#6处理API回应 (#6 Handling the API response)
The final task is building a table based on the response data; again, the sample app points us in the right direction by including some code that is triggered when a successful response is received. However, this just adds the “Success!” message to the UI, so I need to create a Table component that dynamically builds itself:
最后的任务是根据响应数据构建表。 同样,该示例应用程序通过包含一些收到成功响应时触发的代码,为我们指明了正确的方向。 但是,这只是添加了“成功!” 消息发送到UI,因此我需要创建一个可动态构建自身的Table组件:

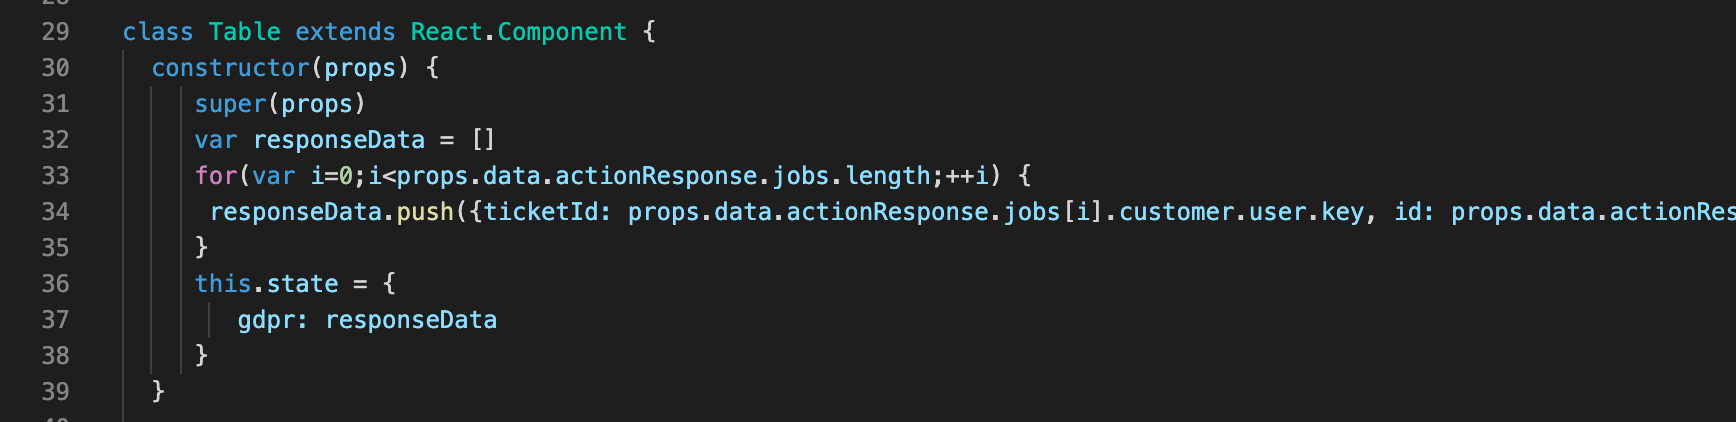
Essentially this just passes the existing state object — which includes the actionResponse object that contains the Privacy Service response data — through to the Table component when a successful API response is received. That state object is then accessible via the props keyword, which means the data can be re-structured into a format that makes sense for a table:
本质上,当收到成功的API响应时,这只会将现有状态对象(包括包含隐私服务响应数据的actionResponse对象)传递到Table组件。 然后可以通过props关键字访问该状态对象,这意味着可以将数据重组为对表有意义的格式:
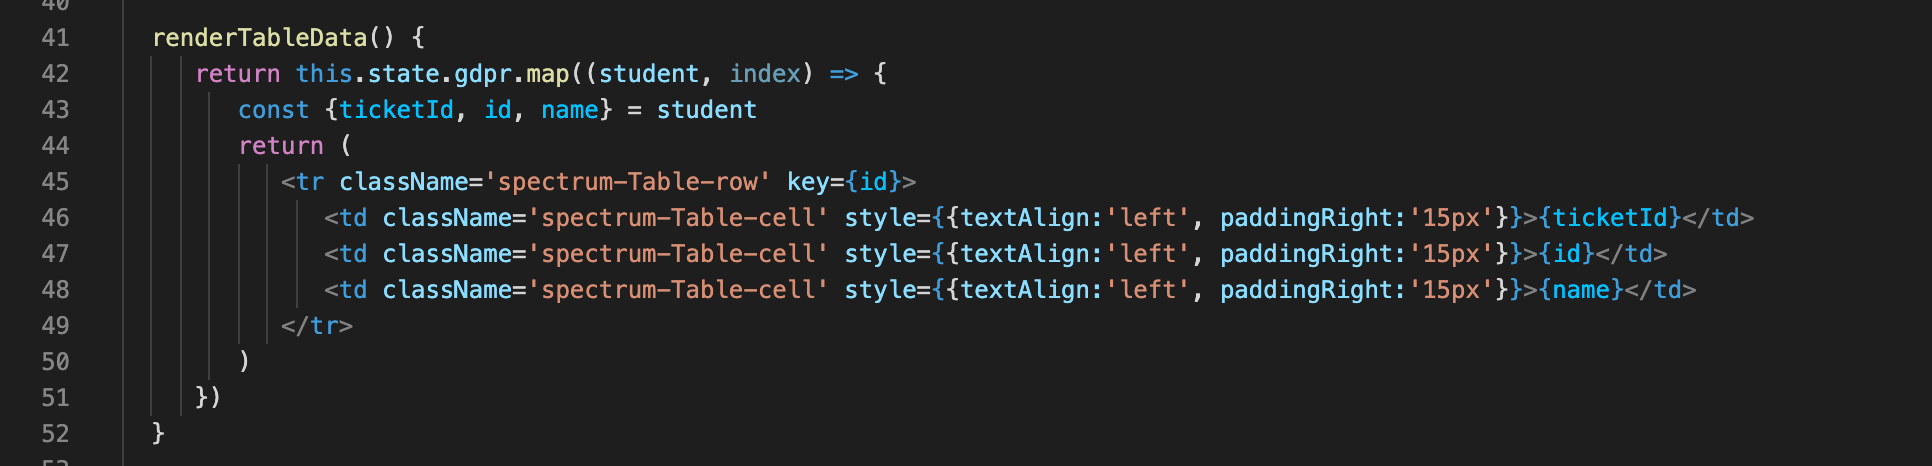
Once the data is re-structured, the map method can be used to dynamically construct the table elements:
数据重组后,可以使用map方法动态构建表元素:
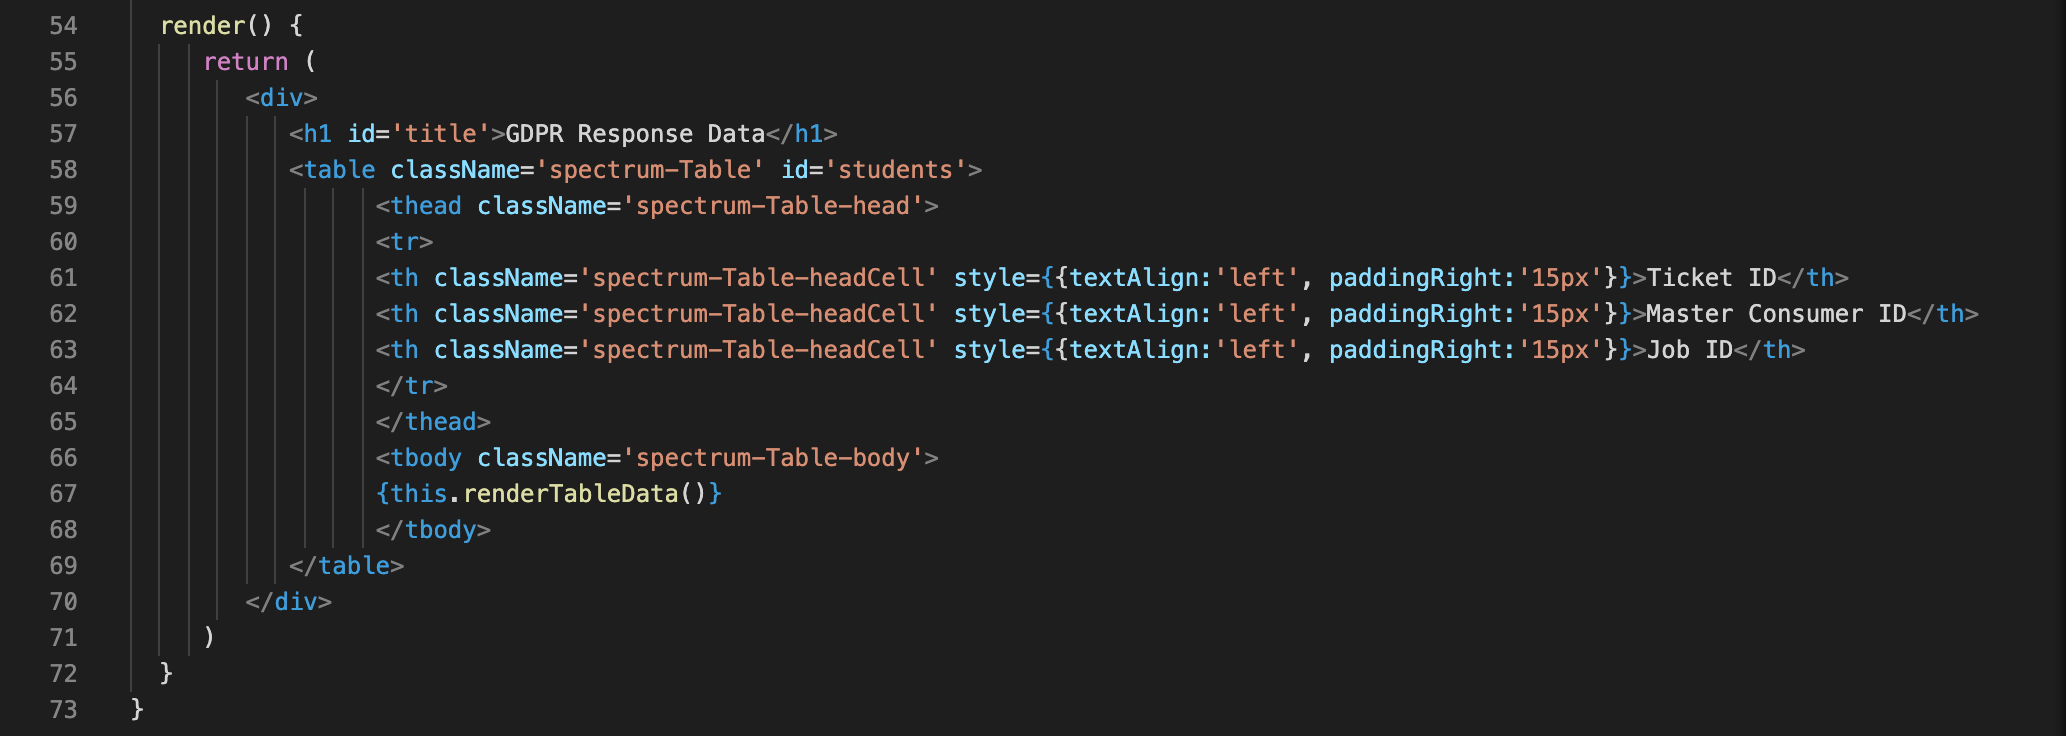
The final step is to insert the table using the render() method:
最后一步是使用render()方法插入表:
The end result is a GDPR UI that displays Privacy Service response data in a table, which allows the employee to easily keep a record of the request details that have been submitted:
最终结果是GDPR UI,该UI在表中显示Privacy Service响应数据,这使员工可以轻松地保存已提交的请求详细信息的记录:
This project is a fairly lightweight example of what can be achieved with Runtime but it should provide a good introduction into what it is capable of. In this example, the backend action is triggered by an employee submitting a form but there are many use cases where the backend action will be triggered by some sort of customer interaction. For example, a customer enquires about items that are out of stock in the store and provides their contact information; when the items are back in stock this triggers a request to a Runtime action that will send updated information to Target’s Profile Update API and present personalised content relating to the previously out of stock items when they next login.
该项目是运行时可以实现的功能的相当轻量级的示例,但它应提供对其功能的很好的介绍。 在此示例中,后端操作是由员工提交表单触发的,但是在许多用例中,后端操作将由某种类型的客户交互触发。 例如,客户查询商店中缺货的商品并提供其联系信息; 当物品重新入库时,这会触发对运行时操作的请求,该操作会将更新的信息发送到Target的配置文件更新API,并在下次登录时显示与先前缺货的物品有关的个性化内容。
So how does Runtime compare with building the same solution with AWS Lambda? One of the big advantages of Runtime is that all authentication requirements are handled for you. Similarly, there are some libraries available that make the process of executing the API requests very simple. I also think that being able to build a UI that follows the Adobe look and feel is a big positive, as it’s important for end users to have that level of familiarity. One uncertainty with Runtime is what the pricing model will look like, so it will be interesting to see how that stacks up against the very low running costs of something like Lambda. Finally, and it’s by no means a negative, to get the most out of the React Spectrum libraries you need to have at least a basic understanding of React, so for more complex UIs it may also depend on availability of developer resources.
那么,运行时与使用AWS Lambda构建相同的解决方案相比又如何呢? Runtime的一大优点是可以为您处理所有身份验证要求。 同样,有一些可用的库使执行API请求的过程非常简单。 我还认为,能够建立遵循Adobe外观的UI是一个很大的积极因素,因为对于最终用户而言,具有一定程度的熟悉度很重要。 Runtime的不确定性是定价模型的外观,因此有趣的是如何看清它如何与Lambda之类的极低运行成本相提并论。 最后,要充分利用React Spectrum库,这绝不是负面的,您至少需要对React有基本的了解,因此对于更复杂的UI,它也可能取决于开发人员资源的可用性。
翻译自: https://medium.com/swlh/getting-started-with-adobe-i-o-runtime-project-firefly-ac8d8aa77eaa
firefly


 8299
8299


 被折叠的 条评论
为什么被折叠?
被折叠的 条评论
为什么被折叠?
 到【灌水乐园】发言


