


kafka azure
This blog will cover data ingestion from Kafka to Azure Data Explorer (Kusto) using Kafka Connect.
该博客将介绍使用Kafka Connect从Kafka到Azure Data Explorer (Kusto)的数据提取。
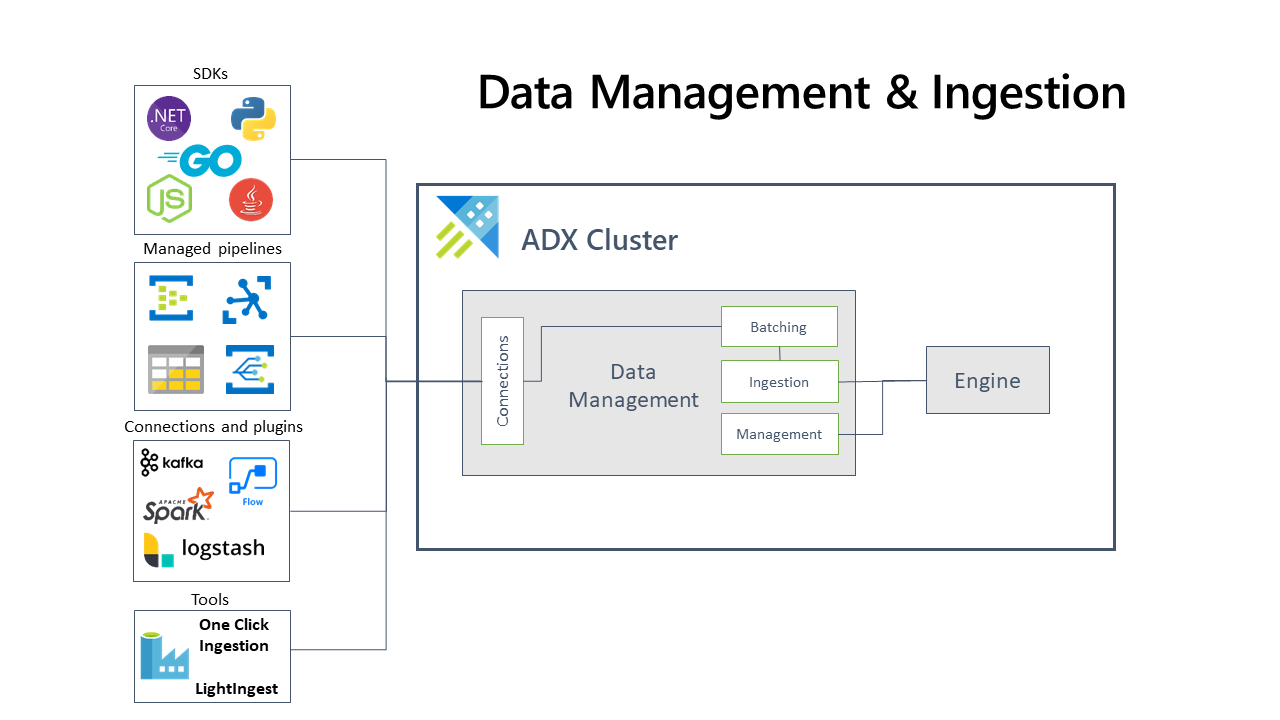
Azure Data Explorer is a fast and scalable data exploration service that lets you collect, store, and analyze large volumes of data from any diverse sources, such as websites, applications, IoT devices, and more. Kafka Connect platform allows you to stream data between Apache Kafka and external systems in a scalable and reliable manner. The Kafka Connect Sink connector for Azure Data Explorer allows you to move data in Kafka topics to Azure Data Explorer tables which you can later query and analyze.
Azure数据资源管理器是一种快速且可扩展的数据探索服务,使您可以从任何不同来源(如网站,应用程序,IoT设备等)收集,存储和分析大量数据。 Kafka Connect平台允许您以可扩展且可靠的方式在Apache Kafka和外部系统之间流式传输数据。 用于Azure数据资源管理器的Kafka Connect Sink连接器允许您将Kafka主题中的数据移动到Azure数据资源管理器表中,以便以后查询和分析。
Here is the GitHub repo for this blog — https://github.com/abhirockzz/kafka-kusto-ingestion-tutorial
这是此博客的GitHub存储库-https: //github.com/abhirockzz/kafka-kusto-ingestion-tutorial
The goal is to get started quickly, so we will keep things simple and Docker-ize everything! This includes Kafka, Zookeeper, Kafka Connect worker and the event generator application — defined in docker-compose.yaml
我们的目标是快速入门,因此我们将使事情变得简单,并使Docker大小化! 这包括Kafka,Zookeeper,Kafka Connect工作程序和事件生成器应用程序-在docker-compose.yaml中定义
Over the course of this tutorial, you will:
在本教程中,您将:
- Get an overview of the individual components 概述各个组件
- Configure and setup Azure Data Explorer and install the connector 配置和设置Azure Data Explorer并安装连接器
- Run the end to end demo 运行端到端演示
先决条件 (Pre-requisites)
You will need a Microsoft Azure account. Maybe try a free one?
您将需要一个Microsoft Azure帐户 。 也许尝试一个免费的?
Install Azure CLI if you don’t have it already (should be quick!) or just use the Azure Cloud Shell from your browser.
如果还没有安装Azure CLI (应该很快!),或者仅从浏览器中使用Azure Cloud Shell 。
Docker and Docker Compose installed
总览 (Overview)
As previously mentioned, all the components are defined inside docker-compose.yaml file. Let's go over it bit by bit:
如前所述,所有组件都在docker-compose.yaml文件中定义。 让我们一点一点地看一下:
The Kafka and Zookeeper part is pretty straightforward — using the debezium images
Kafka和Zookeeper部分非常简单-使用debezium图像
zookeeper:
    image: debezium/zookeeper:1.2
    ports:
      - 2181:2181
kafka:
    image: debezium/kafka:1.2
    ports:
      - 9092:9092
    links:
      - zookeeper
    depends_on:
      - zookeeper
    environment:
      - ZOOKEEPER_CONNECT=zookeeper:2181
      - KAFKA_ADVERTISED_LISTENERS=PLAINTEXT://localhost:9092
The events-producer service is a simple application that sends Storm Events data to a Kafka topic. Storm Events data is a canonical example used throughout the Azure Data Explorer documentation (for example, check this Quickstart and the complete CSV file). The producer app uses the original CSV, but only includes selected fields (such as start and end time, state, source etc.) rather than the entire row (which has more than 20 columns). Here is the sample data:
events-producer服务是一个简单的应用程序 ,可将Storm Events数据发送到Kafka主题。 Storm Events数据是整个Azure数据资源管理器文档中使用的规范示例(例如, 检查此快速入门和完整的CSV文件 )。 生产者应用使用原始CSV,但仅包含选定的字段(例如开始和结束时间,状态,来源等),而不是整个行(包含20多个列)。 这是示例数据:
2007-01-01 00:00:00.0000000,2007-01-01 05:00:00.0000000,23357,WISCONSIN,Winter Storm,COOP Observer
2007-01-01 00:00:00.0000000,2007-01-01 06:00:00.0000000,9488,NEW YORK,Winter Weather,Department of Highways
2007-01-01 00:00:00.0000000,2007-01-01 06:00:00.0000000,9487,NEW YORK,Winter Weather,Department of Highways
...
The service component in Docker Compose is defined as such:
Docker Compose中的服务组件定义如下:
events-producer:
    build:
      context: ./storm-events-producer
    links:
      - kafka
    depends_on:
      - kafka
    environment:
      - KAFKA_BOOTSTRAP_SERVER=kafka:9092
      - KAFKA_TOPIC=storm-events
      - SOURCE_FILE=StormEvents.csv
The sink connector is where a lot of the magic happens! Let’s explore it:
水槽连接器是发生许多魔术的地方! 让我们来探索一下:
用于Azure数据资源管理器的Kafka Sink连接器 (Kafka Sink Connector for Azure Data Explorer)
Here is the kusto-connect service in docker compose file:
这是kusto-connect compose文件中的kusto-connect服务:
kusto-connect:
    build:
      context: ./connector
    ports:
      - 8083:8083
    links:
      - kafka
    depends_on:
      - kafka
    environment:
      - BOOTSTRAP_SERVERS=kafka:9092
      - GROUP_ID=adx
      - CONFIG_STORAGE_TOPIC=my_connect_configs
      - OFFSET_STORAGE_TOPIC=my_connect_offsets
      - STATUS_STORAGE_TOPIC=my_connect_statuses
The container is built from a Dockerfile - this makes it easier for you to run it locally as opposed to pulling it from an external Docker registry
容器是从Dockerfile -与从外部Docker注册表中提取容器Dockerfile ,这使您更容易在本地运行它
FROM debezium/connect:1.2WORKDIR $KAFKA_HOME/connectARG KUSTO_KAFKA_SINK_VERSIONRUN curl -L -O https://github.com/Azure/kafka-sink-azure-kusto/releases/download/v$KUSTO_KAFKA_SINK_VERSION/kafka-sink-azure-kusto-$KUSTO_KAFKA_SINK_VERSION-jar-with-dependencies.jarIt’s based on top of the Debezium Kafka Connect image. Simply download the Kusto Connector JAR (version 1.0.1 at the time of writing) and place it in the Kafka Connect plugins directory. That’s it!
它基于Debezium Kafka Connect图像的顶部。 只需下载Kusto Connector JAR(在编写本文时为1.0.1版 ),然后将其放在Kafka Connect插件目录中即可。 而已!
Here is what the sink connector configuration file looks like:
接收器连接器配置文件如下所示:
{
    "name": "storm",
    "config": {
        "connector.class": "com.microsoft.azure.kusto.kafka.connect.sink.KustoSinkConnector",
        "flush.size.bytes": 10000,
        "flush.interval.ms": 50000,
        "tasks.max": 1,
        "topics": "storm-events",
        "kusto.tables.topics.mapping": "[{'topic': 'storm-events','db': '<enter database name>', 'table': 'Storms','format': 'csv', 'mapping':'Storms_CSV_Mapping'}]",
        "aad.auth.authority": "<enter tenant ID>",
        "aad.auth.appid": "<enter application ID>",
        "aad.auth.appkey": "<enter client secret>",
        "kusto.url": "https://ingest-<name of cluster>.<region>.kusto.windows.net",
        "key.converter": "org.apache.kafka.connect.storage.StringConverter",
        "value.converter": "org.apache.kafka.connect.storage.StringConverter"
    }
}
The process of loading/importing data into a table in Azure Data Explorer is known as Ingestion. This is how the the connector operates as well.
在Azure Data Explorer中将数据加载/导入到表中的过程称为Ingestion 。 连接器也是如此。
Behind the scenes, it uses the following modules in the Java SDK for Azure Data Explorer
在后台,它在用于Azure Data Explorer的Java SDK中使用以下模块
data: to connect, issue (control) commands and query datadata:连接,发出(控制)命令和查询数据ingest: to ingest dataingest:摄取数据
At the time of writing, the data formats supported by the connector are: csv, json, txt, avro, apacheAvro, tsv, scsv, sohsv and psv. Data in the Kafka topics is written to files on disk. These are then sent to Azure Data Explorer based on the following connector configurations - when file has reached flush.size.bytes or the flush.interval.ms interval has passed.
在撰写本文时,连接器支持的数据格式为: csv , json , txt , avro , apacheAvro , tsv , scsv , sohsv和psv 。 Kafka主题中的数据被写入磁盘上的文件。 然后根据以下连接器配置将它们发送到Azure数据资源管理器-当文件达到flush.size.bytes 或 flush.interval.ms间隔时。
The only exception to the above mechanism is the
avroandapacheAvrodata types which are handled as byte arrays上述机制的唯一例外是
avro和apacheAvro数据类型,它们作为字节数组处理
By “sent to Azure Data Explorer”, what I really mean that the file is queued for Ingestion (using IngestClient.ingestFromFile)
我所说的“发送到Azure数据资源管理器”实际上是指文件在队列中进行提取 (使用IngestClient.ingestFromFile )
Alright, lots of theory so far…
好吧,到目前为止有很多理论……
..让我们尝试一下! (.. let’s try it out!)
Clone this repo:
克隆此仓库:
git clone https://github.com/abhirockzz/kafka-kusto-ingestion-tutorialcd kafka-kusto-ingestion-tutorialStart off creating an Azure Data Explorer cluster and database using Azure Portal, Azure CLI or any of the client SDKs such as Python.
开始使用Azure Portal , Azure CLI或任何客户端SDK(例如Python)创建Azure Data Explorer群集和数据库。
Once that’s done, create a table (Storms) and respective mapping (Storms_CSV_Mapping):
完成后,创建一个表( Storms )和相应的映射( Storms_CSV_Mapping ):
.create table Storms (StartTime: datetime, EndTime: datetime, EventId: int, State: string, EventType: string, Source: string).create table Storms ingestion csv mapping 'Storms_CSV_Mapping' '[{"Name":"StartTime","datatype":"datetime","Ordinal":0}, {"Name":"EndTime","datatype":"datetime","Ordinal":1},{"Name":"EventId","datatype":"int","Ordinal":2},{"Name":"State","datatype":"string","Ordinal":3},{"Name":"EventType","datatype":"string","Ordinal":4},{"Name":"Source","datatype":"string","Ordinal":5}]'启动容器并安装连接器 (Start containers and install the connector)
Before installing the connector, we need to create a Service Principal in order for the connector to authenticate and connect to Azure Data Explorer service.
在安装连接器之前,我们需要创建一个服务主体,以便连接器进行身份验证并连接到Azure Data Explorer服务。
Use az ad sp create-for-rbac command:
az ad sp create-for-rbac -n "kusto-sp"You will get a JSON response as such — please note down the appId, password and tenant as you will be using them in subsequent steps
您将得到这样的JSON响应-请记下appId , password和tenant因为您将在后续步骤中使用它们
{
  "appId": "fe7280c7-5705-4789-b17f-71a472340429",
  "displayName": "kusto-sp",
  "name": "http://kusto-sp",
  "password": "29c719dd-f2b3-46de-b71c-4004fb6116ee",
  "tenant": "42f988bf-86f1-42af-91ab-2d7cd011db42"
}
Start the containers:
启动容器:
docker-compose upThe producer application will start sending events to the storm-events topic. You should see logs similar to:
生产者应用程序将开始将事件发送到storm-events主题。 您应该看到类似于以下内容的日志:
....
events-producer_1  | sent message to partition 0 offset 0
events-producer_1  | event  2007-01-01 00:00:00.0000000,2007-01-01 00:00:00.0000000,13208,NORTH CAROLINA,Thunderstorm Wind,Public
events-producer_1  |
events-producer_1  | sent message to partition 0 offset 1
events-producer_1  | event  2007-01-01 00:00:00.0000000,2007-01-01 05:00:00.0000000,23358,WISCONSIN,Winter Storm,COOP Observer
events-producer_1  |
events-producer_1  | sent message to partition 0 offset 2
events-producer_1  | event  2007-01-01 00:00:00.0000000,2007-01-01 05:00:00.0000000,23357,WISCONSIN,Winter Storm,COOP Observer
events-producer_1  |
events-producer_1  | sent message to partition 0 offset 3
events-producer_1  | event  2007-01-01 00:00:00.0000000,2007-01-01 06:00:00.0000000,9494,NEW YORK,Winter Weather,Department of Highways
events-producer_1  |
events-producer_1  | sent message to partition 0 offset 4
events-producer_1  | 2020/08/20 16:51:35 event  2007-01-01 00:00:00.0000000,2007-01-01 06:00:00.0000000,9488,NEW YORK,Winter Weather,Department of Highways
....
We can now install the sink connector to consume these events and ingest them into Azure Data Explorer
现在,我们可以安装接收器连接器以使用这些事件并将其吸收到Azure Data Explorer中
Replace the values for following attributes in adx-sink-config.json: aad.auth.authority, aad.auth.appid, aad.auth.appkey, kusto.tables.topics.mapping (the database name) and kusto.url
替换adx-sink-config.json以下属性的值: aad.auth.authority , aad.auth.appid , aad.auth.appkey , kusto.tables.topics.mapping (数据库名称)和kusto.url
{
    "name": "storm",
    "config": {
        "connector.class": "com.microsoft.azure.kusto.kafka.connect.sink.KustoSinkConnector",
        "flush.size.bytes": 10000,
        "flush.interval.ms": 50000,
        "tasks.max": 1,
        "topics": "storm-events",
        "kusto.tables.topics.mapping": "[{'topic': 'storm-events','db': '<enter database name>', 'table': 'Storms','format': 'csv', 'mapping':'Storms_CSV_Mapping'}]",
        "aad.auth.authority": "<enter tenant ID>",
        "aad.auth.appid": "<enter application ID>",
        "aad.auth.appkey": "<enter client secret>",
        "kusto.url": "https://ingest-<name of cluster>.<region>.kusto.windows.net",
        "key.converter": "org.apache.kafka.connect.storage.StringConverter",
        "value.converter": "org.apache.kafka.connect.storage.StringConverter"
    }
}
In a different terminal, keep a track of the connector service logs:
在另一个终端中,跟踪连接器服务日志:
docker-compose logs -f | grep kusto-connectInstall the connector:
安装连接器:
curl -X POST -H "Content-Type: application/json" --data @adx-sink-config.json http://localhost:8083/connectors//check status
curl http://localhost:8083/connectors/storm/status
The connector should spring into action. Meanwhile in the other terminal, you should see logs similar to:
连接器应弹起。 同时,在另一个终端中,您应该看到类似于以下内容的日志:
kusto-connect_1    | INFO   ||  Refreshing Ingestion Resources   [com.microsoft.azure.kusto.ingest.ResourceManager]kusto-connect_1    | INFO   ||  Kusto ingestion: file (/tmp/kusto-sink-connector-0a8a9fa2-9e4b-414d-bae1-5d01f3969522/kafka_storm-events_0_0.csv.gz) of size (9192) at current offset (93)   [com.microsoft.azure.kusto.kafka.connect.sink.TopicPartitionWriter]kusto-connect_1    | INFO   ||  WorkerSinkTask{id=storm-0} Committing offsets asynchronously using sequence number 1: {storm-events-0=OffsetAndMetadata{offset=94, leaderEpoch=null, metadata=''}}   [org.apache.kafka.connect.runtime.WorkerSinkTask]
ct.runtime.WorkerSinkTask]kusto-connect_1    | INFO   ||  Kusto ingestion: file (/tmp/kusto-sink-connector-0a8a9fa2-9e4b-414d-bae1-5d01f3969522/kafka_storm-events_0_94.csv.gz) of size (1864) at current offset (111)   [com.microsoft.azure.kusto.kafka.connect.sink.TopicPartitionWriter]kusto-connect_1    | INFO   ||  WorkerSinkTask{id=storm-0} Committing offsets asynchronously using sequence number 2: {storm-events-0=OffsetAndMetadata{offset=112, leaderEpoch=null, metadata=''}}   [org.apache.kafka.connect.runtime.WorkerSinkTask]
....
Wait for sometime before data ends up in the Storms table. To confirm, check the row count and confirm that there are no failures in the ingestion process:
等待一段时间,直到数据最终显示在Storms表中。 要确认,请检查行数并确认提取过程中没有失败:
Storms | count. show ingestion failuresOnce there is some data, try out a few queries. To see all the records:
一旦有一些数据,尝试一些查询。 要查看所有记录:
StormsUse where and project to filter specific data
使用where和project过滤特定数据
Storms
| where EventType == 'Drought' and State == 'TEXAS'
| project StartTime, EndTime, Source, EventIdStorms
| summarize event_count=count() by State
| where event_count > 10
| project State, event_count
| render columnchartYou should see a chart similar to this:
您应该看到类似于以下的图表:
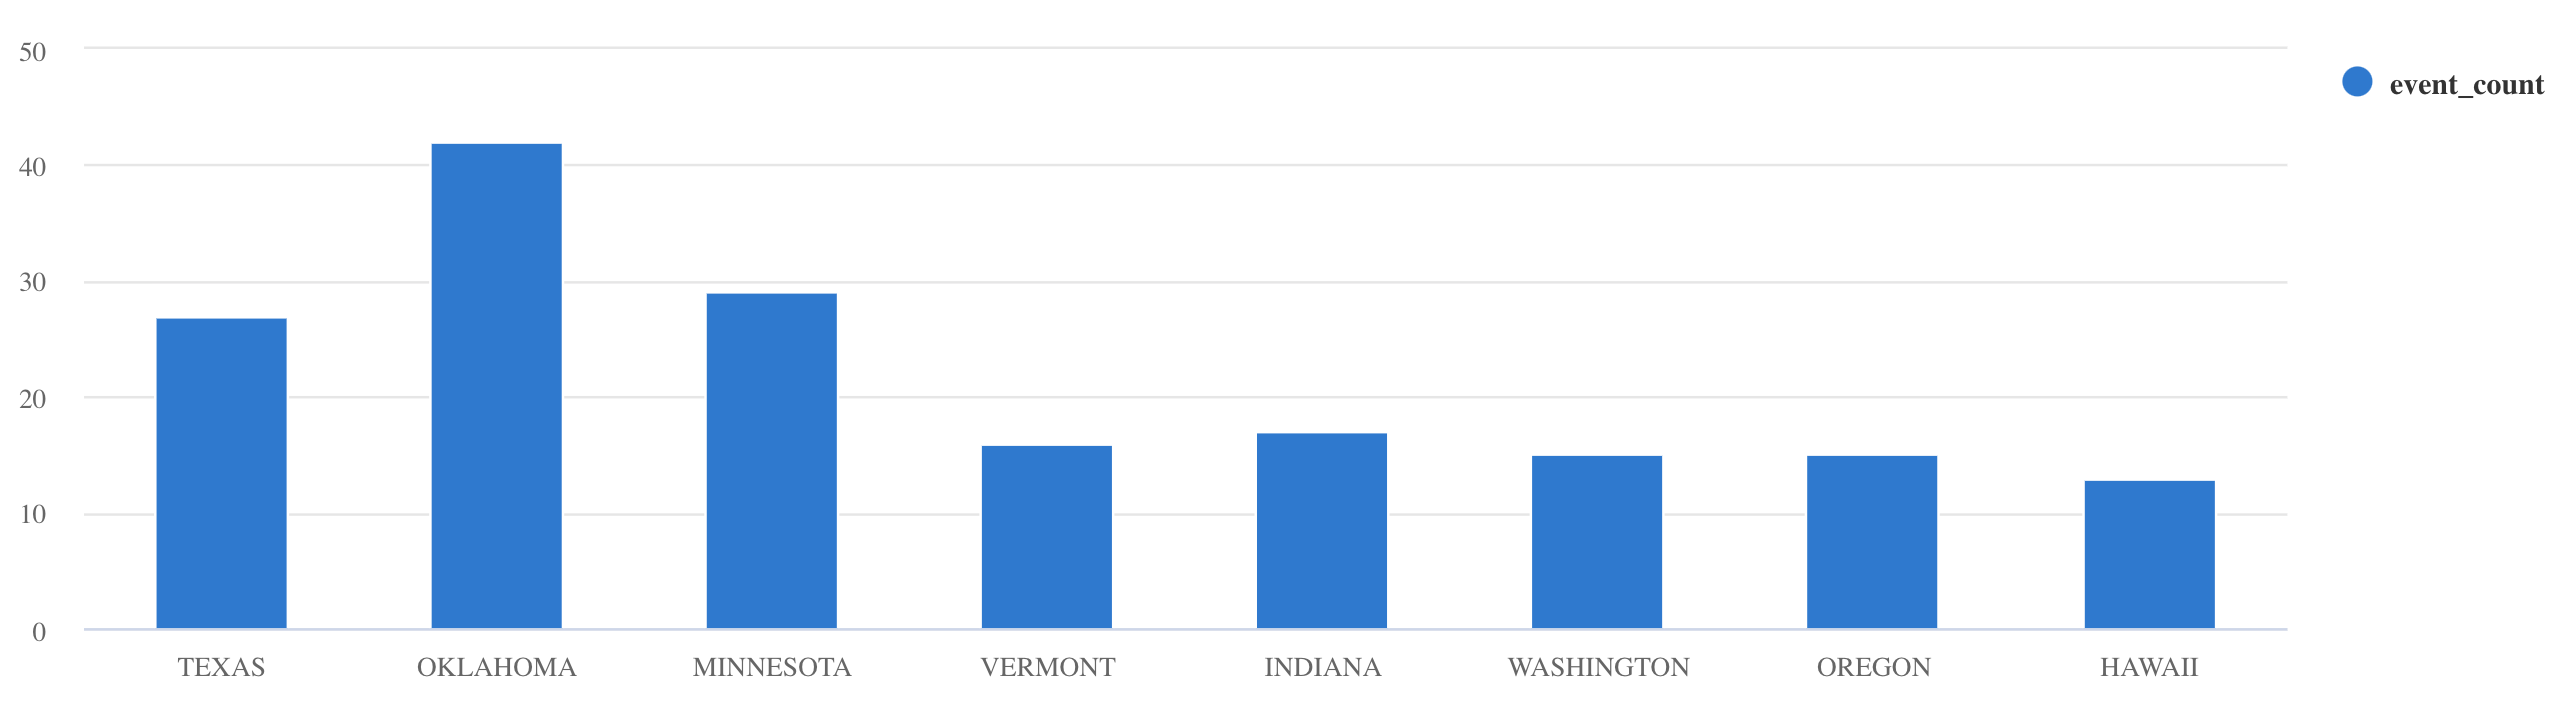
These are just few examples. Dig into the Kusto Query Language documentation or explore tutorials about how to ingest JSON formatted sample data into Azure Data Explorer, using scalar operators, timecharts etc.
这些只是几个例子。 深入了解Kusto查询语言文档或探索有关如何使用标量运算符 , 时间表等将JSON格式的示例数据提取到Azure Data Explorer中的 教程 。
If you want to re-start from scratch, simply stop the containers (
docker-compose down -v), delete (drop table Storms) and re-create theStormstable (along with the mapping) and re-start containers (docker-compose up)如果您想从头开始重新启动,只需停止容器(
docker-compose down -v),删除(drop table Storms)并重新创建Storms表(以及映射),然后重新启动容器(docker-compose up)
清理 (Clean up)
To delete the Azure Data Explorer cluster/database, use az cluster delete or az kusto database delete
若要删除Azure Data Explorer群集/数据库,请使用z群集删除或az kusto数据库删除
az kusto cluster delete -n <cluster name> -g <resource group name>az kusto database delete -n <database name> --cluster-name <cluster name> -g <resource group name>这是一个包装! (That’s a wrap!)
I hope this helps you get started building data ingestion pipelines from Kafka to Azure Data Explorer using the Kafka Connect sink connector. This is not the only way to ingest data into Azure Data Explorer (of course!). You’re welcome to explore the documentation and explore other techniques such as One-click Ingestion, using Event Grid, IoT Hub and much more!
我希望这可以帮助您开始使用Kafka Connect接收器连接器来构建从Kafka到Azure Data Explorer的数据提取管道。 这不是将数据导入Azure Data Explorer的唯一方法(当然!)。 欢迎您浏览文档并浏览其他技术,例如“ 一键式提取”,使用事件网格 , IoT中心等等!
Until next time, Happy Exploring!
直到下一次,快乐探索!
翻译自: https://itnext.io/tutorial-data-ingestion-from-kafka-to-azure-data-explorer-d1886e24f054
kafka azure


 被折叠的 条评论
为什么被折叠?
被折叠的 条评论
为什么被折叠?
 到【灌水乐园】发言


