In the last two parts, we have seen how Kivy and Kivymd make it super easy to develop apps using Python with its drawbacks. We have covered the basics of app development, how to display text, take input, and use buttons to make our app interactive. We have also seen various UI/UIX elements that are supported by Kivy and how they can be easily implemented using Kivy String Builders which are written in a hierarchical format and don't require any explicit import statements. If you haven’t read the previous parts, I recommend you have a look at them for better understanding.
在最后两部分中,我们看到了Kivy和Kivymd如何使使用Python的缺点使其超级容易开发应用程序。 我们已经介绍了应用程序开发的基础知识,如何显示文本,接受输入以及使用按钮使我们的应用程序具有交互性。 我们还看到了Kivy支持的各种UI / UIX元素,以及如何使用Kivy String Builders轻松实现它们,这些字符串以分层格式编写,不需要任何显式的import语句。 如果您还没有阅读前面的部分,我建议您看一下它们,以更好地理解。
In this part, we will cover all the remaining frequently used elements in Kivymd, and in another part, we will build our capstone app which will fetch weather-related information using weather API, convert that app into Android APK and deploy it on an online platform. Isn’t this cool?
在这一部分中,我们将涵盖Kivymd中所有剩余的常用元素,在另一部分中,我们将构建顶点应用程序,该应用程序将使用天气API获取与天气有关的信息,将该应用程序转换为Android APK并在线部署平台。 这不是很酷吗?
对话方块 (MDDialog)
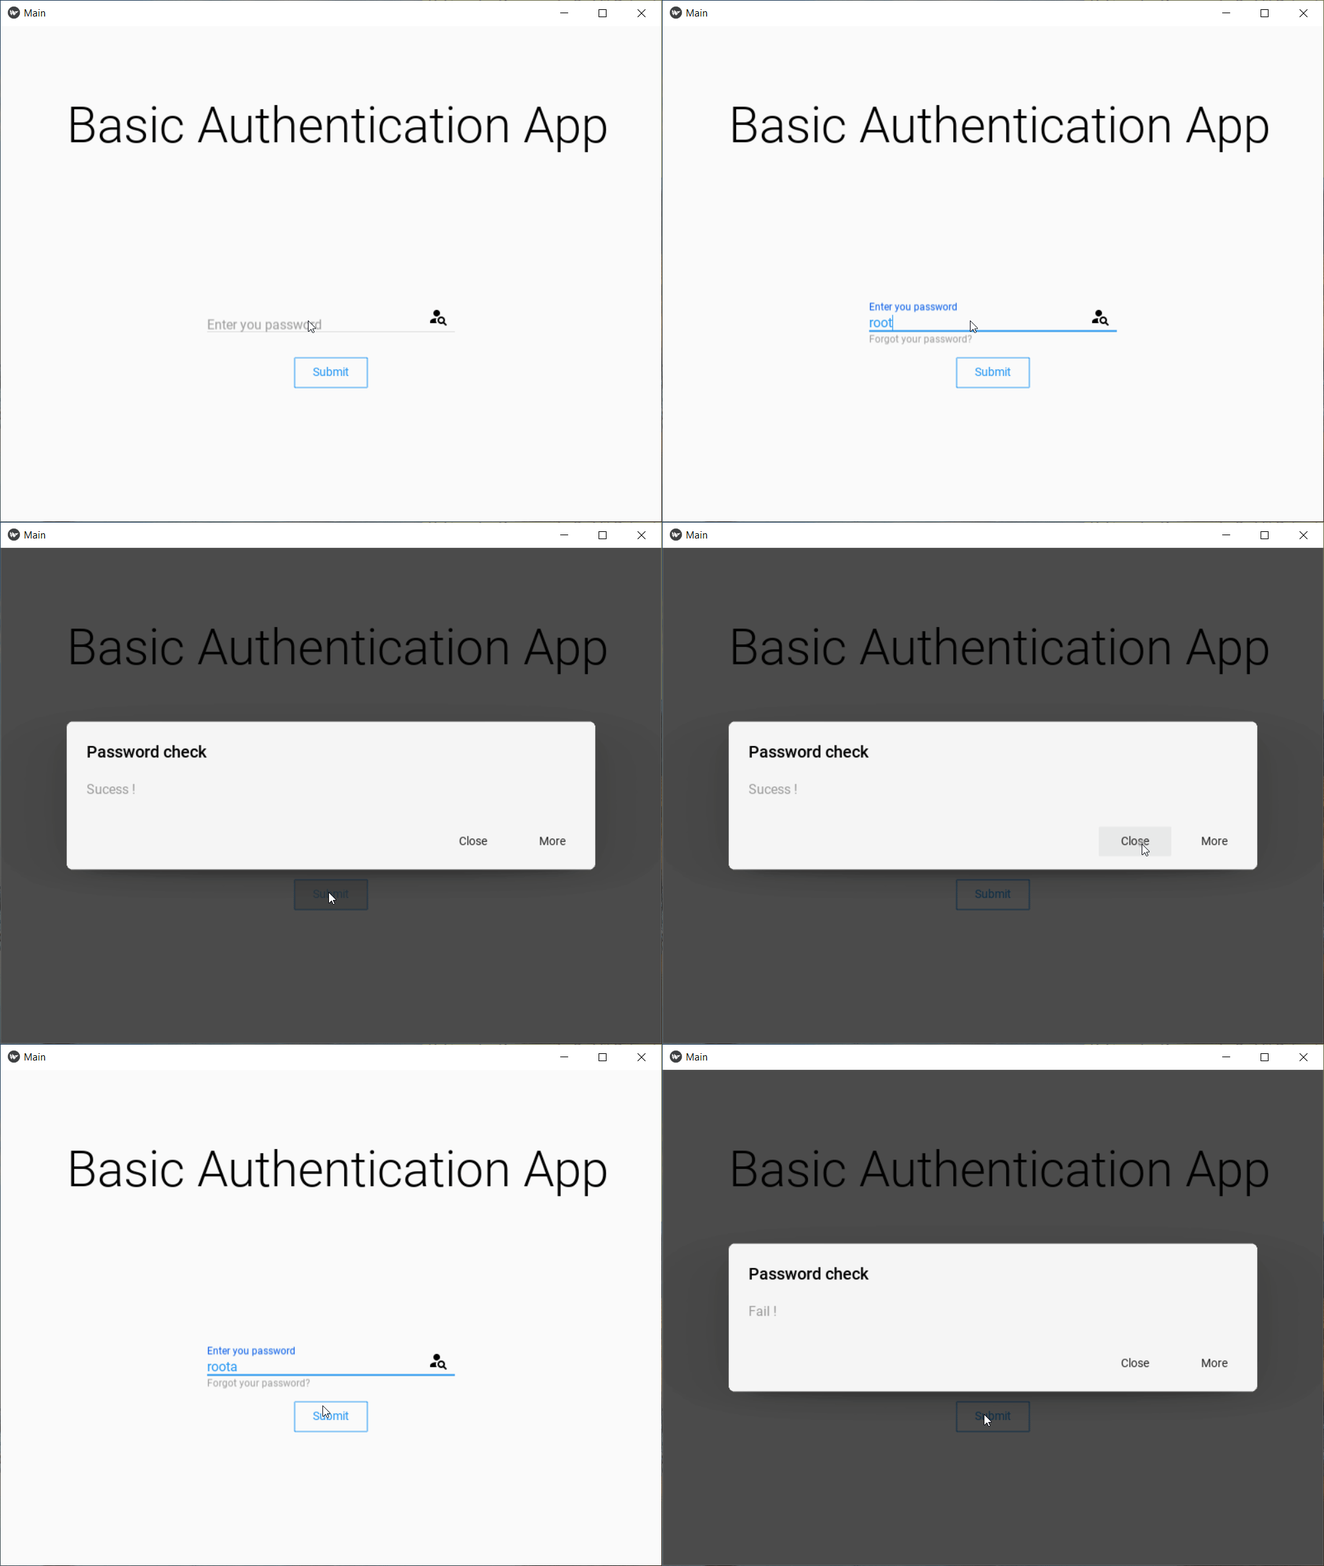
Last time we built a basic app that takes a password as input, compares it with our keyword “root” and displays success or failure message but as a text on the screen. What if a dialog box pops up which not only displays the result of the action but gives more options if applicable? This type of function can be made with the help of MDDialog. Let’s look at its implementation:
上一次,我们构建了一个基本应用程序,该应用程序将密码作为输入,将其与关键字“ root”进行比较,并在屏幕上以文本形式显示成功或失败消息。 如果弹出一个对话框,该对话框不仅显示操作结果,还提供更多选项(如果适用)? 可以在MDDialog的帮助下完成此类功能。 让我们看一下它的实现:
from kivymd.app import MDApp
from kivy.lang import Builder
from kivy.properties import ObjectProperty
from kivymd.uix.dialog import MDDialog
from kivymd.uix.button import MDFlatButton


kv = """
Screen:
    in_class: text
    MDLabel:
        text: 'Basic Authentication App'
        font_style: 'H2'
        pos_hint: {'center_x': 0.6, 'center_y': 0.8}
    MDTextField:
        id: text
        hint_text: 'Enter you password'
        helper_text: 'Forgot your password?'
        helper_text_mode: "on_focus"
        pos_hint: {'center_x': 0.5, 'center_y': 0.4}
        size_hint_x: None
        width: 300
        icon_right: "account-search"
        required: True

    MDRectangleFlatButton:
        text: 'Submit'
        pos_hint: {'center_x': 0.5, 'center_y': 0.3}
        on_press:
            app.auth()

    MDLabel:
        text: ''
        id: show
        pos_hint: {'center_x': 1.0, 'center_y': 0.2}

"""


class Main(MDApp):
    in_class = ObjectProperty(None)


    def build(self):
        return Builder.load_string(kv)


    def auth(self):
        if self.root.in_class.text == 'root':
            # label = self.root.ids.show
            # label.text = "Sucess"
            self.dialog = MDDialog(title='Password check',
                                   text="Sucess !", size_hint=(0.8, 1),
                                   buttons=[MDFlatButton(text='Close', on_release=self.close_dialog),
                                            MDFlatButton(text='More')]
                                   )
            self.dialog.open()
        else:
            # label = self.root.ids.show
            # label.text = "Fail"
            self.dialog.text = 'Fail !'
            self.dialog.open()


    def close_dialog(self, obj):
        self.dialog.dismiss()


Main().run()
The output looks like this:
输出如下:

Various properties can be modified in a dialog box like:
可以在对话框中修改各种属性,例如:
- various types of events including on_pre_open, on_open, on_pre_dismiss, on_dismiss 各种类型的事件,包括on_pre_open,on_open,on_pre_dismiss,on_dismiss
- “title” of the dialog box. In the example, the Password check is the title of the box. 对话框的“标题”。 在示例中,“密码”复选框是该框的标题。
- “text” of the box. Here we have success or failure as the text. 框的“文本”。 在这里,我们以成功或失败作为文字。
- control the “radius” of the box and make it round, elliptical. 控制盒子的“半径”并使它呈圆形,椭圆形。
- add buttons, list, make it a form that can take inputs, and many more. 添加按钮,列表,使其成为可以接受输入的表单等等。
Read more about these features here.
在此处阅读有关这些功能的更多信息。
MDList(一,二和三行列表项) (MDList (One, Two & Three line list item))
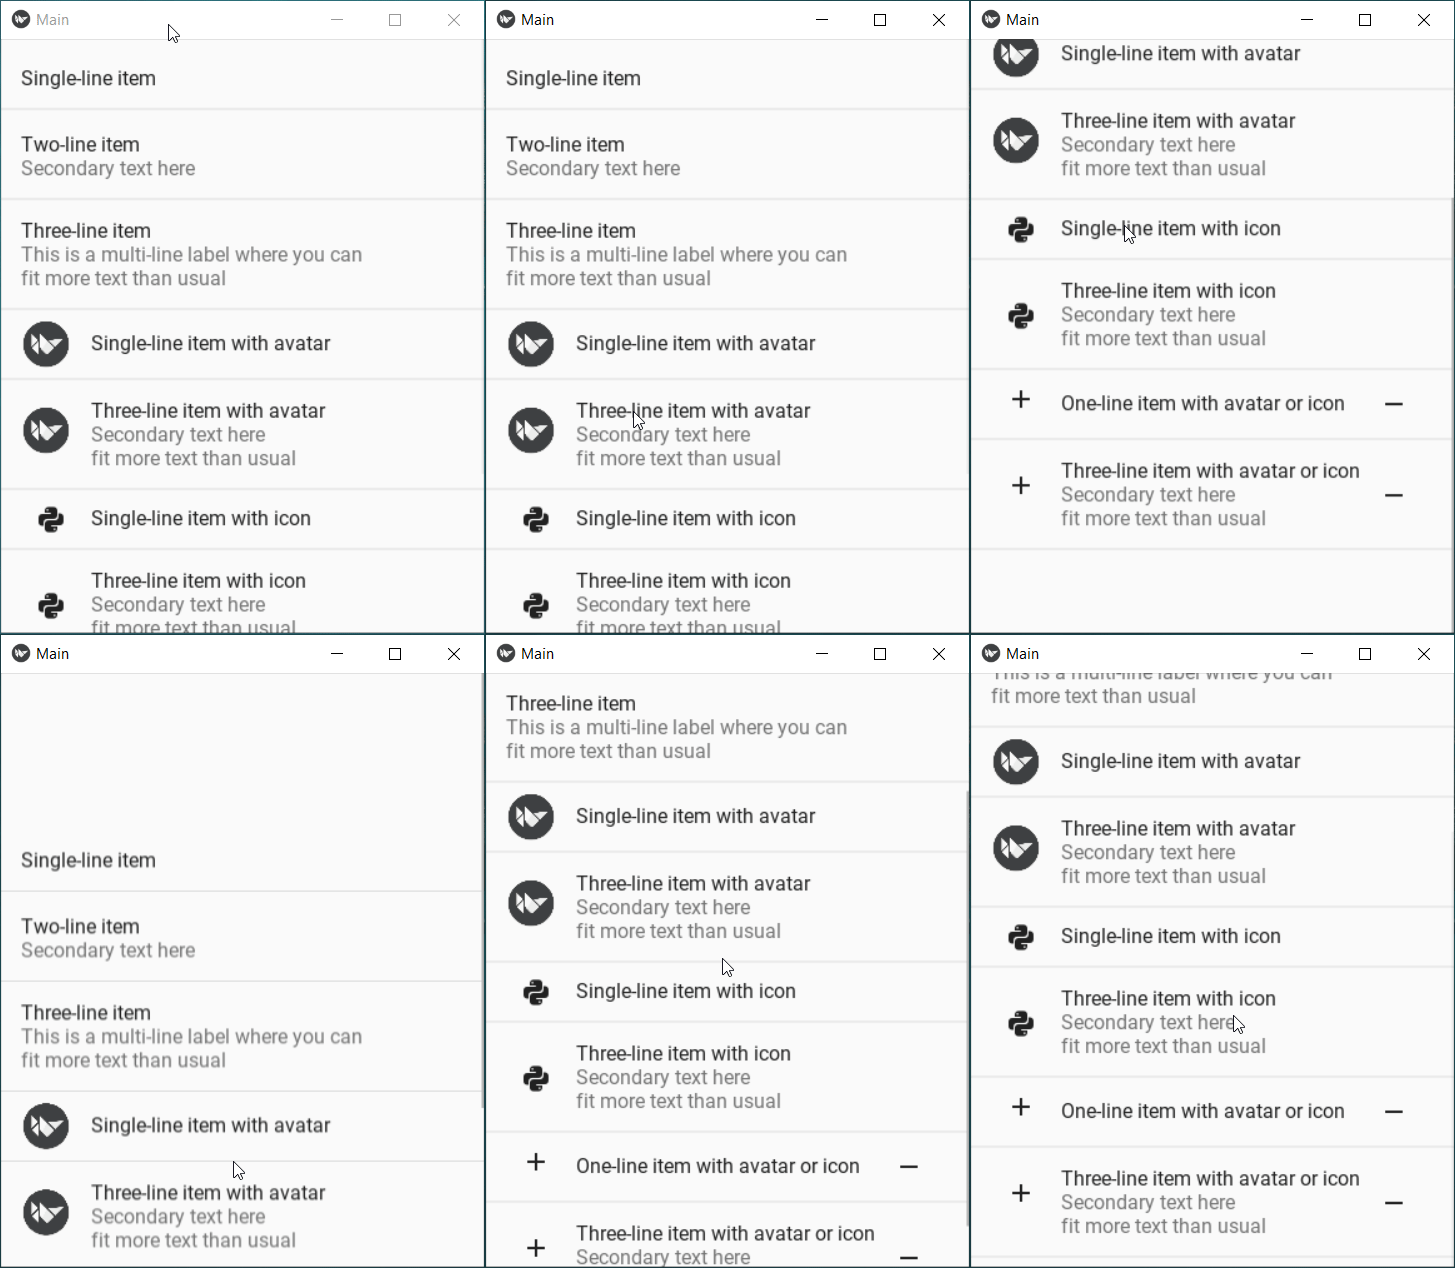
The list is one of the most commonly used entities in app development. It is a vertical continuous index of text with images. MDList is combined with a scroll view and list items to make a functional list. We have different types of list items in Kivymd ranging from OneLineListItem to ThreeLineAvatarIconListItem. The example below covers all type of items in a list:
该列表是应用程序开发中最常用的实体之一。 它是带有图像的文本的垂直连续索引。 MDList与滚动视图和列表项结合在一起以构成功能列表。 我们在Kivymd中有不同类型的列表项,范围从OneLineListItem到ThreeLineAvatarIconListItem。 下面的示例涵盖列表中的所有项目类型:
from kivymd.app import MDApp
from kivy.lang import Builder


kv = """
Screen:
    ScrollView:
        MDList:
            OneLineListItem:
                text: "Single-line item"
            TwoLineListItem:
                text: "Two-line item"
                secondary_text: "Secondary text here"
            ThreeLineListItem:
                text: "Three-line item"
                secondary_text: "This is a multi-line label where you can"
                tertiary_text: "fit more text than usual"
            OneLineAvatarListItem:
                text: "Single-line item with avatar"
                ImageLeftWidget:
                    source: "data/logo/kivy-icon-256.png"
            ThreeLineAvatarListItem:
                text: "Three-line item with avatar"
                secondary_text: "Secondary text here"
                tertiary_text: "fit more text than usual"
                ImageLeftWidget:
                    source: "data/logo/kivy-icon-256.png"
            OneLineIconListItem:
                text: "Single-line item with icon"
                IconLeftWidget:
                    icon: "language-python"
            ThreeLineIconListItem:
                text: "Three-line item with icon"
                secondary_text: "Secondary text here"
                tertiary_text: "fit more text than usual"
                IconLeftWidget:
                    icon: "language-python"
            OneLineAvatarIconListItem:
                text: "One-line item with avatar or icon"
                IconLeftWidget:
                    icon: "plus"
                IconRightWidget:
                    icon: "minus"
            ThreeLineAvatarIconListItem:
                text: "Three-line item with avatar or icon"
                secondary_text: "Secondary text here"
                tertiary_text: "fit more text than usual"
                IconLeftWidget:
                    icon: "plus"
                IconRightWidget:
                    icon: "minus"
            """


class Main(MDApp):


    def build(self):
        return Builder.load_string(kv)


Main().run()
Look at its output:
看一下它的输出:

The basic difference between avatar and icon is that icons are mostly predefined, freely available and they don’t need to be explicitly referenced via source. Avatar is more of an image that is referenced to a profile though it can be used in a list item. The items contain text which can be modified using the text properties of MDLabel.
头像和图标之间的基本区别在于,图标通常是预定义的,可免费使用,无需通过源显式引用。 尽管头像可以在列表项中使用,但头像更多是参考配置文件的图像。 这些项目包含可以使用MDLabel的文本属性修改的文本。
MDDataTables (MDDataTables)
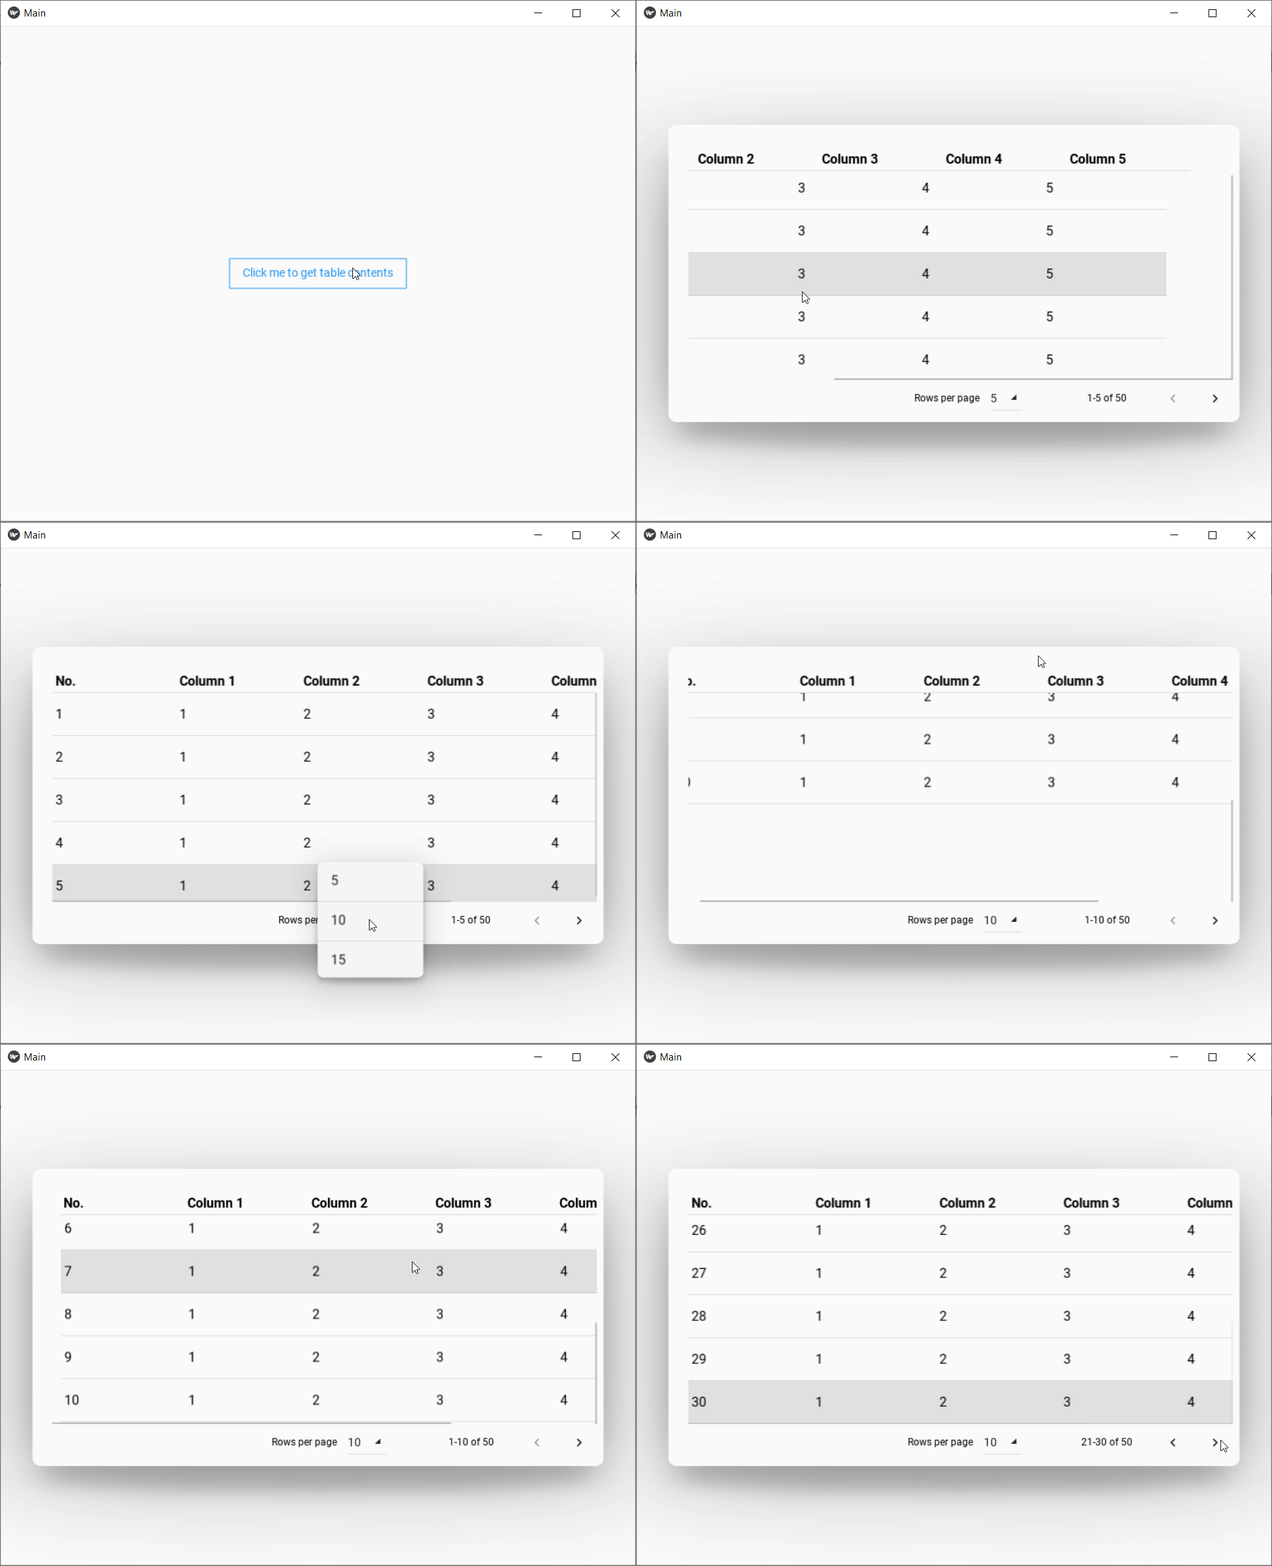
Datatables are used to display tabular data in the form of rows and columns. It is a simple yet powerful utility offered by Kivymd. It can be linked with a button or any other action. The row items can be combined with checkboxes making a todo list in a table format. You can add pagination, control the number of rows to be displayed. Let’s check it’s code:
数据表用于以行和列的形式显示表格数据。 它是Kivymd提供的一个简单而强大的实用程序。 它可以与按钮或任何其他动作链接。 可以将行项目与复选框组合在一起,以表格格式创建待办事项列表。 您可以添加分页,控制要显示的行数。 让我们检查一下它的代码:
from kivymd.app import MDApp
from kivy.lang import Builder
from kivymd.uix.datatables import MDDataTable
from kivy.metrics import dp


kv = """
Screen:
    MDRectangleFlatButton:
        text: 'Click me to get table contents'
        pos_hint: {'center_x': 0.5, 'center_y': 0.5}
        on_press: app.table()

"""


class Main(MDApp):


    def table(self):
        self.tables = MDDataTable(size_hint=(0.9, 0.6),
                                  use_pagination=True,
                                  column_data=[
                                      ("No.", dp(30)),
                                      ("Column 1", dp(30)),
                                      ("Column 2", dp(30)),
                                      ("Column 3", dp(30)),
                                      ("Column 4", dp(30)),
                                      ("Column 5", dp(30)),
                                  ],
                                  row_data=[
                                      (f"{i + 1}", "1", "2", "3", "4", "5") for i in range(50)
                                  ],
                                  )
        self.tables.open()


    def build(self):
        return Builder.load_string(kv)


Main().run()
And the interesting output:
有趣的输出:

MD工具栏 (MDToolbar)
You all have seen in android apps we have a top stripped portion where the name of the app is mentioned with a stack of three lines on the left and three dots on the right side. It is called a toolbar and it is very essential in an app to make it more easily accessible and organize different actions. As always Kivymd comes with options and this one also has two options: Top toolbar and bottom toolbar. Both have their advantages and features but for this series, we will focus on Top toolbar. If you want to know more about the bottom toolbar then follow this link. A simple toolbar is coded as follows:
大家都已经在android应用程序中看到过,在顶部有一个剥离部分,其中提到了应用程序的名称,左侧有三行,右侧有三点。 它被称为工具栏,在应用程序中非常重要,它可以使其更易于访问并组织各种操作。 与往常一样,Kivymd带有选项,并且该选项还具有两个选项:顶部工具栏和底部工具栏。 两者都有其优点和功能,但是在本系列中,我们将重点介绍“顶部”工具栏。 如果您想了解更多有关底部工具栏的信息,请点击此链接 。 一个简单的工具栏编码如下:
kv = """
Screen:
    BoxLayout:
        orientation: 'vertical'
        MDToolbar:
            title: "MDToolbar"
            left_action_items: [["menu", lambda x: app.callback()]]
            right_action_items: [["dots-vertical", lambda x: app.callback()]]
        Widget:


"""
Now if you click on 3 dots menu, it will crash the app as it requires a callback. Callback defines what action should be taken for that particular event. To make a functional menu, we need something called Navigation Drawer, let’s see what is it.
现在,如果您单击3点菜单,它将使应用程序崩溃,因为它需要回调。 回调定义了对该特定事件应采取的操作。 要制作功能菜单,我们需要一个称为导航抽屉的东西,让我们看看它是什么。
MDNavigationDrawer (MDNavigationDrawer)
This is where things get interesting. Now we can finally build a menu in our app with different sections to browse. Navigation Drawer makes it possible to access different destinations in our app. Before I show the code explanation, there is one more concept here. There are different types of layout Kivymd offers. The layout is a type of blueprint where all the elements can be arranged. The MDToolbar is usually placed in a BoxLayout. Learn more about layouts here. Now look at this code carefully:
这就是事情变得有趣的地方。 现在,我们终于可以在应用程序中构建一个菜单,其中包含要浏览的不同部分。 导航抽屉使访问我们应用程序中的不同目的地成为可能。 在显示代码说明之前,这里还有一个概念。 Kivymd提供了不同类型的布局。 布局是一种蓝图,可以在其中布置所有元素。 MDToolbar通常放置在BoxLayout中。 在此处了解有关布局的更多信息。 现在,请仔细查看以下代码:
from kivymd.app import MDApp
from kivy.lang import Builder


kv = """
Screen:
    BoxLayout:
        orientation: 'vertical'
        MDToolbar:
            title: "MDToolbar"
            left_action_items: [["menu", lambda x: nav_draw.set_state()]]
        Widget:

    MDNavigationDrawer:
        id: nav_draw
        orientation: "vertical"
        padding: "8dp"
        spacing: "8dp"

        AnchorLayout:
            anchor_x: "left"
            size_hint_y: None
            height: avatar.height

            Image:
                id: avatar
                size_hint: None, None
                size: "56dp", "56dp"
                source: "data/logo/kivy-icon-256.png"

        MDLabel:
            text: "Kaustubh Gupta"
            font_style: "Button"
            size_hint_y: None
            height: self.texture_size[1]

        MDLabel:
            text: "youreamil@gmail.com"
            font_style: "Caption"
            size_hint_y: None
            height: self.texture_size[1]

        ScrollView:
            MDList:
                OneLineAvatarListItem:
                    on_press:
                        nav_draw.set_state("close")

                    text: "Home"
                    IconLeftWidget:
                        icon: "home"

                OneLineAvatarListItem:
                    on_press:
                        nav_draw.set_state("close")

                    text: "About"
                    IconLeftWidget:
                        icon: 'information'

        Widget:
"""


class Main(MDApp):


    def build(self):
        return Builder.load_string(kv)


Main().run()
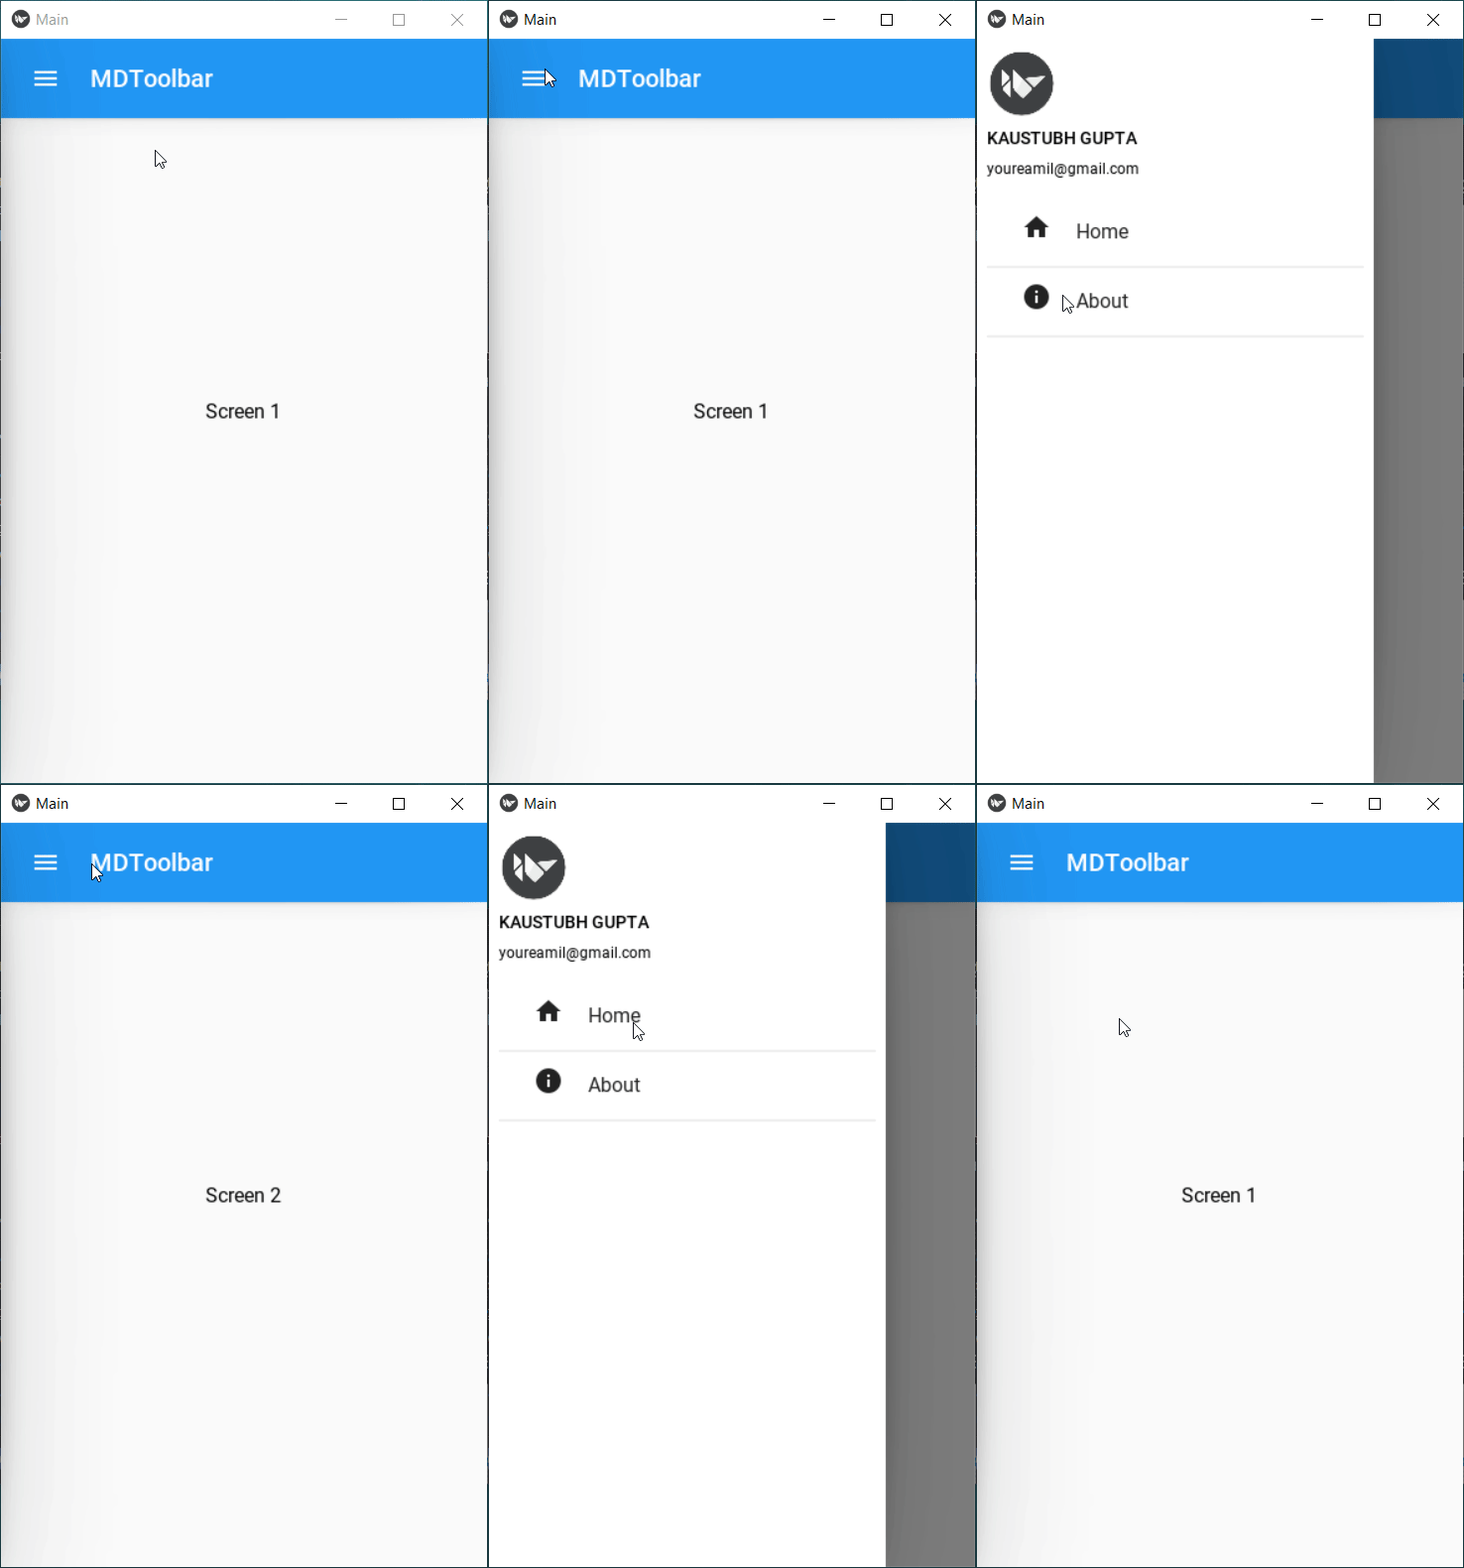
Here I have placed the MDToolbar in a BoxLayout while in MDNavigationDrawer, I have used an AnchorLayout so that I can have an introduction section in the menu bar. After this section, we have the MDList having two destinations, Home and About. Now that we come so far in our android app journey, let’s see how we can work with different screens and make use of the same MDNavigation bar.
在这里,我将MDToolbar放置在BoxLayout中,而在MDNavigationDrawer中,我使用了AnchorLayout,以便可以在菜单栏中看到简介部分。 在本节之后,我们将MDList包含两个目标,即Home和About。 到目前为止,我们已经进入了Android应用程序之旅,接下来让我们看看如何使用不同的屏幕并使用相同的MDNavigation栏。
切换画面(ScreenManager) (Switching Screens (ScreenManager))
As the name suggests, ScreenManager is used to manage all the screens we want to include in our app. It holds all the screens with a unique id and that id can be used to switch screens on the action. To use the same toolbar in all screens, we will place the Screen Manager and NavigationDrawer inside the NavigationLayout. Now, if we go to the Navigation bar and tap on about or information, nothing happens but we can bind this to switch screen. Just refer to the id of the screen manager and change the current screen to the screen you want. See an example here:
顾名思义,ScreenManager用于管理我们要包含在应用程序中的所有屏幕。 它包含所有具有唯一ID的屏幕,并且该ID可用于在操作上切换屏幕。 要在所有屏幕中使用相同的工具栏,我们将屏幕管理器和NavigationDrawer放置在NavigationLayout中。 现在,如果我们转到导航栏并点击“关于”或“信息”,则什么也不会发生,但是我们可以将其绑定到切换屏幕。 只需参考屏幕管理器的ID,然后将当前屏幕更改为所需的屏幕即可。 在这里查看示例:
kv = """
Screen:
    BoxLayout:
        orientation: 'vertical'
        MDToolbar:
            title: "MDToolbar"
            left_action_items: [["menu", lambda x: nav_draw.set_state()]]
        Widget:
    NavigationLayout:
        ScreenManager:
            id: screen_manager
            Screen:
                name: "scr1"
                MDLabel:
                    text: "Screen 1"
                    halign: "center"

            Screen:
                name: "scr2"
                MDLabel:
                    text: "Screen 2"
                    halign: "center"

        MDNavigationDrawer:
            id: nav_draw
            orientation: "vertical"
            padding: "8dp"
            spacing: "8dp"

            AnchorLayout:
                anchor_x: "left"
                size_hint_y: None
                height: avatar.height

                Image:
                    id: avatar
                    size_hint: None, None
                    size: "56dp", "56dp"
                    source: "data/logo/kivy-icon-256.png"

            MDLabel:
                text: "Kaustubh Gupta"
                font_style: "Button"
                size_hint_y: None
                height: self.texture_size[1]

            MDLabel:
                text: "youreamil@gmail.com"
                font_style: "Caption"
                size_hint_y: None
                height: self.texture_size[1]

            ScrollView:
                MDList:
                    OneLineAvatarListItem:
                        on_press:
                            nav_draw.set_state("close")
                            screen_manager.current = "scr1"

                        text: "Home"
                        IconLeftWidget:
                            icon: "home"

                    OneLineAvatarListItem:
                        on_press:
                            nav_draw.set_state("close")
                            screen_manager.current = "scr2"
                        text: "About"
                        IconLeftWidget:
                            icon: 'information'

            Widget:
"""
结论和下一步 (Conclusion and What’s Next)
In this part of the series, we covered more elements used in app development. We learned how to make app interactive using dialog boxes, how to create the toolbar and switch screens on particular action/event. In an upcoming article, I will make an app, convert it to APK and deploy it on a cloud platform so stay tuned for that article. If you liked this development series make sure to follow me on medium so you receive notifications about upcoming articles, comment down if you have any queries, and with that said, Sayonara!
在本系列的这一部分中,我们涵盖了应用程序开发中使用的更多元素。 我们学习了如何使用对话框使应用程序具有交互性,如何创建工具栏以及如何在特定动作/事件上切换屏幕。 在下一篇文章中,我将制作一个应用程序,将其转换为APK并将其部署在云平台上,因此请继续关注该文章。 如果您喜欢这个开发系列,请确保以中等方式关注我,以便您收到有关即将发表的文章的通知,如果有任何疑问,请予以评论,并说,Sayonara!
翻译自: https://towardsdatascience.com/building-android-apps-with-python-part-3-89a455ee7f7c


 本文是使用Python和Kivymd开发Android应用系列的第三部分,介绍了Kivymd中的MDDialog、MDList、MDDataTables、MDToolbar、MDNavigationDrawer和ScreenManager等组件。通过这些组件,可以创建交互式对话框、列表、数据表、工具栏和导航抽屉,实现屏幕切换。文章还展示了代码示例和实际效果。


 被折叠的 条评论
为什么被折叠?


