


 WebSocket是一种客户端-服务器通信协议,相比HTTPS,它具有较低的请求响应开销和全双工通信优势。在Python中,可以利用Flask和Socket.IO模块实现WebSocket。本文将指导读者理解WebSocket的特点,并通过Flask和Socket.IO实现WebSocket的步骤。
WebSocket is a communication protocol for the client-server model.So for understanding WebSocket, It is batter to compare the WebSocket specialty over HTTPS.There are a few advantages of WebSocket over HTTPS that is what the specialty of WebSocket.So If we have to decide that we should choose the WebSocket for our applications then we can analyze the requirements as per the below-written features of WebSocket.
W ebSocket是用于客户端-服务器模型的通信协议,因此为了理解WebSocket,比较HTTPS上的WebSocket专业知识是一个连击.WebSocket相对于HTTPS的一些优点正是WebSocket的特长。决定我们应该为我们的应用程序选择WebSocket,然后我们可以根据下面编写的WebSocket功能分析需求。
HTTP carries extra overheard in individual request and response, WebSocket carries the overhead data while placing connection then it carries less or balanced data within individual request-response.
HTTP在单独的请求和响应中进行了额外的监听,WebSocket在放置连接时传递了开销数据,然后在单独的请求-响应内传递了较少或平衡的数据。
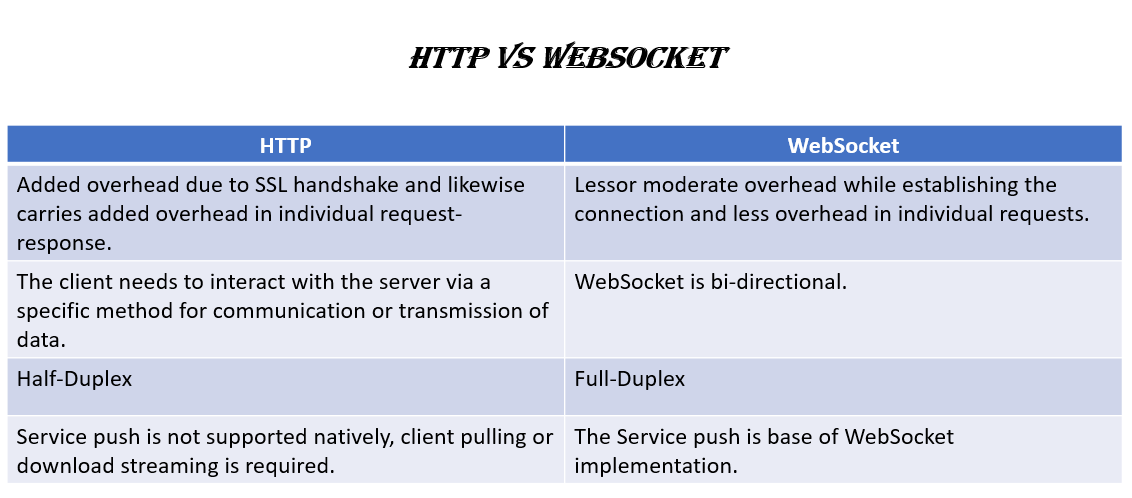
Note: For full-duplex Bi-directional client-server communication the WebSocket is the best choice.
注意:对于全双工双向客户端-服务器通信,WebSocket是最佳选择。
The WebSocket’s can be implemented with all server-side technologies, I am using Flask and Socket-IO modules from Python.Please understand the steps below to implement the WebSocket using Flask and Socket-IO
WebSocket可以使用所有服务器端技术来实现,我正在使用Python的Flask和Socket-IO模块。请理解下面的步骤以使用Flask和Socket-IO来实现WebSocket
步骤1:创建一个项目并创建Requirements.txt (Step1: Creating a project and creating requirements.txt)
- First of all, will start by setting up the virtual environment for our sample project. 首先,将从为我们的示例项目设置虚拟环境开始。
- Create a project folder. 创建一个项目文件夹。
- Create a requirments.txt file into the project folder. 在项目文件夹中创建一个requirments.txt文件。
- Add below code into requirments.txt. 将以下代码添加到requirments.txt中。
Flask==1.0.2
Flask-Login==0.4.1
Flask-Session==0.3.1
Flask_SocketIO
itsdangerous==1.1.0
Jinja2==2.10
MarkupSafe==1.1.0
python-engineio
python-socketio
six==1.11.0
Werkzeug==0.14.1
Note: the above dependency is required for implementing a web socket so we will install all for creating the virtual environment.
注意:以上依赖性是实现Web套接字所必需的,因此我们将安装所有这些组件以创建虚拟环境。
第二步:创建一个虚拟环境并从python安装所有必需的模块。 (Step2: Creating a virtual environment and install all required modules from python.)
- Now create a virtual environment “VENV” for the project. 现在为项目创建一个虚拟环境“ VENV”。

- Go to project root folder and open terminal/cmd and execute the below commands 转到项目根文件夹并打开terminal / cmd并执行以下命令
$ virtualenv <envname>:
$ virtualenv <环境名称> :
“envname” can be anything I have used “websocketenv”
“ envname”可以是我使用过的“ websocketenv”
- Activate the virtual env now(Execute the activate.bat file present location) 立即激活虚拟环境(执行activate.bat文件的当前位置)
$ {Project Root path}/websocketenv/Scripts/activate.bat
$ {项目根路径} /websocketenv/Scripts/activate.bat
- Now install the requirements.txt using the command 现在使用命令安装requirements.txt
$ pip install requirements.txt
$ pip安装需求.txt
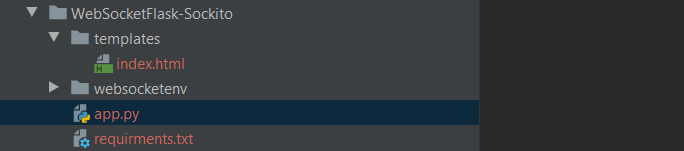
The current project structure looks like this. for me.
当前的项目结构如下所示。 为了我。

第三步:我们将设计一个简单的程序来理解WebSocket的功能。 (Step3: We will design a simple program for understanding the functionality of a WebSocket.)
Create a Python file named app.py in the project root folder.
在项目根文件夹中创建一个名为app.py的Python文件。
- Add the below code into the app.py 将以下代码添加到app.py中
N
ñ
app.py (app.py)
from flask import Flask, render_template
from flask_socketio import SocketIOasync_mode = None
app = Flask(__name__)
socket_ = SocketIO(app, async_mode=async_mode)@app.route('/')
def index():
    return render_template('index.html', async_mode=socket_.async_mode)
if __name__ == '__main__':
    socket_.run(app, debug=True)
Now create the templates directory into the project root folder and create one index.html file in the templates directory.
现在,将模板目录创建到项目根文件夹中,并在模板目录中创建一个index.html文件。
- Add the below code into index.html 将以下代码添加到index.html中
index.html (index.html)
<!DOCTYPE html>
<html lang="en">
<head>
    <meta charset="UTF-8">
    <title>WebSocket</title>
</head>
<body>
<h1>This is webSocket client</h1>
</body>
</html>
Now we can test the WebSocket by running “app.py”
现在我们可以通过运行“ app.py”来测试WebSocket
The expected console output will be after running app.py
预期的控制台输出将在运行app.py之后

Now run the URL: http://localhost:5000/ into a web browser and you will see the message “This is WebSocket Client” on the web page.
现在,在Web浏览器中运行URL: http:// localhost:5000 / ,您将在网页上看到消息“ This is WebSocket Client”。
**127.0.0.1 — — [2020–08–17 10:09:07] “GET / HTTP/1.1” 200 260 0.004024**
** 127.0.0.1 - - [2020年8月17日10时09分07秒]“GET / HTTP / 1.1” 200 260 0.004024 **
If the WebSocket connection is established then the above request log will be added in the console logs whenever the web page will get refreshed.
如果建立了WebSocket连接,则每当刷新网页时,以上请求日志就会添加到控制台日志中。
Flask, render_template flask_socketio , SocketIO
Flask,render_template flask_socketio,SocketIO
we have used the following modules for implementing the basic socket but it is not showcasing anything like how socket works so, let’s extend the feature and implement the sending message and receiving from one client to another.
我们已经使用以下模块来实现基本的套接字,但是并没有展示套接字的工作原理,让我们扩展功能并实现发送消息以及从一个客户端接收消息到另一个客户端。
最后一步:在此步骤中,我们将实现从一个客户端传递到另一客户端的消息。 (Final Step: We will implement a message passing from one client to another client in this step.)
The current project structure is like this:
当前的项目结构如下:
app.py和index.html的最终代码 (The final code for app.py and index.html)
app.py (app.py)
from flask import Flask, render_template, session, copy_current_request_context
from flask_socketio import SocketIO, emit, disconnect
from threading import Lock
async_mode = None
app = Flask(__name__)
app.config['SECRET_KEY'] = 'secret!'
socket_ = SocketIO(app, async_mode=async_mode)
thread = None
thread_lock = Lock()
@app.route('/')
def index():
    return render_template('index.html', async_mode=socket_.async_mode)
@socket_.on('my_event', namespace='/test')
def test_message(message):
    session['receive_count'] = session.get('receive_count', 0) + 1
    emit('my_response',
         {'data': message['data'], 'count': session['receive_count']})
@socket_.on('my_broadcast_event', namespace='/test')
def test_broadcast_message(message):
    session['receive_count'] = session.get('receive_count', 0) + 1
    emit('my_response',
         {'data': message['data'], 'count': session['receive_count']},
         broadcast=True)
@socket_.on('disconnect_request', namespace='/test')
def disconnect_request():
    @copy_current_request_context
    def can_disconnect():
        disconnect()
    session['receive_count'] = session.get('receive_count', 0) + 1
    emit('my_response',
         {'data': 'Disconnected!', 'count': session['receive_count']},
         callback=can_disconnect)
if __name__ == '__main__':
    socket_.run(app, debug=True)
index.html (index.html)
<!DOCTYPE HTML>
<html>
<head>
    <title>Socket-Test</title>
    <script src="//code.jquery.com/jquery-1.12.4.min.js"></script>
    <script src="//cdnjs.cloudflare.com/ajax/libs/socket.io/2.2.0/socket.io.js"></script>
    <script type="text/javascript" charset="utf-8">
        $(document).ready(function() {
            namespace = '/test';
            var socket = io(namespace);
            socket.on('connect', function() {
                socket.emit('my_event', {data: 'connected to the SocketServer...'});
            });
            socket.on('my_response', function(msg, cb) {
                $('#log').append('<br>' + $('<div/>').text('logs #' + msg.count + ': ' + msg.data).html());
                if (cb)
                    cb();
            });
            $('form#emit').submit(function(event) {
                socket.emit('my_event', {data: $('#emit_data').val()});
                return false;
            });
            $('form#broadcast').submit(function(event) {
                socket.emit('my_broadcast_event', {data: $('#broadcast_data').val()});
                return false;
            });
            $('form#disconnect').submit(function(event) {
                socket.emit('disconnect_request');
                return false;
            });
        });
    </script>
</head>
<body style="background-color:white;">
    <h1 style="background-color:white;">Socket</h1>
    <form id="emit" method="POST" action='#'>
        <input type="text" name="emit_data" id="emit_data" placeholder="Message">
        <input type="submit" value="Send Message">
    </form>
    <form id="broadcast" method="POST" action='#'>
        <input type="text" name="broadcast_data" id="broadcast_data" placeholder="Message">
        <input type="submit" value="Send Broadcast Message">
    </form>
    <form id="disconnect" method="POST" action="#">
        <input type="submit" value="Disconnect Server">
    </form>
    <h2 style="background-color:white;">Logs</h2>
    <div id="log" ></div>
</body>
</html>
After adding the final code please start the WebSocket server by running app.py and now again we can check the output in the web browser.
添加最终代码后,请通过运行app.py启动WebSocket服务器,现在我们可以再次在Web浏览器中检查输出。
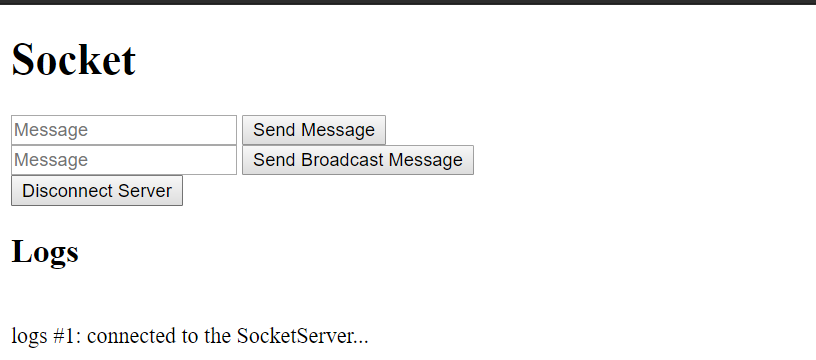
- Here we have implemented two kinds of message one is “Send Message” that’s is a normal ping msg and Send Broadcast Message which is sending or broadcasting the data over a socket connection. 在这里,我们实现了两种消息,一种是“发送消息”,它是普通的ping msg,另一种是“发送广播消息”,它通过套接字连接发送或广播数据。
- We have a couple of options to check the functionality but if we run socket on localhost then it's difficult to observe the feature. 我们有两个选项来检查功能,但是如果我们在localhost上运行套接字,则很难观察到该功能。
Make your localhost accessible anywhere.
使您的本地主机可在任何地方访问。
We can use the “NGROK” tool and we can easily make localhost servers accessible anywhere.
我们可以使用“ NGROK”工具,并且可以轻松地使本地服务器可以在任何地方访问。
One the localhost is set up according to the above link, you can use the generated HTTP or HTTPs URLs instead of the localhost and You can test a Socket server like a live hosted server and use it as a simple chat broadcast server.
一个localhost是根据上面的链接设置的,您可以使用生成的HTTP或HTTPs URL代替localhost,并且可以像实时托管服务器一样测试Socket服务器,并将其用作简单的聊天广播服务器。
Can open the link into your phone and see the message sharing in between. Or use another computer and test exchanging messages.
可以打开手机中的链接,并查看两者之间的消息共享。 或者使用另一台计算机并测试交换消息。
Please explore the code one by one and here I have given some explanations about few must-know things from source code.
请逐一浏览代码,在这里,我对源代码中的一些必不可少的知识进行了解释。
async_mode = None
app = Flask(__name__)
socket_ = SocketIO(app, async_mode=async_mode)
we were given the Flask app instance (standard initialization)we were not given the app, but we were given a message_queue (standard initialization for the auxiliary process), will call init_app from an app factory function.
我们得到了Flask应用程序实例(标准初始化),我们没有得到该应用程序,但是我们得到了message_queue(辅助进程的标准初始化),它将从应用程序工厂函数调用init_app。
@app.route('/')A decorator that is used to register a view function for a given URL rule.
装饰器,用于注册给定URL规则的视图功能。
@socketio.on('my event', namespace='/chat')A Decorator to register a SocketIO event handler. This decorator must be applied to SocketIO event handlers.
一个装饰器,用于注册SocketIO事件处理程序。 此装饰器必须应用于SocketIO事件处理程序。
This small application can be extended for any features please do have use of it freely.
可以扩展此小型应用程序的任何功能,请自由使用。
Thanks, Programmers
谢谢,程序员
Happy Coding!
编码愉快!
翻译自: https://medium.com/swlh/implement-a-websocket-using-flask-and-socket-io-python-76afa5bbeae1


 912
912

 被折叠的 条评论
为什么被折叠?
被折叠的 条评论
为什么被折叠?
 到【灌水乐园】发言


