


golang lambda
The first part of this article series can be found here. I’d recommend you start there to get the full context. However, if you just want to understand how to make a golang lambda talk to dynamodb, then you can clone the starter code for this project from here (you will need to deploy it to AWS).
可以在 此处 找到本系列文章的第一部分 。 我建议您从那里开始以获得完整的上下文。 但是,如果您只想了解如何与dynamodb进行golang lambda对话,则可以从 此处 克隆该项目的启动程序代码 (您需要将其部署到AWS)。
So, we have written a basic lambda and deployed it to AWS. The next piece of the puzzle is hooking it up to DynamoDB so we can save new monsters to the log and update existing ones.
因此,我们编写了一个基本的lambda并将其部署到AWS。 下一个难题是将其连接到DynamoDB,以便我们可以将新的怪物保存到日志中并更新现有的怪物。
We’ll need to do the following three things to achieve that:
为此,我们需要做以下三件事:
- Create a new dynamo table 创建一个新的发电机表
- Give our save / update lambda permissions to write to the dynamo table 授予我们的保存/更新lambda权限以写入dynamo表
- Write code to connect to the table and insert records 编写代码以连接到表并插入记录
Creating a dynamo table
创建发电机表
Note: Dynamo can cost you money. There is a free-tier, but I once ran up a £300 bill on EC2 while thinking I was in the free-tier. I could have spent that money on peanut butter. Do your research.
注意:Dynamo可能会花费您的钱 。 有免费套餐,但是当我以为是免费套餐时,我曾经花300英镑买了EC2。 我本可以把那笔钱花在花生酱上。 做你的研究。
To create a dynamo table, visit the dynamo service in the AWS console (here) and hit ‘Create Table’. Give your table a name and a primary key. This will be used to look up records in your table. Use id for this. Then click create.
要创建发电机表,请在AWS控制台( 此处 )中访问发电机服务,然后点击“创建表”。 给您的表命名和主键。 这将用于查找表中的记录。 为此使用id 。 然后单击创建。

Do not create a secondary index because that will definitely cost you.
不要创建二级索引,因为这肯定会花费您的时间。
Giving your lambda read / write permissions
授予您的lambda读/写权限
Right now, our lambda can’t interact with this table. They literally just can’t deal with each other’s shit right now. To make them friends, head over to your save / update lambda’s console page and click the permissions tab at the top.
目前,我们的lambda无法与此表格进行互动。 他们现在根本无法应付对方的狗屎。 要让他们成为朋友,请转至保存/更新lambda的控制台页面,然后单击顶部的权限标签。

Click on the role name, which will open the IAM console, where you can configure various roles & permissions related to access.
单击角色名称,这将打开IAM控制台,您可以在其中配置与访问相关的各种角色和权限。
Click the blue button that says ‘Attach Policies’. If you can’t see it, please try this link here.
点击显示“附加政策”的蓝色按钮。 如果看不到,请在此处尝试此链接。
Now, enter ‘DynamoDB’ in the search box, and then select AmazonDynamoDBFullAccess.
现在,在搜索框中输入“ DynamoDB”,然后选择AmazonDynamoDBFullAccess 。
Disclaimer: To appease the raging horde of bespectacled security nerds currently panning my windows, I should warn you that giving full access to anything ever is not a good idea. But since nothing really matters, and life is pain, and also we will all die soon, I’m gonna say go for it. Knock yourself out.
免责声明:为了安抚当前泛滥成灾的眼镜安全书呆子,我要警告您,完全访问任何东西都不是一个好主意。 但是由于没有什么真正重要的事情,生活是痛苦的,而且我们都会很快死去,所以我要说下去。 把自己打昏。

Click attach policy.
点击附加政策。
Connect to the table through code and insert / update records
通过代码连接到表并插入/更新记录
When we last left the code, it looked like this.
当我们最后一次离开代码时,它看起来像这样。
package main


import (
	"github.com/aws/aws-lambda-go/lambda"
	"github.com/aws/aws-lambda-go/events"
	"net/http"
	"encoding/json"
	"../types"
)


func main() {
	lambda.Start(Handler)
}


func Handler(req events.APIGatewayProxyRequest) (events.APIGatewayProxyResponse, error) {
	var monster types.Monster


	err := json.Unmarshal([]byte(req.Body), &monster)


	if err != nil {
		return response("Couldn't unmarshal json into monster struct", http.StatusBadRequest), nil
	}


	return response(monster.Name, http.StatusOK), nil
}


func response(body string, statusCode int) events.APIGatewayProxyResponse {
	return events.APIGatewayProxyResponse {
		StatusCode: statusCode,
		Body: string(body),
		Headers: map[string]string {
			"Access-Control-Allow-Origin": "*",
		},
	}
}
In order to keep our code clean and re-usable, we’ll put the dynamo stuff into a separate package. Create a folder called dynamo and a file inside called dynamo.go.
为了保持我们的代码干净和可重复使用,我们将dynamo内容放入单独的程序包中。 创建一个名为dynamo的文件夹,并在其中创建一个名为dynamo.go的文件。
We’ll need to create two functions, one that connects to dynamo and one that writes to it. I’ll show you the completed code and then go over it.
我们将需要创建两个函数,一个函数连接到dynamo,另一个函数写入它。 我将向您展示完整的代码,然后再进行遍历。
package dynamo


import (
	"fmt"
	"github.com/aws/aws-sdk-go/aws"
	"github.com/aws/aws-sdk-go/aws/session"
	"github.com/aws/aws-sdk-go/service/dynamodb"
	"github.com/aws/aws-sdk-go/service/dynamodb/dynamodbattribute"
	"../types"
)


const tableName = "fantasy-monsters"


func SaveMonster(monster types.Monster) error {
	monsterMap, marshalErr := dynamodbattribute.MarshalMap(monster)


	if marshalErr != nil {
		fmt.Println("Failed to marshal to dynamo map")
		return marshalErr
	}


	dynamoSession := createDynamoSession()


	input := &dynamodb.PutItemInput{
          Item:      monsterMap,
          TableName: aws.String(tableName),
	}


	_, writeErr := dynamoSession.PutItem(input)


	if writeErr != nil {
			fmt.Println("Failed to write to dynamo")
			return writeErr
	}


	return nil
}


func createDynamoSession() *dynamodb.DynamoDB {
	sess := session.Must(session.NewSessionWithOptions(
		session.Options{
			SharedConfigState: session.SharedConfigEnable,
		},
	))


	return dynamodb.New(sess)
}
I’ll tackle each function in turn, but first,
我将依次处理每个功能,但首先,
Lines 1–10 are nothing new. We import our types and a bunch of packages from AWS that we need to use dynamo. The
fmtpackage is from the Go standard library and is used to print text to the console.第1-10行并不新鲜。 我们从AWS导入我们需要使用dynamo的类型和一堆软件包。
fmt软件包来自Go标准库,用于将文本打印到控制台。- Line 12 demonstrates how to define a constant, i.e. a value that will never change. 第12行演示了如何定义一个常量,即永远不变的值。
The createDynamoSession function
createDynamoSession函数
The createDynamoSession function is not capitalised because it is not referenced outside of this file.
createDynamoSession函数未大写,因为未在此文件外部引用。
This function is responsible for creating the dynamo session and returning it. You will notice that the return type has a * symbol next to it. This means that we’re returning a pointer. Pointers are simply, well, pointers to a memory address. Pointers can be used to work out the exact memory address within which a value lives. This has all sorts of applications, but isn’t relevant here, and for our purposes, the pointer acts just the same as a regular variable would.
该函数负责创建并返回发电机会话。 您会注意到,返回类型旁边有一个*符号。 这意味着我们要返回一个pointer 。 指针很简单,就是指向内存地址的指针 。 指针可用于计算出值所在的确切内存地址。 它具有各种各样的应用程序,但在这里并不相关,出于我们的目的,指针的作用与常规变量的作用相同。
We then create a session object using the AWS session package and pass it some options.
然后,我们使用AWS会话包创建会话对象,并向其传递一些选项。
Finally, we return a new dynamodb session by passing the aws session object to dynamodb.New().
最后,通过将aws会话对象传递给dynamodb.New()来返回新的dynamodb会话。
The SaveMonster function
SaveMonster功能
The SaveMonster function is capitalised because it is referenced outside of this file.
SaveMonster函数大写,因为在此文件之外引用了该函数。
On line 15, we marshal the monster object into a map that dynamo can use to write with. This might seem strange since we just converted it from the JSON payload to a Monster type in the handler function. Why do that when you could just convert the JSON payload directly to the dynamo map?
在第15行上,我们将怪物对象编组到迪纳摩可以用来书写的地图中。 这似乎很奇怪,因为我们只是在处理程序函数中将其从JSON有效负载转换为Monster类型。 为什么仅将JSON有效负载直接转换为dynamo映射,为什么呢?
The reason is that converting it into a Monster type first gives us some implicit validation and typechecking. For example, if we were to attempt to pass a boolean true for the monster name in the JSON payload and didn’t convert it first to a Monster type, then dynamo would happily accept it and we’d end up with some dumbass monster called true, which isn’t scary at all. But by unmarshaling it we force Go’s JSON library to validate that all of the fields match the types we specified in our Monster struct. It also puts us in a good position to do further transformations later if we so wish.
原因是首先将其转换为Monster类型会为我们提供一些隐式验证和类型检查。 例如,如果我们尝试为JSON有效负载中的怪物名称传递布尔值true ,而没有先将其转换为Monster类型,则dynamo会很乐意接受它,最后我们得到了一个名为dumbass的怪物是的,一点都不可怕。 但是通过解组它,我们强制Go的JSON库验证所有字段都与我们在Monster结构中指定的类型匹配。 如果我们愿意的话,这也使我们处于有利的位置,可以在以后进行进一步的转换。
Lines 17–20 check that the marshaling was successful. If it isn’t, we print something to the console and return the error as-is, so that we can feed it back to whichever client called our lambda.
第17-20行检查编组是否成功。 如果不是这样,我们将打印一些内容到控制台并按原样返回错误,以便我们可以将其反馈给名为lambda的任何客户端。
Line 22 creates the dynamo session.
第22行创建了发电机会话。
Lines 24–27 take the monster map and the table name and combines it into one of the AWS custom types, PutItemInput, which is what we then pass to PutItem on line 29. PutItem will save new items, but it will also update any existing items if the primary key of the item (in our case, id) matches something that’s already in the table.
线24-27取的怪物图和表名和联合入AWS自定义类型中的一种, PutItemInput ,这就是我们然后传递给PutItem上线29 PutItem将保存新的项目,但它也将更新现有的如果项目的主键(在我们的例子中为id )与表中已经存在的键匹配,则返回item。
Lines 31–34 are error checking again.
第31–34行再次进行错误检查。
Line 36 returns nil, which is how our handler function will know that there were no errors during execution.
第36行返回nil,这是我们的处理函数将如何知道执行期间没有错误的方式。
Changes to the main file
对主文件的更改
Now that we’ve finished writing our custom dynamo client, we only need to update our lambda handler to use it. Here’s what that looks like with the changes applied.
现在,我们已经完成了自定义dynamo客户端的编写,我们只需要更新lambda处理程序即可使用它。 这是应用更改后的样子。
package main


import (
	"github.com/aws/aws-lambda-go/lambda"
	"github.com/aws/aws-lambda-go/events"
	"net/http"
	"encoding/json"
	"../types"
	"../dynamo"
)


func main() {
	lambda.Start(Handler)
}


func Handler(req events.APIGatewayProxyRequest) (events.APIGatewayProxyResponse, error) {
	var monster types.Monster


	marshalErr := json.Unmarshal([]byte(req.Body), &monster)


	if marshalErr != nil {
		return response("Couldn't unmarshal json into monster struct", http.StatusBadRequest), nil
	}


	dynamoErr := dynamo.SaveMonster(monster)


	if dynamoErr != nil {
		return response(dynamoErr.Error(), http.StatusInternalServerError), nil
	}


	return response("Successfully wrote monster to log.", http.StatusOK), nil
}


func response(body string, statusCode int) events.APIGatewayProxyResponse {
	return events.APIGatewayProxyResponse {
		StatusCode: statusCode,
		Body: string(body),
		Headers: map[string]string {
			"Access-Control-Allow-Origin": "*",
		},
	}
}
There are only a couple of lines here that matter.
这里只有几行很重要。
- Line 9 imports our new dynamo client. 第9行导入了我们的新dynamo客户端。
Line 27 calls our
SaveMonsterfunction and retrieves the error.第27行调用了
SaveMonster函数并检索错误。- Lines 29–31 check if an error exists, and if it does, it returns that to the client. 第29–31行检查是否存在错误,如果存在,则将错误返回给客户端。
I also changed line 33 from returning the monster’s name to printing a success message, but this doesn’t really matter.
我也将第33行从返回怪物的名字改为打印成功消息,但这并不重要。
Deploy
部署
Having done all this, we can deploy. As before, build your main.go file by running GOOS=linux GOARCH=amd64 go build -v main.go, then zip the file and upload it through your lamdba’s console. Once complete, run the test event we created in the last tutorial, and you should see an output similar to this.
完成所有这些操作之后,我们就可以部署了。 和以前一样,建立自己的main.go通过运行文件GOOS=linux GOARCH=amd64 go build -v main.go ,然后压缩文件并上传它通过你的lamdba的控制台。 完成后,运行我们在上一个教程中创建的测试事件,您应该会看到类似的输出。

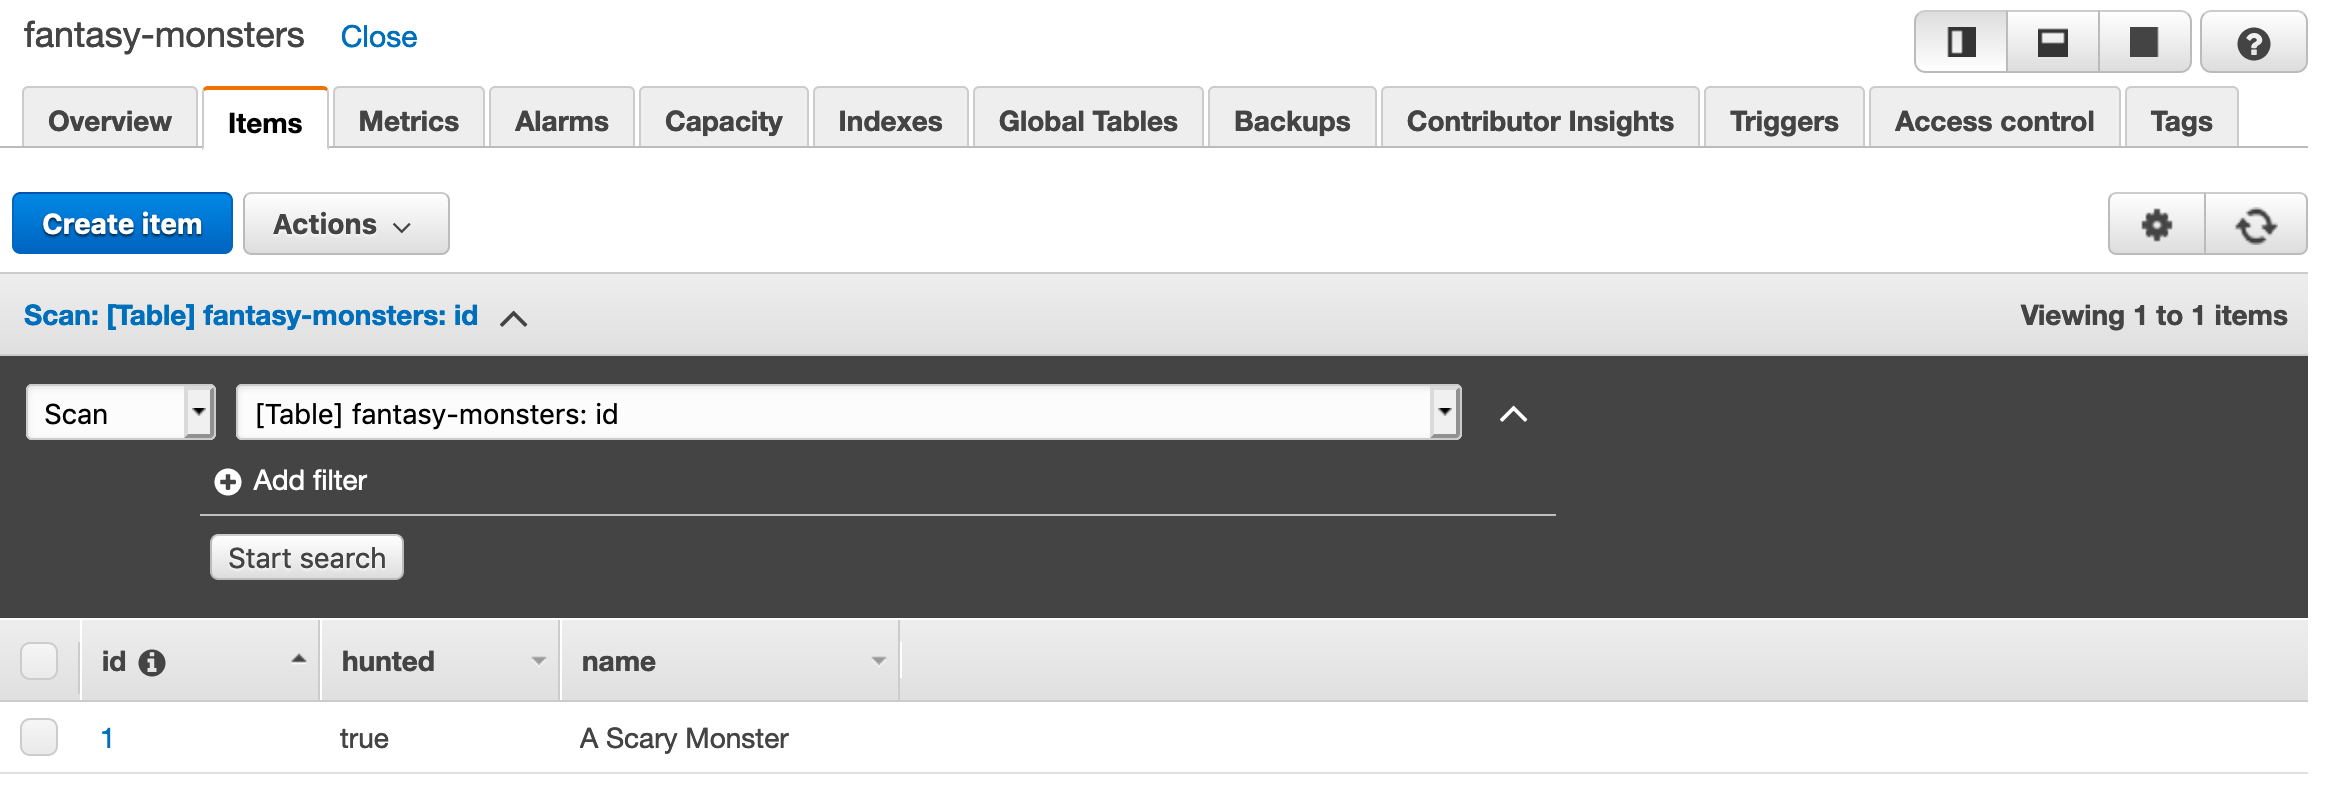
And if you head to your table in dynamo, you’ll see your record saved.
而且,如果您使用发电机在桌子旁走动,则会看到记录已保存。
In this part, you learned how to create a dynamo table, give your lambda dynamo permissions and interact with dynamo through Go code. The next article will demonstrate how to stick an API gateway in front of your lambda and turn it into an HTTP service.
在这一部分中,您学习了如何创建发电机表,如何给lambda发电机权限以及如何通过Go代码与发电机交互。 下一篇文章将演示如何将API网关置于lambda的前面,并将其转变为HTTP服务。
All of the code for this part can be found here.
这部分的所有代码都可以在 这里 找到 。
golang lambda


 1932
1932

 被折叠的 条评论
为什么被折叠?
被折叠的 条评论
为什么被折叠?
 到【灌水乐园】发言


