


 本文介绍如何利用Amazon Redshift创建一个数据仓库,专门用于存储和分析StackOverflow的数据。通过此数据仓库,可以高效地进行大规模数据查询和处理。
redshift 数据仓库
This article is part of the series and continuation of the previous post where we processed the streamed data using spark on EMR.
本文是上一篇文章系列和后续文章的一部分, 在前一篇文章中我们使用EMR上的spark处理流数据 。
Why use Redshift?
为什么要使用Redshift?
Redshift is a fully managed data warehouse solution provided by Amazon. Redshift is designed for analytic workloads and delivers fast query and I/O performance for any dataset by using 2 key techniques ; columnar storage and massive parallel processing.
Redshift是Amazon提供的完全托管的数据仓库解决方案。 Redshift专为分析工作负载而设计,并通过使用2种关键技术为任何数据集提供快速查询和I / O性能 ; 柱状存储和大规模并行处理。
为什么柱状存储如此重要? (Why is columnar storage so important?)
Transactional operations differ majorly from analytical queries.
事务性操作与分析性查询主要不同。
Transactional operations are indexed and very fast, however analytical queries are performed over a huge dataset that can take a lot of time to compute.
事务操作已建立索引并且速度非常快 ,但是分析查询是在庞大的数据集上执行的,这可能需要大量时间才能进行计算。
Relational databases store data in row form and are indexed by primary key for faster accessing. This is perfect for insert ,append or upsert operations.
关系数据库以行形式存储数据,并通过主键索引以加快访问速度 。 这非常适合插入,追加或追加操作。
However analytical queries are interested in aggregates(For example : sum of revenue of a particular region). Performing this query in a row base data base requires to scan the entire database, along with all the unused columns, which can be ineffective and performance heavy.
但是, 分析查询对总计感兴趣(例如:特定区域的收入总和)。 在基于行 的数据库中执行此查询需要扫描整个数据库以及所有未使用的列,这可能是无效的,并且会增加性能 。
This is addressed by columnar databases which stores data in the form of columns instead of rows. This allows the data warehouse to store the data of the same column sequentially on a disk, which allows faster reading capabilities.
列式数据库解决了这一问题,该数据库以列而不是行的形式存储数据。 这使数据仓库可以将同一列的数据顺序存储在磁盘上 ,从而实现更快的读取功能 。
To summarise, here are the key advantages of Redshift
总结一下,这是Redshift的主要优势
- Read less data 读取更少的数据
- Better compression 更好的压缩
- Perfect for OLAP 非常适合OLAP
- Parallel processing , by distribution of queries across multiple nodes. 通过在多个节点之间分布查询来并行处理。
如何创建Redshift集群? (How to Create a Redshift Cluster?)
Amazon has made it insanely easy to create the redshift cluster. Below are the key main steps for creating a Redshift Cluster.
亚马逊让创建Redshift集群变得异常简单。 以下是创建Redshift集群的主要主要步骤。
Step 1 : Login to the console and choose Redshift as the service and click on create cluster
步骤1:登录到控制台,然后选择Redshift作为服务,然后单击create cluster
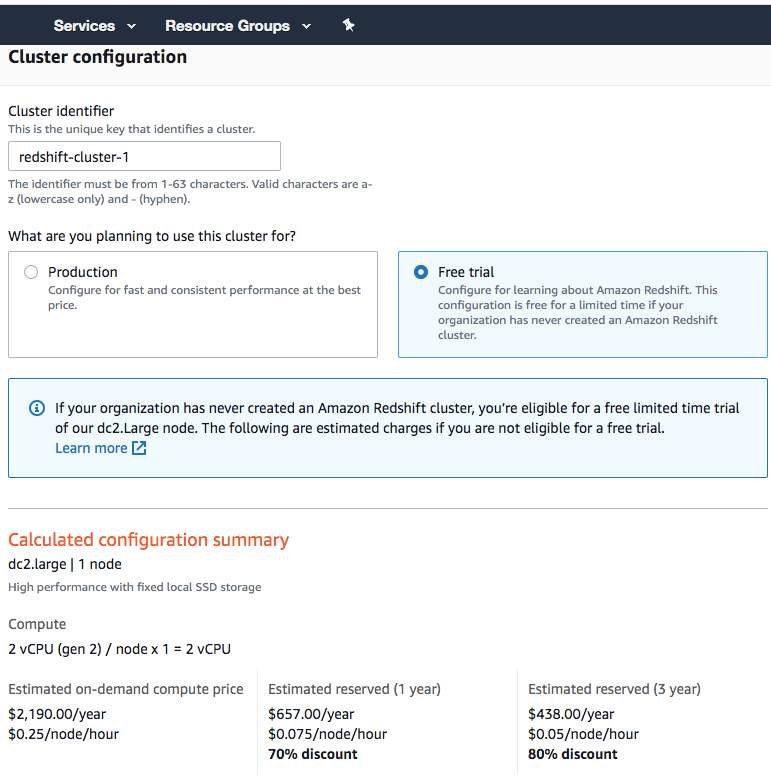
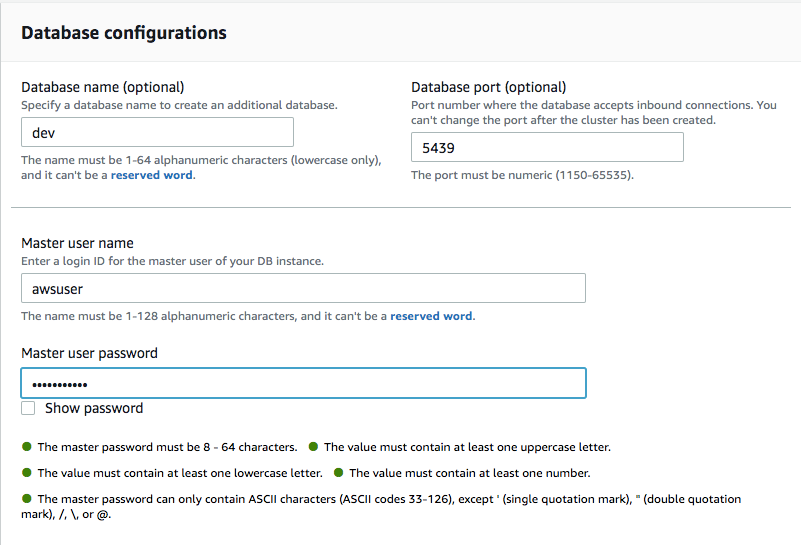
Step 2 : Configure user name and password
步骤2:设定使用者名称和密码
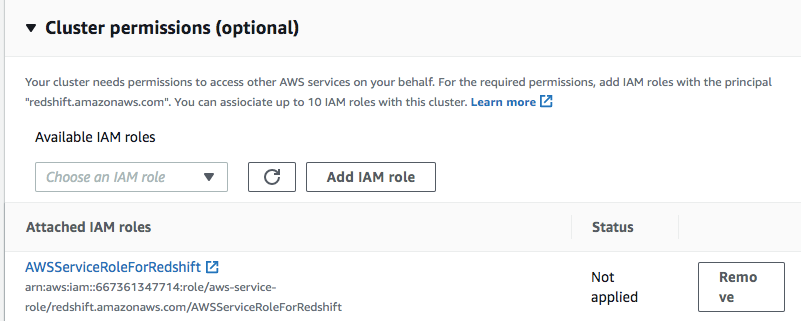
3. Choose an IAM Role for Redshift(This can be the default IAM role)
3.为Redshift选择一个IAM角色(这可以是默认的IAM角色)
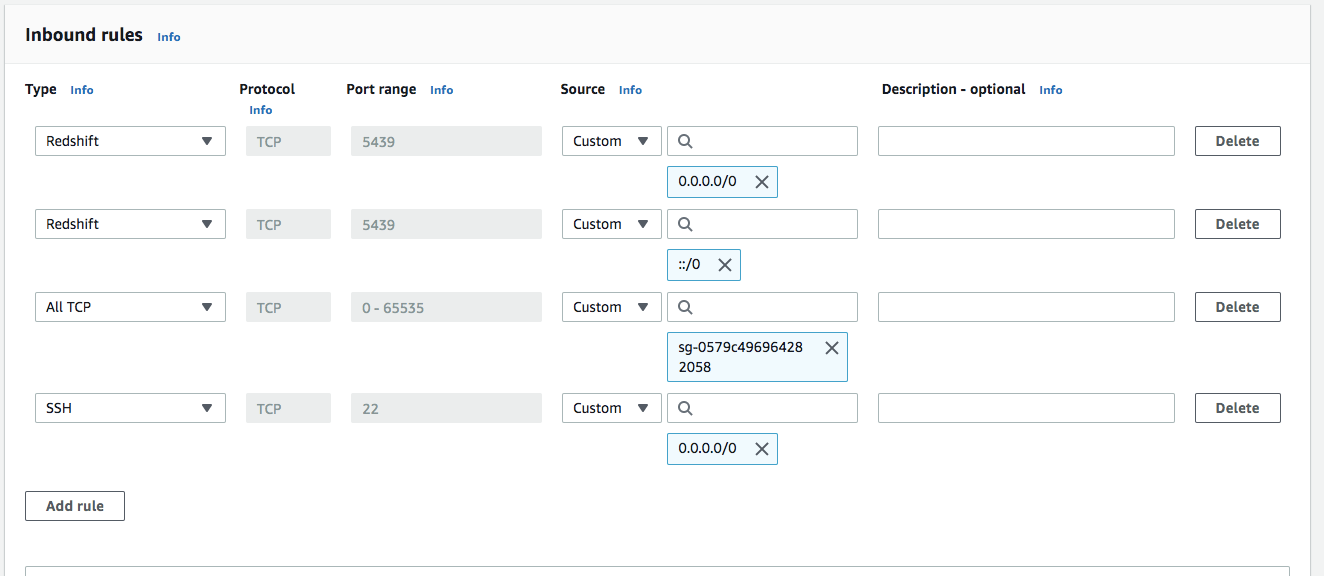
4.Choose a Security Group and make the cluster Publicly accessible
4,选择一个安全组并使集群可公开访问
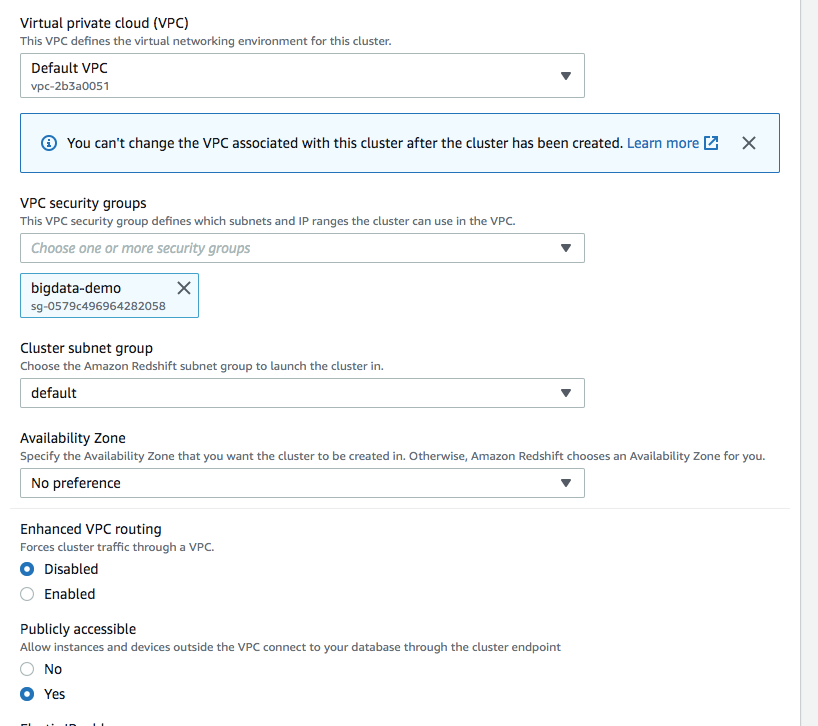
The security group step is really important as without it you cannot connect to redshift using datagrip.
安全组步骤非常重要,因为没有它,您将无法使用datagrip连接到redshift。
In the security group, make sure we have inbound rules configured for Redshift.
在安全组中,确保已为Redshift配置了入站规则。
You can make this either my ip or choose anywhere option.
您可以将其设为我的IP或选择任何位置。
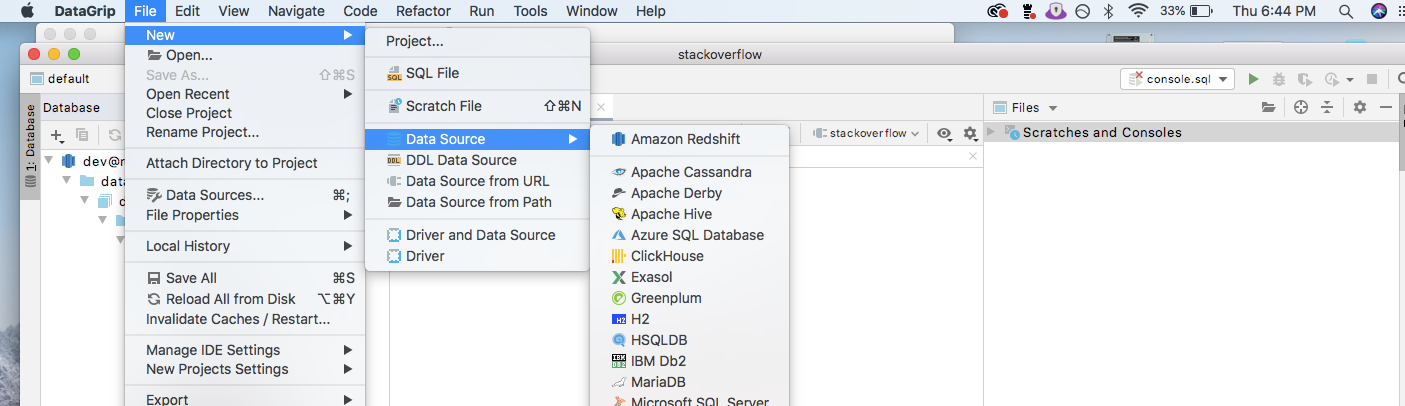
5. Configure DataGrip to connect to Redshift
5.配置DataGrip以连接到Redshift
DataGrip is designed to query, create and manage databases. If you have a JDBC connection, you can easily connect to any database.
DataGrip旨在查询,创建和管理数据库 。 如果您具有JDBC连接,则可以轻松连接到任何数据库。
You can install DataGrip from this site https://www.jetbrains.com/help/datagrip/installation-guide.html
您可以从此站点安装DataGrip https://www.jetbrains.com/help/datagrip/installation-guide.html
From the properties panel of the Redshift cluster copy the JDBC URL
从Redshift集群的属性面板复制JDBC URL
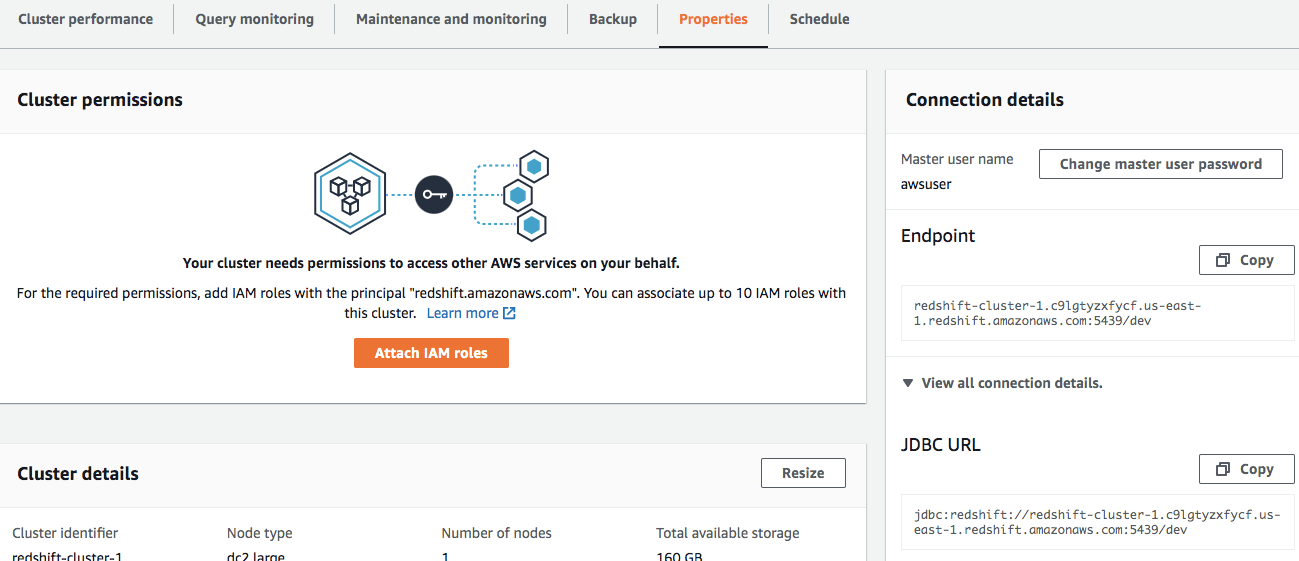
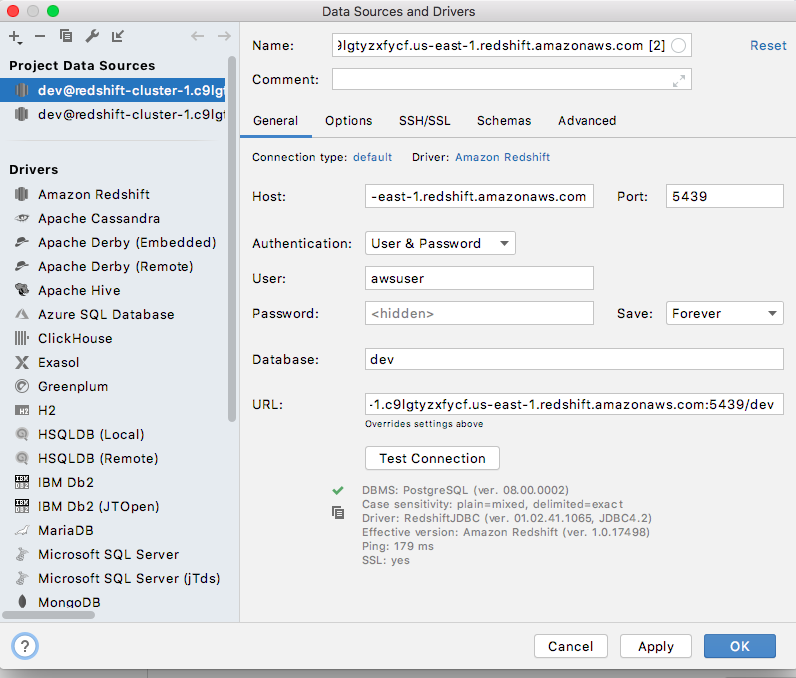
Provide the URL, username and password & test the connection in DataGrip
提供URL,用户名和密码并在DataGrip中测试连接
Step 8 : Create a Table in Redshift with the below query.
步骤8:使用以下查询在Redshift中创建一个表。
The schema should match that of the source data(In this case our stack overflow data)
模式应与源数据的模式匹配(在这种情况下,我们的堆栈溢出数据)
create table stackoverflow (
question_id varchar(13),
is_answered varchar(10),
view_count int,
answer_count int,
score int,
creation_date date
)
Our basic Redshift cluster creation and configuration is done!!
我们基本的Redshift集群创建和配置已经完成!!
下一步 (Next Steps)
- We ned to write our pre-processed dataframe into the redshift cluster using pyspark. This step will be the last step in the script we created in the previous post. 我们需要使用pyspark将预处理后的数据帧写入redshift集群。 这一步是我们在上一篇文章中创建的脚本的最后一步。
- Below is the snippet of the code for writing our spark dataframe into our redshift cluster. 以下是用于将我们的spark数据帧写入我们的redshift集群的代码片段。
df_duplicates.write.format("com.databricks.spark.redshift")\
.option("url", "jdbc:redshift://redshift-cluster-1.c9lgtyzxfycf.us-east-1.redshift.amazonaws.com:5439/dev?user=awsuser&password=")\
.option("dbtable", "stackoverflow")\
.option("forward_spark_s3_credentials","true")\
.option("tempdir", "s3n://stack-overflow-bucket")\
.mode("append")\
.save()
We use spark-redshift for this purpose which is a library used to load data into Spark SQL DataFrames from Amazon Redshift, and write them back to Redshift tables. Amazon S3 is used to efficiently transfer data in and out of Redshift, and JDBC is used to automatically trigger the appropriate
COPYandUNLOADcommands on Redshift.为此,我们使用spark-redshift,它是一个用于从Amazon Redshift将数据加载到Spark SQL DataFrames并将其写回到Redshift表的库。 Amazon S3用于有效地将数据移入和移出Redshift,而JDBC用于自动触发Redshift上的适当
COPY和UNLOAD命令。
However, this is easily said than done and I think this was the most challenging part of this project.
但是,这说起来容易做起来难,我认为这是该项目最具挑战性的部分。
Key dependencies for PySpark to be able to call spark-redshift library are as follows :
PySpark能够调用spark- redshift 库的关键依赖项如下:
In order to connect to Redshift using the Amazon Redshift JDBC Driver, the JDBC application or Java code that you are using to connect to your data must be able to access the driver JAR files. The driver Jar files can be downloaded from here and this needs to be available in the EMR cluster before the pyspark script runs http://docs.aws.amazon.com/redshift/latest/mgmt/configure-jdbc-connection.html#download-jdbc-driver
为了使用Amazon Redshift JDBC驱动程序连接到Redshift,您用来连接到数据的JDBC应用程序或Java代码必须能够访问驱动程序JAR文件。 可以从此处下载驱动程序Jar文件,并且在pyspark脚本运行http://docs.aws.amazon.com/redshift/latest/mgmt/configure-jdbc-connection.html#之前,该文件必须在EMR群集中可用。 下载-jdbc驱动程序
The PySpark script should be able to find the necessary packages in the moment to execute it. The org.apache.spark:spark-avro_2.11:2.4.3 and com.databricks:spark-redshift_2.11:2.0.1 are the 2 necessary packages that are required to be added as part of the spark-submit step.
PySpark脚本应该能够立即找到执行它所需的包。 org.apache.spark:spark-avro_2.11:2.4.3和com.databricks:spark-redshift_2.11:2.0.1是在spark-submit步骤中需要添加的两个必需软件包。
Since Redshift uses s3 as temporary storage, you need to set up proper access keys in the script. In order to achieve this, we need to add our aws access key and secret access key in our PySpark script.
由于Redshift使用s3作为临时存储 ,因此您需要在脚本中设置p 密码访问密钥 。 为了实现这一目标,我们需要在PySpark脚本中添加aws访问密钥和秘密访问密钥。
sc._jsc.hadoopConfiguration().set("fs.s3n.awsAccessKeyId", "")
sc._jsc.hadoopConfiguration().set("fs.s3n.awsSecretAccessKey", "")
After adding all these dependencies, our final script looks like below :
添加所有这些依赖项后,我们的最终脚本如下所示:
#Import All Functions
from pyspark.sql import SQLContext
from pyspark.sql import functions as F
from pyspark.sql import SparkSession
from pyspark.sql.functions import unix_timestamp, to_date, date_format, month, year, dayofyear, dayofweek, col
from pyspark.sql.types import TimestampType
from pyspark.sql import functions as F
from pyspark.sql import SparkSession
from pyspark.sql.functions import unix_timestamp, to_date, date_format, month, year, dayofyear, dayofweek, col
from pyspark.sql.types import TimestampType
from pyspark.sql.types import DateType
from datetime import datetime
from datetime import timedelta


def get_latest_file_name():
    """
    This function connects to s3 and get the latest file from the s3 bucket
    """
    Previous_Date = datetime.today() -timedelta(days=1)
    year=Previous_Date.strftime ('%Y')
    month=Previous_Date.strftime ('%m')
    day=Previous_Date.strftime ('%d')
    file_folder="s3://stack-overflow-bucket/StackOverFlow/year="+'{}'.format(year)+"/month="+'{:0>2}'.format(month)+"/day="+'{:0>2}'.format(day)+"*"
    return file_folder


#Create Spark Session
spark = SparkSession.builder.appName('Stack Overflow ML').getOrCreate()
print('Session created')
sc = spark.sparkContext


#Set the configuration for Redshift to access S3
sc._jsc.hadoopConfiguration().set("fs.s3n.awsAccessKeyId", "")
sc._jsc.hadoopConfiguration().set("fs.s3n.awsSecretAccessKey", "")


#Get the latest file from s3
filename=get_latest_file_name()
stack = sc.textFile(filename)
stack.take(5)
#Convert it into a dataframe
df = spark.read.json(stack)
df.show(5)


#Drop any duplicates if any
df_duplicates=df.dropDuplicates(['questionid'])
#Convert the UnixTimesStamp into time stamp
df_duplicates=df_duplicates.withColumn("creation_date", F.from_unixtime("creation_date", "yyyy-mm-dd"))


#Write the dataframe to Redshift
df_duplicates.write.format("com.databricks.spark.redshift")\
.option("url", "jdbc:redshift://redshift-cluster-1.c9lgtyzxfycf.us-east-1.redshift.amazonaws.com:5439/dev?user=awsuser&password=")\
.option("dbtable", "stackoverflow")\
.option("forward_spark_s3_credentials","true")\
.option("tempdir", "s3n://stack-overflow-bucket")\
.mode("append")\
.save()
We also have a bash script which calls this PySpark Script with all the necessary packages and Jars.
我们还有一个bash脚本,它使用所有必需的包和Jar调用此PySpark脚本。
spark-submit --jars RedshiftJDBC42-no-awssdk-1.2.20.1043.jar
--packages org.apache.spark:spark-avro_2.11:2.4.3,com.databricks:spark-redshift_2.11:2.0.1  stack-processing.py
接下来是什么? (What Next?)
- Now that we have our scripts ready, we need to test this in a emr cluster before we automate this in boto3. 现在我们已经准备好脚本,我们需要在emto集群中对其进行测试,然后才能在boto3中对其进行自动化。
Let’s see how to do that!!
让我们看看如何做到这一点!
Key Steps for testing in EMR Cluster
EMR群集中测试的关键步骤
Step 1 : Create a dummy EMR cluster with spark added.
步骤1:创建一个添加了spark的虚拟EMR集群。
Step 2 : Copy the Jar file and our two scripts into the hadoop folder of EMR cluster
步骤2:将Jar文件和我们的两个脚本复制到EMR集群的hadoop文件夹中
You can run the below commands in terminal to copy the files from local machine to EMR cluster
您可以在终端中运行以下命令以将文件从本地计算机复制到EMR群集
scp -i bigdata.pem RedshiftJDBC42-no-awssdk-1.2.20.1043.jar hadoop@ec2–3–88–110–90.compute-1.amazonaws.com:/home/hadoop/


scp -i bigdata.pem Execute.sh hadoop@ec2–3–88–110–90.compute-1.amazonaws.com:/home/hadoop/


scp -i bigdata.pem stack-processing.py hadoop@ec2–3–88–110–90.compute-1.amazonaws.com:/home/hadoop/
If your copy is successful, your terminal will show the below message.
如果复制成功,则终端将显示以下消息。

Step 3 : ssh into the emr cluster and check if the file exists
步骤3:SSH进入EMR集群并检查文件是否存在
ssh -i bigdata.pem hadoop@ec2–3–88–110–90.compute-1.amazonaws.com
ssh -i bigdata.pem hadoop@ec2–3–88–110–90.compute-1.amazonaws.com
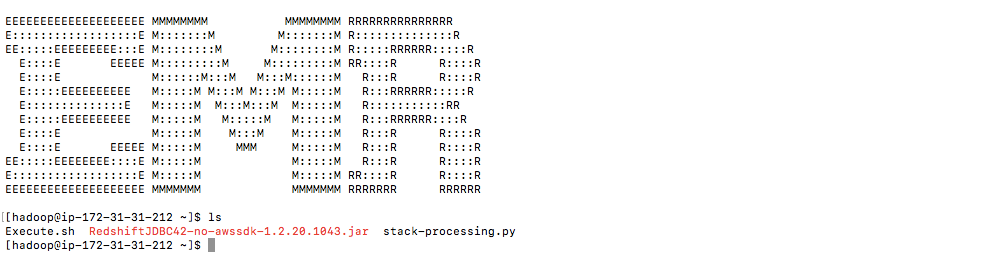
You can use the ls command to list all the files in the home/hadoop directory
您可以使用ls命令列出home / hadoop目录中的所有文件
Step 4 : Execute the bash script to run our PySpark script
步骤4:执行bash脚本以运行我们的PySpark脚本
sudo sh Execute.sh
须藤sh Execute.sh

If your script is successful, then you will get the above message in your terminal.
如果您的脚本成功,那么您将在终端中收到以上消息。
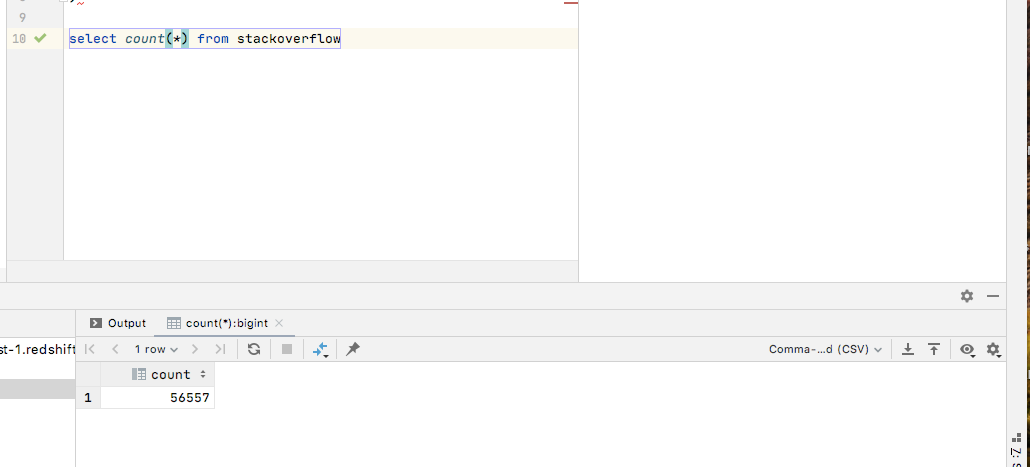
Step 5 : After this is done, you can check the records in your stackoverflow table in DataGrip
步骤5:完成此操作后,您可以在DataGrip中检查stackoverflow表中的记录
If you get any errors while loading data in Redshift, it won’t be very evident from the terminal.
如果在Redshift中加载数据时遇到任何错误,从终端上将不会很明显。
You will need to run the below query to understand the error.
您将需要运行以下查询以了解该错误。
SELECT le.starttime,d.query,d.line_number, d.colname,d.value,le.raw_line,le.err_reasonFROM stl_loaderror_detail dJOIN stl_load_errors leON d.query = le.queryORDER BY le.starttime DESC
选择le.starttime,d.query,d.line_number,d.colname,d.value,le.raw_line,le.err_reasonFROM stl_loaderror_detail dJOIN stl_load_errors leON d.query = le.query按LE.starttime DESC排序
使用boto3自动执行上述步骤 (Automating Above Steps using boto3)
Now that we know our script works, we need to automate this. I want the EMR cluster to be a transient cluster as it just runs maybe for an hour everyday.
现在我们知道脚本可以工作了,我们需要使它自动化。 我希望EMR群集是一个临时群集,因为它每天可能只运行一个小时。
So I created two scripts :- One to create EMR cluster and copy all the scripts from my S3 location, second to execute my bash script to run the PySpark Script.
因此,我创建了两个脚本:-一个用于创建EMR集群并从S3位置复制所有脚本,第二个用于执行bash脚本以运行PySpark脚本。
import boto3
import setup


def create_emr():
    client = boto3.client('emr', region_name='us-east-1')


    cluster_id = client.run_job_flow(Name='stackoverflow', ReleaseLabel='emr-5.18.0',
                                         Applications=[
                                             {
                                                 'Name': 'Spark'
                                             },
                                             {
                                                 'Name':'hue'
                                             },
                                             {
                                                 'Name': 'hive'
                                             },
                                             {
                                                 'Name': 'presto'
                                             }
                                         ],
                                         Instances={
                                             'InstanceGroups': [
                                                 {
                                                     'Name': "Master",
                                                     'Market': 'SPOT',
                                                     'InstanceRole': 'MASTER',
                                                     'InstanceType': 'm1.xlarge',
                                                     'InstanceCount': 1,
                                                 },
                                                 {
                                                     'Name': "Slave",
                                                     'Market': 'SPOT',
                                                     'InstanceRole': 'CORE',
                                                     'InstanceType': 'm1.xlarge',
                                                     'InstanceCount': 1,
                                                 }
                                             ],


                                             'Ec2KeyName': setup.key_name,
                                             'KeepJobFlowAliveWhenNoSteps': True,
                                             'TerminationProtected': False,


                                         },
                                        VisibleToAllUsers = True,
                                        JobFlowRole = 'EMR_EC2_DefaultRole',
                                        ServiceRole = 'EMR_DefaultRole',
                                     Steps=[


                                         {
                                             'Name': 'Copy Processing Script',
                                             'ActionOnFailure': 'TERMINATE_CLUSTER',
                                             'HadoopJarStep': {
                                                 'Jar': 'command-runner.jar',
                                                 'Args': ['aws', 's3', 'cp', 's3://stack-overflow-bucket/scripts/stack-processing.py', '/home/hadoop/']
                                             }
                                         },
                                         {
                                             'Name': 'Copy Executing Script',
                                             'ActionOnFailure': 'TERMINATE_CLUSTER',
                                             'HadoopJarStep': {
                                                 'Jar': 'command-runner.jar',
                                                 'Args': ['aws', 's3', 'cp', 's3://stack-overflow-bucket/scripts/Execute.sh','/home/hadoop/']
                                             }
                                         },
                                         {
                                             'Name': 'Copy Jar',
                                             'ActionOnFailure': 'TERMINATE_CLUSTER',
                                             'HadoopJarStep': {
                                                 'Jar': 'command-runner.jar',
                                                 'Args': ['aws', 's3', 'cp',
                                                          's3://stack-overflow-bucket/scripts/RedshiftJDBC42-no-awssdk-1.2.20.1043.jar', '/home/hadoop/']
                                             }
                                         }


                                     ]
                                     )
    response = client.list_clusters(


        ClusterStates=['RUNNING'
        ],


    )
    print(response)


create_emr()
We would need to schedule these scripts in an ec2 instance using cron jobs.
我们将需要使用cron作业在ec2实例中安排这些脚本。
- I intend to schedule the first script which launches the cluster at 12 :00 am everyday- This will ensure it picks up all the streams created yesterday. 我打算安排第一个脚本,该脚本每天早上12:00启动群集-这将确保它拾取昨天创建的所有流。
- Second script to run the PySpark script should run at one hour after this. 第二个运行PySpark脚本的脚本应在此后一小时运行。
The reason I had to do this way is because, aws runs the steps in random order to optimize the resources, so i was not able to sequentially run them.
我必须这样做的原因是,aws以随机顺序运行步骤以优化资源,因此我无法顺序运行它们。
Now, let’s finally get to the data visualization part using Einstein Analytics.
现在,让我们最后使用Einstein Analytics进入数据可视化部分。
This is covered in detail in this post.
在这篇文章中将对此进行详细介绍。
redshift 数据仓库


 被折叠的 条评论
为什么被折叠?
被折叠的 条评论
为什么被折叠?
 到【灌水乐园】发言


