


Together with my wife, we run a small digital agency. We use Django as a primary web development framework and love simplicity.
我们和妻子一起经营一家小型数字代理商 。 我们使用Django作为主要的Web开发框架,并且喜欢简单性。
In this post, I will guide you on how to enable WebSockets in your Django application without installing third-party apps.
在本文中,我将指导您如何在不安装第三方应用程序的情况下在Django应用程序中启用WebSockets。
Django has introduced the ASGI interface since version 3.0 and async views in 3.1. Our solution will be based on async views. In this tutorial, we will use Python 3.7 and Django 3.1.
Django从3.0版开始引入了ASGI接口,在3.1版中引入了异步视图。 我们的解决方案将基于异步视图。 在本教程中,我们将使用Python 3.7和Django 3.1。
WebSockets ASGI界面简介 (Introduction into WebSockets ASGI interface)
ASGI is a replacement protocol to good-old WSGI protocol that served us for years and it will become a de-facto standard in Python web frameworks in the next 2–3 years.
ASGI是对旧的WSGI协议的替代协议,该协议为我们服务了很多年,它将在接下来的2-3年内成为Python Web框架中的实际标准。
So, how does WebSocket work in this context? Let us find it!
那么,WebSocket在这种情况下如何工作? 让我们找到它!
The communication between WebSocket clients and your application is event-based. The ASGI specification defines two types of events: send and receive.
WebSocket客户端与您的应用程序之间的通信是基于事件的。 ASGI规范定义了两种类型的事件:发送和接收。
Receive events. These are events that clients send to your application. Let's look at them:
接收事件。 这些是客户端发送到您的应用程序的事件。 让我们看看它们:
websocket.connectis sent when the client tries to establish a connection with our application当客户端尝试与我们的应用程序建立连接时,发送
websocket.connectwebsocket.receiveis sent when the client sends data to our app当客户端向我们的应用程序发送数据时发送
websocket.receivewebsocket.disconnecttells us that the client has disconnected.websocket.disconnect告诉我们客户端已断开连接。
Send events are emitted by our application to a client (e.g. a browser). Here is a list of them:
发送事件由我们的应用程序发出给客户端(例如浏览器)。 以下是它们的列表:
websocket.accept— we send this event back to the client if we want to allow the connectionwebsocket.accept—如果我们要允许连接,我们会将事件发送回客户端websocket.send— with this event, we push data to the clientwebsocket.send通过此事件,我们将数据推送到客户端websocket.closeis emitted by the application when we want to abort the connection.当我们想要中止连接时,应用程序会发出
websocket.close。
Now, as we know all participants of that party, it is the time to speak about their order.
现在,我们知道该党的所有参与者,是时候谈论他们的命令了。
When a browser opens a connection, the ASGI protocol server (we will talk about this later) sends us websocket.connect event. Our application must respond to it with either websocket.accept or websocket.close according to our logic. It is simple: emit websocket.accept if you allow the connection or emit websocket.close to cancel the connection. You may want to cancel the connection, for example, if the user has no permissions to connect or is not logged in. I will assume that you allow the connection in the next steps.
当浏览器打开连接时,ASGI协议服务器(我们将在后面讨论)将向我们发送websocket.connect事件。 我们的应用程序必须根据我们的逻辑使用websocket.accept或websocket.close对其进行响应。 很简单:发出websocket.accept如果允许连接)或发出websocket.close取消连接。 例如,如果用户没有连接权限或未登录,则可能要取消连接。我将假设您在接下来的步骤中允许连接。
After you accepted the connection, the application is ready to send and receive data via that socket using websocket.send and websocket.receive events.
接受连接后,应用程序即可使用websocket.send和websocket.receive事件通过该套接字发送和接收数据。
Finally, when the browser leaves your page or refreshes it, a websocket.disconnect is sent to the application. As a developer, you still have control over the connection and can abort the connection by sending websocket.close event at any time you wish.
最后,当浏览器离开或刷新页面时,会将websocket.disconnect发送到应用程序。 作为开发人员,您仍然可以控制连接,并且可以随时通过发送websocket.close事件来中止连接。
This was a brief description of how ASGI processes WebSockets. It is not scoped to Django, it works for any other ASGI compatible web framework like Starlette or FastAPI.
这是ASGI如何处理WebSocket的简要说明。 它不限于Django,它适用于任何其他与ASGI兼容的Web框架,例如Starlette或FastAPI 。
设置Django应用 (Setting up Django apps)
In this tutorial, I am not going to cover Django installation and setup topics. Also, I assume that you have Django installed and operating.
在本教程中,我将不涉及Django安装和设置主题。 另外,我假设您已经安装并正在运行Django。
First, we have to create a new Django application. This app will keep the custom URL pattern function, ASGI middleware, and WebSocket connection class.
首先,我们必须创建一个新的Django应用程序。 该应用程序将保留自定义URL模式功能,ASGI中间件和WebSocket连接类。
Let's make a new app using this command:
让我们使用以下命令创建一个新应用:
django-admin startapp websocketOkay, now let's make a new little helper function for developer convenience. This function will be a simple alias for path function at the moment.
好的,现在让我们创建一个新的小助手功能,以方便开发人员。 目前,此功能将是path功能的简单别名。
Add urls.py to the websocket app with this content:
使用以下内容将urls.py添加到websocket应用程序:
from django.urls import pathwebsocket = pathNow you can configure WebSocket URLs in a distinct way. Time to create your first WebSocket view! To keep things simple and reusable we will make another Django app named, say, `users`. Don’t forget to enable both applications in the INSTALLED_APPS setting!
现在,您可以以不同的方式配置WebSocket URL。 是时候创建您的第一个WebSocket视图了! 为了使事情简单易用,我们将制作另一个名为`users'的Django应用。 不要忘记在INSTALLED_APPS设置中启用两个应用程序!
django-admin startapp users实施ASGI中间件 (Implementing ASGI middleware)
The middleware will be our glue code between WebSockets and asynchronous views provided by Django. The middleware will intercept WebSocket requests and will dispatch them separately from the Django default request handler. When you created a new Django project, the installed has added a new file named asgi.py to the project installation directory. You will find the ASGI application in it. This is the application we are going to use instead of one defined inwsgi.py.
中间件将是我们在WebSocket和Django提供的异步视图之间的粘合代码。 中间件将拦截WebSocket请求,并将其与Django默认请求处理程序分开分发。 创建新的Django项目时,已安装的项目已将名为asgi.py的新文件添加到项目安装目录。 您将在其中找到ASGI应用程序。 这是我们将要使用的应用程序,而不是wsgi.py定义的应用程序。
Create a new websocket/middleware.py file and put the code in it:
创建一个新的websocket/middleware.py文件,并将代码放入其中:
from django.urls import resolve
from .connection import WebSocket


def websockets(app):
    async def asgi(scope, receive, send):
        if scope["type"] == "websocket":
            match = resolve(scope["raw_path"])
            await match.func(WebSocket(scope, receive, send), *match.args, **match.kwargs)
            return
    await app(scope, receive, send)
return asgi
Every ASGI middleware is a callable that accepts another callable. In the middleware, we test if the request type is websocket , and if so, we call Django’s URL resolver for a dispatchable view function. By the way, a 404 error will be raised if the resolver fails to find a view matching the URL.
每个ASGI中间件都是一个可调用对象,它接受另一个可调用对象。 在中间件中,我们测试请求类型是否为websocket ,如果是,则为可调度视图函数调用Django的URL解析器。 顺便说一句,如果解析器找不到与URL匹配的视图,将引发404错误。
Now, open project_name/asgi.py file and wrap default application with this middleware:
现在,打开project_name/asgi.py文件,并使用以下中间件包装默认应用程序:
from django.core.asgi import get_asgi_applicationfrom websocket.middleware import websocketsapplication = get_asgi_application()
application = websockets(application)
Since that moment, every request made will be caught by our middleware and tested for its type. If the type is websocket then the middleware will try to resolve and call a view function.
从那一刻起,我们的中间件将捕获每个发出的请求,并对其类型进行测试。 如果类型是websocket则中间件将尝试解析并调用视图函数。
Don’t mind at the moment about missing import from the .connection module. We are about to make it in a minute.
此刻不要介意从.connection模块中丢失导入。 我们将在一分钟内完成。
添加WebSocket连接 (Add WebSocket connection)
The role of the WebSocket connection is similar to the request object you use in your views. The connection will encapsulate request information along with methods that assist you in receiving and sending the data. This connection will be passed as the first argument of our WebSocket view functions.
WebSocket连接的角色类似于您在视图中使用的请求对象。 该连接将封装请求信息以及有助于您接收和发送数据的方法。 该连接将作为WebSocket视图函数的第一个参数传递。
Create websocket/connection.py with the contents from the gist below. To make life easier we will also enumerate all possible WebSocket events in classes, add Headers class to access request headers, and QueryParams to get variables from a query string.
使用下面要点中的内容创建websocket/connection.py 。 为了简化生活,我们还将枚举类中所有可能的WebSocket事件,添加Headers类以访问请求标头,并添加QueryParams从查询字符串中获取变量。
import json
import typing as t
from urllib import parse


class State:
    CONNECTING = 1
    CONNECTED = 2
    DISCONNECTED = 3


class SendEvent:
    """Lists events that application can send.

    ACCEPT - Sent by the application when it wishes to accept an incoming connection.
    SEND - Sent by the application to send a data message to the client.
    CLOSE - Sent by the application to tell the server to close the connection.
        If this is sent before the socket is accepted, the server must close
        the connection with a HTTP 403 error code (Forbidden), and not complete
        the WebSocket handshake; this may present on some browsers as
        a different WebSocket error code (such as 1006, Abnormal Closure).
    """


    ACCEPT = "websocket.accept"
    SEND = "websocket.send"
    CLOSE = "websocket.close"


class ReceiveEvent:
    """Enumerates events that application can receive from protocol server.

    CONNECT - Sent to the application when the client initially
        opens  a connection and is about to finish the WebSocket handshake.
        This message must be responded to with either an Accept message or a Close message
        before the socket will pass websocket.receive messages.
    RECEIVE - Sent to the application when a data message is received from the client.
    DISCONNECT - Sent to the application when either connection to the client is lost,
        either from the client closing the connection,
        the server closing the connection, or loss of the socket.
    """


    CONNECT = "websocket.connect"
    RECEIVE = "websocket.receive"
    DISCONNECT = "websocket.disconnect"


class Headers:
    def __init__(self, scope):
        self._scope = scope


    def keys(self):
        return [header[0].decode() for header in self._scope["headers"]]


    def as_dict(self) -> dict:
        return {h[0].decode(): h[1].decode() for h in self._scope["headers"]}


    def __getitem__(self, item: str) -> str:
        return self.as_dict()[item.lower()]


    def __repr__(self) -> str:
        return str(dict(self))


class QueryParams:
    def __init__(self, query_string: str):
        self._dict = dict(parse.parse_qsl(query_string))


    def keys(self):
        return self._dict.keys()


    def get(self, item, default=None):
        return self._dict.get(item, default)


    def __getitem__(self, item: str):
        return self._dict[item]


    def __repr__(self) -> str:
        return str(dict(self))


class WebSocket:
    def __init__(self, scope, receive, send):
        self._scope = scope
        self._receive = receive
        self._send = send
        self._client_state = State.CONNECTING
        self._app_state = State.CONNECTING


    @property
    def headers(self):
        return Headers(self._scope)


    @property
    def scheme(self):
        return self._scope["scheme"]


    @property
    def path(self):
        return self._scope["path"]


    @property
    def query_params(self):
        return QueryParams(self._scope["query_string"].decode())


    @property
    def query_string(self) -> str:
        return self._scope["query_string"]


    @property
    def scope(self):
        return self._scope


    async def accept(self, subprotocol: str = None):
        """Accept connection.

        :param subprotocol: The subprotocol the server wishes to accept.
        :type subprotocol: str, optional
        """
        if self._client_state == State.CONNECTING:
            await self.receive()
        await self.send({"type": SendEvent.ACCEPT, "subprotocol": subprotocol})


    async def close(self, code: int = 1000):
        await self.send({"type": SendEvent.CLOSE, "code": code})


    async def send(self, message: t.Mapping):
        if self._app_state == State.DISCONNECTED:
            raise RuntimeError("WebSocket is disconnected.")


        if self._app_state == State.CONNECTING:
            assert message["type"] in {SendEvent.ACCEPT, SendEvent.CLOSE}, (
                'Could not write event "%s" into socket in connecting state.'
                % message["type"]
            )
            if message["type"] == SendEvent.CLOSE:
                self._app_state = State.DISCONNECTED
            else:
                self._app_state = State.CONNECTED


        elif self._app_state == State.CONNECTED:
            assert message["type"] in {SendEvent.SEND, SendEvent.CLOSE}, (
                'Connected socket can send "%s" and "%s" events, not "%s"'
                % (SendEvent.SEND, SendEvent.CLOSE, message["type"])
            )
            if message["type"] == SendEvent.CLOSE:
                self._app_state = State.DISCONNECTED


        await self._send(message)


    async def receive(self):
        if self._client_state == State.DISCONNECTED:
            raise RuntimeError("WebSocket is disconnected.")


        message = await self._receive()


        if self._client_state == State.CONNECTING:
            assert message["type"] == ReceiveEvent.CONNECT, (
                'WebSocket is in connecting state but received "%s" event'
                % message["type"]
            )
            self._client_state = State.CONNECTED


        elif self._client_state == State.CONNECTED:
            assert message["type"] in {ReceiveEvent.RECEIVE, ReceiveEvent.DISCONNECT}, (
                'WebSocket is connected but received invalid event "%s".'
                % message["type"]
            )
            if message["type"] == ReceiveEvent.DISCONNECT:
                self._client_state = State.DISCONNECTED


        return message


    async def receive_json(self) -> t.Any:
        message = await self.receive()
        self._test_if_can_receive(message)
        return json.loads(message["text"])


    async def receive_jsonb(self) -> t.Any:
        message = await self.receive()
        self._test_if_can_receive(message)
        return json.loads(message["bytes"].decode())


    async def receive_text(self) -> str:
        message = await self.receive()
        self._test_if_can_receive(message)
        return message["text"]


    async def receive_bytes(self) -> bytes:
        message = await self.receive()
        self._test_if_can_receive(message)
        return message["bytes"]


    async def send_json(self, data: t.Any, **dump_kwargs):
        data = json.dumps(data, **dump_kwargs)
        await self.send({"type": SendEvent.SEND, "text": data})


    async def send_jsonb(self, data: t.Any, **dump_kwargs):
        data = json.dumps(data, **dump_kwargs)
        await self.send({"type": SendEvent.SEND, "bytes": data.encode()})


    async def send_text(self, text: str):
        await self.send({"type": SendEvent.SEND, "text": text})


    async def send_bytes(self, text: t.Union[str, bytes]):
        if isinstance(text, str):
            text = text.encode()
        await self.send({"type": SendEvent.SEND, "bytes": text})


    def _test_if_can_receive(self, message: t.Mapping):
        assert message["type"] == ReceiveEvent.RECEIVE, (
            'Invalid message type "%s". Was connection accepted?' % message["type"]
        )
添加您的第一个WebSocket视图 (Add your first WebSocket view)
Our project is set up to handle WebSocket connections. The only thing left is a WebSocket view function. We would also need a template view to serve an HTML page.
我们的项目设置为处理WebSocket连接。 剩下的唯一是WebSocket视图功能。 我们还需要一个模板视图来提供HTML页面。
# users/views.pyfrom django.views.generic.base import TemplateViewclass IndexView(TemplateView):
template_name = "index.html"
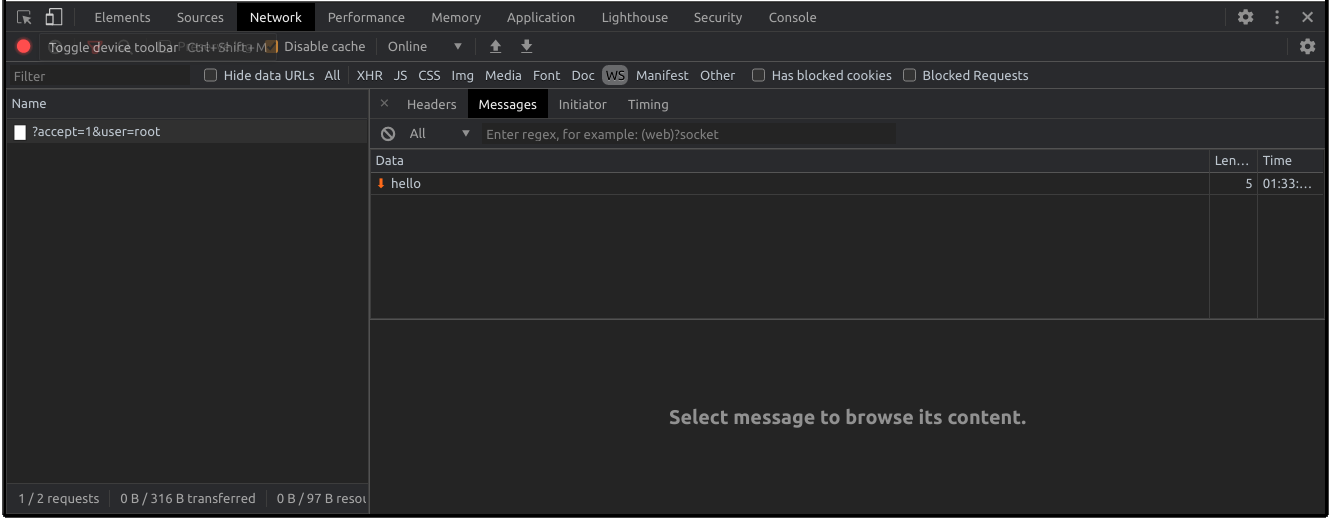
async def websocket_view(socket):
await socket.accept()
await socket.send_text('hello')
await socket.close()Mount both views in the root urls.py
将两个视图安装在根urls.py
# project_name/urls.pyfrom django.urls import pathfrom websocket.urls import websocketfrom users import viewsurlpatterns = [
    path("", views.IndexView.as_view()),
    websocket("ws/", views.websocket_view),
]
users/templates/index.html should contain this script:
users/templates/index.html应该包含以下脚本:
<script>
    new WebSocket('ws://localhost:8000/ws/');
</script>
This is a bare minimum to establish a WebSocket connection.
这是建立WebSocket连接的最低要求。
启动开发服务器 (Start the development server)
The Django’s runserver command does not use application defined in asgi.py at the time of writing this post. We need to use a 3rd-party application server. I will use Uvicorn.
在撰写本文时,Django的runserver命令未使用asgi.py中定义的应用程序。 我们需要使用第三方应用服务器。 我将使用Uvicorn 。
pip install uvicornOnce installed start the server passing ASGI application as the first positional argument:
安装完成后,启动传递ASGI应用程序的服务器作为第一个位置参数:
uvicorn project_name.asgi:application --reload --debugNavigate to http://localhost:8000/test/, open browser’s console, switch to Network tab and observe the WebSockets working.
导航到http:// localhost:8000 / test / ,打开浏览器的控制台,切换到“网络”选项卡,观察WebSockets的工作情况。
回声服务器 (Echo server)
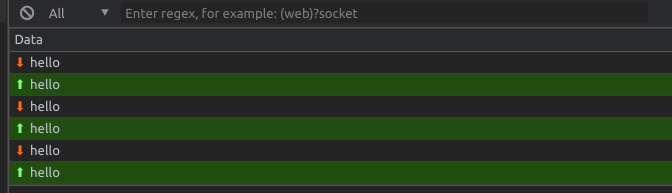
The WebSocket view we created is useless. It sends one message and then closes the connection. We will refactor it in a simple echo server that replies to a client using the incoming message text.
我们创建的WebSocket视图是没有用的。 它发送一条消息,然后关闭连接。 我们将在一个简单的回显服务器中重构它,该服务器使用传入的消息文本来回复客户端。
Replace websocket_view in users/views.py with this code:
用以下代码替换users/views.py websocket_view :
async def websocket_view(socket: WebSocket):
    await socket.accept()    while True:
        message = await socket.receive_text()
        await socket.send_text(message)
and replace contents of users/templates/index.html with this:
并使用以下内容替换users/templates/index.html内容:
<script>
let socket = new WebSocket('ws://localhost:8000/ws/');
let timer = null;socket.onopen = () => {
    timer = setInterval(() => {
        socket.send('hello');
    }, 1000);
};socket.onclose = socket.onerror = () => {
    clearInterval(timer);
};
</script>
The updated code will send hello text to our application every one second and our application will respond to it with the same message.
更新的代码将每隔一秒钟将hello文本发送到我们的应用程序,我们的应用程序将以相同的消息对其进行响应。
结论 (Conclusion)
In this post, I demonstrated how to add WebSocket support to your Django project using only Django 3.1 and the standard python library. Yes, I know that Uvicorn still needs to be installed but this is a limitation of the Django dev server at the moment.
在本文中,我演示了如何仅使用Django 3.1和标准python库将WebSocket支持添加到Django项目中。 是的,我知道仍然需要安装Uvicorn,但这是目前Django开发服务器的限制。
翻译自: https://medium.com/@alex.oleshkevich/websockets-in-django-3-1-73de70c5c1ba


 4138
4138


 被折叠的 条评论
为什么被折叠?
被折叠的 条评论
为什么被折叠?
 到【灌水乐园】发言


