


 本文介绍了一款基于TensorFlow的日本手写字符识别应用程序,包括平假名、片假名和汉字。通过使用ETL和KMNIST数据集,模型在各种字符上实现了高达98%的准确率。
手写识别是图像识别吗
This summer, I worked on a machine learning project to create an App that recognizes Japanese characters, using python’s tensorflow library.
今年夏天,我参与了一个机器学习项目,使用python的tensorflow库创建了一个识别日语字符的应用程序。
Before we get started, here’s the final result!
在开始之前,这是最终结果!

软件需求 (Software Requirements)
We will need to install a couple libraries. Here are the versions I used:
我们将需要安装几个库。 这是我使用的版本:
- Python 3.7 (any python3 version should work) Python 3.7(任何python3版本都可以使用)
- Tensorflow 2.2.0 Tensorflow 2.2.0
- Keras 2.4.3 凯拉斯2.4.3
- Numpy 1.16.4 (this isn’t the newest version but this prevents tensorflow from printing bunch of future warnings) Numpy 1.16.4(这不是最新版本,但是这可以防止tensorflow打印出一系列将来的警告)
- matplotlib — newest version matplotlib-最新版本
- PIL — newest version PIL-最新版本
- skimage — newest version skimage-最新版本
- sklearn — newest version sklearn-最新版本
- corelmltools 3.2 corelmltools 3.2
If you don’t know how to install the libraries, type this in your terminal:
如果您不知道如何安装库,请在终端中输入以下内容:
pip install library_name (e.g. matplotlib)To install a specific library:
要安装特定的库:
pip install library_name==version_name (e.g. tensorflow==2.2.0)Note that if tensorflow doesn’t work after installation, try running the following command in terminal:
请注意,如果tensorflow在安装后不起作用,请尝试在终端中运行以下命令:
/Applications/Python 3.7/Install Certificates.commandChange the 3.7 to the python version you’re using if you are using a different version.
如果使用其他版本,请将3.7更改为使用的python版本。

机器学习概述 (Brief Overview of Machine Learning)
There are two main machine learning problems: Classification problem, and Regression problem. The main difference between the two is that a Classification problem have categorical answers, while a Regression problem has continuous values as its answers. An example of a classification problem would be predicting whether an image is a cat or a dog, while an example of a regression problem would be predicting prices of houses.
机器学习有两个主要问题:分类问题和回归问题。 两者之间的主要区别在于,分类问题具有分类答案,而回归问题具有连续值作为答案。 分类问题的一个例子将是预测图像是猫还是狗,而回归问题的一个例子将预测房屋价格。
Handwriting Recognition is a Classification problem.
手写识别是一个分类问题。
Here’s what you should do to create a machine learning model that can recognize handwriting, or any other Classification Problems in general:
这是创建可识别手写或一般其他任何分类问题的机器学习模型时应采取的措施:
- Get enough data. You need thousands of examples to train your model to learn something it had zero knowledge on. The more, the better. 获取足够的数据。 您需要成千上万的示例来训练模型,以学习其零知识的知识。 越多越好。
- Give labels to each data, so your model knows the answers. (some database may already do the steps 1 and 2 for your convenience) 给每个数据加上标签,以便模型知道答案。 (为方便起见,某些数据库可能已经执行了步骤1和2)
- Split your data into training data and testing data, so your model can learn from some examples, and test its newly learnt knowledge on some others. A good ratio is about 8:2 for training data:testing data. 将您的数据分为训练数据和测试数据,因此您的模型可以从一些示例中学习,并在其他示例上测试其新近学习的知识。 训练数据:测试数据的良好比率约为8:2。
- Build your model. Here’s the fun and time consuming part. Each dataset will have different models that suit them the most. You just have to try different models and tweak minor parts to find the best model. 建立模型。 这是有趣且耗时的部分。 每个数据集将具有最适合它们的不同模型。 您只需要尝试不同的模型并调整次要部分即可找到最佳模型。
- Run your code and train your model! 运行您的代码并训练您的模型!
数据集 (The Dataset)
I used the ETL Character Database, which had over ten thousands of Japanese characters written by different people, and the KMNIST database, which had old Japanese characters. Here are the 5 types of machine learning models I created:
我使用了ETL字符数据库和KMNIST数据库,其中ETL字符数据库包含上万个由不同人编写的日语字符,而KMNIST数据库则包含旧的日语字符。 这是我创建的5种类型的机器学习模型:
Hiragana (ETL 8)
平假名 (ETL 8)
Katakana (ETL 1)
片假名 (ETL 1)
Kanji (ETL 8)
汉字 (ETL 8)
Kuzushiji (KMNIST)
Kuzushiji (KMNIST)
3036 Kanji (ETL 9)
3036汉字 (ETL 9)
To explain briefly, Kanji are Chinese characters that were adopted in Japanese, while Hiragana and Katakana are the syllabic scripts (essentially the Japanese alphabets); Hiragana is the main alphabet, and each Hiragana has a corresponding Katakana, but Katakana are used for foreign words. Kuzushiji is the old Japanese Hiragana, but much more complex.
简而言之,汉字是日语中使用的汉字,而平假名和片假名是音节脚本(本质上是日语字母); 平假名是主要的字母,每个平假名都有对应的片假名,但片假名用于外来词。 Kuzushiji是旧的日本平假名,但更为复杂。

使用数据 (Using The Data)
After downloading the ETL 1 and 8 dataset, I had to extract the data to fit my tensorflow model. Here’s how exactly I manipulated the Katakana dataset:
下载ETL 1和8数据集后,我必须提取数据以适合我的张量流模型。 这是我正确操作片假名数据集的方式:
import struct
from PIL import Image
import numpy as np


def read_record_ETL1G(f):
    s = f.read(2052)
    r = struct.unpack('>H2sH6BI4H4B4x2016s4x', s)
    iF = Image.frombytes('F', (64, 63), r[18], 'bit', 4)
    iL = iF.convert('P')
    return r + (iL,)


def read_kana():
    katakana = np.zeros([51, 1411, 63, 64], dtype=np.uint8) # 51 characters, 1411 writers, img size = 63*64
    for i in range(7,14):
        filename = 'ETL1/ETL1C_{:02d}'.format(i)
        with open(filename, 'rb') as f: # file 13 only has 3 characters, others have 8 characters
            if i!=13: limit = 8
            else: limit=3
            for dataset in range(limit):
                for j in range(1411):
                    try :
                        r = read_record_ETL1G(f)
                        katakana[(i - 7) * 8 + dataset, j] = np.array(r[-1])
                    except struct.error: # two imgs are blank according to the ETL website, so this prevents any errors
                        pass
    np.savez_compressed("kana.npz", katakana)


read_kana()
Here’s a simple explanation:
这是一个简单的解释:
The contents of the
read_recordfunction was provided on the ETL website; it basically reads the file’s data.在ETL网站上提供了
read_record函数的内容; 它基本上读取文件的数据。the
read_kanafunction extracts the data and formats it into numpy arrays; this is useful because tensorflow machine learning and numpy arrays work nicely together. We also group the same characters together so that we can make the labels easily.read_kana函数提取数据并将其格式化为numpy数组; 这很有用,因为tensorflow机器学习和numpy数组可以很好地协同工作。 我们还将相同的字符分组在一起,以便我们轻松制作标签。
After this, I reshaped each image size to 48*48 pixels, created the labels for each characters, and split the images and labels to train images, train labels, test images, and test labels. Here’s my code:
之后,我将每个图像大小调整为48 * 48像素,为每个字符创建标签,并将图像和标签拆分为训练图像,训练标签,测试图像和测试标签。 这是我的代码:
import skimage.transform
import numpy as np
from sklearn.model_selection import train_test_split


kana = np.load("kana.npz")['arr_0'].reshape([-1, 63, 64]).astype(np.float32)


kana = kana/np.max(kana) # make the numbers range from 0 to 1


# 51 is the number of different katakana (3 are duplicates so in the end there are 48 classes), 1411 writers.
train_images = np.zeros([51 * 1411, 48, 48], dtype=np.float32)


for i in range(51 * 1411): # change the image size to 48*48
    train_images[i] = skimage.transform.resize(kana[i], (48, 48))


arr = np.arange(51) # create labels
train_labels = np.repeat(arr, 1411)


# In the actual code, I combined the duplicate classes here and had 48 classes in the end


# split the images/labels to train and test
train_images, test_images, train_labels, test_labels = train_test_split(train_images, train_labels, test_size=0.2)


np.savez_compressed("katakana_train_images.npz", train_images)
np.savez_compressed("katakana_train_labels.npz", train_labels)
np.savez_compressed("katakana_test_images.npz", test_images)
np.savez_compressed("katakana_test_labels.npz", test_labels)
I did the same thing for Hiragana and Kanji with some minor changes (e.g. number of characters and writers, image sizes, the way the read the original file, the duplicate characters are slightly different), so I won’t go into detail here. Check out my github page to see the exact code!
我对平假名和汉字做了同样的事情,只是做了一些细微的更改(例如,字符和编写器的数量,图像大小,读取原始文件的方式,重复字符略有不同),因此在此不再赘述。 查看我的github页面以查看确切的代码!
KMNIST already provided each of training images, training labels, testing images, and testing labels, so no extra steps are necessary here.
KMNIST已经提供了训练图像,训练标签,测试图像和测试标签中的每一个,因此此处无需采取额外的步骤。
可视化 (Visualizing)
A very helpful tool to visualize your data is matplotlib.pyplot; this helps a lot with debugging, because you can see if all the data were extracted/formatted correctly. Here’s an example:
matplotlib.pyplot是一个非常有用的工具,它可以形象化地显示您的数据。 这对调试很有帮助,因为您可以查看是否所有数据都已正确提取/格式化。 这是一个例子:
import matplotlib.pyplot as plt
plt.figure(figsize=(6,6)).patch.set_facecolor('color_name')
for i in range(25):
    plt.subplot(5,5,i+1)
    plt.xticks([])
    plt.yticks([])
    plt.grid(False)
    plt.imshow(train_images[i], cmap=plt.cm.binary)
plt.show()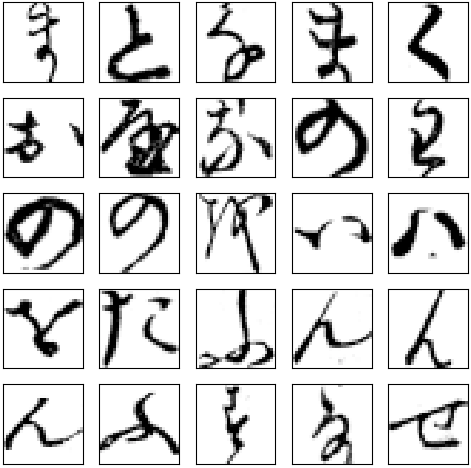
机器学习-训练模型 (Machine Learning - Training the Model)
Finally, the fun part: training the model!
最后,有趣的部分:训练模型!
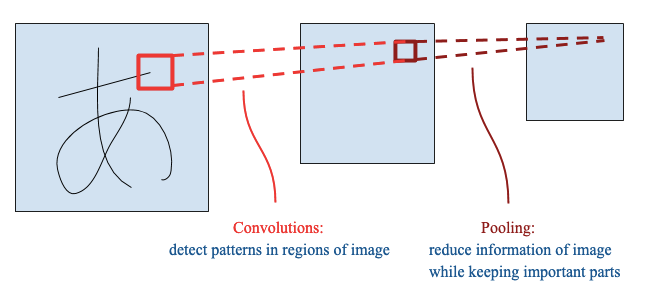
We will be using a Convolutional Neural Network (CNN). CNN consists of the process of convolution and pooling, and essentially keeps the important parts of an image so that the model can make a better prediction.
我们将使用卷积神经网络(CNN)。 CNN由卷积和合并过程组成,本质上保留了图像的重要部分,因此模型可以做出更好的预测。
We will also be using ImageDataGenerator in tensorflow.keras, which is a technique of image data augmentation that creates modified versions of images, such as rotated, zoomed, and flipped versions, to train so that the model doesn’t overfit (recognizes training examples well but doesn’t understand different kind of outside data).
我们还将在tensorflow.keras中使用ImageDataGenerator,这是一种图像数据增强技术,可创建图像的修改版本(例如旋转,缩放和翻转版本)进行训练,以使模型不会过拟合(识别训练示例)很好,但不了解其他类型的外部数据)。

After adding/removing layers and tweaking the exact numbers in each layers, I was able to create a pretty good model for all characters. To be exact,
添加/删除图层并调整每个图层中的确切数字后,我能够为所有字符创建一个很好的模型。 确切地说,
Katakana - 98.6% accuracy
片假名-准确度达98.6%
Hiragana - 98.4% accuracy
平假名-准确率98.4%
Kanji (879 Kanji characters that are used regularly) - 98.6% accuracy
汉字(879个经常使用的汉字字符)-准确度达98.6%
Kuzushiji - 95.6% accuracy
Kuzushiji-准确率95.6%
Kanji3036 (3036 Kanji characters, includes ones that aren’t used usually) - 97.9% accuracy
Kanji3036(3036个汉字字符,包括通常不使用的字符)-97.9 %的准确性
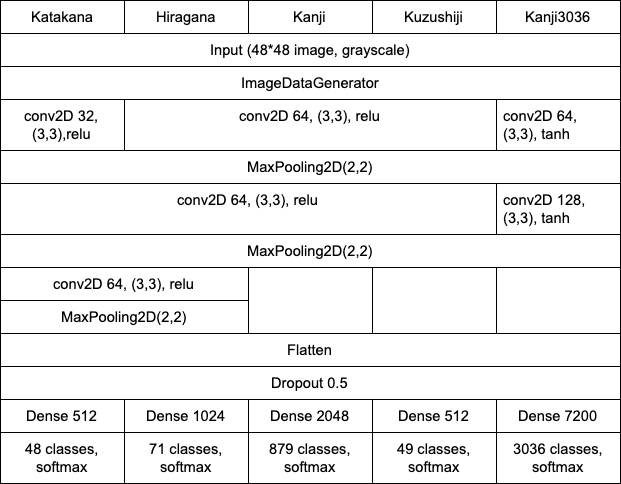
Here are the exact CNN model I used for each Japanese Characters:
这是我用于每个日语字符的确切CNN模型:
该模型 (The model)
To show an example, I’ll show the exact code for my Katakana model. The model I created for the other characters can be seen in my github page.
为了显示示例,我将显示片假名模型的确切代码。 我为其他角色创建的模型可以在我的github页面上看到。
import tensorflow as tf
from tensorflow import keras
import numpy as np
from keras.preprocessing.image import ImageDataGenerator
from keras import backend as K


train_images = np.load("katakana_train_images.npz")['arr_0']
train_labels = np.load("katakana_train_labels.npz")['arr_0']
test_images = np.load("katakana_test_images.npz")['arr_0']
test_labels = np.load("katakana_test_labels.npz")['arr_0']


if K.image_data_format() == "channels_first": # reshape the image to be able to go through 2D CNN
  train_images = train_images.reshape(train_images.shape[0], 1,48,48)
  test_images = test_images.reshape(test_images.shape[0], 1,48,48)
  shape = (1,48,48)
else:
  train_images = train_images.reshape(train_images.shape[0], 48, 48, 1)
  test_images = test_images.reshape(test_images.shape[0], 48, 48, 1)
  shape = (48,48,1)


datagen = ImageDataGenerator(rotation_range=15,zoom_range=0.2)
datagen.fit(train_images)
model = keras.Sequential([
  keras.layers.Conv2D(32, (3,3), activation='relu', input_shape=shape),
  keras.layers.MaxPooling2D(2,2),
  keras.layers.Conv2D(64, (3,3), activation='relu'),
  keras.layers.MaxPooling2D(2,2),
  keras.layers.Conv2D(64, (3,3), activation='relu'),
  keras.layers.MaxPooling2D(2,2),
  keras.layers.Flatten(),
  keras.layers.Dropout(0.5),
  keras.layers.Dense(512, activation='relu'),
  keras.layers.Dense(48, activation="softmax")
]) # the model


model.compile(optimizer='adam', loss="sparse_categorical_crossentropy", metrics=['accuracy'])


model.fit_generator(datagen.flow(train_images,train_labels,shuffle=True),epochs=30,validation_data=(test_images,test_labels),callbacks = [keras.callbacks.EarlyStopping(patience=8,verbose=1,restore_best_weights=True),keras.callbacks.ReduceLROnPlateau(factor=0.5,patience=3,verbose=1)])


model.save("katakana-model.h5")
Some explanation of my models:
我的模型的一些解释:
CNN and a neural network were used for all models. The characters with more classes have a larger neural network after the CNN. The activation used for most models were
relu, one of the most popular activation due to its simplicity, buttanhwas used for Kanji3036 due to the large number of classes.CNN和神经网络用于所有模型。 在CNN之后,具有更多类的字符具有更大的神经网络。 大多数模型使用的激活是
relu,由于其简单性,它是最受欢迎的激活之一,但由于种类众多,tanh被用于Kanji3036。ImageDataGeneratorwas used since people may have smaller handwriting or write in a tilted way. However,ImageDataGeneratorwas not used for Kuzushiji, since there are too many different variations of writing for each character, and this actually hurts the model.之所以使用
ImageDataGenerator是因为人们的笔迹可能较小,也可能以倾斜的方式书写。 但是,ImageDataGenerator未用于Kuzushiji,因为每个字符的书写形式有太多不同,这实际上会损害模型。The optimizer parameter was set to
adamsince it can achieve the best results very fast, loss was set tosparse_categorical_crossentropy, and metrics was set toaccuracy.优化参数设置为
adam,因为它可以达到最好的效果非常快,损耗设定为sparse_categorical_crossentropy和指标设置为accuracy。fit_generatorwas used to train the model, sinceImageDataGeneratorwas used.fit_generator使用了ImageDataGenerator因此使用fit_generator来训练模型。ReduceLROnPlateauwas used to reduce the learning rate if the accuracy wasn’t improving for a while, andEarlyStoppingwas used to stop the training if the accuracy still didn’t improve for a longer time. Reducing the learning rate helped improve the accuracy by 1–2%, while early stopping prevented the model from overfitting to the training data.如果一段时间未提高准确性,则使用
ReduceLROnPlateau降低学习率,如果长期未提高准确性,则使用EarlyStopping停止训练。 降低学习率有助于将准确性提高1-2%,同时尽早停止可防止模型过度拟合训练数据。- .h5 is basically the format to save your model so that you don’t need to re-run your code every time you want to re-train your model. .h5基本上是用于保存模型的格式,因此您无需在每次想要重新训练模型时都重新运行代码。
Once you have your h5 file, you can load it by keras.models.load_model("your_model_name.h5"), see your model by model.summary() , and test the accuracy on test data by model.evaluate(test_images,test_labels).
一旦你有你的H5文件,您可以通过加载keras.models.load_model("your_model_name.h5")看到你的模型model.summary()并通过测试对测试数据的准确性model.evaluate(test_images,test_labels) 。
转换模型 (Converting the Model)
Before creating the app, we need use coremltools to convert the .h5 format to .mlmodel format to be able to use the models in the app. Here, we need to downgrade keras 2.4.3 to 2.2.4, because coremltools only supports keras 2.2.4 or older versions.
在创建应用程序之前,我们需要使用coremltools将.h5格式转换为.mlmodel格式,以便能够在应用程序中使用模型。 在这里,我们需要将keras 2.4.3降级到2.2.4,因为coremltools仅支持keras 2.2.4或更旧的版本。
keras 2.2.4 also have some issues with tensorflow 2, so I had to run the following command to upgrade a keras file:
keras 2.2.4 tensorflow 2也有一些问题,因此我必须运行以下命令来升级keras文件:
I also had to go into the optimizers.py file within keras and manually change this in line 75:
我还必须进入keras中的optimizers.py文件,并在第75行中手动更改此文件:
original: allowed_kwargs = {'clipnorm','clipvalue'}
原始: allowed_kwargs = {'clipnorm','clipvalue'}
changed version: allowed_kwargs = {'clipnorm','clipvalue','name','learning_rate'}
更改版本: allowed_kwargs = {'clipnorm','clipvalue','name','learning_rate'}
Finally, run the following code:
最后,运行以下代码:
import coremltools
 from keras.utils import CustomObjectScope
 from keras.initializers import glorot_uniform


 # make tensorflow work fine between tensorflow 1 and 2.
 import tensorflow.compat.v1 as tf
 tf.disable_v2_behavior()


 from katakanajapanese import label
 scale = 1/255.0 # scale from 0 to 1


 # make keras understand that 'GlorotUniform' and glorot_uniform() are the same.
 with CustomObjectScope({'GlorotUniform': glorot_uniform()}):
   katakana_model = coremltools.converters.keras.convert("./katakana-model.h5",input_names=["image"],image_input_names = 'image',class_labels=label,image_scale=scale)


 katakana_model.save("katakana.mlmodel")
The katakanajapanese file can be found here.
katakanajapanese文件可在此处找到。
input_names="image" changes the input from an array to an image. Very important step because on XCode, handling image is much easier.
input_names="image"将输入从数组更改为图像。 非常重要的一步,因为在XCode上,处理图像要容易得多。
As always, the code for the other Japanese characters can be seen here:
与往常一样,其他日语字符的代码也可以在这里看到:
创建应用 (Creating the App)
Finally, let’s get into actually making the app for iOS!
最后,让我们开始实际制作适用于iOS的应用程序!
Here’s the general process.
这是一般过程。
- Create a new XCode project and choose the single view app and swift language. Then drag and drop your mlmodel to the project. 创建一个新的XCode项目,然后选择单视图应用程序和快速语言。 然后将您的mlmodel拖放到项目中。
- Create a space where you can draw things by hand touch, and create a button that clears the handwriting. 创建一个空间,您可以在其中用手画图,并创建一个清除笔迹的按钮。
- Create a system that checks the handwritten character and detects the character through the imported mlmodel. 创建一个检查手写字符并通过导入的mlmodel检测字符的系统。
The exact implementation can be seen here:
确切的实现可以在这里看到:
import UIKit


 class Handwrite: UIView {

     var path:UIBezierPath!
     var touchPoint:CGPoint!
     var startingPoint:CGPoint!

     override func touchesBegan(_ touches: Set<UITouch>, with event: UIEvent?) {
         let touch = touches.first
         startingPoint = touch?.location(in: self)
     }

     override func touchesMoved(_ touches: Set<UITouch>, with event: UIEvent?) {
         let touch = touches.first
         touchPoint = touch?.location(in: self)
         path = UIBezierPath()
         path.move(to: startingPoint)
         path.addLine(to: touchPoint)
         startingPoint = touchPoint

         let shapeLayer = CAShapeLayer()
         shapeLayer.path = path.cgPath
         shapeLayer.strokeColor = UIColor.yellow.cgColor
         shapeLayer.lineWidth = 5
         shapeLayer.fillColor = UIColor.clear.cgColor
         self.layer.addSublayer(shapeLayer)
         self.setNeedsDisplay()
     }

     func clear(){
         path.removeAllPoints()
         self.layer.sublayers = nil
         self.setNeedsDisplay()
     }
 }
import UIKit
import Vision
class ViewController: UIViewController {
@IBOutlet weak var characterlabel: UILabel!
@IBOutlet weak var handwrite: Handwrite!
let model = try! VNCoreMLModel(for: katakana().model)
override func viewDidLoad() {
super.viewDidLoad()
}
func classification(request:VNRequest, error:Error?){
guard let result = request.results as? [VNClassificationObservation] else {print("Error"); return}
let results = result.map({$0.identifier})
characterlabel.text = results[0]
}
@IBAction func recognize(_ sender: AnyObject? = nil) {
let request = [VNCoreMLRequest(model: model, completionHandler: classification)]
let image = convertImage(image: UIImage(view: handwrite), size: CGSize(width: 48, height: 48))
let handler = VNImageRequestHandler(cgImage: image.cgImage!)
try! handler.perform(request)
}
@IBAction func clear(_ sender: AnyObject? = nil) {
handwrite.clear()
}
func convertImage(image:UIImage, size:CGSize) -> UIImage{
UIGraphicsBeginImageContextWithOptions(size,false, 1.0 )
image.draw(in: CGRect(x:0,y:0,width:size.width,height:size.height))
return UIGraphicsGetImageFromCurrentImageContext()!
}
}The functions
touchesBeganandtouchesMovedhandle events when the screen is touched; in this code, it allows the user to handwrite.当触摸屏幕时,函数
touchesBegan和touchesMoved处理事件; 在此代码中,它允许用户手写。The
classificationandrecognizefunctions together do the process of recognizing the user’s handwriting and predicting what the character is.convertImagemakes the input size (48*48 pixels in this case) fit the model.classification和recognize功能一起执行识别用户笔迹和预测字符是什么的过程。convertImage使输入大小(在这种情况下为48 * 48像素)适合模型。
The code here makes the most basic app for recognizing handwritten Japanese!
这里的代码是识别手写日语的最基本的应用程序!
You can add features by providing second and third choice characters and enabling switching modes between Hiragana, Katakana, and Kanji, for example.
您可以通过提供第二和第三选择字符并启用平假名,片假名和汉字之间的切换模式来添加功能。
结论 (Conclusion)
Though the codes of the models themselves are actually short, creating the best models was definitely the most time consuming part of the project.
尽管模型的代码实际上很短,但是创建最佳模型绝对是项目中最耗时的部分。
The results were rewarding; about 98% accuracy for all characters, especially for Kanji, is good!
结果令人鼓舞; 所有字符,尤其是汉字,大约98%的准确率是不错的!
In future machine learning projects, I’d like to work on larger and more complicated dataset and achieve higher accuracy, and also try Regression problems.
在未来的机器学习项目中,我想处理更大和更复杂的数据集并获得更高的准确性,并尝试回归问题。
Perhaps I could try to predict the number of gold medals Japan would win at Tokyo Olympics next year!
也许我可以尝试预测日本明年在东京奥运会上将获得的金牌数量!
翻译自: https://towardsdatascience.com/creating-a-japanese-handwriting-recognizer-70be12732889
手写识别是图像识别吗


 被折叠的 条评论
为什么被折叠?
被折叠的 条评论
为什么被折叠?
 到【灌水乐园】发言


