


Managing a MySQL server using the command-line interface can be difficult for many people. It becomes a lot easier when we can work with a graphical interface. The database administration tool phpMyAdmin solves that problem. We can use this tool over a web interface. It supports MySQL and MariaDB with a wide variety of operations, such as import data, export data, execution of SQL statements, and many more.
中号 anaging使用命令行界面是很困难的很多人MySQL服务器。 当我们可以使用图形界面时,它将变得更加容易。 数据库管理工具phpMyAdmin解决了该问题。 我们可以通过Web界面使用此工具。 它支持MySQL和MariaDB的各种操作,例如导入数据,导出数据,SQL语句的执行等等。
We will use Docker for our setup because running and managing phpMyAdmin on a different machine can be nerve-wracking for environment management. Docker solves this problem by using its containerization technology, which uses Docker images. Previously, I’ve discussed how to run MySQL using Docker. You can read the following post, where I’ve covered some basic concepts and commands of MySQL and Docker.
我们将使用Docker进行设置,因为在另一台机器上运行和管理phpMyAdmin可能会破坏环境管理。 Docker通过使用其容器化技术解决了这个问题,该技术使用了Docker镜像。 之前,我已经讨论了如何使用Docker运行MySQL。 您可以阅读以下文章,其中涵盖了MySQL和Docker的一些基本概念和命令。
From this post, you’ll learn how to connect phpMyAdmin to a MySQL server using Docker. This method will save you time and effort since you don’t have to install or configure phpMyAdmin and MySQL.
从这篇文章中,您将学习如何使用Docker将phpMyAdmin连接到MySQL服务器。 由于您不必安装或配置phpMyAdmin和MySQL,因此此方法将节省您的时间和精力。
建立 (Setup)
There are two ways we can connect phpMyAdmin with MySQL using Docker. In the first method, we will use a single Docker compose file. For the second one, I’ll show you how to connect to an already running MySQL Docker container. First, you will need to install Docker. I’ll use macOS for both methods.
我们可以使用两种方式使用Docker将phpMyAdmin与MySQL连接。 在第一种方法中,我们将使用单个Docker compose文件。 对于第二个,我将向您展示如何连接到已经运行MySQL Docker容器。 首先,您需要安装Docker 。 两种方法都将使用macOS。
方法1 (Method 1)
In this method, we will use a Docker compose file. We need to put docker-compose.yml inside a folder. The folder name used in this setup is phpMyAdmin. Let’s break down the individual ingredients of the docker-compose.yml file.
在这种方法中,我们将使用Docker compose文件 。 我们需要将docker-compose.yml放在一个文件夹中。 此设置中使用的文件夹名称为phpMyAdmin 。 让我们分解一下docker-compose.yml文件的各个组成部分。
version: '3.1'services:  db:
    image: mysql
    restart: always
    environment:
      MYSQL_ROOT_PASSWORD: root
      MYSQL_DATABASE: test_db
    ports:
      - "3308:3306"
  phpmyadmin:
    image: phpmyadmin/phpmyadmin:latest
    restart: always
    environment:
      PMA_HOST: db
      PMA_USER: root
      PMA_PASSWORD: root
    ports:
      - "8080:80"
First, we are using a version tag to define the Compose file format, which is 3.1. There are other file formats — 1, 2, 2.x, and 3.x. Get more information on Compose file formats from Docker’s documentation here.
首先,我们使用版本标记定义Compose文件格式,即3.1。 还有其他文件格式-1、2、2.x和3.x。 获得从泊坞窗的文档上撰写的文件格式的详细信息在这里 。
We follow our version tag by the services hash. Inside this, we have to define the services we want to use for our application. For our application, we have two services, db, and phpmyadmin.
我们通过服务哈希值跟随我们的版本标记。 在其中,我们必须定义我们要用于我们的应用程序的服务。 对于我们的应用程序,我们有两个服务db和phpmyadmin 。
To make our setup process quick and easy, we are using the pre-built official image of MySQL and phpMyAdmin for the image tag.
为了使我们的设置过程变得快速简便,我们将MySQL和phpMyAdmin的预构建官方映像用作image标记。
When we use always for the restart tag, the container always restarts. It can save time. For example, you don’t have to start the container every time you reboot your machine manually. It restarts the container when either the Docker daemon restarts or the container itself is manually restarted.
当我们始终对重新启动标记使用时,容器将始终重新启动。 这样可以节省时间。 例如,您不必每次手动重新启动计算机时都启动容器。 当Docker守护进程重新启动或手动重新启动容器本身时,它将重新启动容器。
We have defined the environment variables under the environment tag, which we will use for database and phpMyAdmin authentication.
我们已经在环境标签下定义了环境变量,将用于数据库和phpMyAdmin身份验证。
Finally, the ports tag is used to define both host and container ports. For the db service, it maps the port 3308 on the host to port 3306 on the MySQL container. For the phpmyadmin service, it maps the port 8080 on the host to port 80 on the phpMyAdmin container.
最后,ports标签用于定义主机端口和容器端口。 对于db服务,它将主机上的端口3308映射到MySQL容器上的端口3306。 对于phpmyadmin服务,它将主机上的端口8080映射到phpMyAdmin容器上的端口80。
Now run the following command from the same directory where the docker-compose.yml file is located. The command docker-compose up starts and runs your entire app. If you encounter the following error, that means you’re already running a Docker container on port 3308. To fix the problem, you just have to change to a different port, or you can stop the other container.
现在从docker-compose.yml文件所在的目录中运行以下命令。 命令docker-compose up启动并运行您的整个应用程序。 如果遇到以下错误,则意味着您已经在端口3308上运行了Docker容器。要解决此问题,只需更改为其他端口即可,也可以停止其他容器。
Bind for 0.0.0.0:3308 failed: port is already allocatedNow choose any web browser and go to the following address.
现在选择任何Web浏览器,然后转到以下地址。
http://localhost:8080Voila! you should see the web page like the one below on your browser.
瞧! 您应该在浏览器中看到如下所示的网页。
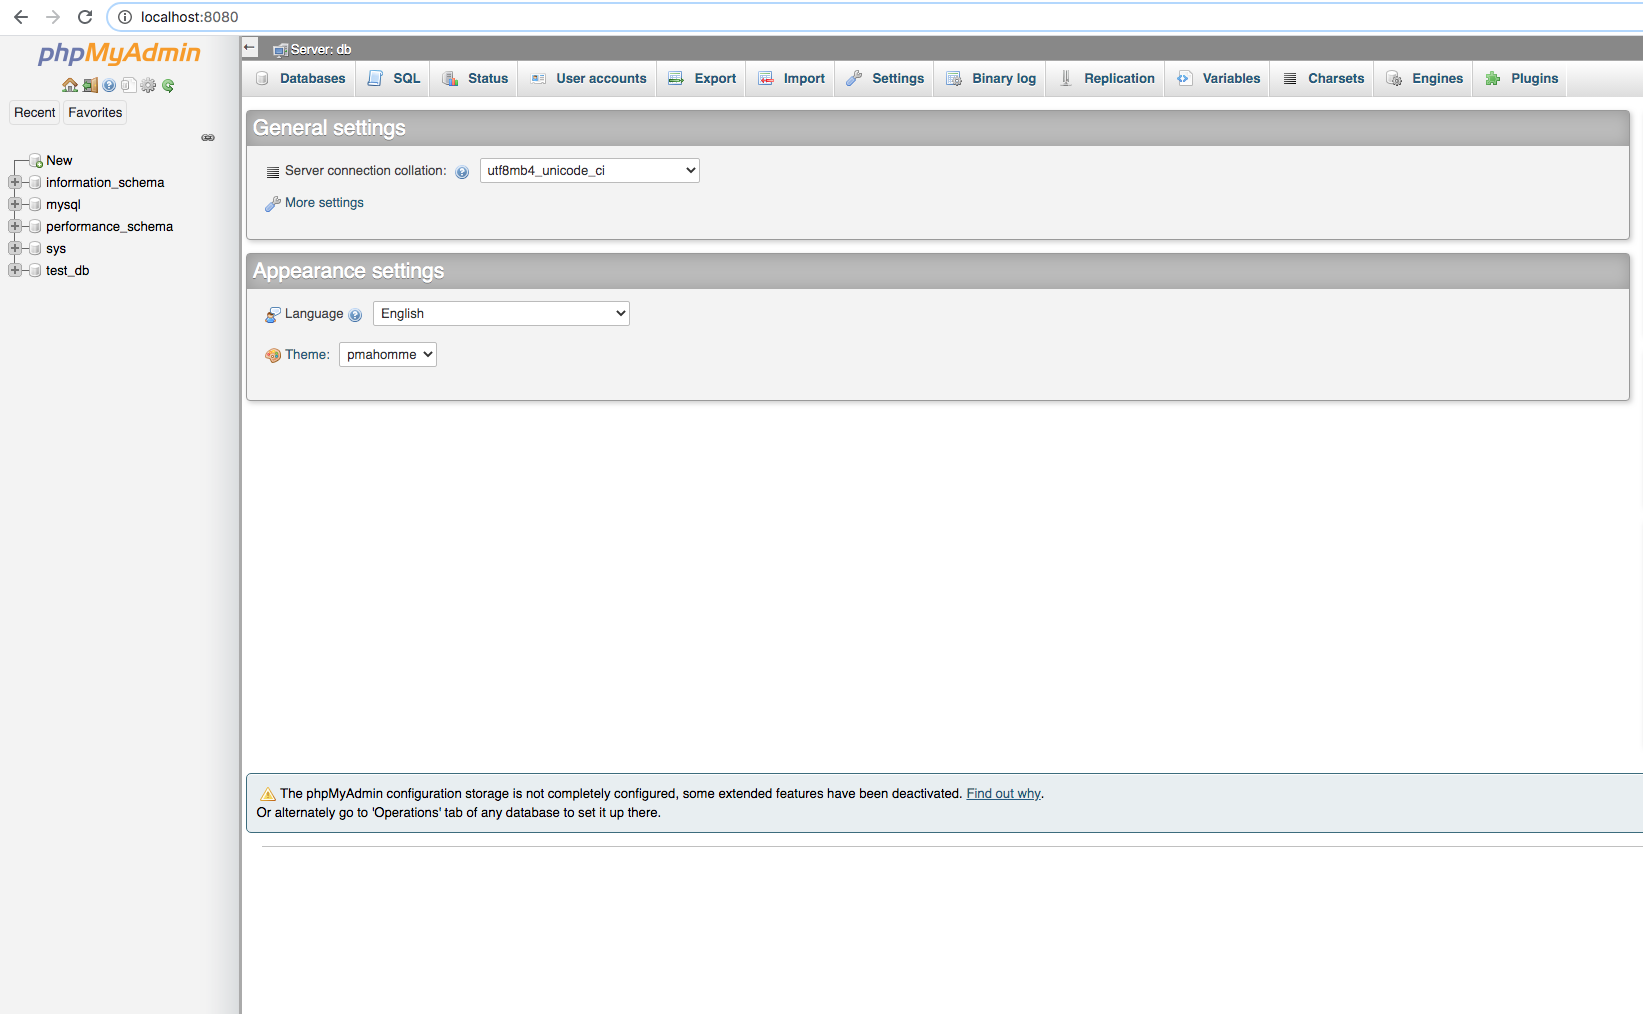
As you can see, there is a warning message at the bottom. Let’s fix that now.
如您所见,底部有一个警告消息。 让我们现在修复它。

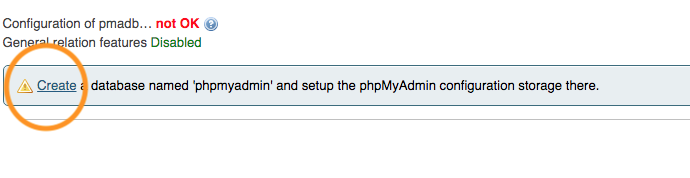
You are all set to manage your database!
您已准备好管理数据库!
方法2 (Method 2)
In this method, you will learn how to connect a phpMyAdmin docker container to a MySQL container that is already running. It is helpful when you don’t have a phpMyAdmin service in your docker-compose file.
通过这种方法,您将学习如何将phpMyAdmin docker容器连接到已经运行MySQL容器。 当您在docker-compose文件中没有phpMyAdmin服务时,这将很有帮助。
First, we need to list all the current Docker networks using the following command.
首先,我们需要使用以下命令列出所有当前的Docker网络。
docker network lsNow you should see phpmyadmin_default from the list. Our goal here is to find the application network that we have created using the docker-compose file in method one. Since we didn’t specify a network name in the docker-compose file for our application, Docker will give the network name based on the name of the directory with _default at the end. In this case, phpmyadmin_default. If you’re interested in Docker networks, check here.
现在,您应该从列表中看到phpmyadmin_default 。 我们的目标是找到在方法一中使用docker-compose文件创建的应用程序网络。 由于我们没有在应用程序的docker-compose文件中指定网络名称,因此Docker将根据目录名称提供网络名称,并以_default结尾。 在这种情况下, phpmyadmin_default 。 如果您对Docker网络感兴趣,请点击此处 。
Well done, you have successfully identified the network! Finally, we can run a stand-alone phpMyAdmin Docker container, which is connected to our desired network.
做得好,您已经成功确定了网络! 最后,我们可以运行一个独立的phpMyAdmin Docker容器,该容器已连接到我们所需的网络。
docker run --name stand-alone-phpmyadmin --network phpmyadmin_default -p 8081:80 phpmyadmin/phpmyadmin:latestThe docker run command is used to run a container from an image. Here we are using phpmyadmin/phpmyadmin:latest image.
docker run命令用于从映像运行容器。 在这里,我们使用的是phpmyadmin/phpmyadmin:latest图片。
The--name flag (optional) is used to give the container a specific name. If you don’t want to provide one, Docker will randomly assign a name.
--name标志(可选)用于为容器指定特定名称。 如果您不想提供一个,Docker将随机分配一个名称。
The —- network flag is used to connect to a Docker network.
—- network标志用于连接到Docker网络。
The -p flag is already discussed in this post.
-p标志已在本文中讨论。
Now choose any web browser and go to the following address. Use root as a username and password to log in.
现在选择任何Web浏览器,然后转到以下地址。 使用root作为用户名和密码登录。
http://localhost:8081/index.phpThis method is helpful when you want to connect multiple Docker containers.
当您要连接多个Docker容器时,此方法很有用。
结语 (Wrap Up)
Database management can be a daunting task when we use a command-line interface. The web-based tool phpMyAdmin takes care of that problem, and Docker makes the entire process smoother. I use this setup to experiment with MySQL queries, which saves a lot of time. By using Docker, I don’t have to worry about MySQL and phpMyAdmin setup. I hope this will help you to get started with MySQL, phpMyAdmin, and Docker.
当我们使用命令行界面时,数据库管理可能是一项艰巨的任务。 基于Web的工具phpMyAdmin可以解决该问题,而Docker使整个过程更加流畅。 我使用此设置来试验MySQL查询,这节省了大量时间。 通过使用Docker,我不必担心MySQL和phpMyAdmin设置。 我希望这将帮助您开始使用MySQL,phpMyAdmin和Docker。
翻译自: https://towardsdatascience.com/how-to-run-mysql-and-phpmyadmin-using-docker-17dfe107eab7


 1879
1879

 被折叠的 条评论
为什么被折叠?
被折叠的 条评论
为什么被折叠?
 到【灌水乐园】发言


