


html两个框架同时
If you’re like me you have a favourite framework you gravitate towards in every project. For me, it’s Tensorflow, particularly since they better integrated Keras in tf2.0. But every time another feature is released in PyTorch the grass looks a little bit greener on the other side. So this tutorial is for those people with a strong understanding of one framework, and a curiosity about the other.
如果您像我一样,则在每个项目中都有一个喜欢的框架。 对我而言,它是Tensorflow,尤其是因为它们更好地将Keras集成到了tf2.0中。 但是,每次在PyTorch中发布另一个功能时,另一面的草都会看起来有点绿色。 因此,本教程适合那些对一个框架有深刻理解而又对另一个框架有好奇心的人。
In this tutorial, I’ll walk you through the same example in both frameworks, including side-by-side comparisons of a few best practices such as:
在本教程中,我将向您介绍两个框架中的相同示例,包括对一些最佳实践的并行比较,例如:
数据集 (Dataset)
I’ll be using a familiar dataset, Cats v Dogs, because this guide isn’t about solving a tricky problem (you’ve probably already got your own problem in mind), it’s about creating a general, minimal example that you can easily adapt. Mostly though, I’m using this dataset because if I’m going to spend vast amounts of time looking at images I’d rather they be of cute animals. If you want to follow along exactly, download the data from here.
我将使用一个熟悉的数据集Cats v Dogs,因为该指南并不是要解决棘手的问题(您可能已经想到了自己的问题),而是要创建一个通用的最小示例,您可以轻松地适应。 不过,大多数情况下,我使用的是此数据集,因为如果我要花费大量时间查看图像,我希望它们是可爱的动物 。 如果您想完全遵循,请从此处下载数据。
My dataset is stored in a subdirectory (‘data’) of folder containing my training script (‘folder’), with the following structure:
我的数据集存储在包含我的训练脚本(文件夹)的文件夹的子目录(“数据”)中,其结构如下:
folder
├── data/
    ├── test/
        ├──1.jpg
        ├──...
    └── train/
        ├──cat.0.jpg
        ├──dog.0.jpg
        ├──...
设置数据生成器 (Setting up the data generator)
My dataset isn’t very large (25,000 fairly small images, of which I’ll only be using 1000 as a minimal example), so I can load it all in to memory. But datasets too large to load in to memory are becoming more common, so it’s important to have a pipeline that can deal with those situations. A data generator is a great option which allows you to generate the data in real time, run preprocessing and augmentation in batches, and feed it right in to the model. This can lead to huge efficiencies during training, since it allows for data to be prepped on the CPU which the GPU is running training.
我的数据集不是很大(有25,000张相当小的图像,其中我将仅以1000张为最小示例),因此我可以将所有图像加载到内存中。 但是太大而无法加载到内存中的数据集变得越来越普遍,因此拥有可以处理这些情况的管道非常重要。 数据生成器是一个很好的选择,它允许您实时生成数据,分批运行预处理和扩充,然后将其直接输入模型。 由于它允许将数据准备在正在运行GPU的GPU上进行训练,因此可以在训练过程中提高效率。
Tensorflow数据生成器 (Tensorflow data generator)
For my Tensorflow data generator, I’m going to inherit from tf.keras.utils.Sequence, so that I can capitalise on perks like multiprocessing. You’ll notice I’m calling a function ‘augment’ in this code, you can find the code for that here, or make your own function where the input is an image, and the output is an augmented version of that image, with fixed size (im_size), scaled between -1 and 1.
对于我的Tensorflow数据生成器,我将从tf继承。 喀拉斯邦 。 实用程序 。 Sequence ,这样我就可以利用诸如多重处理之类的特权。 您会注意到我在此代码中称函数为“增补”,您可以在此处找到该代码,或者在输入为图像,输出为该图像的增强版本的情况下创建自己的函数,固定大小(im_size),在-1和1之间缩放。
We put as arguments important information such as the directory containing the data (data_dir), the batch size, size the images will be rescaled to (for this purpose they’ll have the same height and width), number of images to use (setting this to a number less than the total number of images is helpful for testing the network and debugging), and whether the data should be shuffled each epoch.
我们将重要信息作为参数,例如包含数据的目录(data_dir),批处理大小,图像将被缩放到的大小(为此,它们将具有相同的高度和宽度),要使用的图像数(设置数量少于映像总数,这有助于测试网络和调试),以及是否应在每个时期重新整理数据。
The class needs a few methods in order to function correctly:
该类需要一些方法才能正常运行:
__init__ is the initialising method, it’s called when the class is instantiated. Here it’s locating our image names, put them in a list and shuffle it.
__init__是初始化方法,在实例化类时调用它。 在这里找到我们的图像名称,将它们放在列表中并随机播放。
on_epoch_end is triggered at the end of each epoch, here it just shuffles the data.
on_epoch_end在每个时期结束时触发,此处只是将数据随机播放 。
Each time the training loop requests new data from the generator, an index will be incremented from 0 to an upper limit defined by __len__. Best practice is to set this upper value to the number of batches in each epoch, so that each image is seen once each epoch.
每次训练循环从生成器请求新数据时,索引将从0递增到__len__定义的上限。 最佳做法是将此上限值设置为每个时期的批处理数量,以便每个时期可以看到每个图像。
__getitem__ is called each time data is requested, it takes the aforementioned index, gets a batch_size list of image names based on that index, and fetches them.
每次请求数据时都会调用__getitem__ ,它将获取上述索引,并基于该索引获取图像名称的batch_size列表,然后进行获取。
The two other methods in the class aren’t strictly required:
并非严格要求该类中的其他两个方法:
__get_data is a private method called by __getitem__ to fetch the images and augment them. You could just put this code in __getitem__ but this layout makes the code more modular.
__get_data是__getitem__调用的私有方法,用于获取图像并增强图像。 您可以将这段代码放在__getitem__中,但是这种布局使代码更具模块化。
load_val loads all of the validation images in one go. This kind of defeats the purpose of having a data generator to deal with large datasets, but unfortunately one of the training methods I’ll be using (‘fit’) does not accept a generator as a validation dataset, hopefully, this is fixed in future releases.
load_val一次性加载所有验证图像。 这种方法无法实现使用数据生成器处理大型数据集的目的,但是不幸的是,我将使用的一种训练方法(“拟合”)不接受生成器作为验证数据集,希望此问题已得到解决。将来的版本。
Then it’s a pretty simple matter to create an instance of the generator in the training script, and read in all the validation images.
然后,在训练脚本中创建生成器的实例并读取所有验证图像是一件非常简单的事情。
PyTorch数据生成器 (PyTorch data generator)
The PyTorch data generator is fairly similar to the Tensorflow generator. However in this case, inheriting from torch.utils.data.Dataset allows us to use multiprocessing, analogous to the inheritance of tf.keras.utils.Sequence in the previous section. There’s a lot of other similarities too, we’re using the augment function, we’re also using similar arguments, including batch size, image size, number of images and shuffle.
PyTorch数据生成器与Tensorflow生成器非常相似。 但是,在这种情况下,继承自Torch 。 实用程序 。 数据 。 数据集使我们可以使用多重处理,类似于上一节中tf.keras.utils.Sequence的继承。 还有很多其他相似之处,我们使用了增强功能,还使用了类似的参数,包括批处理大小,图像大小,图像数量和随机播放。
The generator involves three of the same methods:
生成器涉及三种相同的方法:
__init__ is the initialising method, here is shuffles the image filenames (which it has been passed), and sets up the augmentation parameters.
__init__是初始化方法,这里是重新排列图像文件名(已传递),并设置扩充参数。
__len__ operates in the same way as above
__len__的运作方式与上述相同
__getitem__ reads one image and augments it. Note a key difference between this generator and the previous is that here the generator yields only one image and label - PyTorch manages the batching of the images.
__getitem__读取一张图像并对其进行扩充。 请注意,此生成器与前一个生成器之间的主要区别在于,此处生成器仅生成一个图像和标签-PyTorch管理图像的批处理。
An important thing to note here is the normalization applied to the image if the model type in mobilenet, that’s because the network we’ll use for ‘mobilenet’ is a pretrained, torchvision model, which was trained using images normalised in this fasion. Therefore, when using this model we need to normalise in the same way.
这里要注意的重要一点是,如果mobilenet中的模型类型适用于图像,这是因为我们将用于“ mobilenet”的网络是预训练的Torchvision模型,该模型是使用此功能中标准化的图像进行训练的。 因此,在使用此模型时,我们需要以相同的方式进行归一化。
Creating the PyTorch generator in the training pipeline requires a little extra work. First we set up some parameters, including the number of threads used to load data in parallel. Then we instantiate the class, and pass it to the DataLoader class, which also takes the parameters we set up. We create a second generator for validation, where we pass the validation flag to make sure that images won’t undergo augmentation.
在训练管道中创建PyTorch生成器需要一些额外的工作。 首先,我们设置一些参数,包括用于并行加载数据的线程数。 然后,我们实例化该类,并将其传递给DataLoader类,该类也采用我们设置的参数。 我们创建第二个用于验证的生成器,在其中传递验证标志以确保图像不会进行扩增。
创建一个简单的模型 (Creating a simple model)
Now let’s see what it looks like to create a simple CNN. In both frameworks I’m going to set up a CNN with 4 convolutional layers, separated by max pooling, followed by dropout at 50%, and then two linear layers. We’re not going for performance here, just demonstration.
现在,让我们看看创建一个简单的CNN的样子。 在这两个框架中,我将建立一个具有4个卷积层的CNN,并通过最大池化将其分开,然后以50%的比例退出,然后是两个线性层。 我们不打算在这里表现,只是示范。
Both frameworks allow you to create the layers you need from the ground up, which means you have a fair amount of customisability. However, unless you have a very good reason to want to create your own custom layer, I encourage you to save yourself the trouble and use the user-friendly wrappers both frameworks provide.
这两个框架都允许您从头开始创建所需的层,这意味着您具有大量的可定制性。 但是,除非您有充分的理由要创建自己的自定义层,否则我建议您省去麻烦并使用这两个框架提供的用户友好包装器。
Tensorflow简单模型 (Tensorflow simple model)
Tensorflow has recently properly integrated Keras, the highly popular wrapper that simplifies creation and training of deep neural networks. This is what it looks like to create our simple CNN in Tensorflow Keras.
Tensorflow最近已正确集成了Keras,这是一种非常流行的包装器,可简化深度神经网络的创建和训练。 这就是在Tensorflow Keras中创建我们的简单CNN的样子。
Using the Sequential model type groups a stack of layers together. The order that the layers are stacked within Sequential denotes the order of the layers in the network. In contrast to what we’ll see in PyTorch, all layers, including those without trainable parameters (like MaxPooling and activation functions) are included in the model. That’s because this one function serves to both declare the structure of the model, and define the flow of data in the forward (and backward) pass.
使用顺序模型类型将一组堆栈组合在一起。 层在顺序内堆叠的顺序表示网络中层的顺序。 与我们在PyTorch中看到的相反,该模型包括了所有层,包括没有可训练参数的层(例如MaxPooling和激活函数)。 这是因为此功能既可以声明模型的结构,又可以定义前向(和后向)传递中的数据流。
PyTorch简单模型 (PyTorch simple model)
In PyTorch, the model is defined as a class that inherits from nn.Module, with an __init__ that contains the layers, and a method forward() that defines how the data will pass through the network, and returns the output of the network.
在PyTorch中,模型定义为从nn.Module继承的类,其中的__init__包含图层,而方法forward()定义数据如何通过网络并返回网络的输出。
Keep in mind that any layers that have parameters that need to be trained (like convolutional layers) need to be registered in __init__. Layers with no trainable parameters (like max pooling and activation functions) can be registered either in __init__ or forward().
请记住,任何需要训练参数的层(例如卷积层)都必须在__init__中注册。 没有可训练参数的层(例如最大池和激活函数)可以在__init__或forward()中注册。
This may be a bit more complex than how we connected our network in Tensorflow, but the separation of layers and connectivity lends PyTorch quite a bit of flexibility that isn’t nearly as easy to achieve in Tensorflow.
这可能比我们在Tensorflow中连接网络的方式更为复杂,但是层和连通性的分离为PyTorch带来了相当多的灵活性,这在Tensorflow中几乎不那么容易实现。
定义损失函数和优化器 (Defining a loss function and optimizer)
The loss function compares the output of the model to the target value, and estimates how far apart they are. The loss function you use will depend on your application, I’m using Binary Cross Entropy with Logit Loss because I’m training a binary classifier. The “logit loss” part is because the output from my model has a linear activation function, which in DL framework terms means that the input in to my loss function is a “logit”, the term used for a classification output before it passes through a sigmoid or softmax layer. It is more computationally efficient to calculate the sigmoid/softmax with the cross-entropy, which the BCE with logit loss layer does.
损失函数将模型的输出与目标值进行比较,并估计它们之间的距离。 您使用的损失函数将取决于您的应用程序,因为我正在训练二进制分类器,所以我将使用二进制交叉熵和Logit损失 。 “ logit损失”部分是因为我的模型的输出具有线性激活函数,这在DL框架中意味着我的损失函数的输入是“ logit”,该术语用于分类输出在通过之前的分类输出乙状或softmax层。 具有交叉熵的Sigmoid / softmax计算效率更高,具有logit损失层的BCE可以做到。
The optimizer is used to update the parameters of the model in order to reduce the loss. There are lots of optimizers to choose from, but I’m using Adam.
优化器用于更新模型的参数,以减少损失。 有很多优化器可供选择,但是我正在使用Adam 。
Tensorflow损失功能和优化器 (Tensorflow loss function and optimizer)
In Tensorflow binary cross-entropy with and without logit loss are defined through the same function.
在Tensorflow中,具有和不具有logit损失的二进制交叉熵都通过相同的函数定义。
PyTorch损失函数和优化器 (PyTorch loss function and optimizer)
In PyTorch, binary cross-entropy with logits loss is a separate function to that without logits loss. Also, the optimizer takes the model parameters as input as well as the learning rate. Therefore, if you’re not training all of the parameters (i.e. if you’re fine tuning a model), then make sure to only pass in the parameters that you are training.
在PyTorch中,具有logits损失的二进制互熵与没有logits损失的二进制互熵是一个独立的函数。 同样,优化器将模型参数作为输入以及学习率。 因此,如果您不训练所有参数(例如,您正在微调模型),请确保仅传递您训练的参数。
训练循环(带日志记录) (The training loop (with logging))
Finally, we get to the good stuff, training our network. We’re also going to be adding two separate functions to the training loop, one for logging the process of our training to Tensorboard, and another for model checkpointing.
最后,我们掌握了好东西,训练了我们的网络。 我们还将在训练循环中添加两个单独的功能,一个用于将训练过程记录到Tensorboard中,另一个用于模型检查点。
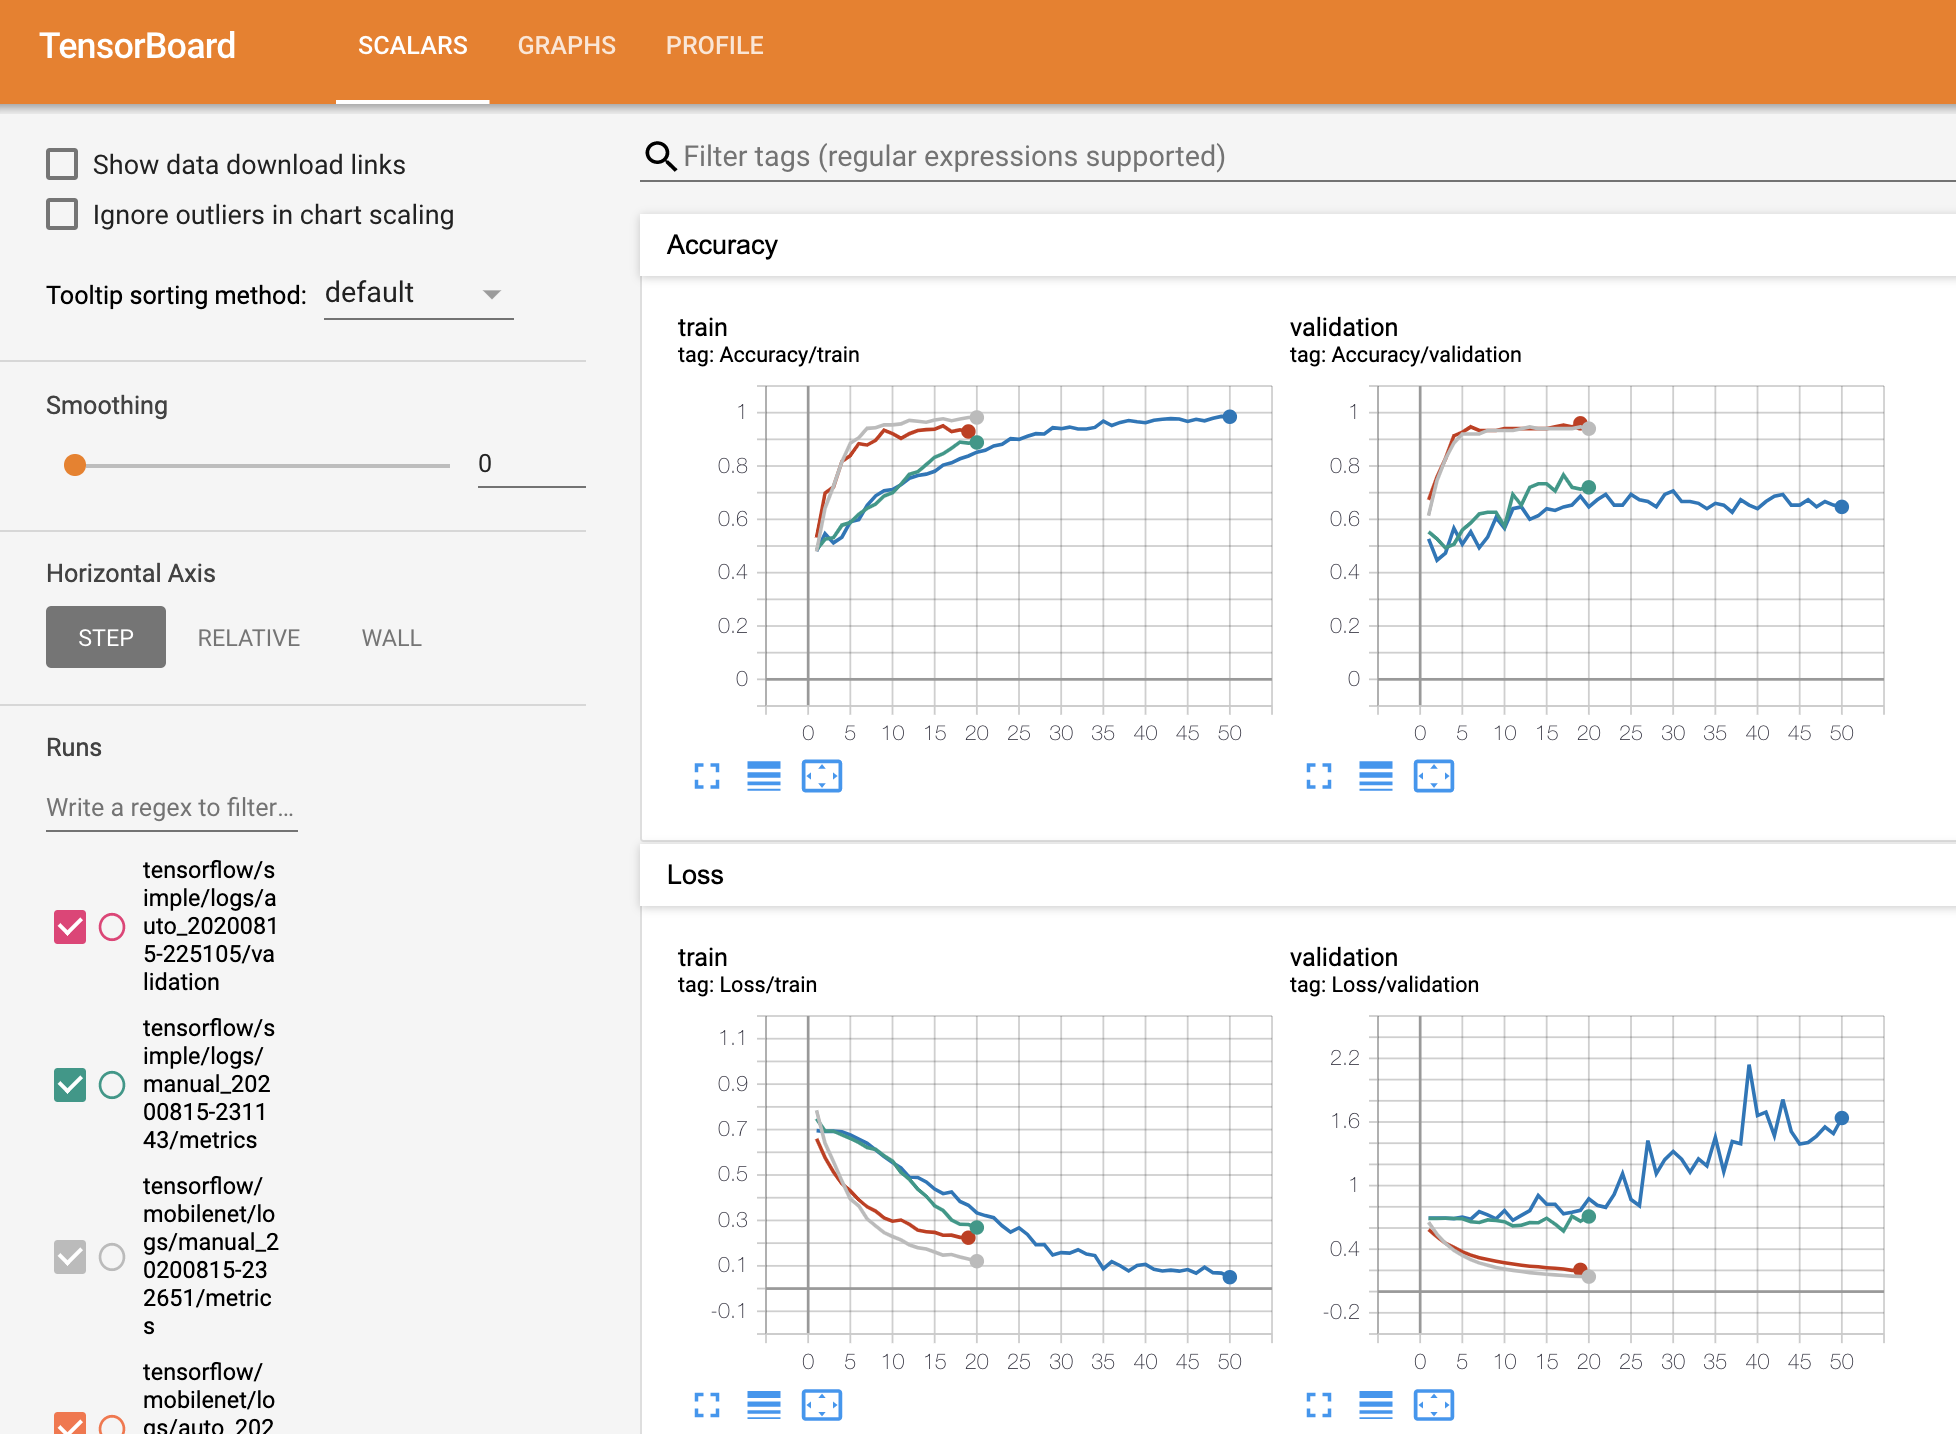
Tensorboard is used to log the loss and accuracy of the model during training. you can also add other capabilities, such as logging images (which is particularly handy if you’re training an image generator), and histograms (great for keeping track of gradients).
Tensorboard用于记录训练期间模型的损失和准确性。 您还可以添加其他功能,例如记录图像(如果正在训练图像生成器,则特别方便)和直方图(用于跟踪梯度的出色功能)。
Model checkpointing saves the model or weights in the chosen folder at regular intervals during training (every epoch as default). We will only be overwriting the weights each step if the validation accuracy is larger than the current checkpoint.
模型检查点会在训练过程中定期将模型或权重保存在所选文件夹中(默认为每个纪元)。 如果验证精度大于当前检查点,我们将仅覆盖权重。
There are many other functions that you can (and should) add, such as learning rate scheduling and early stopping.
您可以(并且应该)添加许多其他功能,例如学习率调度和提前停止。
Tensorflow训练循环(选项1) (Tensorflow training loop (option 1))
In Tensorflow there are multiple ways of training the network. The first is the simplest, it takes advantage of the Keras ‘fit’ method, using your data generator as the training data input (note that prior to Tensorflow 2.0 you would have had to use ‘fit_generator’ to take a generator as input, but this has been deprecated in recent releases). Unfortunately, the validation data cannot be passed in as a generator.
在Tensorflow中,有多种训练网络的方法。 首先是最简单的方法,它利用Keras的“拟合”方法,将数据生成器用作训练数据输入(请注意,在Tensorflow 2.0之前,您必须使用“ fit_generator”将生成器作为输入,但是在最近的发行版中已弃用)。 不幸的是,验证数据无法作为生成器传递。
Prior to calling ‘fit’ we need to compile our model with the optimizer and loss. We also set some parameters for multiprocessing to speed up the training loop. The other thing to note here is the use of callbacks, which is how we’re defining the Tensorboard and model checkpointing behaviour mentioned earlier.
在称为“拟合”之前,我们需要使用优化器和损失来编译模型。 我们还为多处理设置了一些参数,以加快训练循环。 这里要注意的另一件事是回调的使用,这是我们定义前面提到的Tensorboard和模型检查点行为的方式。
This training code, applied to 850 cat/dog training images, with 150 validation images, on a MacBook Pro with no GPU, gives the following results:
在没有GPU的MacBook Pro上,此训练代码应用于850个猫/狗训练图像和150个验证图像,得出以下结果:
Tensorflow训练循环(选项2) (Tensorflow training loop (option 2))
Alternatively, we can define the training loop more explicitly. Specifically, we define a for-loop that iterates over epochs, then another loop over the dataset in batches. First up, we’re defining a number of metrics (train/validation accuracy and loss) which get updated during the train and test step functions.
或者,我们可以更明确地定义训练循环。 具体来说,我们定义了一个for循环,该循环在历元上进行迭代,然后在数据集中批量进行另一个循环。 首先,我们定义了许多指标(训练/验证准确性和损失),这些指标会在训练和测试步骤功能期间进行更新。
We then define the train and validation functions. In the train function, we open a GradientTape() scope, in which we call the model to run the forward pass and compute the loss. Then we retrieve the gradients and use the optimizer to update the weights based on the gradients. The difference in the validation function is that we only run the data through the model to calculate the loss and accuracy, logging them both.
然后,我们定义训练和验证功能。 在训练函数中,我们打开GradientTape()范围,在其中调用模型以运行前向通过并计算损耗。 然后,我们检索梯度并使用优化器根据梯度更新权重。 验证功能的区别在于,我们仅通过模型运行数据以计算损失和准确性,并同时记录它们。
An important thing to note here is the use of the tf.function decorator above both train and test step functions. Tensorflow 2.0 onwards operates in eager mode by default, which is great for line by line execution and therefore debugging, but it makes for slower function execution. This decorator converts a python function to a static tensorflow graph, which runs faster.
这里要注意的重要事项是在训练和测试步骤功能上方使用tf.function装饰器 。 Tensorflow 2.0及更高版本默认情况下以渴望模式运行,这非常适合逐行执行并因此进行调试,但它会使函数执行速度变慢。 该装饰器将python函数转换为静态tensorflow图,其运行速度更快。
We also need to set up Tensorboard logging manually, and check the validation accuracy to monitor when to save out the model weights.
我们还需要手动设置Tensorboard日志记录,并检查验证准确性以监视何时节省模型权重。
This training code, applied to 850 cat/dog training images, with 150 validation images, on a MacBook Pro with no GPU, gives the following results:
在没有GPU的MacBook Pro上,将此训练代码应用于850个猫/狗训练图像和150个验证图像,得出以下结果:
PyTorch训练循环 (PyTorch training loop)
The Pytorch loop follows the same logic as the tensorflow loop, one of the main differences to note is how the backwards pass is run quite elegantly and intuitively, by calling the backward method on the loss, and parameters are updated by calling the step method on the optimizer. It’s important to note the use of no_grad scope in the validation step, which temporarily sets all of the “requires_grad” flags in the model parameters to False.
Pytorch循环遵循与tensorflow循环相同的逻辑,需要注意的主要区别之一是,如何通过调用loss上的向后方法来相当优雅且直观地运行向后传递,并通过调用step方法来更新参数。优化器。 重要的是要注意在验证步骤中使用no_grad范围,该范围将模型参数中的所有“ requires_grad”标志暂时设置为False。
Also note the use of ‘model.train()’ and ‘model.eval()’, which are used to switch between modes for models that contain modules which have different training and evaluation behavior, such as batch normalization.
还要注意使用“ model.train()”和“ model.eval()”,它们用于在包含具有不同训练和评估行为(例如批归一化)的模块的模型的模式之间切换。
This training code, applied to 850 cat/dog training images, with 150 validation images, on a MacBook Pro with no GPU, gives the following results:
在没有GPU的MacBook Pro上,此训练代码应用于850个猫/狗训练图像和150个验证图像,得出以下结果:
This is notably longer time per epoch compared with Tensorflow. Monitoring the use of my CPU cores during execution shows they’re being under-utilised compared to the Tensorflow implementation, despite the setting of the num_workers parameter in the data loader. This is a known issue in Pytorch currently, please comment if you know of a fix!
与Tensorflow相比,每个时期的时间明显更长。 尽管在数据加载器中设置了num_workers参数,但在执行过程中监视我的CPU内核的使用情况表明,与Tensorflow实现相比,它们的使用率不足。 这是当前在Pytorch中的已知问题,如果您知道有解决方法,请发表评论!
使用预先训练的模型改善结果 (Improving the results with a pre-trained model)
One of the great aspects of Tensorflow and PyTorch as deep learning frameworks is the ability to capitalise on in-built pre-trained models. Both frameworks include many of the most popular models pretrained on ImageNet for you to use for free. Better yet, it’s quite easy to start using these networks, and replace the classification layers with something that better fits your problem.
Tensorflow和PyTorch作为深度学习框架的重要方面之一就是能够利用内置的预训练模型。 这两个框架都包含许多在ImageNet上经过预训练的最受欢迎的模型,供您免费使用。 更好的是,开始使用这些网络并用更适合您的问题的方式替换分类层非常容易。
Tensorflow预训练模型 (Tensorflow pre-trained model)
One particularly easy way of using a pre-trained model in Tensorflow is through Keras Applications, which are canned architectures with pre-trained weights. Note that this is not the only way of using pre-trained models, but it’s probably the easiest. If your model of choice isn’t listed here you can check out TFHub or TF Model Garden.
在Tensorflow中使用预训练模型的一种特别简单的方法是通过Keras Applications ,它是具有预训练权重的固定结构。 请注意,这不是使用预训练模型的唯一方法,但这可能是最简单的方法。 如果未在此处列出您选择的型号,则可以查看TFHub或TF Model Garden 。
This training code, applied to 850 cat/dog training images, with 150 validation images, on a MacBook Pro with no GPU, gives the following results:
在没有GPU的MacBook Pro上,将此训练代码应用于850个猫/狗训练图像和150个验证图像,得出以下结果:
This is much better than the simple model! Note that the training time is lower than the simple model due to the smaller number of parameters actually being trained (even though the whole model is much larger).
这比简单模型要好得多! 请注意,由于实际训练的参数数量较少(即使整个模型要大得多),因此训练时间比简单模型要短。
PyTorch预训练模型 (PyTorch pre-trained model)
The Pytorch equivalent of Keras Applications is Torchvision. Torchvision pre-trained networks require their inputs to be normalised in a particular way, see here for details. As mentioned earlier, I normalised the images in the data augmentation stage.
Keras应用程序的Pytorch等效项是Torchvision 。 Torchvision预训练网络要求以特定方式将其输入归一化,有关详细信息,请参见此处 。 如前所述,我在数据扩充阶段对图像进行了标准化。
We don’t want to train the feature extraction stage of the network, therefore we turn off the ‘requires_grad’ flag of the network for all layers, before replacing the second classification layer with our own (trainable) linear layer. We pass only this layer in to the optimizer.
我们不想训练网络的特征提取阶段,因此在用我们自己的(可训练的)线性层替换第二个分类层之前,请关闭所有层的网络的'requires_grad'标志。 我们仅将这一层传递给优化器。
This training code, applied to 850 cat/dog training images, with 150 validation images, on a MacBook Pro with no GPU, gives the following results:
在没有GPU的MacBook Pro上,此训练代码应用于850个猫/狗训练图像和150个验证图像,得出以下结果:
模型评估 (Model evaluation)
It’s been a long read but we’re almost there, we just need to evaluate the models. The following code assumes you’ve already created the model layout, and therefore just need to load the weights from file.
读了很长的书,但是我们差不多了,我们只需要评估模型即可。 以下代码假定您已经创建了模型布局,因此只需要从文件中加载权重即可。
Tensorflow模型评估 (Tensorflow model evaluation)
The Tensorflow method ‘load_weights’ used on the predefined model structure loads and applies the trained parameters of the model found in the selected checkpoint file. The following code grabs one batch of images from the test set and runs them through the model.
预定义模型结构上使用的Tensorflow方法“ load_weights”加载并应用在选定检查点文件中找到的模型的训练参数。 以下代码从测试集中获取一批图像,并在模型中运行它们。
Pytorch模型评估 (Pytorch model evaluation)
The Pytorch function ‘load_state_dict’ applies the state of the parameters of ‘model’ found in the selected checkpoint file. The following code grabs one batch of images from the test set and runs them through the model.
Pytorch函数“ load_state_dict”应用在选定检查点文件中找到的“模型”参数的状态。 以下代码从测试集中获取一批图像,并在模型中运行它们。
摘要 (Summary)
I hope that this tutorial has given you a better understanding of the use of the counterpart to your preferred framework. Both frameworks have developed to the point that they’re simultaneously easy to use for beginners and highly customisable when required. To see the code in full, check out the code on GitHub.
我希望本教程可以使您对首选框架的对应用法有更好的了解。 两种框架都发展到了既适合初学者又易于定制的高度。 要查看完整的代码,请在GitHub上查看代码 。
翻译自: https://towardsdatascience.com/a-tale-of-two-frameworks-985fa7fcec
html两个框架同时


 62万+
62万+

 被折叠的 条评论
为什么被折叠?
被折叠的 条评论
为什么被折叠?
 到【灌水乐园】发言


