


python做作业没头绪
Applying OpenCV and Tesseract to do your math-homework
应用OpenCV和Tesseract进行数学作业
The possibilities to use Python are almost endless — repetitive tasks especially can be solved easily using Python. Here we show how Python can be used to automatically answer problems on a math worksheet.
使用Python的可能性几乎是无限的-重复的任务尤其可以使用Python轻松解决。 在这里,我们展示了如何使用Python自动回答数学工作表上的问题。
First we take a look at the math questions:
首先我们看一下数学问题:

Nothing too difficult, but the amount of questions could make it very tiring to solve and fill in every single one. Instead, let us try it in Python!
没什么难的,但是大量的问题会使解决和填写每一个问题变得很累人。 相反,让我们在Python中尝试一下!
We start by importing the relevant packages. In fact, we need exactly three packages. The first package enables us to read the questions, meaning it transforms image to text. The package we are talking about is called pytesseract. It is important to note that a bit more work than only pip install … is required to get it running. Here is a link to a good tutorial regarding this problem.
我们首先导入相关的软件包。 实际上,我们需要三个软件包。 第一个软件包使我们能够阅读问题,这意味着它将图像转换为文本。 我们正在谈论的软件包称为pytesseract。 重要的是要注意,要运行它,不仅需要点安装,还需要做更多的工作。 这里是有关此问题的优秀教程的链接。
The second package is necessary for finding where exactly the solution should be written. This means we have to tell the machine that the answer of every equation should be written in the black squares next to the equation. In order to find and identify these squares, OpenCV is needed.
第二个程序包对于找到解决方案的确切位置是必需的。 这意味着我们必须告诉机器,每个方程的答案都应该写在方程旁边的黑色方块中。 为了找到和识别这些正方形,需要OpenCV。
Last but not least we import a package which is able to handle strings or regular expression operations, called “re” for short.
最后但并非最不重要的一点是,我们导入一个能够处理字符串或正则表达式操作的包,简称为“ re”。
import pytesseract as tess
path = (r"C:\Users\PaulM\AppData\Local\Tesseract-OCR\tesseract.exe")
tess.pytesseract.tesseract_cmd = path
import cv2
import re
01阅读问题 (01 Reading the questions)
We start by importing the picture and apply the image_to_string function from tesseract
我们首先导入图片,然后从tesseract应用image_to_string函数
png = "{}\questions.png".format(raw_path)
text = tess.image_to_string(png)
Looking at the results below, it seems at first glance that everything worked succesfully. Our result is one big string where each equation is delimited by a line break, which is denoted as a \n symbol.
查看下面的结果,乍看之下一切正常。 我们的结果是一个大字符串,其中每个方程式均由换行符分隔,该换行符表示为\ n符号。

However, a bit more cleaning is still necessary before doing the calculations. First we have to remove all spaces between numbers and then figure out which part of this string represent actual questions. This is done with the following three lines of code:
但是,在进行计算之前,仍然需要进行更多清洁工作。 首先,我们必须删除数字之间的所有空格,然后找出该字符串的哪一部分代表实际问题。 这是通过以下三行代码完成的:
text.replace(" ", "")
pattern = re.compile("[0-9]+x[0-9]+")
equations = [x for x in parsed_text if bool(re.match(pattern, x))]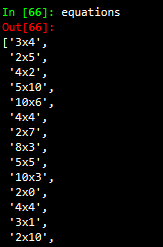
The last line of the code above is filtering the long string shown above and only extracts a certain string pattern. Specifically, it extracts an undefined amount of numbers (denoted as [0–9]+) then the letter x and then again an undefined amount of numbers. The result of that code is a list which contains all equations.
上面代码的最后一行正在过滤上面显示的长字符串,并且仅提取特定的字符串模式。 具体来说,它将提取数量不确定的数字(表示为[0-9] +),然后提取字母x ,再提取数量不确定的数字。 该代码的结果是一个包含所有方程式的列表。
The last step is probably the easiest, namely to calculate the solutions of all the equations. For this we build a small function, which is then used within a list comprehension to solve the equations.
最后一步可能是最简单的,即计算所有方程的解。 为此,我们构建了一个小函数,然后将其用于列表推导中来求解方程。
def multiplication (equation):
    split_equation = equation.split("x")
    num1 = int(split_equation[0])
    num2 = int(split_equation[1])
    return str(num1 * num2)solutions = [multiplication(x) for x in equations]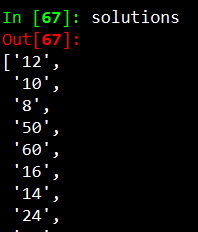
The result of this function is the solutions of all questions. In total we end up with a list with the length of 40, which is the exact number of questions on the sheet.
该功能的结果是所有问题的解决方案。 总的来说,我们得到一个长度为40的列表,这是工作表上确切的问题数。
02处理图像 (02 Processing the image)
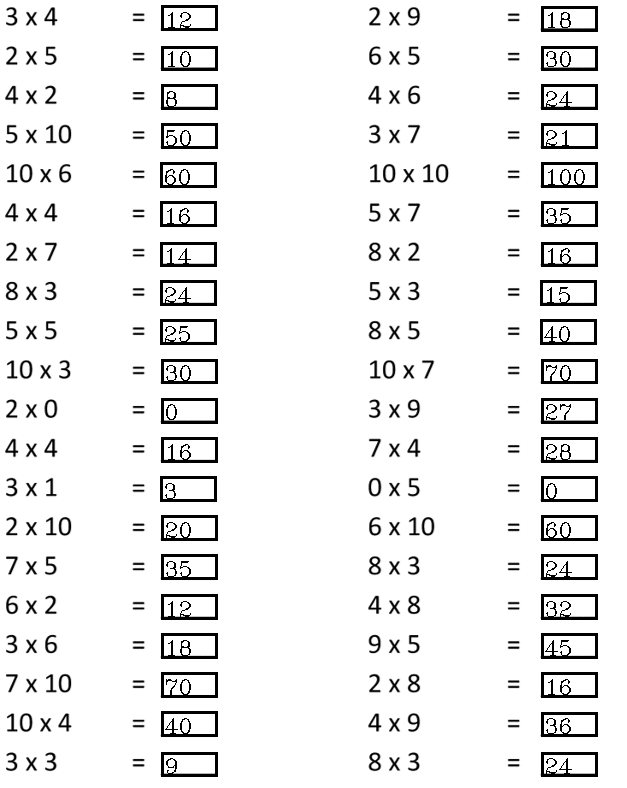
The next step is now to fill in the solutions back on the questionnaire. This sounds easier then it actually is. To fill in the answers on the sheet, we have to find a specific location on the png where we want the solution to be written. In our example, we would like to find the coordinates of the black answer box which is next to every equation.
现在的下一步是将解决方案重新填写到问卷中。 听起来比实际要容易。 要在工作表上填写答案,我们必须在png上找到要写入解决方案的特定位置。 在我们的示例中,我们希望找到每个方程式旁边的黑色答案框的坐标。
We start by reading in the image using OpenCV. Next, we transform the picture into a gray-scale format. This is done in order to compress information. Since we would like to identify a certain shape on an image, colors are not important to us and we can move from a tensor to a matrix.
我们首先使用OpenCV读取图像。 接下来,我们将图片转换为灰度格式。 这样做是为了压缩信息。 由于我们想在图像上确定某种形状,因此颜色对我们而言并不重要,因此我们可以从张量转变为矩阵。
raw_img = cv2.imread(png)
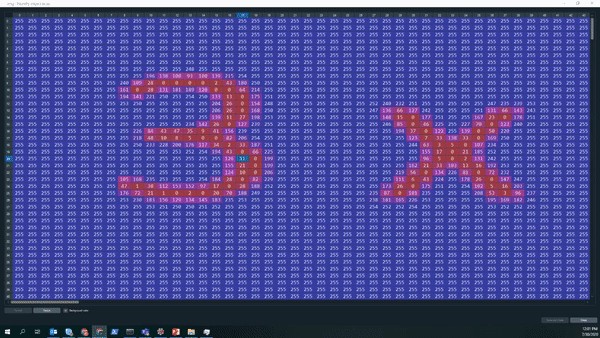
img = cv2.imread(png, cv2.IMREAD_GRAYSCALE)Let’s take a look on how the output of the gray-scale looks like. The Gif below nicely shows that we now have a large matrix containing all the pixels of the picture. We can see that most of the picture is covered with white pixels (white encodes to the integer 255). Furthermore, we can even read the equation, the equal sign, as well as the answer box ny looking at where the pixel number and color changes.
让我们看一下灰度输出的样子。 下面的Gif很好地显示了我们现在有一个包含图片所有像素的大矩阵。 我们可以看到大部分图片被白色像素覆盖(白色编码为整数255)。 此外,我们甚至可以读取等式,等号以及查看像素数和颜色变化位置的答案框ny。
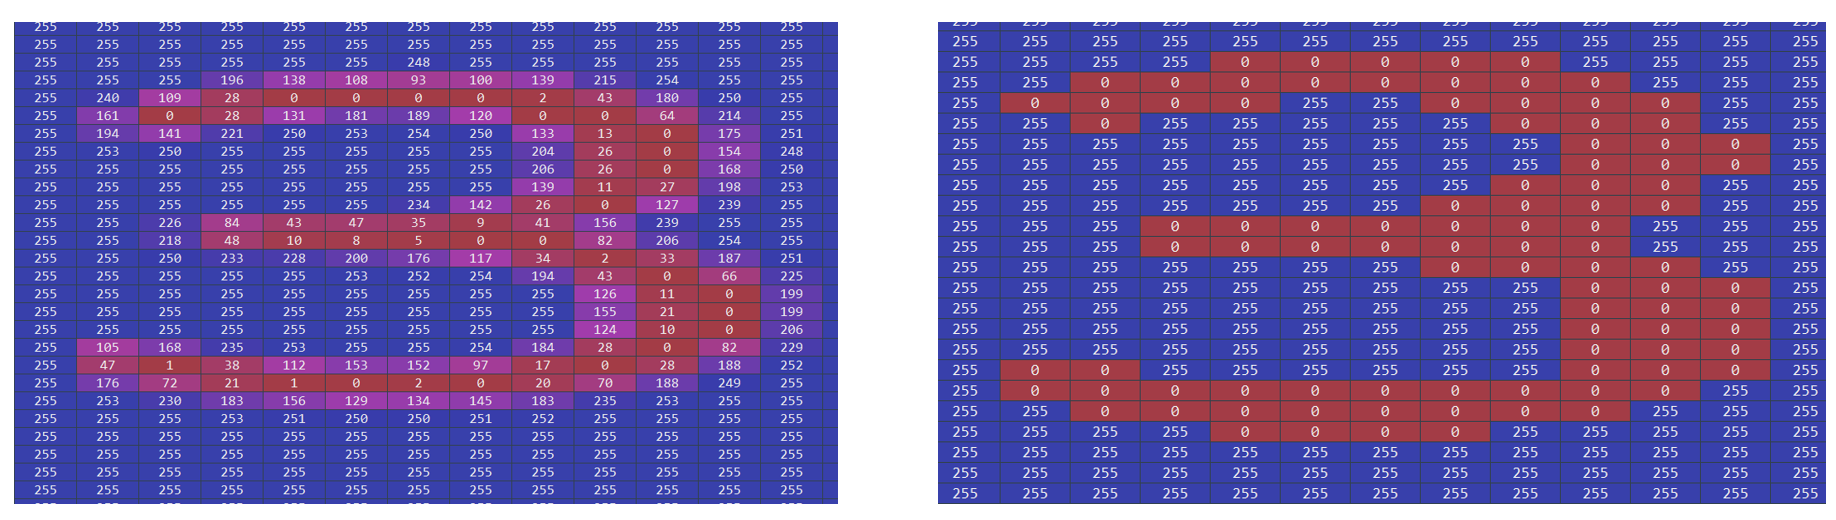
The pixels representing the answer box are of particular interest to us, since we would like the answer to be placed within it. Before continuing to identify the box, some pre-processing is necessary — namely to enhance the contrast between the box and the white background for better identification of the shapes, a process called thresholding. An example which exemplifies the need to do that, is shown below. On the left side we have the number three shown from the initial image, whereas on the right side we have the same number after applying the thresholding.
代表答案框的像素对我们特别感兴趣,因为我们希望将答案放置在其中。 在继续识别盒子之前,必须进行一些预处理-即增强盒子和白色背景之间的对比度,以便更好地识别形状,此过程称为阈值处理。 下面显示了一个示例,说明了这样做的必要性。 在左侧,我们显示了初始图像中显示的数字3,而在使用阈值后,我们使用了相同的数字。
As can be seen below, a written number is not entirely black. Especially on the sides the strength of the ink fades out. In order to make it easier for the computer to identify clear shapes, like a square for example, we turn every pixel below a certain threshold black and the rest white.
如下所示,一个书面数字并非全是黑色的。 尤其是在侧面,墨水的强度逐渐减弱。 为了使计算机更容易识别清晰的形状(例如正方形),我们将每个低于特定阈值的像素设为黑色,将其余像素变为白色。
img = cv2.imread(png, cv2.IMREAD_GRAYSCALE)
_, threshold = cv2.threshold(img, 170, 255, cv2.THRESH_BINARY)
The code above shows how this step was implemented. The first line reads in the png we imported at the beginning and directly transforms it into a gray-scaled picture. The second line then applies the thresholding to the gray-scaled image. This is done by specifying the image, the threshold value (in our case 170, which is obtained by trial and error), the maximum value (in our case we would like the pixels to turn white if the exceed the threshold), and the way OpenCV should apply the thresholding. Binary thresholding means that there will be a clear cut — every pixel with a value below the thresholding will be set to zero, every pixel above the threshold will be set to the maximum value, in our case 255.
上面的代码显示了如何执行此步骤。 第一行读入我们一开始导入的png,并将其直接转换为灰度图片。 然后第二行将阈值应用于灰度图像。 这是通过指定图像,阈值(在我们的情况下为170,这是通过反复试验获得的),最大值(在我们的情况下,如果像素超过阈值,我们希望像素变为白色)以及OpenCV应该应用阈值的方式。 二进制阈值意味着存在明确的界限-每个值低于阈值的像素都将设置为零,高于阈值的每个像素都将设置为最大值(在我们的示例中为255)。
The next step is then to identify the squares within our image. This is done by the handy function called findContours
然后,下一步是识别图像中的正方形。 这是通过名为findContours的便捷函数完成的
contours, _ = cv2.findContours(threshold, cv2.RETR_TREE,
                               cv2.CHAIN_APPROX_SIMPLE)
We see that the function takes three inputs (it thas more arguments than that, but these three are relevant for our problem). The first input represents our thresholded image. The second input is not of great importance to us, since it states which kind of hierarchy should be used when storing the contours. The third output defines how a shape should be saved.
我们看到该函数接受三个输入(其参数更多,但是这三个与我们的问题有关)。 第一个输入代表我们的阈值图像。 第二个输入对我们而言并不重要,因为它指出了存储轮廓时应使用哪种层次结构。 第三个输出定义应如何保存形状。
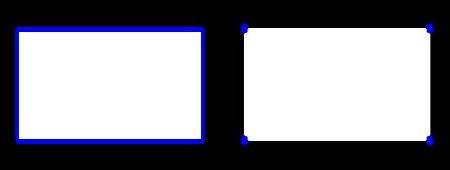
The image below shows this last point visually. Even though we have two white squares, there are two different in which we could save the relevant information needed to replicate these squares: we could either save every single pixel, as it is done in the left picture, or we save only the corner coordinates. Needless to say, the right one would use significantly less memory. Exactly this method is specified when the cv2.CHAIN_APPROX_SIMPLE in the command above was called.
下图直观地显示了最后一点。 即使我们有两个白色正方形,也有两个可以保存复制这些正方形所需的相关信息的方法:我们可以保存每个像素(如左图所示),或者仅保存角坐标。 不用说,正确的人将使用更少的内存。 当调用上述命令中的cv2.CHAIN_APPROX_SIMPLE时,正是指定了此方法。
03插入解决方案 (03 Inserting the solutions)
After storing all the information of all kind of shapes from the picture, we would like to restrict the shapes we are looking for to the squares. As outlined above, we stored the information of every shape by storing the coordinates of the corner points of every contour. Since we are interested in squares, only contours which have exactly four corner points are relevant for our problem.
在存储完图片中各种形状的所有信息之后,我们希望将所需形状限制为正方形。 如上所述,我们通过存储每个轮廓的拐角点的坐标来存储每个形状的信息。 由于我们对正方形感兴趣,因此只有正好具有四个角点的轮廓才与我们的问题有关。
rectangles = [x for x in contours[1:] if (len(x)==4)]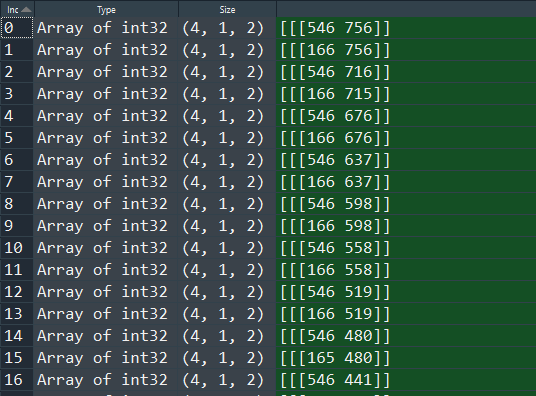
One not very intuitive feature of the OpenCV function findCountours is that it detects contours from right to left and from bottom to top. This created a bit of a problem, given that we our solutions are stored in a different way, namely from top to bottom and left to right. In order to align these two lists, we alter the rectangles list we created in the code above through the following code
OpenCV函数findCountours的一项不是很直观的功能是它从右到左以及从下到上检测轮廓。 考虑到我们的解决方案以不同的方式存储,即从上到下,从左到右,这造成了一个问题。 为了对齐这两个列表,我们通过以下代码更改了在上面的代码中创建的矩形列表
right_side = list(reversed(rectangles[0::2]))
left_side = list(reversed(rectangles[1::2]))
sorted_list = left_side + right_side
Now the solutions as well as the rectangle information are both in same order. Last but not least we then have to write the solutions into the rectangle. This is done by extracting the bottom left x and y coordinate, which is shown in the image below as the red circle.
现在,解和矩形信息都处于相同的顺序。 最后但并非最不重要的一点是,我们必须将解写入矩形中。 这是通过提取左下角的x和y坐标完成的,在下图中显示为红色圆圈。
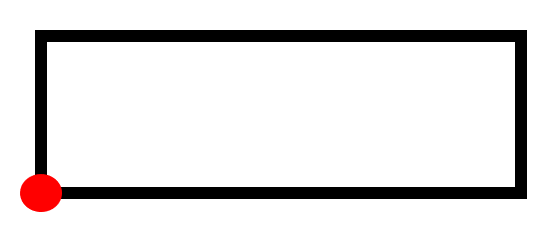
The actual writing of the solution for each question is done by a function called putText. The input of the function are relatively straight forward. Namely, we insert the image as well as some coordinates and a font.
每个问题的答案的实际编写是通过一个称为putText的函数完成的。 函数的输入相对简单。 即,我们插入图像以及一些坐标和字体。
font = cv2.FONT_HERSHEY_COMPLEX
for i, j in zip(solutions, sorted_list):
    x = j[1][0][0]
    y = j[1][0][1]
    cv2.putText(img, i, (x, y), font, 0.7, (0))cv2.imshow("Threshold", img)
cv2.waitKey(0)
cv2.destroyAllWindows()
Finally we then can display our results, which look very promising. It might be that solving these question by hand instead of using Python could have been quicker, but it would have been considerably less fun!
最后,我们可以显示我们的结果,这看起来很有希望。 也许手动解决这些问题而不是使用Python可能会更快,但乐趣会大大减少!
翻译自: https://medium.com/swlh/using-python-to-do-your-homework-4453264ba517
python做作业没头绪


 301
301


 被折叠的 条评论
为什么被折叠?
被折叠的 条评论
为什么被折叠?
 到【灌水乐园】发言


