


 本文深入探讨了边缘计算的概念,重点关注边缘AI如何在设备端进行计算机视觉推理。通过引用一篇翻译文章,阐述了如何在边缘计算环境中应用机器学习和计算机视觉技术,如OpenCV,以实现高效的数据处理和分析。
边缘计算边缘计算edge
Carsten Moenning, Ph.D.
卡斯滕·莫宁(Carsten Moenning)博士
This is the final part of a two-part series on running AI applications on the edge in general and Computer Vision inference on an Intel Neural Compute Stick 2-accelerated Raspberry Pi 3, in particular.
Ť他是在对英特尔的神经计算棒2加速树莓派3一般与计算机视觉推理边缘延伸AI的应用,特别是两部分系列的最后一部分。
Have a look at part 1 to obtain:
看一下第1部分 ,获得:
- an overview of edge AI hardware accelerator and development board options, 边缘AI硬件加速器和开发板选项的概述,
- a guide as to how to configure a Raspberry Pi with an on-board camera as an edge AI-ready device, 有关如何使用车载摄像头将Raspberry Pi配置为边缘AI就绪设备的指南,
- a guide as to how to install the Intel OpenVINO toolkit on the Raspberry Pi and, for example, your laptop, to get ready for performing Computer Vision inference on the Raspberry Pi. 有关如何在Raspberry Pi上(例如您的笔记本电脑)安装Intel OpenVINO工具包的指南,以准备在Raspberry Pi上执行计算机视觉推理。
This second part builds on steps 2 and 3. Whilst part 1 finished with an OpenVINO face detection demo application running on a Raspberry Pi, this post deals with developing your very own Computer Vision custom solution on such an edge device. More specifically, I will walk you through the custom implementation of a YOLOv3-tiny object detection model on a Raspberry Pi pre-configured as described in part 1. (Details on the YOLOv3 object detection model can be found here.) But, first, let’s have a closer look at the open source Intel OpenVINO toolkit in general and the OpenVINO toolkit for Raspbian OS, in particular. 🗹
第二部分基于第2步和第3步。第1部分完成了在Raspberry Pi上运行的OpenVINO人脸检测演示应用程序,而本文则涉及在这种边缘设备上开发自己的Computer Vision定制解决方案。 更具体地说,我将引导您完成在第1部分中所述预先配置的Raspberry Pi上的YOLOv3-tiny对象检测模型的自定义实现。(有关YOLOv3对象检测模型的详细信息,请参见此处 。)但是,首先,让我们仔细了解一下开放源代码的Intel OpenVINO工具包 ,特别是Raspbian OS的OpenVINO工具包 。 🗹
The Intel OpenVINO toolkit
英特尔OpenVINO工具包
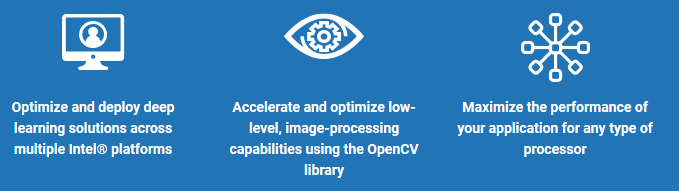
To quote the official OpenVINO toolkit documentation: “The OpenVINO™ toolkit is a comprehensive toolkit for quickly developing applications and solutions that emulate human vision. Based on Convolutional Neural Networks (CNNs), the toolkit extends CV workloads across Intel® hardware, maximizing performance.”
引用官方的OpenVINO工具包文档:“ OpenVINO™工具包是一种综合工具包,用于快速开发可模拟人类视觉的应用程序和解决方案。 该工具包基于卷积神经网络(CNN),可在英特尔®硬件上扩展CV工作负载,从而最大限度地提高性能。”
To quote further, the toolkit:
进一步引用该工具包:
- “enables CNN-based deep learning inference on the edge “在边缘启用基于CNN的深度学习推理
- supports heterogeneous execution across an Intel® CPU, Intel® Integrated Graphics, Intel® FPGA, Intel® Neural Compute Stick 2 and Intel® Vision Accelerator Design with Intel® Movidius™ VPUs 支持通过英特尔®Movidius™VPU在英特尔®CPU,英特尔®集成显卡,英特尔®FPGA,英特尔®神经计算棒2和英特尔®视觉加速器设计之间进行异构执行
- speeds time-to-market via an easy-to-use library of computer vision functions and pre-optimized kernels 通过易于使用的计算机视觉功能和预优化内核库,加快了产品上市时间
- includes optimized calls for computer vision standards, including OpenCV and OpenCL™.” 包括对计算机视觉标准(包括OpenCV和OpenCL™)的优化呼吁。”
Amongst other things, this implies that the toolkit is particularly well-suited for the development of Computer Vision inference applications on edge devices such as a Raspberry Pi enhanced by an Intel Neural Compute Stick 2 USB accelerator stick featuring the Intel Movidius VPU.
除其他外,这意味着该工具包特别适合在边缘设备(例如通过具有Intel Movidius VPU的Intel Neural Compute Stick 2 USB加速棒增强的Raspberry Pi)上开发计算机视觉推理应用程序。
⚡ In case you might be wondering: “OpenVINO” stands for “Open Visual Inference and Neural Network Optimization”, indicating its Deep Learning Computer Vision focus. ⚡
⚡也许您会感到奇怪:“ OpenVINO”代表“开放式视觉推理和神经网络优化”,表示其深度学习计算机视觉的重点。 ⚡
The main elements of the OpenVINO toolkit consist of:
OpenVINO工具包的主要元素包括:
- the Model Optimizer, 模型优化器
- the Inference Engine and 推理引擎和
- the Open Model Zoo. 开放模型动物园。
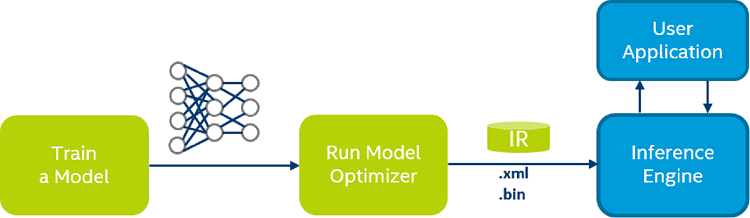
The Model Optimizer takes Deep Learning Computer Vision models pre-trained in the Caffe, TensorFlow, MXNet, Kaldi or ONNX frameworks and converts them into the OpenVINO Intermediate Representation (IR), a streamlined model representation optimised for model execution using the Inference Engine running on an edge device. The Inference Engine loads and infers these IR files using a common API for both CPU and GPU as well as VPU hardware.
模型优化器采用在Caffe,TensorFlow,MXNet,Kaldi或ONNX框架中预先训练的深度学习计算机视觉模型,并将其转换为OpenVINO中间表示(IR),这是一种简化的模型表示,可使用运行在以下平台上的推理引擎进行模型执行优化。边缘设备。 推理引擎使用针对CPU和GPU以及VPU硬件的通用API加载和推断这些IR文件。
The Open Model Zoo provides pre-trained models for free download that can be used to speed up the development process by not having to train one’s own model first, which would then need to be converted into the Intermediate Representation using the Model Optimizer next before being ready for use with the Inference Engine on the edge device under consideration.
Open Model Zoo提供了免费的预训练模型,可以免费下载,无需先训练自己的模型即可用于加速开发过程,然后需要先使用Model Optimizer将其转换为中间表示形式,然后再进行建模准备与正在考虑的边缘设备上的推理引擎一起使用。
When not using a pre-trained model from the Open Model Zoo, the typical workflow for deploying a deep learning model on the edge using the OpenVINO toolkit is shown below.
当不使用Open Model Zoo中的预训练模型时,使用OpenVINO工具包在边缘部署深度学习模型的典型工作流程如下所示。
So, Open Model Zoo models come with the advantage of already having been converted into the OpenVINO Intermediate Representation, but what is the Intermediate Representation?
因此,Open Model Zoo模型的优点是已经转换为OpenVINO中间表示,但是什么是中间表示?
The IR describes the result of an input model, which has been optimised for edge inference with the help of one or multiple of the following techniques:
IR描述了输入模型的结果,借助以下一种或多种技术,该模型已针对边沿推理进行了优化:
- quantization, i.e. the reduction in numerical precision of the model weights and bias, 量化,即模型权重和偏差的数值精度降低,
- model layer fusion, i.e. the combination of multiple model layers into one, 模型层融合,即将多个模型层组合成一个层,
- freezing, i.e. the removal of metadata and operations which were only useful for model training (in the case of TensorFlow models only). 冻结,即删除仅对模型训练有用的元数据和操作(仅在TensorFlow模型的情况下)。
You are also perfectly free to use models from other sources, of course. These will have to go through step two of the OpenVINO workflow, though. That is, you will have to apply the Model Optimizer to the input model to produce its inference-optimised IR.
当然,您也可以完全自由地使用其他来源的模型。 不过,这些步骤必须经过OpenVINO工作流程的第二步。 也就是说,您必须将Model Optimizer应用于输入模型,以产生其推理优化的IR。
Once the IR is generated, its .xml (optimised model topology) and .bin (optimised model weights and biases) files can be fed into the OpenVINO Inference Engine running on the edge device for performance-optimised inference on the edge.
生成IR后,可以将其.xml(优化的模型拓扑)和.bin(优化的模型权重和偏差)文件输入到在边缘设备上运行的OpenVINO推理引擎中,以对边缘进行性能优化的推理。
In fact, we already made our way through this workflow the easy way during the face detection example in part 1 of this two-part blog series: We downloaded a pre-trained face detection model from the Open Model Zoo. More specifically, since the OpenVINO Model Downloader is not available within the OpenVINO toolkit for Raspbian OS, we downloaded the IR files manually onto the Raspberry Pi and fed them into the Inference Engine for bounding box generation on an input image.
实际上,在这个由两部分组成的博客系列的第1部分中 ,我们已经通过脸部检测示例中的简单方法来完成此工作流程:我们从Open Model Zoo下载了预先训练的脸部检测模型。 更具体地说,由于OpenVINO模型下载器在Raspbian OS的OpenVINO工具包中不可用,因此我们将IR文件手动下载到Raspberry Pi上,并将其输入到推理引擎中,以在输入图像上生成边界框。
We will now take the slightly more challenging route of converting a pre-trained public model, the “tiny” version of YOLOv3 [2], into the IR via the Model Optimizer. This gets us to a crucial point: Since the OpenVINO Inference Engine represents the only OpenVINO main element included within the OpenVINO toolkit for Raspbian OS, the model conversion needs to be done outside of the Raspberry Pi environment, for example, on your main machine, which means that you will need to install OpenVINO on your main machine as well. With the help of the OpenVINO Linux, macOS and Windows installation guides, this should prove not to be too much of a challenge.
现在,我们将采取更具挑战性的方法,即通过模型优化器将经过预训练的公共模型YOLOv3 [2]的“微型”版本转换为IR。 这将我们带到了关键点:由于OpenVINO推理引擎代表Raspbian OS的OpenVINO工具包中包含的唯一OpenVINO主要元素,因此模型转换需要在Raspberry Pi环境之外进行,例如,在您的主机上,这意味着您还需要在您的主机上安装OpenVINO。 在OpenVINO Linux , macOS和Windows安装指南的帮助下,这应该证明不是太大的挑战。
⚡ In the case of the OpenVINO toolkit for Windows, you could do without the Microsoft Visual Studio and CMake installation steps, since, in the following, we will be using the Model Optimizer only. However, if you want to have a fully-fledged OpenVINO installation on your Windows machine, it is, of course, strongly recommended to complete all of the installation steps. ⚡
⚡对于Windows的OpenVINO工具包,您可以不用Microsoft Visual Studio和CMake安装步骤,因为在下面,我们将仅使用模型优化器。 但是,如果要在Windows机器上进行完整的OpenVINO安装,则强烈建议您完成所有安装步骤。 ⚡
You are now all set for the custom implementation of the YOLOv3-tiny [2] model on your Raspberry Pi.
现在,您已经准备好在Raspberry Pi上自定义实现YOLOv3-tiny [2]模型。
Converting a pre-trained YOLOv3-tiny model into the OpenVINO Intermediate Representation
将预先训练的YOLOv3-tiny模型转换为OpenVINO中间表示
With the OpenVINO installation on your main machine out of the way, let’s generate an IR of the YOLOv3-tiny model. The network architecture of YOLOv3-tiny is execution-optimised for low-performance devices at the expense of reduced prediction accuracy: It uses only 19 convolutional layers instead of the 53 convolutional layers of the standard YOLOv3 model. As a consequence, it is much more execution-efficient than the standard YOLOv3 model, but also much less accurate with a mean average precision (mAP) of 33.1% compared to a mAP value of 51–57% of the standard YOLOv3 model.
通过在主机上安装OpenVINO,让我们生成YOLOv3-tiny模型的IR。 YOLOv3-tiny的网络体系结构针对低性能设备进行了执行优化,以降低预测精度为代价:它仅使用19个卷积层,而不是标准YOLOv3模型的53个卷积层。 因此,它比标准YOLOv3模型的执行效率高得多,但与标准YOLOv3模型的51-57%的mAP值相比,其平均平均精度(mAP)为33.1%时精度要低得多。
To convert the YOLOv3-tiny model into the IR format, we will largely follow the OpenVINO guide for converting YOLO models.
要将YOLOv3-tiny模型转换为IR格式,我们将在很大程度上遵循OpenVINO 指南来转换YOLO模型 。
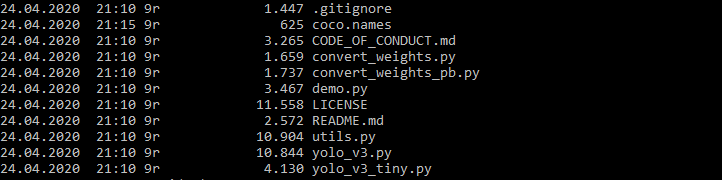
Step 1: Clone the following GitHub repository to obtain a TensorFlow-based YOLOv3-tiny implementation.
步骤1 :克隆以下GitHub存储库以获得基于TensorFlow的YOLOv3-tiny实现。
⚡ In principle, you can also use any other TensorFlow-based YOLOv3-tiny model implementation, but you may run into difficulties when trying to convert it into the Intermediate Representation using the steps below. ⚡
⚡原则上,您也可以使用任何其他基于TensorFlow的YOLOv3-tiny模型实现,但是当您尝试使用以下步骤将其转换为中间表示形式时,您可能会遇到困难。 ⚡
git clone https://github.com/mystic123/tensorflow-yolo-v3.git
git clone https://github.com/mystic123/tensorflow-yolo-v3.git

Step 2: Download a set of class labels in the form of, for example, coco.names, which includes 80 common object classes ranging from people to cars and animals, or provide your own set of class labels you want to do inference on using YOLOv3-tiny, subject to YOLOv3-tiny having been pre-trained on your classes of choice.
第2步 :以例如coco.names的形式下载一组类标签,其中包括80种常见的对象类,范围从人到汽车和动物,或者提供您自己的一组要推断使用的类标签YOLOv3-tiny,请按照您选择的课程预先训练YOLOv3-tiny。
Step 3: Download pre-trained YOLOv3-tiny weights, or train YOLOv3-tiny yourself and use the resulting model weights.
步骤3 :下载经过预先训练的YOLOv3-tiny权重 ,或者自己训练YOLOv3-tiny权重 ,然后使用生成的模型权重。
Step 4: Convert the YOLOv3 model to the protocol buffer file format (.pb) to obtain a simplified, i.e. “frozen”, model definition for inference.
步骤4 :将YOLOv3模型转换为协议缓冲区文件格式(.pb),以获取简化的模型(即“冻结”)模型定义以进行推断。
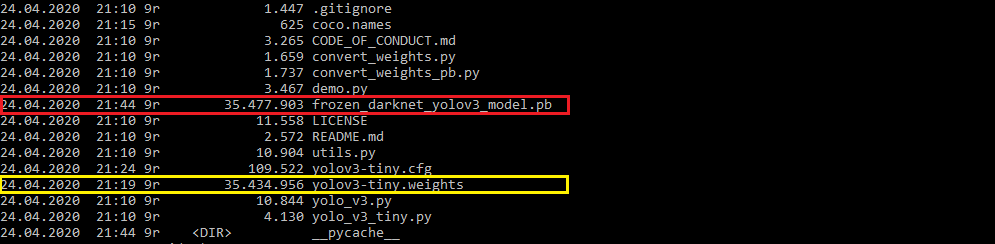
python convert_weights_pb.py --class_names coco.names --data_format NHWC --weights_file yolov3-tiny.weights --tiny
python convert_weights_pb.py --class_names coco.names --data_format NHWC --weights_file yolov3-tiny.weights --tiny
The --tiny parameter at the end of the statemenet instructs the converter to generate the YOLOv3-tiny version of the frozen TensorFlow graph.
--tiny末尾的--tiny参数指示转换器生成冻结的TensorFlow图的YOLOv3-tiny版本。
Step 5: Convert the frozen model defintion to its IR format. Don’t forget to execute the OpenVINO setupvars environment setup script located in $OPENVINO_INSTALL_DIR/bin/ prior to this step.
步骤5 :将冻结的模型定义转换为其IR格式。 在执行此步骤之前,请不要忘记执行位于$OPENVINO_INSTALL_DIR/bin/的OpenVINO setupvars环境设置脚本。
python mo_tf.py --input_model frozen_darknet_yolov3_model.pb --tensorflow_use_custom_operations_config <path/>yolo_v3_tiny.json --batch 1 --generate_deprecated_IR_V7
python mo_tf.py --input_model frozen_darknet_yolov3_model.pb --tensorflow_use_custom_operations_config <path/>yolo_v3_tiny.json --batch 1 --generate_deprecated_IR_V7
where the OpenVINO <path/> to the yolo_v3_tiny.json model configuration file should look something like this:
yolo_v3_tiny.json模型配置文件的OpenVINO <path/>应该看起来像这样:
$OPENVINO_INSTALL_DIR/deployment_tools/model_optimizer/extensions/front/tf/
$OPENVINO_INSTALL_DIR/deployment_tools/model_optimizer/extensions/front/tf/
⚡ The --generate_deprecated_IR_V7 parameter forces the Model Optimizer to generate the older IR version 7. This is due to the compatability bug associated with the IR version 10 already mentioned in part 1. If not using this parameter, your converted model will fail during inference with somewhat intractable error messages. ⚡
⚡-- --generate_deprecated_IR_V7参数强制模型优化器生成较旧的IR版本7。这是由于与在第1部分中已经提到的IR版本10相关的兼容性错误 。 如果不使用此参数,则转换后的模型将在推理过程中失败,并带有一些棘手的错误消息。 ⚡
⚡ If you want to run OpenVINO demos using your converted model, please note that you may need to add the --reverse_input_channel option, since OpenVINO demos typically expect the colour channels to be in BGR rather than the usual RGB order. Consult the official OpenVINO demo documentation to check the demo’s specific input requirements. ⚡
⚡如果要使用转换后的模型运行OpenVINO演示,请注意,您可能需要添加--reverse_input_channel选项,因为OpenVINO演示通常期望颜色通道为BGR,而不是通常的RGB顺序。 请查阅OpenVINO官方演示文档,以检查演示的特定输入要求。 ⚡
As a result, we obtain the edge-optimised YOLOv3-tiny network topology (.xml) and weight and bias terms (.bin) IR files.
结果,我们获得了边缘优化的YOLOv3-tiny网络拓扑(.xml)以及权重和偏差项(.bin)IR文件。
To test the validity of the generated IR files, you may want to run the OpenVINO object detection YOLOv3 demo on your main machine. Please take into account the --reverse_input_channel remark above in this context.
为了测试所生成的IR文件的有效性,您可能需要在主机上运行OpenVINO 对象检测YOLOv3演示 。 在这种情况下,请考虑上面的--reverse_input_channel备注。
The result for a sample input video can be shown below. As to be expected when using YOLOv3-tiny for inference, the frame rate easily hits near real-time inference throughout on a non-Edge device at the expense of partially rather poor car detection and bounding box accuracies.
样本输入视频的结果如下所示。 可以预期,使用YOLOv3-tiny进行推理时 ,整个非Edge设备上的帧速率很容易达到接近实时推理的水平,但代价是汽车检测和边界框的准确性很差。

To conclude this preparation stage, simply transfer the IR files to your Raspberry Pi. 🗹
要结束此准备阶段,只需将IR文件传输到Raspberry Pi。 🗹
This leaves us with incorporating the converted YOLOv3-tiny model in a custom-developed application running on the Raspberry Pi.
这使我们可以将转换后的YOLOv3-tiny模型整合到在Raspberry Pi上运行的定制开发的应用程序中。
Object detection application using YOLOv3-tiny on the edge
在边缘使用YOLOv3-tiny的物体检测应用程序
Our application consists of three main elements, which are, generally speaking, representative for most OpenVINO-based edge applications:
我们的应用程序包含三个主要元素,通常来说,它们是大多数基于OpenVINO的边缘应用程序的代表:
- Inference Engine model loading 推理机模型加载
- App-based input processing and inference request 基于应用程序的输入处理和推理请求
- App-based inference result and output processing 基于应用程序的推理结果和输出处理
This is reflected in the following code structure of our Raspberry PI application:
这反映在我们的Raspberry PI应用程序的以下代码结构中:
- Helper class for loading of the IR into the Inference Engine and performing inference 用于将IR加载到推理引擎并执行推理的Helper类
- Core routine consisting of video and camera input preprocessing, frame extraction and inference and video output processing 核心例程包括视频和摄像机输入预处理,帧提取和推断以及视频输出处理
- YOLOv3-tiny model parameterisation class YOLOv3-tiny模型参数化类别
We will use the Python wrapper of the Inference Engine API. The codebase can be found here on GitHub. The elements concerning YOLO inference processing largely coincide with, for example, the corresponding parts within object_detection_demo_yolov3_async.py from the OpenVINO YOLO showcase. So, to keep things easy and to the point, in the following, I discuss the OpenVINO-specific elements only.
我们将使用推理引擎API的Python包装器。 代码库可以发现这里在GitHub上。 与YOLO推理处理有关的元素,例如,与OpenVINO YOLO展示中的 object_detection_demo_yolov3_async.py的相应部分基本一致。 因此,为了使事情变得简单易懂,在下文中,我仅讨论OpenVINO特定的元素。
Let’s have a quick look at the YOLOv3-tiny parameterisation in the form of Python class YoloParams first. Its values correspond to the original darknet parameterisation, so no surprises here in principle. Choosing the “right” set of anchors (line 9–10), however, is as much an art as it is a science and the particular set of anchor values used here is likely not to be the best choice for the particular object detection scenarios under consideration further below. So, in case you, too, have been wondering about YOLO anchor parameter selection, please have a look here.
让我们以Python class YoloParams的形式快速浏览YOLOv3-tiny参数化。 它的值对应于原始的Darknet参数化,因此原则上在此不会感到惊讶。 然而,选择“正确的”锚点集(第9-10行)既是一门科学,也是一门艺术,这里使用的特定锚点值集可能不是特定对象检测场景的最佳选择。正在进一步考虑中。 因此,如果您也想知道YOLO锚点参数的选择,请在此处查看 。
The OpenVINO-specific methods provided by the helper class Network are more relevant in the context of this two-part blog series: The load_model method instantiates an object of the Inference Engine Core class, IECore (line 24 below). This class provides an abstraction layer across the supported devices hiding any device-specifics. As a consequence, the methods of this class typically expect the device one is actually working with as a parameter, which is why a device parameter is included in the load_model list of parameters. Since we are dealing with the Intel Neural Compute Stick 2 as inference device, this parameter’s default value is set to “MYRIAD”.
在这个分为两部分的博客系列中,助手class Network提供的OpenVINO特定方法更加相关: load_model方法实例化推理引擎核心类IECore的对象(下面的第24行)。 此类在受支持的设备上提供了一个抽象层,隐藏了所有设备特定信息。 结果,此类的方法通常期望设备实际与之一起使用作为参数,这就是为什么将设备参数包含在参数的load_model列表中的原因。 由于我们将Intel Neural Compute Stick 2作为推理设备,因此此参数的默认值设置为“ MYRIAD”。
The YOLOv3-tiny object detection model in the form of the previously created IR files are then read into an IENetwork object (line 29). The IENetwork class supports the reading and manipulation of model parameters such as batch size, numerical precision, model shape and various layer properties. This functionality is used to set the batch size to 1 (line 31), since we will be performing inference on one frame at a time. This single input requirement is also asserted in line 33 by looking at the model’s input topology. If successful, an executable version of the model is instantiated in line 36 and loaded into the MYRIAD device for inference. Finally, lines 39–40 create iterable objects for the model input and output layers with the help of the IENetwork object.
然后将先前创建的IR文件形式的YOLOv3-tiny对象检测模型读入IENetwork对象(第29行)。 IENetwork类支持读取和操纵模型参数,例如批处理大小,数值精度,模型形状和各种图层属性。 此功能用于将批处理大小设置为1(第31行),因为我们将一次对一帧执行推理。 通过查看模型的输入拓扑,在第33行中也可以断言这种单一输入要求。 如果成功,则在第36行实例化模型的可执行版本,并将其加载到MYRIAD设备中以进行推断。 最后,第39–40行借助IENetwork对象为模型输入和输出层创建可迭代对象。
⚡ Since we are dealing with a MYRIAD device, to keep things simple, I have opted against the usual safety check for unsupported network layers, which is required when using a CPU device for visual inference: Since the Model Optimizer preprocessing going into the IR file generation is device-agnostic, it is possible that the optimized neural network might contain layers not supported by the specific device CPU being used. It therefore needs to be checked for any unsupported layers prior to doing CPU-based inference and further processing is actually to be exited to prevent arbitrary results or system crashes if unsupported layers are encountered. Since the the above lines of code support CPU-based inference also and if you want to experiment with inference using the Raspberry Pi’s CPU instead of an Intel Neural Compute Stick 2, have a look at, for example, object_detection_demo_yolov3_async.py for the additional layer support-related code lines required. ⚡
⚡由于我们正在处理MYRIAD设备,为简单起见,我选择了针对不支持的网络层的常规安全检查,这在使用CPU设备进行视觉推理时是必需的:由于Model Optimizer预处理已进入IR文件生成与设备无关,优化的神经网络可能包含所使用的特定设备CPU不支持的层。 因此,在进行基于CPU的推理之前,需要检查所有不受支持的层,并且实际上会退出进一步的处理,以防止在遇到不受支持的层时产生任意结果或系统崩溃。 由于上述代码行还支持基于CPU的推理,并且如果您想使用Raspberry Pi的CPU代替Intel Neural Compute Stick 2进行推理实验,请查看例如object_detection_demo_yolov3_async.py作为附加层需要与支持相关的代码行。 ⚡
As far as the other methods within class Network are concerned, the get_input_shape method uses the IENetwork object to return the shape of the model’s input layer.
就class Network的其他方法而言, get_input_shape方法使用IENetwork对象返回模型输入层的形状。
Method async_inference takes an input request ID and performs an asynchronous inference for that request. Since we are not doing truly asynchronous processing, but rather push one frame at a time to the Inference Engine, the request ID is set to 0. Truly asynchronous processing would require different IDs for different inference requests pushing additional frames to the Inference Engine, whilst it might still be processing previous requests. These difference request IDs then allow to distinguish between the various inference results and to perform the individually required further processing.
方法async_inference接受输入请求ID并对该请求执行异步推断。 由于我们不是在进行真正的异步处理,而是一次将一帧推送到推理引擎,因此请求ID设置为0。对于不同的推理请求,真正的异步处理将需要不同的ID,从而将其他帧推送到推理引擎,而它可能仍在处理先前的请求。 然后,这些差异请求ID可以区分各种推断结果,并执行单独需要的进一步处理。
Since we are performing asynchronous processing, the wait method supports waiting for this process to be completed prior to trying to retrieve any inference result. Note that this status check needs to be done with reference to the correct request ID, so, in this case, 0.
由于我们正在执行异步处理,因此wait方法支持在尝试检索任何推理结果之前等待此过程完成。 请注意,此状态检查需要参考正确的请求ID进行,因此在这种情况下为0。
Method extract_output then returns the inference output generated by an inference request against the executable network. The request index again needs to be set to 0 to reference the correct inference request. The wait function’s value -1 makes sure that the status is returned once the process is completed. It effectively blocks processing until a certain timeout elapses or the result becomes available, whichever comes first.
然后方法extract_output返回由针对可执行网络的推理请求生成的推理输出。 再次需要将请求索引设置为0,以引用正确的推理请求。 等待函数的值-1确保该过程完成后返回状态。 它有效地阻止了处理,直到经过一定的超时或结果变为可用(以先到者为准)为止。
With the various OpenVINO-related helper methods out of the way, this leaves the discussion of the video inference core routine, infer_video, within the tinyYOLOv3.py file of the GitHub repository, which uses the helper methods to take video or camera input in order to generate on-screen and video file inference results.
摆脱了与OpenVINO相关的各种辅助方法,这使得对视频推理核心例程infer_video的讨论infer_video在了GitHub存储库的tinyYOLOv3.py文件中,该文件使用辅助方法按顺序进行视频或摄像机输入。生成屏幕和视频文件推断结果。
The OpenVINO-related initialisation contents of infer_video consists of the Inference Engine initialisation with the help of the Network class (line 7 below), followed by the model’s input shape retrieval (line 18).
的OpenVINO相关初始化内容infer_video由推理引擎初始化与所述的帮助下的Network class (下面第7行),然后该模型的输入形状检索(线18)。
The net object is subsequently used to launch an asynchronous inference request on an individual, pre-processed video frame (line 3 below) and, having waited until the asynchronous inference is completed (line 8), retrieves the inference result using the extract_output helper method (line 9). This output is then parsed as applicable in the YOLOv3 model case.
net对象随后用于在经过预处理的单个视频帧上发起异步推理请求(下面的第3行),并等待异步推理完成(第8行),然后使用extract_output helper方法检索推理结果。 (第9行)。 然后将此输出解析为适用于YOLOv3模型的情况。
⚡ To write the inference result to video later on within the infer_video method, I use the OpenCV VideoWriter class with an .avi output file extension and the MP42 codec: codec = cv2.VideoWriter_fourcc("M","P","4","2"). The search for the “right” combination of codec and file extension for a particular device setup can be somewhat frustrating. See, for example, this article by Adrian Rosebrock of Pyimagesearch on this matter. It gives you a number of pointers as to what might be potentially valid combinations for your particular setup. Also, it recommends installing the Python bindings for FFMPEG on your Raspberry Pi. This has worked rather well in my case. Still, the fact that an .avi file extension in combination with the MP42 codec worked for my setup after having installed the FFMPEG library does not mean that it will work for yours and you might find yourself having to go through a number of combinations until you obtain valid video output. ⚡
⚡为了稍后在infer_video方法内将推断结果写入视频,我使用带有.avi输出文件扩展名和MP42编codec = cv2.VideoWriter_fourcc("M","P","4","2").的OpenCV VideoWriter类: codec = cv2.VideoWriter_fourcc("M","P","4","2"). 对特定设备设置的编解码器和文件扩展名的“正确”组合的搜索可能会有些令人沮丧。 见,例如, 本文通过Pyimagesearch的阿德里安Rosebrock在这个问题上。 它为您提供了一些有关特定设置可能是有效组合的指针。 另外,建议在Raspberry Pi上安装FFMPEG的Python绑定。 就我而言,这种方法效果很好。 不过,在安装FFMPEG库后,.avi文件扩展名与MP42编解码器结合使用可用于我的设置的事实并不意味着它会为您使用,并且您可能会发现自己必须经过多种组合才能使用,获取有效的视频输出。 ⚡
⚡ Please note that the infer_video method also makes use of the video package within the imutils package of Pyimagesearch to compute the frames per second (FPS) supported by the processing pipeline. ⚡
⚡请注意, infer_video方法还利用Pyimagesearch的imutils包中的video包来计算处理管道支持的每秒帧数(FPS)。 ⚡
We are now ready to give our application a test run on the Raspberry Pi using both a MP4 input video and the Raspberry Pi’s on-board camera scenario.
现在,我们准备使用MP4输入视频和Raspberry Pi的车载摄像头场景在Raspberry Pi上对我们的应用程序进行测试。
In the case of a MP4 input file, the following command launches the application, reads in the input file, produces an on-screen window showing the inference results in the form of bounding boxes around detected objects, including the corresponding labels and writes these results to an .avi output file:
对于MP4输入文件,以下命令将启动应用程序,读取输入文件,生成一个屏幕上的窗口,以包围对象(包括相应标签)的包围框的形式显示推断结果,并写入这些结果到.avi输出文件:
python tinyYOLOv3.py --m "frozen_darknet_yolov3_model.xml" --i "test_video.mp4" --l "coco.names"
python tinyYOLOv3.py --m "frozen_darknet_yolov3_model.xml" --i "test_video.mp4" --l "coco.names"
where you might have to add your specific paths to the model, input video and class label file parameters. The resulting output video for the test file [1] used is shown below. The Raspberry Pi manages a respectable frame rate of around 3 FPS due to the help of the Intel Neural Compute Stick 2. Without this hardware accelerator stick, processing slows down to a crawl with the Raspberry Pi CPU mostly being occupied with decoding the MP4 input. Not unexpectedly, the performance benefit of the YOLOv3-tiny model comes at the price of low object detection accuracy: Although persons and bicycles are detected reasonably well, other objects such as dogs and balls are not detected at all.
您可能需要在其中添加模型的特定路径,输入视频和类标签文件参数。 下面显示了所使用的测试文件[1]的最终输出视频。 Raspberry Pi在Intel Neural Compute Stick 2的帮助下可管理约3 FPS的可观帧率。如果没有此硬件加速器Stick,Raspberry Pi CPU的处理速度将减慢到抓取速度,而Raspberry Pi CPU则主要用于解码MP4输入。 毫不意外的是,YOLOv3-tiny模型的性能优势是以低的物体检测精度为代价的:尽管可以很好地检测到人和自行车,但是根本无法检测到其他物体(例如狗和球)。

When it comes to inference on a live camera feed, the launch command looks rather similar with the exception of no input video file being provided, of course, so that the application defaults to camera input processing instead, i.e.:
当涉及到实时摄像机源的推理时,启动命令看起来非常相似,除了没有提供输入视频文件外,当然,因此该应用程序默认为摄像机输入处理,即:
python tinyYOLOv3.py --m "frozen_darknet_yolov3_model.xml" --l "coco.names"
python tinyYOLOv3.py --m "frozen_darknet_yolov3_model.xml" --l "coco.names"
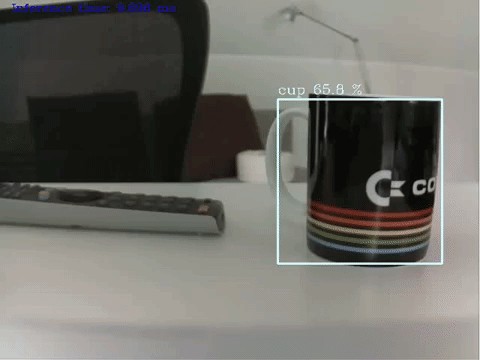
Again, you might have to add your specific paths to the model and class label file parameters. The frame rate increases to between 4 and 5 FPS. This is due to the MP4 input file processing being replaced with the less computationally demanding camera feed processing. Similarly to the input video scenario, certain objects such as the remote control and the coffee mug are detected pretty reliably, whilst, for example, the desk chair is not detected at all.
同样,您可能必须将特定路径添加到模型和类标签文件参数。 帧速率增加到4到5 FPS之间。 这是因为MP4输入文件处理已被对计算量要求较低的相机Feed处理所取代。 与输入视频场景类似,可以非常可靠地检测到某些对象(例如遥控器和咖啡杯),而例如根本没有检测到桌椅。
Depending on the application scenario, these relatively low levels of accuracy might be good enough. If not so, more accurate but frequently less execution-efficient models such as MobileNet single-shot detectors could be utilised as well. 🗹
根据应用程序的情况,这些相对较低的准确性水平可能会足够好。 如果不是这样,也可以使用更准确但经常执行效率较低的模型,例如MobileNet单发检测器。 🗹
It’s a wrap.
包好了
Starting with the overview of Edge AI hardware accelerators and development boards and both Raspberry Pi configuration and Intel OpenVINO installation guides, including an object detection demo application, in part 1, we have managed to work our way all the way to a custom-implementation of a YOLOv3-tiny-based object detection application processing video file or camera input on a Raspberry Pi edge device featuring an Intel Neural Compute Stick 2. The codebase can be found on GitHub.
在第1部分中 ,从Edge AI硬件加速器和开发板的概述以及Raspberry Pi配置和Intel OpenVINO安装指南(包括对象检测演示应用程序)的概述开始,我们一直在努力实现自定义实现一个基于YOLOv3的对象检测应用程序,可在具有Intel Neural Compute Stick 2的Raspberry Pi边缘设备上处理视频文件或摄像机输入。该代码库可在GitHub上找到 。
Although the Intel OpenVINO package comes with the odd intricacy, overall it represents an excellent and straightforward way of implementing AI applications on edge devices, especially so when making use of pre-trained and pre-converted models from the Open Model Zoo.
尽管Intel OpenVINO软件包具有奇特的复杂性,但总体而言,它代表了一种在边缘设备上实现AI应用程序的出色而直接的方法,尤其是在使用Open Model Zoo中经过预训练和预转换的模型时。
Thanks to these fairly recent developments, a realm of Edge AI application scenarios has opened up too numerous to mention and ranging from, for example, smart home or smart drone devices to gesture recognition and visual sensor-based automation scenarios. All that is needed are relatively low-cost devices such as the Raspberry Pi and an hardware accelerator, the free OpenVINO library, some imagination and a little bit of perseverance.
得益于这些相当近期的发展,Edge AI应用场景的领域已经开放了太多,无法提及,范围从智能家居或智能无人机设备到手势识别和基于视觉传感器的自动化场景。 所需要的只是相对低成本的设备,例如Raspberry Pi和硬件加速器,免费的OpenVINO库,一些想像力和毅力。
[2] J. Redmon and A. Farhadi, “YOLOv3: An Incremental Improvement”, Technical Report, arXiv:1804.02767, April 2018
[2] J. Redmon和A. Farhadi,“ YOLOv3:渐进式改进”,技术报告,arXiv:1804.02767,2018年4月
边缘计算边缘计算edge


 被折叠的 条评论
为什么被折叠?
被折叠的 条评论
为什么被折叠?
 到【灌水乐园】发言


