


As a data scientist you are likely using Jupyter notebooks extensively to perform machine learning workflow tasks, such as data exploration, data processing, and model training, evaluation and tuning. Many of those tasks are performed continuously, requiring you to run the notebooks again and again.
作为数据科学家,您可能会广泛使用Jupyter笔记本来执行机器学习工作流程任务,例如数据探索,数据处理以及模型训练,评估和调整。 这些任务中有许多是连续执行的,需要您一次又一次地运行笔记本。
The Elyra (https://github.com/elyra-ai/elyra) JupyterLab extension recently introduced the notebook pipelines visual editor, which you can use to create and run pipelines without any coding.
Elyra( https://github.com/elyra-ai/elyra )JupyterLab扩展最近引入了笔记本管道可视化编辑器,您可以使用它来创建和运行管道而无需任何编码。
In version 1.0 Elyra utilizes Kubeflow Pipelines, a popular platform for building and deploying machine learning workflows on Kubernetes, to run the pipelines.
在1.0版中,Elyra利用Kubeflow Pipelines (一种流行的平台,用于在Kubernetes上构建和部署机器学习工作流程)来运行管道。
Elyra’s notebook pipelines feature is extensible and support for other workflow engines, such as Apache Airflow, might be added in the future given enough demand from the community.
Elyra的笔记本管道功能是可扩展的,并且由于社区的足够需求,将来可能会增加对其他工作流引擎(例如Apache Airflow) 的支持 。
将笔记本作为管道运行 (Running notebooks as a pipeline)
Using Elyra’s visual editor you assemble a pipeline from multiple notebooks and run the pipeline on Kubeflow Pipelines in any Kubernetes environment.
使用Elyra的可视化编辑器,您可以从多个笔记本组装管道,并在任何Kubernetes环境中的Kubeflow管道上运行管道。
To assemble a pipeline, you drag notebooks from the JupyterLab file browser onto the pipeline editor canvas and connect them as desired. Comment nodes can be added to provide lightweight documention.
要组装管道,请将笔记本从JupyterLab文件浏览器拖到管道编辑器画布上,然后根据需要连接它们。 可以添加注释节点以提供轻量级文档。
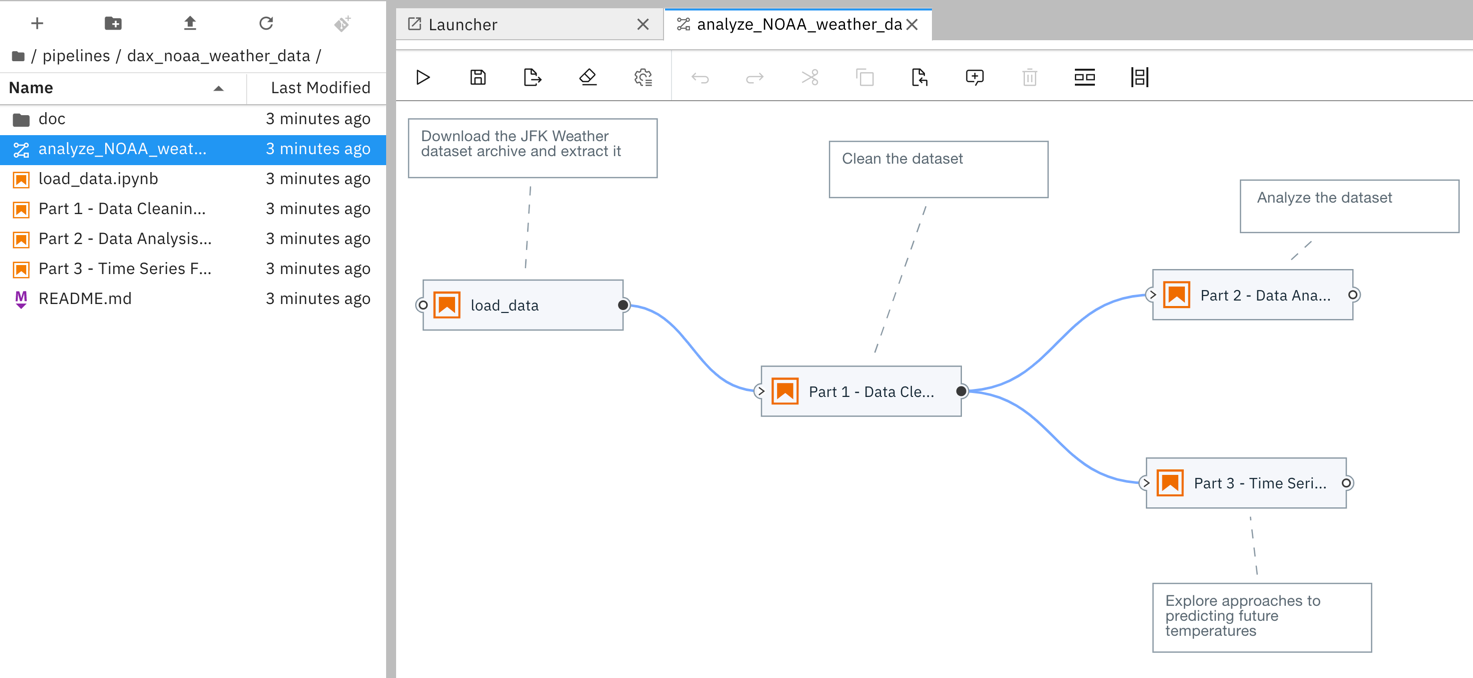
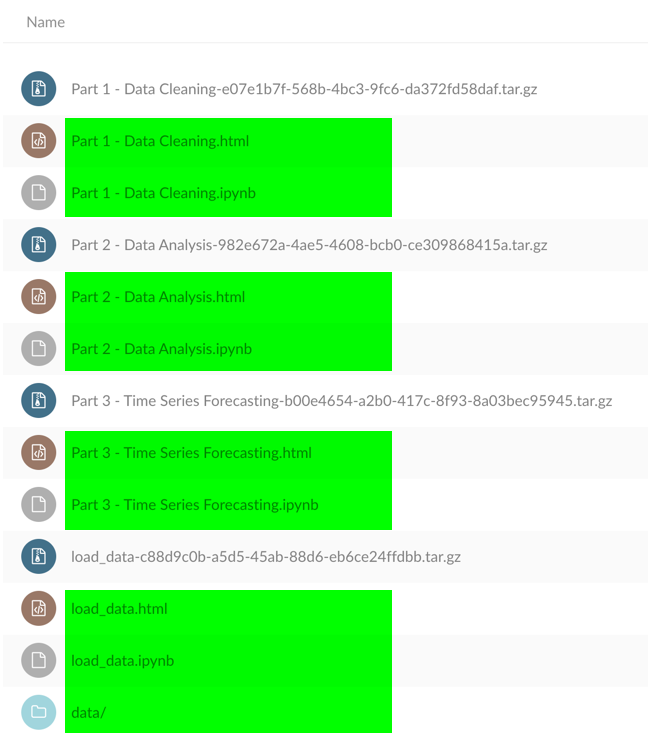
Notebooks can be arranged to execute sequentially or in parallel. The pipeline depicted above from https://github.com/elyra-ai/examples comprises of four notebook nodes. The “load_data” node is executed first and has three downstream nodes. The “Part 1- Data Cleaning” node is executed after processing of its upstream node “load_data” has successfully completed, and the “Part 2- …” and “Part 3 -…” nodes are executed in parallel after processing of their upstream node “Part 1 -…” has finished.
笔记本可以安排为顺序执行或并行执行。 上面https://github.com/elyra-ai/examples中描述的管道包含四个笔记本节点。 首先执行“ load_data”节点,并具有三个下游节点。 在成功完成其上游节点“ load_data”的处理之后,将执行“第1部分-数据清理”节点,并且在对其上游节点进行处理之后,将并行执行“第2-…”部分和“第3 -...”个节点“第1部分-…”已完成。
The following video by Romeo Kienzler illustrates how to analyze COVID-19 time-series data using a notebook pipeline.
Romeo Kienzler的以下视频说明了如何使用笔记本管道分析COVID-19时间序列数据 。
配置笔记本节点 (Configuring notebook nodes)
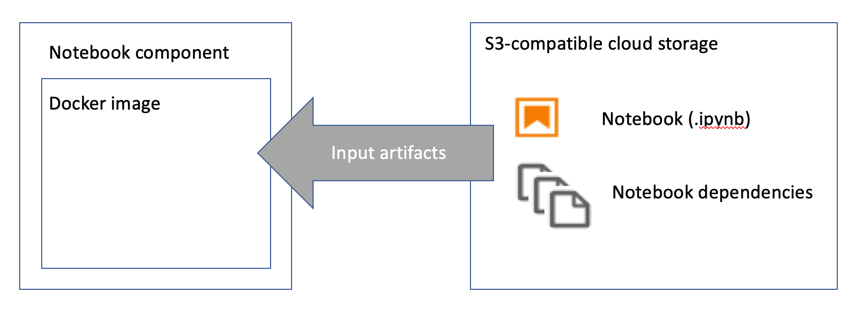
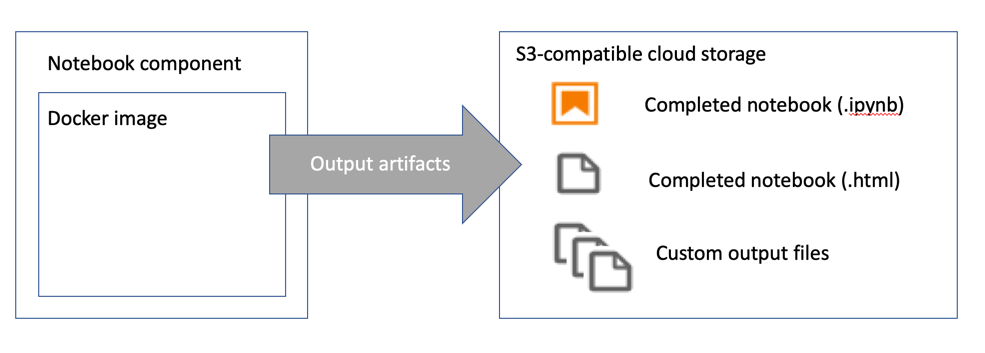
A notebook node is implemented in Elyra as a Kubeflow Pipelines component (source repository) that uses papermill to run the notebook in a Docker container. The Docker containers do not share resources aside from an S3-compatible cloud storage bucket, which is used to store input and output artifacts.
笔记本节点在Elyra中实现为Kubeflow Pipelines组件( 源存储库 ),该组件使用纸厂在Docker容器中运行笔记本。 除了用于存储输入和输出工件的S3兼容云存储桶之外,Docker容器不共享资源。

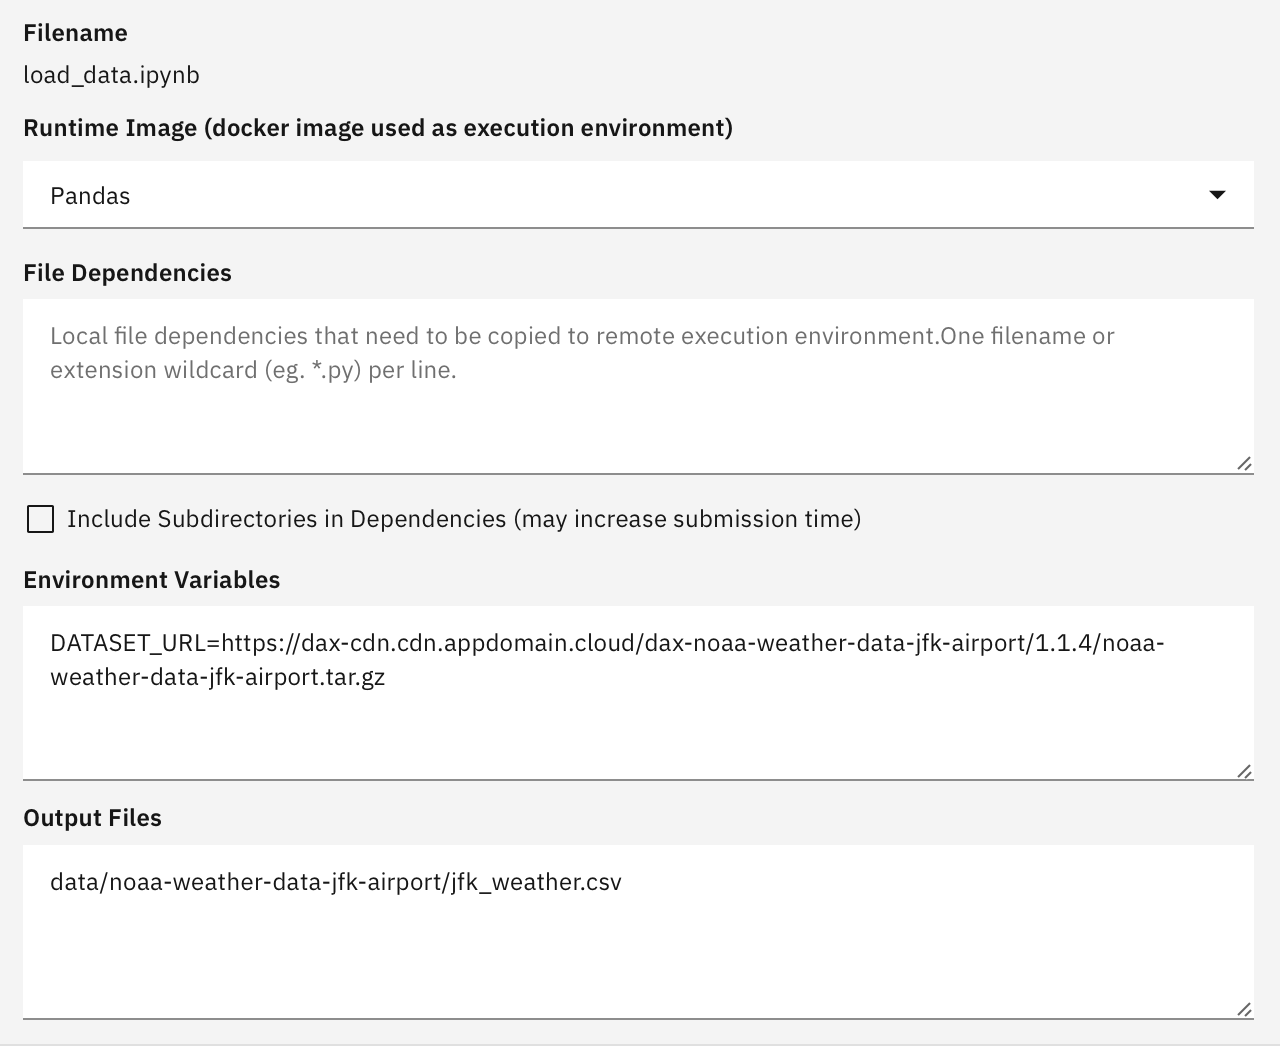
You configure a notebook nodes in the Elyra pipeline editor by providing the following information:
您可以通过提供以下信息在Elyra管道编辑器中配置笔记本节点:
The name and location of the Jupyter notebook.
Jupyter笔记本的名称和位置。
The name of the Docker image that will be used to run the notebook. You can bring your own image or choose from predefined public images, such as a Pandas image, a TensorFlow image (with or without GPU support), or a Pytorch image with the CUDA libraries pre-installed. Any Docker image can be used to run a notebook, as long as curl and Python 3 are preinstalled to allow for automatic scaffolding when the notebook component executes.
用于运行笔记本的Docker映像的名称。 您可以携带自己的图像,也可以从预定义的公共图像中进行选择,例如Pandas图像,TensorFlow图像(具有或不具有GPU支持)或预先安装了CUDA库的Pytorch图像。 只要预先安装了curl和Python 3以允许在执行笔记本组件时自动进行搭建,任何Docker镜像都可以用于运行笔记本。
If your notebook requires access to files that are co-located with the notebook when you assemble a pipeline, such as a set of custom Python scripts, you can declare file dependencies that will be packaged together with the notebook in a compressed archive that is uploaded to the pre-configured cloud storage bucket.
如果您的笔记本需要在组装管道时访问与笔记本位于同一位置的文件(例如一组自定义Python脚本),则可以声明文件依赖性 ,这些文件依赖性将与笔记本一起打包在上载的压缩归档文件中到预先配置的云存储桶。
You can define environment variables to parametrize the notebook runtime environment.
您可以定义环境变量以参数化笔记本运行时环境。
If your notebook produces output files that downstream notebooks consume or that you want to access after the notebook was processed, specify their names. The output files are uploaded to cloud storage after notebook processing has completed.
如果您的笔记本产生了下游笔记本消耗的输出文件 ,或者您希望在处理笔记本之后访问它们,请指定它们的名称。 笔记本处理完成后,输出文件将上传到云存储。
Before you can run a Notebook pipeline you have to configure a Kubeflow Pipelines runtime.
在运行Notebook管道之前,您必须配置Kubeflow Pipelines运行时。
配置Kubeflow管道运行时 (Configuring a Kubeflow Pipelines runtime)
A runtime configuration defines connectivity information for the Kubeflow Pipelines service instance and S3-compatible cloud storage that Elyra uses to process notebook pipelines:
运行时配置为Elyra用于处理笔记本管道的Kubeflow Pipelines服务实例和与S3兼容的云存储定义了连接信息:
The Kubeflows Pipelines API endpoint, e.g.
http://kubernetes-service.ibm.com/pipeline. Note that at the time of writing Elyra (version 1.0.0) does not yet support dex authentication.Kubeflows管道API端点,例如
http://kubernetes-service.ibm.com/pipeline。 请注意,在撰写本文时,Elyra(版本1.0.0) 尚不支持dex身份验证 。The cloud storage endpoint, e.g.
http://minio-service.kubeflow:9000.云存储端点,例如
http://minio-service.kubeflow:9000。- The cloud storage user id, password, and bucket name. 云存储用户标识,密码和存储桶名称。
You can manage runtime configurations using the the JupyterLab GUI and the elyra-metadata CLI.
您可以使用JupyterLab GUI和elyra-metadata CLI管理运行时配置。
Managing runtime configurations using the GUI
使用GUI管理运行时配置
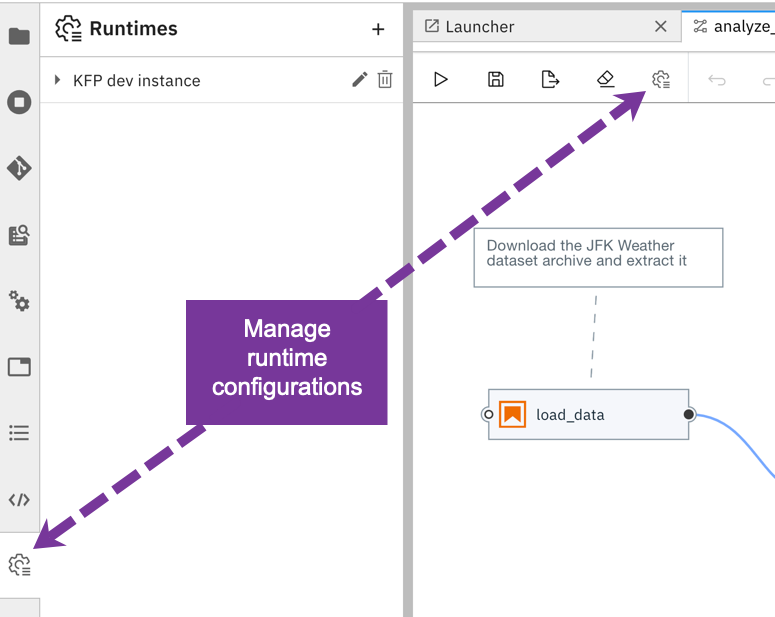
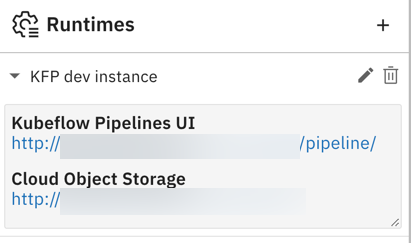
Elyra adds the Runtimes panel to the sidebar in JupyterLab, which you use to add, edit, and remove a configuration.
Elyra将“ 运行时”面板添加到JupyterLab的侧栏中,您可以使用它来添加,编辑和删除配置。
Managing runtime configurations using the CLI
使用CLI管理运行时配置
The elyra-metadata CLI can also be used to manage runtime configurations, for example to automate administrative tasks. The examples below illustrate how to add a runtime configuration named kfp_dev_instance, how to list runtime configurations, and how to delete them.
elyra-metadata CLI也可用于管理运行时配置,例如自动执行管理任务。 以下示例说明了如何添加名为kfp_dev_instance的运行时配置,如何列出运行时配置以及如何删除它们。
$ elyra-metadata install runtimes --schema_name=kfp  \
  --name=kfp_dev_instance \
  --display_name="KFP dev instance" \
  --api_endpoint=http://.../pipeline \
  --cos_endpoint=http://... \
  --cos_username=... \
  --cos_password=... \
  --cos_bucket=...$ elyra-metadata list runtimes
 Available metadata instances for runtimes (includes invalid):
 Schema   Instance         Resource
 ------   --------         --------
 kfp      kfp_dev_instance /Users/.../kfp_dev_instance.json$ elyra-metadata list runtimes --json
 [
  {
   "name": "kfp_dev_instance",
   "display_name": "KFP dev instance",
   "metadata": {
     "api_endpoint": "http://.../pipeline",
     "cos_endpoint": "http://...",
     "description": "...",
     "cos_username": "...",
     "cos_password": "...",
     "cos_bucket": "..."
   },
   "schema_name": "kfp",
   "resource": "/Users/.../kfp_dev_instance.json"
 }
]$ elyra-metadata remove runtimes --name=kfp_dev_instance
  Metadata instance '...' removed from namespace 'runtimes'.
The
listcommands produces optionally raw JSON output, enabling you to process the results using a command line JSON processor likejq.的
list的命令产生任选原始JSON输出,使你能够处理使用命令行处理器JSON像结果j q。
运行笔记本管道 (Running a notebook pipeline)
To run a pipeline from the Pipeline editor click the ▷ (run) button and select the desired runtime configuration.
要从管道编辑器运行管道,请单击▷(运行)按钮,然后选择所需的运行时配置。
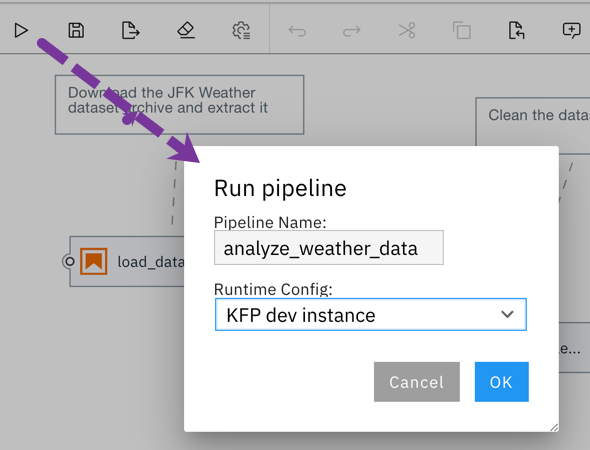
Elyra generates, gathers, and packages the required artifacts, uploads them to cloud storage and triggers pipeline execution in the selected Kubeflow Pipelines environment.
Elyra生成,收集和打包所需的工件,将其上传到云存储,并在选定的Kubeflow Pipelines环境中触发管道执行。
监控笔记本管道的运行 (Monitoring a notebook pipeline run)
Elyra currently does not provide pipeline run monitoring capabilities, but you can use the Kubeflow Pipelines UI to check the run status and view the log files. You can access the UI and pipeline output artifacts Runtimes panel by expanding the appropriate runtime configuration entry.
Elyra当前不提供管道运行监视功能,但是您可以使用Kubeflow Pipelines UI来检查运行状态并查看日志文件。 您可以通过展开适当的运行时配置条目来访问UI和管道输出工件“ 运行时”面板。
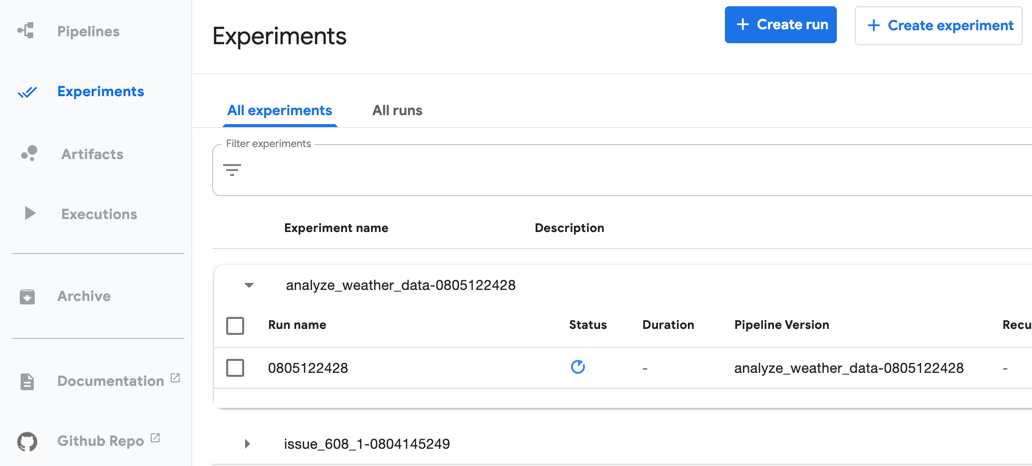
Pipeline runs are listed in the Kubeflow Pipelines UI in the Experiments panel.
管道运行在“ 实验”面板的Kubeflow管道UI中列出。
The Graph panel in the experiment details page displays the execution status of each (notebook) node.
实验详细信息页面中的“ 图形”面板显示每个(笔记本)节点的执行状态。
The graph only displays nodes that have already been processed or are currently running.
该图仅显示已被处理或当前正在运行的节点。
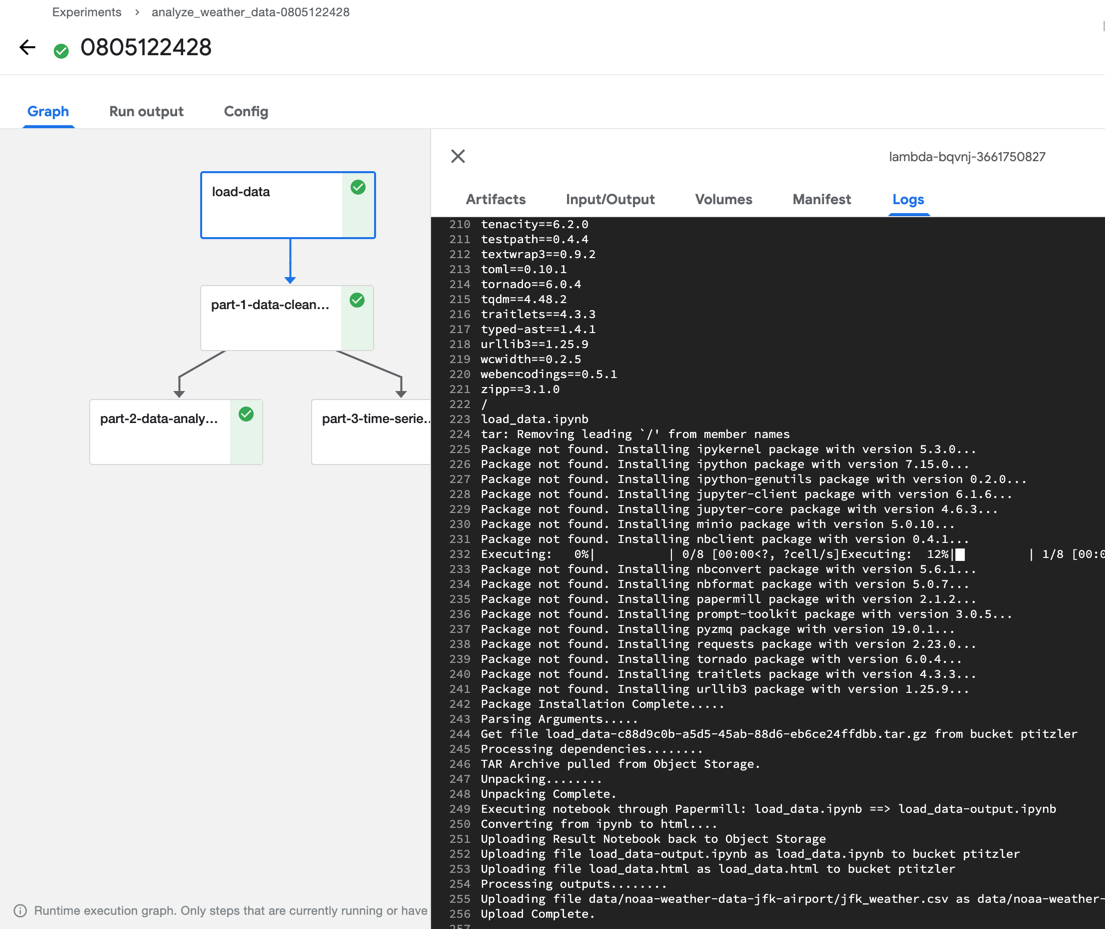
You can access a node’s execution log by selecting the node and opening the Logs panel.
您可以通过选择节点并打开“ 日志”面板来访问节点的执行日志。
Generally speaking, each node in your notebook pipeline is processed by the Notebook component in Kubeflow Pipelines as follows:
一般来说,笔记本管道中的每个节点都由Kubeflow管道中的笔记本组件按以下方式处理:
- Install the prerequisite Python packages. 安装必备的Python软件包。
- Download the input artifacts — the notebook and its dependencies — from cloud storage. (The input artifacts are stored in a compressed archive.) 从云存储下载输入工件(笔记本及其依赖项)。 (输入工件存储在压缩档案中。)
Run the notebook using papermill and store the completed notebook as Jupyter notebook file and HTML file
使用运行笔记本造纸厂和存储完成笔记本作为Jupyter笔记本文件和HTML文件
- Upload completed notebook files to the configured cloud storage bucket 将完成的笔记本文件上传到配置的云存储桶
- Upload configured output files to the configured cloud storage bucket 将配置的输出文件上传到配置的云存储桶
Note that if processing of a node fails its downstream nodes are not executed.
请注意,如果节点的处理失败,则不会执行其下游节点。
访问笔记本管道输出工件 (Accessing the notebook pipeline output artifacts)
You can access the pipeline’s output artifacts using any supported S3 client. As shown earlier, the runtime configuration includes a link that you can use to browse the associated cloud storage.
您可以使用任何受支持的S3客户端访问管道的输出工件。 如前所述,运行时配置包含一个链接,您可以使用该链接浏览关联的云存储。
导出笔记本管道 (Exporting a notebook pipeline)
You can export a notebook pipeline as Kubeflow Pipelines SDK domain specific language (DSL) Python code or a YAML-formatted Kubeflow Pipelines configuration file. During export the input artifacts for each notebook are uploaded to S3-compatible cloud storage.
您可以将笔记本管道作为Kubeflow Pipelines SDK域特定语言(DSL)Python代码或YAML格式的Kubeflow Pipelines配置文件导出 。 在导出期间,每个笔记本的输入工件都被上载到S3兼容的云存储中。
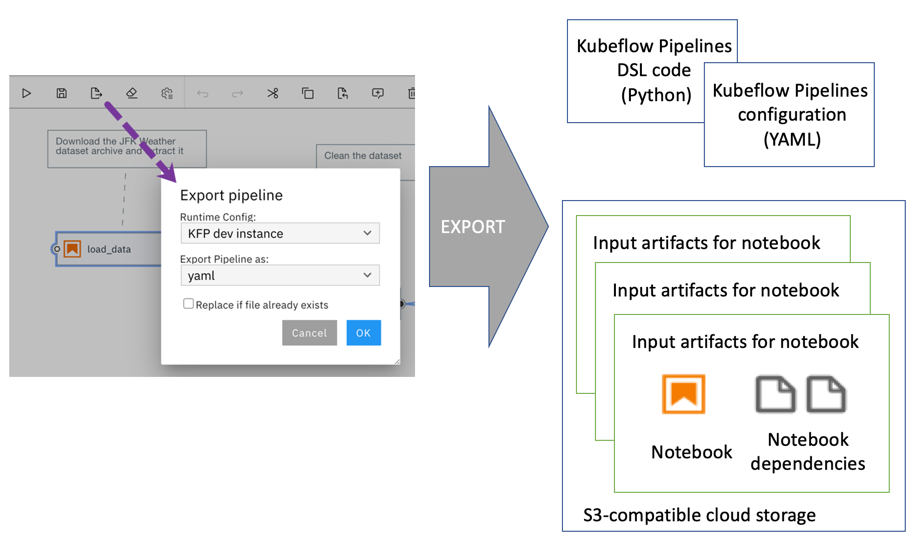
Caution: The exported Python code or configuration file contains connectivity information (including credentials) for the cloud storage location where input artifacts are stored.
警告:导出的Python代码或配置文件包含用于存储输入工件的云存储位置的连接信息(包括凭据)。
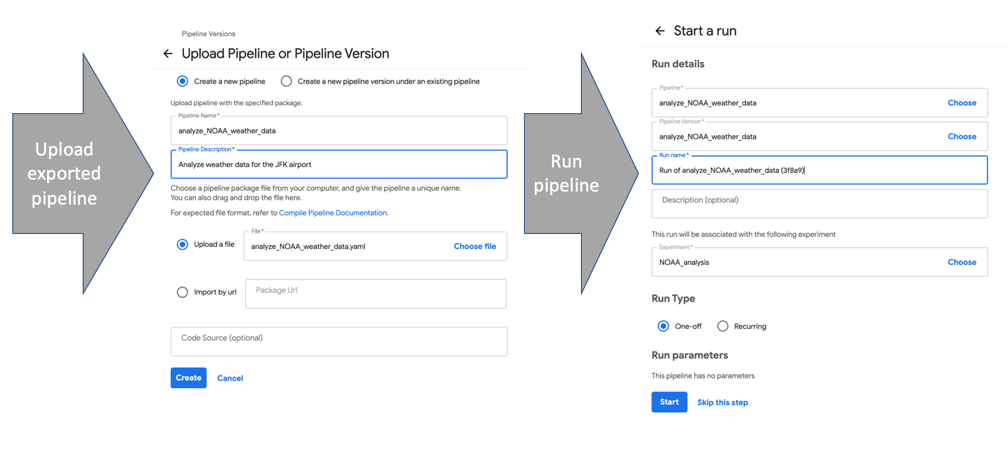
To run an exported pipeline from the Kubeflow Pipelines GUI, upload it and create a new run.
要从Kubeflow Pipelines GUI运行导出的管道,请上载它并创建一个新的运行。
运行自己的管道 (Running your own pipelines)
If you have access to a Kubeflows Pipeline service running locally or in the cloud you can start to assemble notebook pipelines in minutes. To get you started we’ve already published a few pipelines. The weather data pipeline we’ve referenced in this blog post is part of the official samples repository, which you can find at https://github.com/elyra-ai/examples. If you are interested in learning how to process COVID-19 time-series data (for the USA and the European Union), take a look at https://github.com/CODAIT/covid-notebooks.
如果您有权访问在本地或云中运行的Kubeflows管道服务,则可以在几分钟内开始组装笔记本管道。 为了让您入门,我们已经发布了一些管道。 我们在本博文中引用的天气数据管道是官方样本存储库的一部分,您可以在https://github.com/elyra-ai/examples上找到它。 如果您有兴趣学习如何处理COVID-19时间序列数据(适用于美国和欧盟),请访问https://github.com/CODAIT/covid-notebooks 。
使用预构建的Docker映像尝试JupyterLab和Elyra (Try JupyterLab and Elyra using the pre-built Docker image)
The Elyra community publishes ready-to-use Docker images on Docker Hub, which have JupyterLab v2 and the Elyra extension pre-installed. To use such an image run
Elyra社区在Docker Hub上发布了现成的Docker映像 ,这些映像已预先安装了JupyterLab v2和Elyra扩展。 要使用这样的图像运行
$ and open the displayed URL (e.g. http://127.0.0.1:8888/?token=...) in your web browser.
并在网络浏览器中打开显示的URL(例如http://127.0.0.1:8888/?token=... )。
If you already have notebooks stored on your local file system you should mount the desired directory (e.g. /local/dir/) to make them available.
如果您已经在本地文件系统上存储了笔记本,则应该安装所需的目录(例如/local/dir/ )以使它们可用。
$ docker run -it -p 8888:8888 -v /local/dir/:/home/jovyan/work -w /home/jovyan/work elyra/elyra:1.0.0 jupyter lab --debug在Binder上尝试JupyterLab和Elyra (Try JupyterLab and Elyra on Binder)
If you don’t have Docker installed or don’t want to download the image (e.g. because of bandwidth constraints) you can try JupyterLab and Elyra in your web browser without having to install anything, thanks to mybinder.org. Open https://mybinder.org/v2/gh/elyra-ai/elyra/v1.0.0?urlpath=lab/tree/binder-demo and you are good to go.
如果您没有安装Docker或不想下载映像(例如,由于带宽限制),则可以通过mybinder.org在Web浏览器中尝试JupyterLab和Elyra,而无需安装任何内容 。 打开https://mybinder.org/v2/gh/elyra-ai/elyra/v1.0.0?urlpath=lab/tree/binder-demo ,您一切顺利。
安装JupyterLab和Elyra (Install JupyterLab and Elyra)
If your local environment meets the prerequisites, you can run JupyterLab and Elyra natively on your own machine by following the installation instructions.
如果您的本地环境满足先决条件,则可以按照安装说明在本地计算机上本地运行JupyterLab和Elyra。
如何参与 (How to get involved)
If you find the visual notebook editor useful, would like to open an enhancement request or report an issue, head on over to https://github.com/elyra-ai/elyra and get the conversation started.
如果您发现可视笔记本编辑器有用,想打开一个增强请求或报告问题,请转到https://github.com/elyra-ai/elyra并开始对话。
To learn more about how you can contribute to Elyra, take a look at https://github.com/elyra-ai/elyra#contributing-to-elyra.
要了解有关如何为Elyra做出贡献的更多信息,请访问https://github.com/elyra-ai/elyra#contributing-to-elyra 。
Thanks for reading!
谢谢阅读!


 1064
1064


 被折叠的 条评论
为什么被折叠?
被折叠的 条评论
为什么被折叠?
 到【灌水乐园】发言


