


一切伟大的行动和思想,都有一个微不足道的开始; -- 徐志摩《励志天下》
一切能忍受的微不足道,都有一个行动思想在脚下。 -- 小QQ 《励志自己》
------------------------------------------------------------------------------------------------------
前一节,我们把HTML直接硬编码在python中,尽管他便于解释使徒的工作原理,但是却不是一个好主意:
1、对页面设计进行任何修改都必须对python代码进行修改,而且站点设计的修改又频繁与python代码;
2、python代码和HTML设计是不同的工作,大多的企业都将他们分配在给不同的部门;
3、python的编写和HTML页面设计同时工作,远高于一人等待另一人完成即python又HTML的编辑。
所以我们要将页面的设计和Python代码分离开,而使用的就是Django模板系统(Template system)。
【 模 板 系 统 示 例 解 读 】
模板是一个文本,用于分离文档的表现形式和内容;
模板定义了占位符以及各种规范文档显示的基本逻辑(模板标签);
模板通常用于产生HTML,但是Django的模板也能产生热和机遇文本格式的文档;
举例:(第二段即简单的模板文件,以下是我ipython解释器格式)In [1]: from django.template import Template, Context
In [2]: raw_template="""
Dear{{ name }},
#两个大括号括起来的值{{ name }}称变量...:
Thanks an order from {{ company }}.It's scheduled #{{ company }}也是变量
...: ship on {{ s_date|date:"F j, Y" }}.
#过滤器,见下...:
...: {% if ordered_warranty %} #if标签,通知模板完成某些工作标签,后面会详解
...:
Your warranty information will be included in the packaging.
...: {% else %}
...:
You didn't order a warranty, so you're on your own when
...: the products inevitably stop working.
...: {% endif %}
...:
Sincerely,
{{ company }}
In [3]: t = Template(raw_template)
In [4]: import datetime
In [5]: c = Context({'name': 'John Smith',
...: 'Company': 'Outdoor Equipment',
...: 's_date': datetime.date(2009, 4, 2),
...: 'ordered_warranty': False})
In [6]: t.render(c)
Out[6]: u"
Dear John Smith,
\n\nThanks for placing an order from .
It's scheduledto\nship on April 2, 2009.
\n\n\nYou didn't order a
warranty, so you're on your own when\nthe products inevitably stop
working.
\n\n\nSincerely,
"代码解读:
1、导入 (import)类 Template 和 Context ;
2、将模板的原始文本保存到变量raw_template,并用三引号表示这些文本(包含多行),{{ s_date|date:"F j, Y" }}过滤器,s_date变量传到date,并以F j, Y格式输出 April 2, 2009
3、创建模板对象't',把raw_template作为Template类构造函数的参数;
4、从python标准库导入datetime模块使用;
5、创建Context对象'c',Context构造的参数是Python字典数据类型;
6、然后输出(模板文本中\n,为什么输出没有换行呢?因为解释器只缺省显示这些字符串,不是打印值,用print t.render(c)就可以打印值,输出换行了)(模板中的company变量没有被打印,因为context构造的参数Company无效的变量,所以模板系统默认将它展示为空字符串)
7-15、对上下文(context)对象的添加删除;In [7]: c = Context({"foo": "bar"})
In [8]: c['foo']
Out[8]: 'bar'
In [9]: del c['foo']
In [10]: c['foo']
---------------------------------------------------------------------------
KeyError Traceback (most recent call last)
.........
KeyError: 'foo'
In [11]: c['newvariable'] = 'hello'
In [12]: c['newvariable']
Out[12]: 'hello'
In [13]: c['newva'] = 'helloooo'
In [14]: c['newva']
Out[14]: 'helloooo'
In [15]: print c
[{'False': False, 'True': True},{'newva': 'helloooo', 'newvariable': 'hello'}]
【 拆 解 模 板 系 统 】
模板系统最重要的两个功能创建模板对象、模板渲染。
创建模板对象
创建一个template对象最简单的办法就是直接实例化它;Template类就在django.template模块中,构造函数接受一个参数。
当创建模板对象时,模板系统在内部编译这个模板到内部格式,并做优化,做好渲染准备
转到项目目录下:cd ~/HelloWorld/
启动交互界面:python manage.py shell
启动后会进入python界面,但与python不同的是,他会告诉python使用哪个配置文件,而django大部分子系统、模板系统,都依赖于配置文件,否则django将不能工作;
背后工作:执行后,Django去搜索DJANGO_SETTING_MODULE环境变量(它被设置在setting.py中),然后自动帮你处理这个环境变量,建议用“python manage.py shell”。
随着熟悉Django,我们可能偏向废弃此方法,而是直接在.bash_profile中添加DJANGO_SETTING_MODULE变量。
模板渲染
一旦创建Template对象,就可以用context传递数据,如上代码:
>>> from django import template
>>> t = template.Template('My name is ` name `.') #创建模板对象
>>> c = template.Context({'name': 'Adrian'}) #模板渲染,调用context上下文切换name变量值
>>> t.render(c)
u'My name is Adrian.'
>>> print t.render(c)
'My name is Adrian.'
print t
#0xb7d5f24c template对象ID
代码解读:
t.render(c)返回一个unicode对象,不是普通字符串,可通过开头'u'来区分,原因是如此可以让你的应用程序更轻松处理各式各样传递字符集,而不仅仅是A-Z英文字符;
============================================================================================
一模板,多渲染
一旦有了模板对象,我们可以渲染多个context
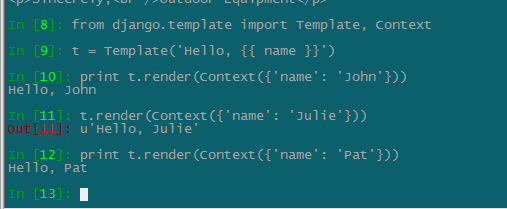
## Bad
for name in ('John', 'Julie', 'Pat'):
t = Template('Hello, ` name `')
print t.render(Context({'name': name}))
## Good
t = Template('Hello, ` name `')
for name in ('John', 'Julie', 'Pat'):
print t.render(Context({'name': name}))
注:模板解析非常的快捷,大部分的解析工作都是在后台通过对简短正则表达式一次性调用完成。和基于XML模板引擎对比鲜明,那些引擎承担了XML解析器的开销,且往往比Django模板渲染引擎慢几个数量级。
点语法处理复杂数据结构
句点字符"."是django模板遍历复杂数据结构的关键。遍历的原则顺序如下
字典类型查找(比如 foo["bar"])
属性查找 (比如 foo.bar)
方法调用 (比如 foo.bar())
列表类型索引(比如 foo[bar])
1、点语法用于函数属性In [24]: from django.template import Template, Context
In [25]: import datetime
In [26]: d = datetime.date(1993, 5, 2)
In [27]: d.year
Out[27]: 1993
In [28]: t = Template('The month {{ date.month }} and the year {{ date.year }}.')
In [29]: c = Context({'date': d})
In [30]: t.render(c)
Out[30]: u'The month is 5 and the year is 1993.'
2、点语法用于upper()、isdigit()方法In [44]: from django.template import Template, Context
In [45]: t = Template('{{ var }} -- {{ var.upper }} -- {{ var.isdigit }}')
In [46]: print t.render(Context({'var': '123'}))
123 -- 123 -- True
In [47]: t.render(Context({'var': 'hello'}))
Out[47]: u'hello -- HELLO -- False'
3、点语法用于列表索引In [48]: t = Template('Item 2 is {{ items.2 }}.') #但是不允许用items.-1这样的语法
In [49]: c = Context({'items': ['apples', 'bananas', 'carrots']})
In [50]: t.render(c)
Out[50]: u'Item 2 is carrots.'
4、点语法用于多级嵌套In [60]: from django.template import Template, Context
In [61]: person = {'name': 'Sally', 'age': '43'}
In [62]: t = Template('{{ person.name.upper }} is {{ person.age }} years old.')
In [63]: c = Context({'person': person})
In [64]: t.render(c)
Out[64]: u'SALLY is 43 years old.'
============================================================================================
【模板标签和过滤器】
if/else 标 签
上面我们用了if/else 的例子,判断条件、执行方式和其他语言类似,而且{% else %} 标签是可选的。{% if condition1 and/or condition2 %}
........
{% elif condition3 %}
........
{% else %}
........
{% endif %}
注:不允许同一标签同时出现and和or、不支持圆括号组合比较、每一个标签都要用{% endif %}关闭。
for 标 签{% for condition %} ##{% for condition reversed %} 表示反向迭代
...............
{% empty %} ##相当于外层加了{% if condition %} ,判断条件是否为空
This condition is empty.
{% endfor %}
注:django不支持退出循环操作,也不支持continue语句,从当前迭代跳回循环头部。
============================================================================================
"forloop"模板变量
a、forloop.counter:整数加法计数器,默认从1开始,forloop.counter0表示从0开始;
{% for item in todo_list %}
` forloop`.`counter `: ` item `
{% endfor %}
b、forloop.revcounter:整数减法计数器,默认初次执行被设为总数,执行至1时结束,forloop.revcounter0表示执行至0时结束,开始为总数-1;
c、forloop.first:布尔值,第一次执行后被置为""空;
d、forloop.last:布尔值,最后一次执行时被置为Ture,常用语法:
>>> {% for link in links %}` link `{% if not forloop.last %} | {% endif %}{% endfor %}
Link1 | Link2 | Link3 | Link4
============================================================================================
ifequal/ifnotequal 标 签
可以等效{% if %} 部分功能,判断两个值或变量是否相等或不等{% ifequal/ifnotequal var 'var' %}
.............
{% endifequal/endifnotequal %}
注:参数可以是模板变量、字符串、小数、整数,不能是字典、列表、布尔类型。
{% comment %}/{# #} 注 释
简单注释 {# ........ #}:注释一两行可以,但是不能跨多行
多行注释 {% comment %} .......... {% endcomment %}:多行注释时使用。
include 标 签
{% include %} 标签允许在模板中包含其它的模板的内容,下面会举例。
过 滤 器
实现模板过滤器关键是使用管道符,并且可以多次过滤,即多次管道。
{{ name|lower }}:将变量name,通过过滤器被lower转换为小写
{{ my_list|first|upper }}:将my_list的第一个元素转换为大写
{{ pub_date|date:"F j, Y" }}:格式参数不介绍了,返回April 2, 2009
{{ bio|truncatewords:"30" }}:显示bio变量的前30个词
date:按指定格式字符串格式date或者datetime对象;
length:可以对列表或字符串返回变量的长度(就是说有__len__()方法的对象);
addslashes:添加反斜杠到任何反斜杠、单引号、双引号前面,对于处理JavaScript文本很重要;
【 视 图 函 数 应 用 模 板 】
以上我们大致了解了django模板系统的一些知识,下面我们要用到实战中,即在视图中调用django的模板。继续current_time视图,引入Django模板系统:def current_time(request):
now = datetime.datetime.now()
** t = Template("
It is now {{ current_date }}.")## fp = open('/django/HelloWorld/templates/template.html')
## t = Template(fp.read())
## fp.close()
** html = t.render(Context({'current_date': now}))
return HttpResponse(html)
** 更改,虽说是引入了模板系统,但是django的理念是模板与python代码分离,所以这样是不行的;
##更改,将模板单独写一个文件,然后用open()函数,但是文件丢失或权限会引发异常、对文件的位置仍是硬编码、每次加载都要输繁琐代码。
为了解决以上这些问题,django使用了模板加载、模板目录的技巧。
模 板 加 载
为了减少模板加载调用过程及模板本身的冗余代码,django提供一种强大的API,在磁盘中加载模板。要使用此模板加载API,首先要告诉框架(项目)模板的位置:
vim settings.pyTEMPLATE_DIRS = (
'/python/django/HelloWorld/templates',
#== os.path.join(os.path.dirname(__file__), 'templates').replace('\\','/'), ##调用函数表示
# 'C:/python/django/HelloWorld/templates', ## windos平台下写法
)
注:路径后面一定要加",",以消除圆括号与表达式之间的歧义。有的版本的django设置如下
cat ~/HelloWorld/HelloWorld/view.py**from django.template.loader import get_template # 调用get_template函数,加载模板
**from django.template import Context # 调用context对象函数
from django.http import Http404,HttpResponse
import datetime
def hello(request):
return HttpResponse("Hello World !!!")
def current_time(request):
now = datetime.datetime.now()
** t = get_template('current_time.html') #去找这个文件,并将内容实例化给't',文件名随意
** html = t.render(Context({'current_date': now})) #render方法传入context对象参数
return HttpResponse(html)
============================================================================================
error:TemplateDoesNotExist at /time/ ;/usr/lib/python2.7/site-packages/django/template/loader.py in get_template, line 25
解决:因为get_template()根据setting.py中路径,找不到current_time.html文件,去建这个文件。
============================================================================================
cat ~/HelloWorld/view.py
It is now {{ current_date }}.
============================================================================================
render_to_response()方法
上面我们用的get_template()方法载入文件,render()方法传入context对象渲染,最后用HttpResponse处理后的对象给用户;
这在django内,算是较冗余繁杂了,因为它提供了一个更好的方法render_to_response()方法。如下:**from django.shortcuts import render_to_response
from django.http import Http404,HttpResponse #保留他是因为hello视图
import datetime
def hello(request):
return HttpResponse("Hello World !!!")
def current_time(request):
now = datetime.datetime.now()
** return render_to_response('current_time.html',{'current_date':now})
很明显,原本三步三个方法完成的事,现在一步完成,极其简便。
render_to_response第一参数必须是模板名称,第二个若存在,必须是模板创建context使用的字典。
把所有模板放在一个目录下,会让很多事情变得难以掌控,于是会有人考虑建一个子目录,但是指定模板文件时怎么指定呢?
比如将current_time.html文件放到模板目录下的dateapp下:
return render_to_response('dateapp/current_time.html', {'current_date': now})
t = get_template('dateapp/current_time.html') ##get_template() 方法也支持,并都可多级指定。
locals() 方法
有些偷懒的程序员会想再次优化此视图代码。用locals()返回字典对所有(注意所有)局部变量的名称和值进行映射。如下:
def current_time(request):
** current_date = datetime.datetime.now()
** return render_to_response('current_datetime.html', locals())
=============================================================================================
【 模 板 继 承 】
问题:目前为止,我们所有的示例都是零星片段,实际应用中,我们会使用django模板去创建整个HTML页面,这就有一个问题:如何减少共用页面区域的代码?
传统答案是 :用上面提到的{% include %}标签。
Django答案:更优雅的模板继承。即先构造一个基础框架模板,然后在其子模板对他共用部分进行重载。
接下来我们对前一章节写的current_time、hours_ahead 视图举例:
cat ~/HelloWorld/HelloWorld/view.pyfrom django.shortcuts import render_to_response
import datetime
#def hello(request):
# return HttpResponse("Hello World !!!")
def current_time(request):
now = datetime.datetime.now()
return render_to_response('current_time.html',{'current_date':now})
def hours_ahead(request,offset):
try:
offset = int(offset)
except ValueError:
raise Http404()
dt = datetime.datetime.now() + datetime.timedelta(hours=offset)
return render_to_response('hours_ahead.xml',{'next_time':dt,'hour_offset':offset})
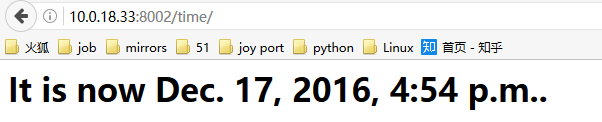
cat ~/HelloWorld/templates/current_time.html
It is now {{ current_date }}.
HTML PUBLIC "-//W3C//DTD HTML 4.01//EN">
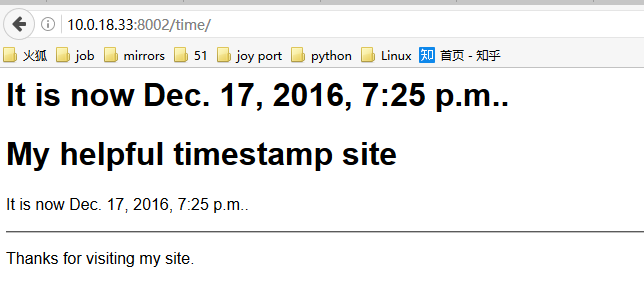
The current timeMy helpful timestamp site
It is now {{ current_date }}.
Thanks for visiting my site.
cat ~/HelloWorld/templates/hours_ahead.xml (定义xml为了展示文件名字可随意,但最好规范)HTML PUBLIC "-//W3C//DTD HTML 4.01//EN">
Future timeMy helpful timestamp site
In {{ hour_offset }} hour(s), it will be {{ next_time }}.
Thanks for visiting my site.
很明显,hours_ahead.xml、current_time.html两个文件重复地方太多,再想如果是真是网站的话,那重复量可是无法想象的。。。
如果用传统的 include 标签,就会找出两个模板相同的地方,保存成不同的模板片段,比如头部相似处保存为header.html,尾部保存footer.html,然后在hours_ahead.xml文件中用{% include "header.html" %}调用; 中间部分其实大体相同,如果能保存到header.html中最好了,但是每个
不同,无法定制。而Django的模板继承却解决了这个问题。简言之:
模板继承可视为 include的逆向思维,对不同代码段进行定义,而非对相同代码段。参照如下三步:
1、定义基础摸板框架base.html:(主定义外观感受,几乎不修改)
vim ~/HelloWorld/templates/base.htmlHTML PUBLIC "-//W3C//DTD HTML 4.01//EN">
{% block title %}{% endblock %} # 定义了一个title 块My helpful timestamp site
{% block content %}{% endblock %} # 定义了一个content block
{% block footer %} # 定义了一个footer块,并没有调用,当做一条退路
Thanks for visiting my site.
{% endblock %}
2、创建区域模板 base_SECTION.html (如:base_photos.html、base_forum.html )对base.html进行扩展。
3、创建独立视图子模板文件
vim ~/HelloWorld/templates/current_time.html{% extends "base.html" %} # extends就是加载 setting.py 中设置模板目录下的文件
{% block title %}The current time{% endblock %}
{% block content %}
It is now {{ current_date }}.
{% endblock %}
vim ~/HelloWorld/templates/hours_ahead.xml{% extends "base.html" %}
{% block title %}Future time{% endblock %}
{% block content %}
In {{ hour_offset }} hour(s), it will be {{ next_time }}.
{% endblock %}
注:
a、{% extends %} 必须为子模板的第一个模板标记,否则模板继承将不起作用;
b、一般来说,基础模板中{% block %}越多越好,而且子模板文件只是调用用的着的block部分;
c、` block`.`super ` 标签,将会表现出父模板中内容,若只想在上级代码块添加内容,而不是全部加载,该魔法变量就很有用了;
--------------------------------------------------------------------------------------------------


 1161
1161


 被折叠的 条评论
为什么被折叠?
被折叠的 条评论
为什么被折叠?
 到【灌水乐园】发言


