


前言
ConstraintLayout是谷歌2016年I/O大会发布的新型的layout布局,当然到现在已经在很多的APP中大范围使用了,关于好处除了官方文档各大博客也都说的很详细了,总之我觉得ConstraintLayout带来的最大好处就是ConstraintLayout可以最大化的减少复杂布局的层级嵌套,实现布局的扁平化,提升页面的渲染速度。
使用
添加依赖
implementation 'com.android.support.constraint:constraint-layout:1.1.2'
Relative positioning 相对约束
image
app:layout_constraintLeft_toRightOf="@+id/buttonA" />
主要属性如下:
image
layout_constraintLeft_toLeftOf
layout_constraintLeft_toRightOf
layout_constraintRight_toLeftOf
layout_constraintRight_toRightOf
layout_constraintTop_toTopOf
layout_constraintTop_toBottomOf
layout_constraintBottom_toTopOf
layout_constraintBottom_toBottomOf
layout_constraintBaseline_toBaselineOf
layout_constraintStart_toEndOf
layout_constraintStart_toStartOf
layout_constraintEnd_toStartOf
layout_constraintEnd_toEndOf
这个属性相信大家一看就懂,他是以某个View布局为约束来控制自己所在的位置的。
具体实现
image
xmlns:android="http://schemas.android.com/apk/res/android"
xmlns:app="http://schemas.android.com/apk/res-auto"
android:layout_width="match_parent"
android:layout_height="match_parent">
android:id="@+id/button1"
android:layout_width="wrap_content"
android:layout_height="wrap_content"
android:text="button1"
app:layout_constraintStart_toStartOf="parent" //起始位置以父布局为约束
app:layout_constraintTop_toTopOf="parent"/> // 顶部以父布局为约束
android:id="@+id/button2"
style="@style/Widget.AppCompat.Button.Colored"
android:layout_width="wrap_content"
android:layout_height="wrap_content"
android:text="button2"
app:layout_constraintStart_toEndOf="@id/button1" // 起始参照以button1 结束位置为约束
app:layout_constraintTop_toTopOf="parent"/> // 顶部以父布局为约束
android:id="@+id/button3"
android:layout_width="wrap_content"
android:layout_height="wrap_content"
android:text="button3"
app:layout_constraintStart_toStartOf="parent" //起始位置以父布局为约束
app:layout_constraintTop_toBottomOf="@id/button1"/> // 顶部以button1的底部为约束
android:id="@+id/button4"
style="@style/Widget.AppCompat.Button.Colored"
android:layout_width="wrap_content"
android:layout_height="wrap_content"
android:text="button4"
app:layout_constraintStart_toEndOf="@id/button3" //起始位置以button3的结束位置为约束
app:layout_constraintTop_toBottomOf="@id/button2"/> //顶部以button2的地步为约束
Margins 外边距
[图片上传失败...(image-a9f1d2-1545808041237)]
外边距不用多说,和一般的布局使用方法一样
具体属性:
android:layout_marginStart
android:layout_marginEnd
android:layout_marginLeft
android:layout_marginTop
android:layout_marginRight
android:layout_marginBottom
goneMargin 隐藏边距
这个属性很有意思的,使用方法大家一看就明白了,当前View与另一个View绑定后,另一个View的属性设置为了Gone,则该属性会生效
具体属性:
layout_goneMarginStart
layout_goneMarginEnd
layout_goneMarginLeft
layout_goneMarginTop
layout_goneMarginRight
layout_goneMarginBottom
bias 权重,占比
在说bias这个属性之前我们先看下一下如何让约束的目标居中(横向、纵向、整体居中)
[图片上传失败...(image-f6ef5a-1545808041237)]
android:layout_width="wrap_content"
android:layout_height="wrap_content"
app:layout_constraintLeft_toLeftOf="parent"
app:layout_constraintRight_toRightOf="parent/>
>
这里我们看到上面的是横向居中的,因为他的宽度为wrap_content是,左右约束来自于父布局ConstraintLayout,这样他就能实现居中了。
具体实现
image
xmlns:android="http://schemas.android.com/apk/res/android"
xmlns:app="http://schemas.android.com/apk/res-auto"
android:layout_width="match_parent"
android:layout_height="match_parent">
//全局居中
android:id="@+id/button1"
android:layout_width="100dp"
android:layout_height="100dp"
android:text="button1"
app:layout_constraintBottom_toBottomOf="parent" //底部以父布局的底部为约束
app:layout_constraintEnd_toEndOf="parent" //右侧结束以父布局的右侧为约束
app:layout_constraintStart_toStartOf="parent" //左侧起始以父布局的左侧为约束
app:layout_constraintTop_toTopOf="parent"/> //顶部以父布局的顶部为约束
android:id="@+id/button2"
android:layout_width="100dp"
android:layout_height="100dp"
android:layout_marginLeft="30dp"
android:layout_marginTop="30dp"
android:text="button2"
app:layout_constraintStart_toStartOf="parent"
app:layout_constraintTop_toTopOf="parent"/>
// 以 button2 为约束的纵向居中
android:id="@+id/button3"
android:layout_width="wrap_content"
android:layout_height="wrap_content"
android:text="button3"
app:layout_constraintBottom_toBottomOf="@id/button2" //底部以button2的底部为约束
app:layout_constraintStart_toEndOf="@id/button2"
app:layout_constraintTop_toTopOf="@id/button2"/> //顶部以button2的顶部为约束
居中实现了,也很好理解。那我们需要将约束目标定位到约束参照物的非中心位置的时候呢,这时候我们就可以用到bias了,其实居中布局的bias默认是0.5的,他的取值范围推荐0~1之间。bias有横向和纵向的两种展现方式,他们的延伸轨迹也是也是按照View布局的默认方式来的 从左到右和从上到下。
layout_constraintHorizontal_bias
layout_constraintVertical_bias
具体实现
image
xmlns:android="http://schemas.android.com/apk/res/android"
xmlns:app="http://schemas.android.com/apk/res-auto"
android:layout_width="match_parent"
android:layout_height="match_parent">
android:id="@+id/button"
android:layout_width="wrap_content"
android:layout_height="wrap_content"
android:text="button"
app:layout_constraintHorizontal_bias="0.3" //距离父布局的左侧30%权重
app:layout_constraintVertical_bias="0.2" //距离父布局的顶部20%权重
app:layout_constraintBottom_toBottomOf="parent"
app:layout_constraintEnd_toEndOf="parent"
app:layout_constraintStart_toStartOf="parent"
app:layout_constraintTop_toTopOf="parent"/>
Circular positioning (1.1版本新加的属性)
这个还真想不好用什么恰当的中文词来称呼它,我们先来看下官方的定义吧
You can constrain a widget center relative to another widget center, at an angle and a distance. This allows you to position a widget on a circle (see Fig. 6). The following attributes can be used:
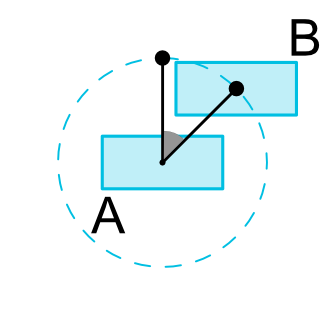
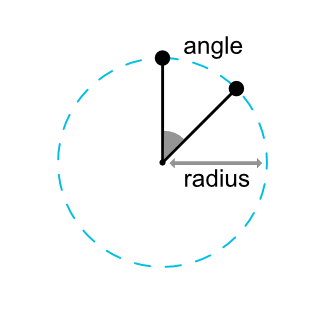
我是这样理解的,约束目标B以A为约束,而约束规则是以A形成一个圆,并根据添加的圆半径和圆弧来定位自己的位置。
具体实现
image
xmlns:android="http://schemas.android.com/apk/res/android"
xmlns:app="http://schemas.android.com/apk/res-auto"
xmlns:tools="http://schemas.android.com/tools"
android:layout_width="match_parent"
android:layout_height="match_parent">
android:id="@+id/button1"
android:layout_width="wrap_content"
android:layout_height="wrap_content"
android:text="Button1"
app:layout_constraintBottom_toBottomOf="parent"
app:layout_constraintEnd_toEndOf="parent"
app:layout_constraintHorizontal_bias="0.3"
app:layout_constraintStart_toStartOf="parent"
app:layout_constraintTop_toTopOf="parent"
app:layout_constraintVertical_bias="0.3"
/>
android:id="@+id/button2"
android:layout_width="wrap_content"
android:layout_height="wrap_content"
android:text="Button2"
app:layout_constraintCircle="@id/button1" // 以button1为约束
app:layout_constraintCircleAngle="120" //圆弧以0时针开始顺时针旋转120°
app:layout_constraintCircleRadius="100dp"/> //圆半径为100dp
Ratio 比例
Ratio这个属性呢,其实它的应用场景对于Andrid的屏幕适配很友好,它会让View按照一定的比列来展示给我们。
比如我们的ImageView展示要求按照宽高3:4来展示,如果我们将宽高按照UI设计稿来写死的话,不是说不行,但是在适配上就很尴尬。Ratio就可以帮助我们解决这个问题,使用Ratio必须要保证View的宽高有一方为0dp,这样才能按照一定比例进行展示。
具体实现
image
xmlns:android="http://schemas.android.com/apk/res/android"
xmlns:app="http://schemas.android.com/apk/res-auto"
android:layout_width="match_parent"
android:layout_height="match_parent">
android:layout_width="200dp"
android:layout_height="0dp" //高度为0
android:background="@mipmap/hhh"
app:layout_constraintBottom_toBottomOf="parent"
app:layout_constraintDimensionRatio="3:4" //宽高比3:4
app:layout_constraintEnd_toEndOf="parent"
app:layout_constraintStart_toStartOf="parent"
app:layout_constraintTop_toTopOf="parent"/>
当然,如果两个尺寸都为0dp,我们为了保持比列的话,可以预先附加W或H,分别约束宽或高。
image
xmlns:android="http://schemas.android.com/apk/res/android"
xmlns:app="http://schemas.android.com/apk/res-auto"
android:layout_width="match_parent"
android:layout_height="match_parent">
android:layout_width="0dp"
android:layout_height="0dp"
android:background="@mipmap/hhh"
app:layout_constraintDimensionRatio="H,3:1"
app:layout_constraintEnd_toEndOf="parent"
app:layout_constraintStart_toStartOf="parent"
app:layout_constraintTop_toTopOf="parent"/>
注:
app:layout_constraintDimensionRatio="H,3:1"和
app:layout_constraintDimensionRatio="W,1:3"这两个是一样的
通过layout_constraintWidth_percent来调整宽度
image
xmlns:android="http://schemas.android.com/apk/res/android"
xmlns:app="http://schemas.android.com/apk/res-auto"
android:layout_width="match_parent"
android:layout_height="match_parent">
android:layout_width="0dp"
android:layout_height="0dp"
android:background="@mipmap/hhh"
app:layout_constraintDimensionRatio="W,1:3"
app:layout_constraintEnd_toEndOf="parent"
app:layout_constraintWidth_percent="0.5" //宽度占屏幕50%
app:layout_constraintStart_toStartOf="parent"
app:layout_constraintTop_toTopOf="parent"/>
通过layout_constraintHorizontal_bias来摆放位置
image
xmlns:android="http://schemas.android.com/apk/res/android"
xmlns:app="http://schemas.android.com/apk/res-auto"
android:layout_width="match_parent"
android:layout_height="match_parent">
android:layout_width="0dp"
android:layout_height="0dp"
android:background="@mipmap/hhh"
app:layout_constraintDimensionRatio="W,1:3"
app:layout_constraintEnd_toEndOf="parent"
app:layout_constraintWidth_percent="0.5"
app:layout_constraintHorizontal_bias="0.2"
app:layout_constraintStart_toStartOf="parent"
app:layout_constraintTop_toTopOf="parent"/>
Chains
[图片上传失败...(image-793814-1545808041237)]
chains这个给我的感觉像LinearLayout里面的weight属性,但是比他更为灵活;有点类似css里面的FlexBox弹性盒子布局,Chains必须有两个View组成,这两个View相互约束,Chains中的第一个控件叫做chain head,我们称之为链头吧,Chain Style的样式主要由链头来控制
Chain Style 属性样式
[图片上传失败...(image-2651f7-1545808041237)]
具体实现
image
xmlns:android="http://schemas.android.com/apk/res/android"
xmlns:app="http://schemas.android.com/apk/res-auto"
android:layout_width="match_parent"
android:layout_height="match_parent">
android:id="@+id/tv1"
android:layout_width="wrap_content"
android:layout_height="50dp"
android:background="#82d959"
android:gravity="center"
android:text="chain1"
app:layout_constraintHorizontal_chainStyle="spread" //链头设置样式
app:layout_constraintLeft_toLeftOf="parent"
app:layout_constraintRight_toLeftOf="@+id/tv2"/>
android:id="@+id/tv2"
android:layout_width="wrap_content"
android:layout_height="50dp"
android:background="#b536d8"
android:gravity="center"
android:text="chain2"
app:layout_constraintLeft_toRightOf="@+id/tv1"
app:layout_constraintRight_toLeftOf="@+id/tv3"/>
android:id="@+id/tv3"
android:layout_width="wrap_content"
android:layout_height="50dp"
android:background="#de8f6a"
android:gravity="center"
android:text="chain3"
app:layout_constraintLeft_toRightOf="@+id/tv2"
app:layout_constraintRight_toLeftOf="@+id/tv4"/>
android:id="@+id/tv4"
android:layout_width="wrap_content"
android:layout_height="50dp"
android:background="#07d2e4"
android:gravity="center"
android:text="chain4"
app:layout_constraintLeft_toRightOf="@+id/tv3"
app:layout_constraintRight_toRightOf="parent"/>
通过layout_constraintHorizontal_weight来设置权重
image
xmlns:android="http://schemas.android.com/apk/res/android"
xmlns:app="http://schemas.android.com/apk/res-auto"
android:layout_width="match_parent"
android:layout_height="match_parent">
android:id="@+id/tv1"
android:layout_width="0dp"
android:layout_height="50dp"
android:background="#82d959"
android:gravity="center"
android:text="chain1"
app:layout_constraintHorizontal_weight="1" //设置权重
app:layout_constraintLeft_toLeftOf="parent"
app:layout_constraintRight_toLeftOf="@+id/tv2"/>
android:id="@+id/tv2"
android:layout_width="0dp"
android:layout_height="50dp"
android:background="#b536d8"
android:gravity="center"
android:text="chain2"
app:layout_constraintHorizontal_weight="1"
app:layout_constraintLeft_toRightOf="@+id/tv1"
app:layout_constraintRight_toLeftOf="@+id/tv3"/>
android:id="@+id/tv3"
android:layout_width="0dp"
android:layout_height="50dp"
android:background="#de8f6a"
android:gravity="center"
android:text="chain3"
app:layout_constraintHorizontal_weight="1"
app:layout_constraintLeft_toRightOf="@+id/tv2"
app:layout_constraintRight_toLeftOf="@+id/tv4"/>
android:id="@+id/tv4"
android:layout_width="0dp"
android:layout_height="50dp"
android:background="#07d2e4"
android:gravity="center"
android:text="chain4"
app:layout_constraintHorizontal_weight="1"
app:layout_constraintLeft_toRightOf="@+id/tv3"
app:layout_constraintRight_toRightOf="parent"/>
GuideLine 基准线
GuideLine、Barrier、Group都是是ConstraintLayout的一个辅助类的控件,运行时是看不见的;顾名思义,GuideLine就是为ConstraintLayout里的子布局提供位置摆放的基准的,他有水平和垂直两种方向android:orientation="horizontal",android:orientation="vertical"
GuideLine有三种定位方式
layout_constraintGuide_begin 距离ConstraintLayout的左侧或者顶部的距离
layout_constraintGuide_end 距离ConstraintLayout的右侧或者底部的距离
layout_constraintGuide_percent 占ConstraintLayout的宽或高的百分比
比如有一下这样一个场景,用GuideLine就可以妥妥的解决
image
xmlns:android="http://schemas.android.com/apk/res/android"
xmlns:app="http://schemas.android.com/apk/res-auto"
android:layout_width="match_parent"
android:layout_height="match_parent">
android:id="@+id/guideline"
android:layout_width="wrap_content"
android:layout_height="wrap_content"
app:layout_constraintGuide_begin="100dp" // 距离左侧100dp
android:orientation="vertical"/>
android:id="@+id/button1"
android:layout_width="wrap_content"
android:layout_height="wrap_content"
android:text="button1"
app:layout_constraintRight_toLeftOf="@id/guideline"/>
android:id="@+id/button2"
android:layout_width="wrap_content"
android:layout_height="wrap_content"
android:text="button2"
app:layout_constraintLeft_toRightOf="@id/guideline"
app:layout_constraintTop_toBottomOf="@id/button1"/>
android:id="@+id/button3"
android:layout_width="wrap_content"
android:layout_height="wrap_content"
android:text="button3"
app:layout_constraintRight_toLeftOf="@id/guideline"
app:layout_constraintTop_toBottomOf="@id/button2"/>
Barrier(1.1版本新加的控件)
Barrier是一个很实用的辅助类控件,字面意思为边界的意思,他的作用是限制所引用一组View的边界,让这一组View的边界动态的统一起来;关于Barrier的介绍非常的详细,这里的介绍就遵从该网站的翻译简单的说下吧
image
如上图所示,我们创建布局的时候,有时候布局里面的控件内容是变化的,我们有三个TextViews: 左边 textView1 和 textView2 ,右边 textView3。textView3 以textView1 右侧为约束,这样似乎看不出什么问题。但是当textView2的文本内容很长的时候就会出现问题了,如下图:
image
这个问题很好理解的,因为textView3是相对于textView1的。当然解决这个问题的方案最常见的方法就是在textView1、textView2外面包一层LinearLayout。但是现在Barrier可以完美解决这个问题
image
xmlns:android="http://schemas.android.com/apk/res/android"
xmlns:app="http://schemas.android.com/apk/res-auto"
android:layout_width="match_parent"
android:layout_height="match_parent">
android:id="@+id/barrier"
android:layout_width="wrap_content"
android:layout_height="wrap_content"
app:barrierDirection="right"
app:constraint_referenced_ids="tv1,tv2"/>
android:id="@+id/tv1"
android:layout_width="wrap_content"
android:layout_height="wrap_content"
android:text="Rxjava"
app:layout_constraintStart_toStartOf="parent"
app:layout_constraintTop_toTopOf="parent"/>
android:id="@+id/tv2"
android:layout_width="wrap_content"
android:layout_height="wrap_content"
android:layout_marginTop="20dp"
android:text="大王叫我来巡山"
app:layout_constraintStart_toStartOf="parent"
app:layout_constraintTop_toBottomOf="@id/tv1"/>
android:id="@+id/tv3"
android:layout_width="wrap_content"
android:layout_height="wrap_content"
android:layout_marginLeft="10dp"
android:text="RxJava到底是什么?让我们直接跳过官方那种晦涩的追求精确的定义,其实初学RxJava只要把握两点:观察者模式和异步,就基本可以熟练使用RxJava了。
异步在这里并不需要做太多的解释,因为在概念和使用上,并没有太多高深的东西。大概就是你脑子里想能到的那些多线程,线程切换这些东西。我会在后面会讲解它的用法。"
app:layout_constraintLeft_toLeftOf="@id/barrier"
app:layout_constraintTop_toTopOf="parent"/>
barrierDirection属性决定 Barrier 的方向 ,可选择设置范围left、start、right、end、top、 bottom。他是给约束目标指定对齐的方向。
start
[图片上传失败...(image-9de867-1545808041237)]
end
[图片上传失败...(image-73e2d0-1545808041237)]
constraint_referenced_ids Barrier指定引用的view的ID,以逗号隔开。
barrierAllowsGoneWidgets:默认为true,用来指定barrier是否生效
Group (1.1版本新加的控件)
Group可以帮助你对一组控件进行统一的管理。我们最常见的情况是控制一组控件的visibility。你只需把控件的id引用到Group,就能同时对里面的所有控件进行操作。
xmlns:android="http://schemas.android.com/apk/res/android"
android:layout_width="match_parent"
android:layout_height="match_parent"
xmlns:app="http://schemas.android.com/apk/res-auto">
android:layout_width="wrap_content"
android:id="@+id/tv1"
android:text="text1"
android:layout_height="wrap_content"/>
android:layout_width="wrap_content"
android:id="@+id/tv2"
android:text="text2"
app:layout_constraintTop_toBottomOf="@id/tv1"
android:layout_height="wrap_content"/>
android:layout_width="wrap_content"
android:id="@+id/group"
app:constraint_referenced_ids="tv1,tv2"
android:visibility="visible" // 控制tv1,tv2的显示和隐藏
android:layout_height="wrap_content"/>
ConstraintSet
我们知道在LinearLayout、RelativeLayout等中,如果想通过代码来更改布局,则需要LayoutParams,来控制控件的大小位置等。但是在ConstraintLayout中官方不建议使用LayoutParams,官方则推荐使用ConstraintSet来使用。ConstraintSet不仅可以调整布局,还可以添加动画。
我们可以通过以下 3 种方式来获取 ConstraintSet:
1. 手动创建
c = new ConstraintSet();
c.connect(....);
2. 读取xml文件
c.clone(context, R.layout.test);
3. 复制其他ConstraintLayout
c.clone(clayout);
具体实现方式:
替换XML布局
// Activity
public class ConstraintDemo1Activity extends AppCompatActivity {
ConstraintSet mConstraintSet1 = new ConstraintSet(); // create a Constraint Set
ConstraintSet mConstraintSet2 = new ConstraintSet(); // create a Constraint Set
private ConstraintLayout mConstraintLayout;
private AppCompatImageView mImageView;
boolean mOld = true;
@Override
protected void onCreate(Bundle savedInstanceState) {
super.onCreate(savedInstanceState);
setContentView(R.layout.activity_constraint_demo1);
initEvent();
}
private void initEvent() {
mConstraintSet2.clone(this, R.layout.activity_constraint_demo2);
mConstraintLayout = findViewById(R.id.root);
mConstraintSet1.clone(mConstraintLayout);
mImageView = findViewById(R.id.imageView);
mImageView.setOnClickListener(v -> {
TransitionManager.beginDelayedTransition(mConstraintLayout);
if (mOld = !mOld) {
mConstraintSet1.applyTo(mConstraintLayout); // set new constraints
} else {
mConstraintSet2.applyTo(mConstraintLayout); // set new constraints
}
});
}
}
// xml
//activity_constraint_demo1
xmlns:android="http://schemas.android.com/apk/res/android"
xmlns:app="http://schemas.android.com/apk/res-auto"
xmlns:tools="http://schemas.android.com/tools"
android:id="@+id/root"
android:layout_width="match_parent"
android:layout_height="match_parent"
tools:context=".ConstraintDemo1Activity">
android:id="@+id/imageView"
android:layout_width="100dp"
android:layout_height="0dp"
android:layout_marginEnd="8dp"
android:layout_marginStart="8dp"
android:layout_marginTop="8dp"
app:layout_constraintDimensionRatio="3:4"
app:layout_constraintEnd_toEndOf="parent"
app:layout_constraintStart_toStartOf="parent"
app:layout_constraintTop_toTopOf="parent"
app:srcCompat="@mipmap/hhh"/>
//activity_constraint_demo2
xmlns:android="http://schemas.android.com/apk/res/android"
xmlns:app="http://schemas.android.com/apk/res-auto"
xmlns:tools="http://schemas.android.com/tools"
android:id="@+id/root"
android:layout_width="match_parent"
android:layout_height="match_parent"
tools:context=".ConstraintDemo1Activity">
android:id="@+id/imageView"
android:layout_width="250dp"
android:layout_height="0dp"
android:layout_marginBottom="8dp"
android:layout_marginEnd="8dp"
android:layout_marginStart="8dp"
app:layout_constraintBottom_toBottomOf="parent"
app:layout_constraintDimensionRatio="3:4"
app:layout_constraintEnd_toEndOf="parent"
app:layout_constraintStart_toStartOf="parent"
app:srcCompat="@mipmap/hhh"/>
完全代码控制
//Activity
public class ConstraintDemo2Activity extends AppCompatActivity {
private AppCompatButton mBtnOne;
private AppCompatButton mBtnTwo;
private AppCompatButton mBtnThree;
private AppCompatButton mBtnApply;
private ConstraintLayout mRoot;
private ConstraintSet mConstraintSet1 = new ConstraintSet();
private ConstraintSet mConstraintSet2 = new ConstraintSet();
boolean mOld = true;
@Override
protected void onCreate(Bundle savedInstanceState) {
super.onCreate(savedInstanceState);
setContentView(R.layout.activity_constraint2_layout);
initView();
initEevent();
}
private void initView() {
mBtnOne = findViewById(R.id.btn_one);
mBtnTwo = findViewById(R.id.btn_two);
mBtnThree = findViewById(R.id.btn_three);
mBtnApply = findViewById(R.id.btn_apply);
mRoot = findViewById(R.id.root);
}
private void initEevent() {
mConstraintSet1.clone(mRoot);
mConstraintSet2.clone(mRoot);
mBtnApply.setOnClickListener(v->apply());
}
private void apply() {
TransitionManager.beginDelayedTransition(mRoot);
if (mOld = !mOld) {
//默认样式
mConstraintSet2.applyTo(mRoot);
}else {
//清除子View的布局
mConstraintSet1.clear(R.id.btn_one);
mConstraintSet1.clear(R.id.btn_two);
mConstraintSet1.clear(R.id.btn_three);
//重新排列布局
mConstraintSet1.connect(R.id.btn_one, ConstraintSet.LEFT, R.id.root, ConstraintSet.LEFT, 0);
mConstraintSet1.connect(R.id.btn_three, ConstraintSet.RIGHT, R.id.root, ConstraintSet.RIGHT, 0);
mConstraintSet1.connect(R.id.btn_two, ConstraintSet.LEFT, R.id.btn_one, ConstraintSet.RIGHT, 0);
mConstraintSet1.connect(R.id.btn_one, ConstraintSet.RIGHT, R.id.btn_two, ConstraintSet.LEFT, 0);
mConstraintSet1.connect(R.id.btn_two, ConstraintSet.RIGHT, R.id.btn_three, ConstraintSet.LEFT, 0);
mConstraintSet1.connect(R.id.btn_three, ConstraintSet.LEFT, R.id.btn_two, ConstraintSet.RIGHT, 0);
//设置chains的样式
mConstraintSet1.createHorizontalChain(R.id.root, ConstraintSet.LEFT,
R.id.root, ConstraintSet.RIGHT,
new int[]{R.id.btn_one,R.id.btn_two,R.id.btn_three}, null, ConstraintWidget.CHAIN_PACKED);
//设置子View的宽高
mConstraintSet1.constrainWidth(R.id.btn_one,ConstraintSet.WRAP_CONTENT);
mConstraintSet1.constrainWidth(R.id.btn_two,ConstraintSet.WRAP_CONTENT);
mConstraintSet1.constrainWidth(R.id.btn_three,ConstraintSet.WRAP_CONTENT);
mConstraintSet1.constrainHeight(R.id.btn_one,ConstraintSet.WRAP_CONTENT);
mConstraintSet1.constrainHeight(R.id.btn_two,ConstraintSet.WRAP_CONTENT);
mConstraintSet1.constrainHeight(R.id.btn_three,ConstraintSet.WRAP_CONTENT);
//重新载入布局
mConstraintSet1.applyTo(mRoot);
}
}
}
// xml
xmlns:android="http://schemas.android.com/apk/res/android"
xmlns:app="http://schemas.android.com/apk/res-auto"
xmlns:tools="http://schemas.android.com/tools"
android:id="@+id/root"
android:layout_width="match_parent"
android:layout_height="match_parent"
tools:context=".ConstraintDemo2Activity">
android:id="@+id/btn_one"
android:layout_width="wrap_content"
android:layout_height="wrap_content"
android:layout_marginLeft="30dp"
android:layout_marginTop="50dp"
android:background="@color/colorAccent"
android:text="button1"
app:layout_constraintStart_toStartOf="parent"
app:layout_constraintTop_toTopOf="parent"/>
android:id="@+id/btn_two"
android:layout_width="wrap_content"
android:layout_height="wrap_content"
android:layout_marginLeft="40dp"
android:layout_marginTop="20dp"
android:background="@android:color/holo_green_dark"
android:text="button2"
app:layout_constraintStart_toEndOf="@id/btn_one"
app:layout_constraintTop_toBottomOf="@id/btn_one"/>
android:id="@+id/btn_three"
android:layout_width="wrap_content"
android:layout_height="wrap_content"
android:layout_marginTop="20dp"
android:background="@android:color/holo_orange_dark"
android:text="button3"
app:layout_constraintStart_toEndOf="@id/btn_one"
app:layout_constraintTop_toBottomOf="@id/btn_two"/>
android:id="@+id/btn_apply"
android:layout_width="wrap_content"
android:layout_height="wrap_content"
android:layout_marginBottom="30dp"
android:text="apply"
app:layout_constraintBottom_toBottomOf="parent"
app:layout_constraintEnd_toEndOf="parent"
app:layout_constraintStart_toStartOf="parent"/>
总结
本文主要参照官方文档并加上自己的理解来的,在这我们看到ConstraintLayout的强大之处,他可以说是veLayout和LinearLayout的集大成者,同时又简化了布局的层层嵌套,大大提升了页面的渲染速度。但是官方提供的可拖拽的功能还不是很完美,大多情况下需要手动调整。总之,ConstraintLayout是现阶段的大势所趋。
参考


 4185
4185


 被折叠的 条评论
为什么被折叠?
被折叠的 条评论
为什么被折叠?
 到【灌水乐园】发言


