


对于 Android 的 Data Binding 库我一段时间以来一直非常关注. 我决定使用 Model-View-ViewModel 架构实现来 试验 它, 为了做这个, 我拿出了和@matto1990 一起做的应用 HackerNews Reader , 用 Model-View-ViewModel 架构重新实现了它.

这篇文建引用了一个演示MVVM 方式实现的实例 app . 为了帮助你的理解我建议你看一看这里的示例 APP 的仓库
What is MVVM?
Model-View-ViewModel 是一个实现建构用于抽象 view 的状态和行为, 可以让我们分离 UI 和业务逻辑的开发. 这是通过引入一个 ViewModel 实现的, 其职责是展现一个 model 数据对象并处理应用所有包含在 view 展现的逻辑.
这种方法(MVVM)是由三个核心部分,每个都有它自己的不同而独立的作用:
Model - 包含业务和验证逻辑的数据模型
View -- 定义结构,布局和View 在屏幕上的显示
ViewModel - 充当 View 和 ViewModel 之间的连接, 处理所有视图逻辑.
所以这与我们使用的 MVC 方法有设么不同呢? MVC 的架构如下:
View View 位于架构的顶部, Controller 其次, Modle 在最下.
Controller 同时感知 View 和 Model
View 仅感知 Model, 而且在任何时刻都会收到 Model 改变的通知.
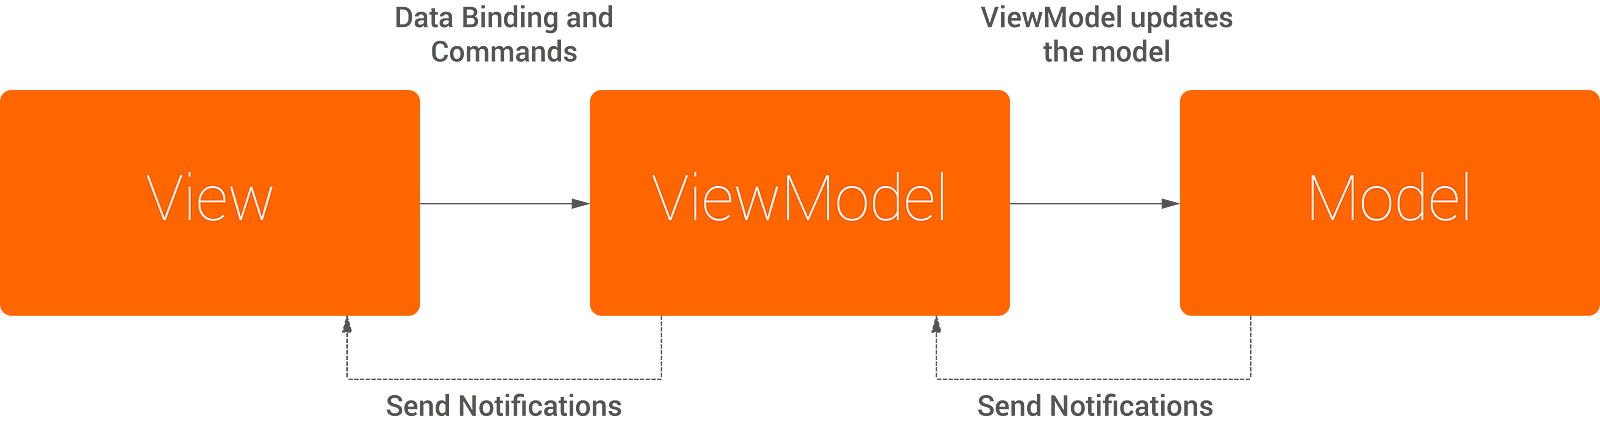
在 MVVM 中, 架构是类似的, 但是有一些明确的差别
Controller 被 View Model 替代, 位于 UI 层之下.
ViewModel 展现 View 所需的数据和指令对象.
View Model 接收 Model 的数据.
You can see here that the two approaches use a similar architecture, with the addition of a View Model and the way that it introduces a different approach to the communication between components. The architecture introduces two-way communication between its components, whereas MVC is only capable of one-way communication.
In a nutshell, MVVM is a progression of the MVC architecture - using an additonal layer of non-visual components on top of the Model (but below the View) to map data closer to the View components in the architecture. We’ll take more of a look at the nature of MVVM over the next few sections.
The Hacker News reader
As previously mentioned, I took an old project of mine and stripped it back for use with this article. The features of this sample application consist of:
Retrieval of Posts
Viewing a single Post
Viewing comments for a Post
Viewing a selected authors Posts
This was done in the hope that it would reduce the codebase, hence making it a little easier to follow and understand how the implementation operates. The screens of the app that we’re working with are as shown below:
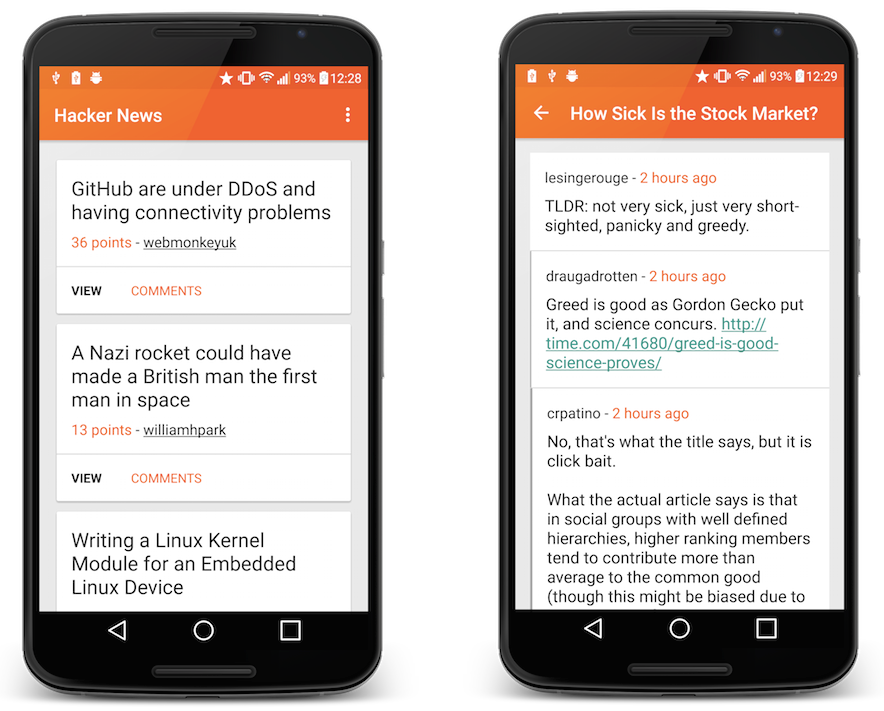
The main part of the application that I’m going to be looking at is the listing of Posts, shown on the left. The comments screen works in pretty much the same way, with a few slight differences (which we’ll look at later).
Displaying Posts

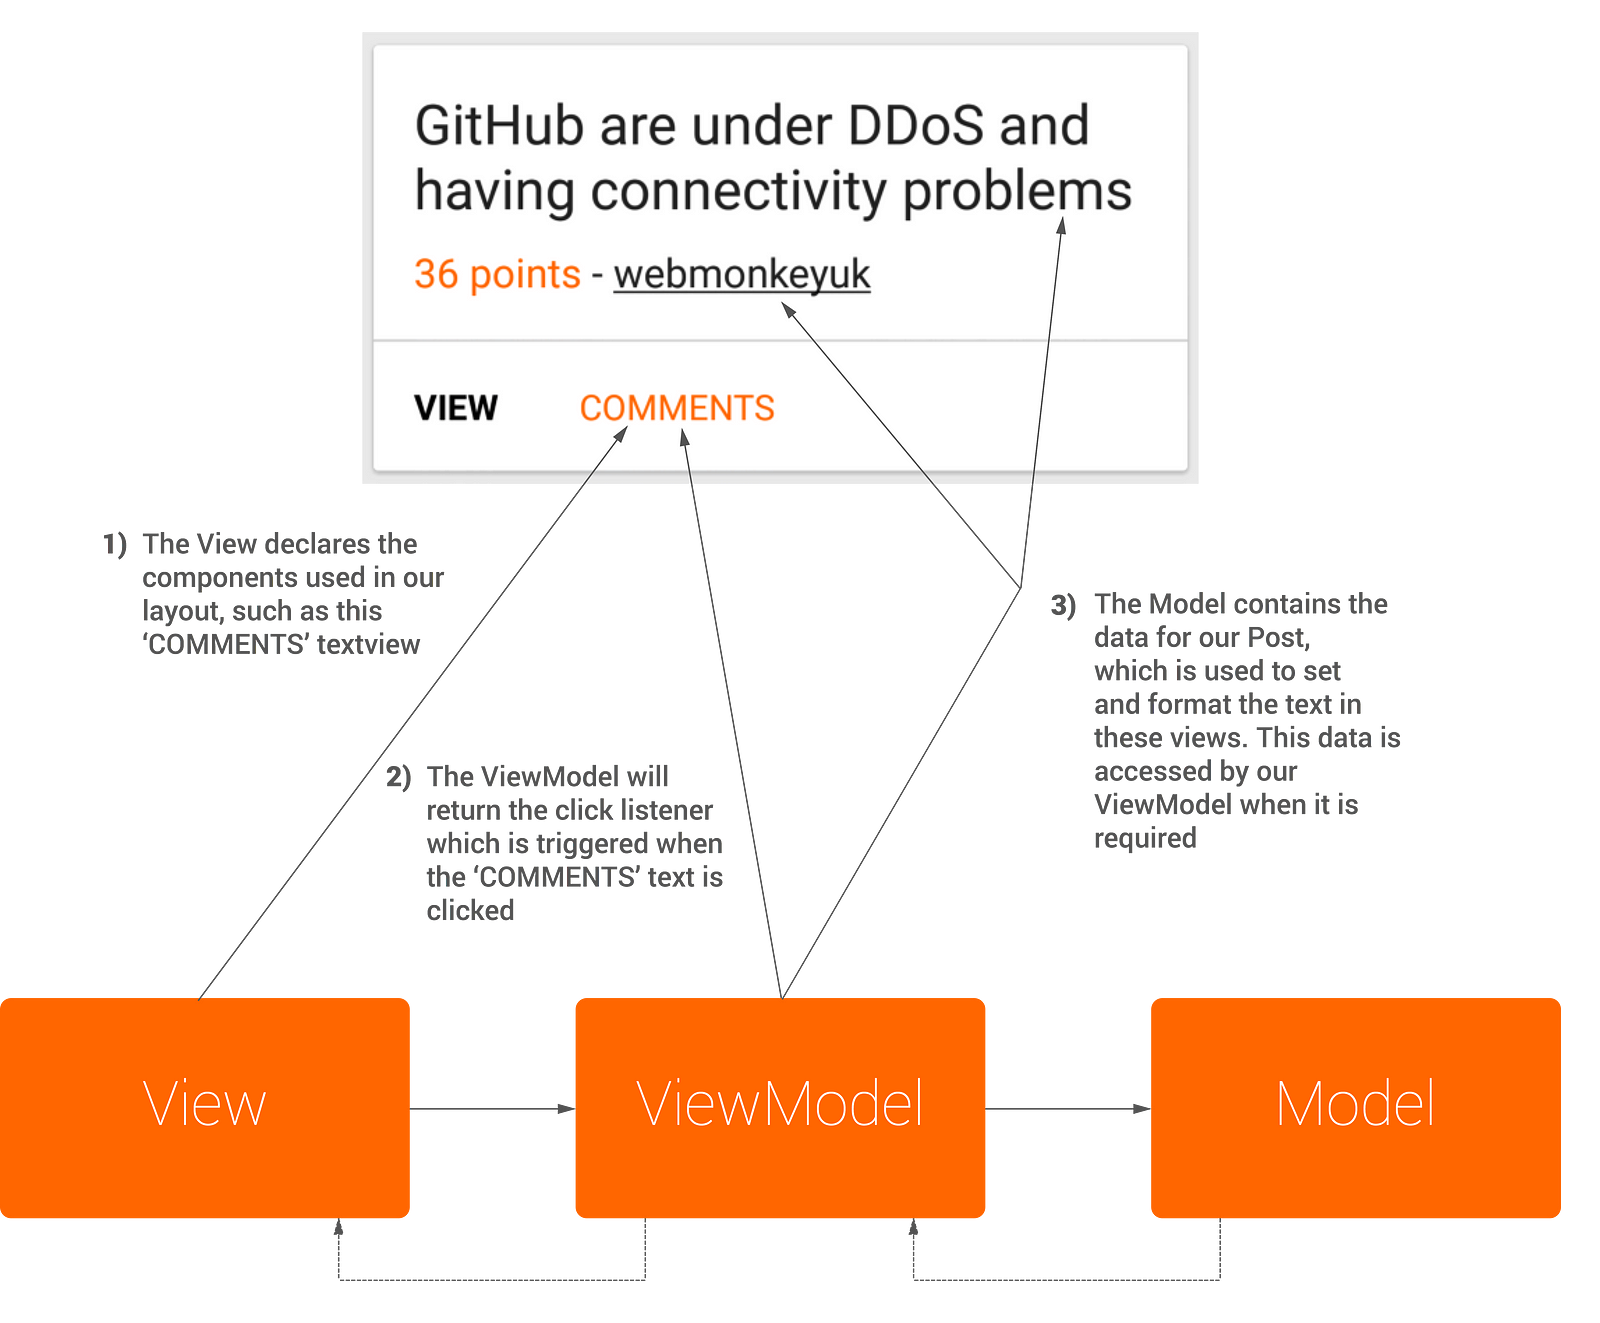
Each Post instance is displayed in a recycler view within a card view, as shown on the left.
Using MVVM we will be able to abstract the different layers that make up this card, meaning that each MVVM component will only be dealing with its assigned responsibility. Using these different components introduced with MVVM, working together they are able to construct the Post card instance. So how can we break this up?
Model
Quite simply put, the Model consists of the business logic belonging to a Post. This includes different properties such as the id, name, text etc. The code below shows a reduced version of this class:
public class Post {
public Long id;
public String by;
public Long time;
public ArrayList kids;
public String url;
public Long score;
public String title;
public String text;
@SerializedName("type")
public PostType postType;
public enum PostType {
@SerializedName("story")
STORY("story"),
@SerializedName("ask")
ASK("ask"),
@SerializedName("job")
JOB("job");
private String string;
PostType(String string) {
this.string = string;
}
public static PostType fromString(String string) {
if (string != null) {
for (PostType postType : PostType.values()) {
if (string.equalsIgnoreCase(postType.string)) return postType;
}
}
return null;
}
}
public Post() { }
}
The Post Model, stripped back of Parcelable and other methods for readability
Here you can see that all our Post Model contains is it’s properties, no other logic has been placed in this class - that’ll be dealt with by the other components.
View
Our View is responsible for defining the layout, appearance and structure of its components. The View itself will be (ideally) constructed completely of XML, however if any java code is used then it should not consist of any business logic. The View retrieves its data from a View Model through the use of binding. Then at run time, the UI content is set and can be updated when the View Model properties flag any change notification events.
To begin with, we created a custom adapter to use with our RecyclerView. For this, we needed to make a create a BindingHolder to keep a reference to our Binding.
public static class BindingHolder extends RecyclerView.ViewHolder {
private ItemPostBinding binding;
public BindingHolder(ItemPostBinding binding) {
super(binding.cardView);
this.binding = binding;
}
}
The onBindViewHolder() method is where the actual binding of the ViewModel and View takes place. We create a new ItemPostBinding (generated from our item_post layout) and set the View Model to a new instance of our PostViewModel class.
ItemPostBinding postBinding = holder.binding;
postBinding.setViewModel(new PostViewModel(mContext,
mPosts.get(position), mIsUserPosts));
Other than the standard adapter views, that’s pretty much it! The full PostAdapter class is displayed below:
public class PostAdapter extends RecyclerView.Adapter {
private List mPosts;
private Context mContext;
private boolean mIsUserPosts;
public PostAdapter(Context context, boolean isUserPosts) {
mContext = context;
mIsUserPosts = isUserPosts;
mPosts = new ArrayList<>();
}
@Override
public BindingHolder onCreateViewHolder(ViewGroup parent, int viewType) {
ItemPostBinding postBinding = DataBindingUtil.inflate(
LayoutInflater.from(parent.getContext()),
R.layout.item_post,
parent,
false);
return new BindingHolder(postBinding);
}
@Override
public void onBindViewHolder(BindingHolder holder, int position) {
ItemPostBinding postBinding = holder.binding;
postBinding.setViewModel(new PostViewModel(mContext, mPosts.get(position), mIsUserPosts));
}
@Override
public int getItemCount() {
return mPosts.size();
}
public void setItems(List posts) {
mPosts = posts;
notifyDataSetChanged();
}
public void addItem(Post post) {
mPosts.add(post);
notifyDataSetChanged();
}
public static class BindingHolder extends RecyclerView.ViewHolder {
private ItemPostBinding binding;
public BindingHolder(ItemPostBinding binding) {
super(binding.cardView);
this.binding = binding;
}
}
}
Moving on to our XML layout file, we first begin by wrapping our entire layout in a tag and declare our ViewModel using the tag:
Declaring our View Model is required to allow us to reference it throughout our layout file. I’ve made use of the ViewModel in several places within the item_post layout:
androidText - It’s possible to set the content of a text view by referencing the corresponding method in our ViewModel. You can see below the use of @{viewModel.postTitle}, this references the getPostTitle() method in our ViewModel - which returns us the title of the corresponding post instance.
onClick - We can also reference click events from our layout file. As shown in the layout file, @{viewModel.onClickPost} is used to reference the onClickPost() method in our ViewModel, which returns an OnClickListener containing the click event.
visibility - The ability to open the comments activity for a post depends on whether the post has any comments or not. This is done by checking the size of the comments list and setting the visibility based on the result, which should take place in the ViewModel. Here, we use the getCommentsVisiblity() method which returns the calculated visibility.
xmlns:card_view="http://schemas.android.com/apk/res-auto"
android:id="@+id/card_view"
android:layout_width="match_parent"
android:layout_height="wrap_content"
android:layout_marginTop="2dp"
android:layout_marginBottom="2dp"
card_view:cardCornerRadius="2dp"
card_view:cardUseCompatPadding="true">
android:id="@+id/container_post"
android:layout_width="match_parent"
android:layout_height="wrap_content"
android:clickable="true"
android:orientation="vertical"
android:onClick="@{viewModel.onClickPost}">
android:layout_width="match_parent"
android:layout_height="wrap_content"
android:orientation="vertical"
android:padding="16dp"
android:background="@drawable/touchable_background_white">
android:id="@+id/text_post_title"
android:layout_width="match_parent"
android:layout_height="wrap_content"
android:layout_marginBottom="8dp"
android:text="@{viewModel.postTitle}"
android:textColor="@color/black_87pc"
android:textSize="@dimen/text_large_title"
android:onClick="@{viewModel.onClickPost}"/>
android:layout_width="match_parent"
android:layout_height="wrap_content">
android:id="@+id/text_post_points"
android:layout_width="wrap_content"
android:layout_height="wrap_content"
android:layout_alignParentLeft="true"
android:text="@{viewModel.postScore}"
android:textSize="@dimen/text_body"
android:textColor="@color/hn_orange" />
android:id="@+id/text_post_author"
android:layout_width="wrap_content"
android:layout_height="wrap_content"
android:layout_toRightOf="@+id/text_post_points"
android:text="@{viewModel.postAuthor}"
android:textColor="@color/black_87pc"
android:textSize="@dimen/text_body"
android:bufferType="spannable"
android:onClick="@{viewModel.onClickAuthor}"/>
android:layout_width="match_parent"
android:layout_height="1dp"
android:background="@color/light_grey" />
android:layout_width="match_parent"
android:layout_height="wrap_content"
android:orientation="horizontal"
android:background="@color/white">
android:id="@+id/text_view_post"
android:layout_width="wrap_content"
android:layout_height="wrap_content"
android:padding="16dp"
android:background="@drawable/touchable_background_white"
android:clickable="true"
android:textColor="@color/black"
android:textSize="@dimen/text_small_body"
android:textStyle="bold"
android:text="@string/view_button"
android:onClick="@{viewModel.onClickPost}"/>
android:id="@+id/text_view_comments"
android:layout_width="wrap_content"
android:layout_height="wrap_content"
android:padding="16dp"
android:background="@drawable/touchable_background_white"
android:clickable="true"
android:textColor="@color/hn_orange"
android:textSize="@dimen/text_small_body"
android:text="@string/comments_button"
android:onClick="@{viewModel.onClickComments}"
android:visibility="@{viewModel.commentsVisibility}"/>
That’s great isn’t it? This allows us to abstract the display logic from our layout file, handing it over to our ViewModel to take care of it for us.
ViewModel
The ViewModel is the component which acts as the link between the View and the Model, giving it the responsibility of all of the logic relating to our View. The ViewModel is responsible for accessing the methods and properties of the Model, which is then made available to the View. Within our ViewModel, this data can be returned as is or formatted to again remove this responsibility from other components.
In our case, the PostViewModel uses the Post object to handle the display of content on the CardView of a Post instance. Within this class (below) you can see a whole bunch of methods, each corresponding to a different property of our Post View.
getPostTitle() - This uses the Post instance to return the Post title
getPostAuthor() - This method begins by retreiving a String from the app resources and formatting it with the author of the Post instance. Then if our isUserPosts equates to true we underline the text, finally returning our content String
getCommentsVisibility() - This method returns the value that should be used for the comment TextViews visibility
onClickPost() - This method returns a click event when the corresponding view is pressed
These samples show the different kinds of logic that can currently be handled by our ViewModel. Below shows the complete PostViewModel class and its methods which are referenced from our item_post view.
public class PostViewModel extends BaseObservable {
private Context context;
private Post post;
private Boolean isUserPosts;
public PostViewModel(Context context, Post post, boolean isUserPosts) {
this.context = context;
this.post = post;
this.isUserPosts = isUserPosts;
}
public String getPostScore() {
return String.valueOf(post.score) + context.getString(R.string.story_points);
}
public String getPostTitle() {
return post.title;
}
public Spannable getPostAuthor() {
String author = context.getString(R.string.text_post_author, post.by);
SpannableString content = new SpannableString(author);
int index = author.indexOf(post.by);
if (!isUserPosts) content.setSpan(new UnderlineSpan(), index, post.by.length() + index, 0);
return content;
}
public int getCommentsVisibility() {
return post.postType == Post.PostType.STORY && post.kids == null ? View.GONE : View.VISIBLE;
}
public View.OnClickListener onClickPost() {
return new View.OnClickListener() {
@Override
public void onClick(View v) {
Post.PostType postType = post.postType;
if (postType == Post.PostType.JOB || postType == Post.PostType.STORY) {
launchStoryActivity();
} else if (postType == Post.PostType.ASK) {
launchCommentsActivity();
}
}
};
}
public View.OnClickListener onClickAuthor() {
return new View.OnClickListener() {
@Override
public void onClick(View v) {
context.startActivity(UserActivity.getStartIntent(context, post.by));
}
};
}
public View.OnClickListener onClickComments() {
return new View.OnClickListener() {
@Override
public void onClick(View v) {
launchCommentsActivity();
}
};
}
private void launchStoryActivity() {
context.startActivity(ViewStoryActivity.getStartIntent(context, post));
}
private void launchCommentsActivity() {
context.startActivity(CommentsActivity.getStartIntent(context, post));
}
}
Great, huh? As you can see, our PostViewModel takes care of:
Providing the Post objects properties to be displayed in our view
Carrying out any required formatting on these properties
Returning click events to any views using the onClick attribute
Handling the visibility of any views based on Post properties
Testing the ViewModel
One of the great things about MVVM is that our View Model is now extremely easy to unit test. For the PostViewModel, a simple test class was created to test that the methods in the ViewModel were implemented correctly.
shouldGetPostScore() - Test the getPostScore() method, to ensure that the score for the Post is correctly formatted as a String and returned.
shouldGetPostTitle() - Test the getPostTitle() method, to ensure that the correct Post title is returned.
shouldGetPostAuthor() - Test the getPostAuthor() method, to ensure that a correctly formatted string using the Post author is returned.
shouldGetCommentsVisiblity() - Test that the getCommentsVisibility() method returns the correct visibility for the ‘Comments’ button on the Post card. We pass ArrayLists of different states to ensure that the correct visibility is returned for each case.
@RunWith(RobolectricTestRunner.class)
@Config(constants = BuildConfig.class, sdk = DefaultConfig.EMULATE_SDK, manifest = DefaultConfig.MANIFEST)
public class PostViewModelTest {
private Context mContext;
private PostViewModel mPostViewModel;
private Post mPost;
@Before
public void setUp() {
mContext = RuntimeEnvironment.application;
mPost = MockModelsUtil.createMockStory();
mPostViewModel = new PostViewModel(mContext, mPost, false);
}
@Test
public void shouldGetPostScore() throws Exception {
String postScore = mPost.score + mContext.getResources().getString(R.string.story_points);
assertEquals(mPostViewModel.getPostScore(), postScore);
}
@Test
public void shouldGetPostTitle() throws Exception {
assertEquals(mPostViewModel.getPostTitle(), mPost.title);
}
@Test
public void shouldGetPostAuthor() throws Exception {
String author = mContext.getString(R.string.text_post_author, mPost.by);
assertEquals(mPostViewModel.getPostAuthor().toString(), author);
}
@Test
public void shouldGetCommentsVisibility() throws Exception {
// Our mock post is of the type story, so this should return gone
mPost.kids = null;
assertEquals(mPostViewModel.getCommentsVisibility(), View.GONE);
mPost.kids = new ArrayList<>();
assertEquals(mPostViewModel.getCommentsVisibility(), View.VISIBLE);
mPost.kids = null;
mPost.postType = Post.PostType.ASK;
assertEquals(mPostViewModel.getCommentsVisibility(), View.VISIBLE);
}
}
And now we know that our ViewModel is working as it should, great!
Comments
The approach used for comments is very similar to that of the Post instances, however there is one difference that I would like to point out.
Two different view models are used regarding the comments, the CommentHeaderViewModel and CommentViewModel. If you look at the CommentAdapter then you’ll notice two different view types, which are:
private static final int VIEW_TYPE_COMMENT = 0;
private static final int VIEW_TYPE_HEADER = 1;
If the Post type is an Ask post, then we show a header section at the top of the screen containing the question which was asked - the comments are displayed as normal below. You’ll notice in the onCreateViewHolder() method we inflate the layout based on the VIEW_TYPE that we are currently dealing with, this simply returns one of our two different layouts.
if (viewType == _VIEW_TYPE_HEADER_) {
ItemCommentsHeaderBinding commentsHeaderBinding =
DataBindingUtil._inflate_(
LayoutInflater._from_(parent.getContext()),
R.layout._item_comments_header_,
parent,
false);
return new BindingHolder(commentsHeaderBinding);
} else {
ItemCommentBinding commentBinding =
DataBindingUtil._inflate_(
LayoutInflater._from_(parent.getContext()),
R.layout._item_comment_,
parent,
false);
return new BindingHolder(commentBinding);
}
Then in our onBindViewHolder() method we create the binding depending on the type view that we’re dealing with. This is because we’re using a slightly different View Model for the cases when there is a header section (for our ASK post question text) used.
if (getItemViewType(position) == _VIEW_TYPE_HEADER_) {
ItemCommentsHeaderBinding commentsHeaderBinding =
(ItemCommentsHeaderBinding) holder.binding;
commentsHeaderBinding.setViewModel(new
CommentHeaderViewModel(mContext, mPost));
} else {
int actualPosition = (postHasText()) ? position - 1 : position;
ItemCommentBinding commentsBinding =
(ItemCommentBinding) holder.binding;
mComments.get(actualPosition).isTopLevelComment =
actualPosition == 0;
commentsBinding.setViewModel(new CommentViewModel(
mContext, mComments.get(actualPosition)));
}
And that’s pretty much all that is different about it, the comments section just has two different ViewModel types available - the one chosen is dependent on whether the post is an ASK post or not.
To conclude…
The data binding library, if used correctly, has the potential to really change the way in which we develop applications. There are other ways in which we could make use of data binding in our applications, using an MVVM structure is just one of the ways in which we can do so.
For example, we could simply reference our Model in the layout file and access its properties through a variable reference:
...
android:text="@{post.title}"/>
This is simple to do and could help to remove some basic display logic from adapters and/or classes. Whilst this is nice, a similar approach could result in the following:
...
android:visibility="@{post.hasComments ? View.Visible :
View.Gone}"/>

Me upon seeing the above.
For me, this is where Data Binding could have a negative effect on its usage. This is moving a Views display logic into the View itself. Not only do I find this messy, but it would also make testing / debugging more difficult by mixing logic and layout code together.
It’s still too early to know if this approach is the correct way of developing an application, but this experiment has given me a chance to look at one of the possibilities for future projects. It’s something I definitely want to play around with more. If you wish to read more about the Data Binding library, you can do so here. Microsoft has also written a short and easy to understand article on MVVM here.
I’d love to hear your thoughts on this experiment, if you’ve got any comments and/or suggestions then feel free to leave a response or drop me a tweet!


 1万+
1万+

 被折叠的 条评论
为什么被折叠?
被折叠的 条评论
为什么被折叠?
 到【灌水乐园】发言


