


1.目录结构规划
在app下新增业务hello_world,其中hello_world.c为业务代码,BUILD.gn为编译脚本,具体规划目录结构如下:
.
└──applications
└──sample
└──wifi-iot
└──app
│──hello_world
││──hello_world.c
│└──BUILD.gn
└──BUILD.gn
2. hello_world.c 源码
/*
业务代码的架构
1.任务处理函数HelloWorld_Task,实现业务初始化,并在while(1)中实现循环处理的业务
2.任务入口函数HelloWorld_Entry:实现任务的初始化,并注册任务处理函数
3.调用鸿蒙SYS_RUN(HelloWorld_Entry);实现业务的注册
*/
#include
#include
#include"ohos_init.h"
#include"cmsis_os2.h"
/*1.任务函数:hello_world任务*/
staticvoid*HelloWorld_Task(constchar*arg)
{
(void)arg;
printf("[HelloWorld]HelloWorld_Task()\n");
while(1)
{
//logiccodefortask
usleep(500000);//us延时
}
returnNULL;
}
/*2.任务入口函数:实现任务的初始化*/
staticvoidHelloWorld_Entry(void)
{
osThreadAttr_tattr={0};
printf("[HelloWorld]HelloWorld_Entry()\n");
attr.name="HelloWorld_Task";
attr.attr_bits=0U;
attr.cb_mem=NULL;
attr.cb_size=0U;
attr.stack_mem=NULL;
attr.stack_size=1024;
attr.priority=osPriorityNormal;
if(osThreadNew((osThreadFunc_t)HelloWorld_Task,NULL,&attr)==NULL)
{
printf("[HelloWorld]FaliedtocreateLedTask!\n");
}
}
SYS_RUN(HelloWorld_Entry);
3. 业务代码的编译脚本 BUILD.gn
路径:code\applications\sample\wifi-iot\app\hello_world\BUILD.gn
static_library("hello_world_app"){
sources=[
"hello_world.c"
]
include_dirs=[
"//utils/native/lite/include",
"//kernel/liteos_m/components/cmsis/2.0",
"//base/iot_hardware/interfaces/kits/wifiiot_lite",
]
}
4.模块的编译脚本BUILD.gn
路径:code\applications\sample\wifi-iot\app\BUILD.gn
import("//build/lite/config/component/lite_component.gni")
lite_component("app"){
features=[
"startup",
"hello_world:hello_world_app",
]
}
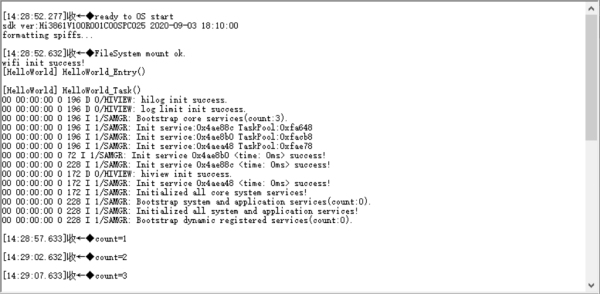
5.执行结果:
6.总结
注意业务代码的项目路径,一定是在code\applications\sample\wifi-iot\app\目录下,按照业务进行新建文件夹
一个业务,可以理解为一个任务或者一个线程,比如OLED液晶显示可以单独做为一个业务,流水灯可以单独作为一个业务。
后续代码,简单的功能会继续在hello_world业务上进行添加,比如LED流水灯、按键中断灯,复杂的功能(比如WIFI,OLED显示)会重新起一个新的业务。


 1835
1835


 被折叠的 条评论
为什么被折叠?
被折叠的 条评论
为什么被折叠?
 到【灌水乐园】发言


