源代码编译,Apache DolphinScheduler前后端分离部署解决方案_SeaTunnel

转载自神龙大侠

生产环境部署方案

在企业线上生产环境中,普遍的做法是至少实施两套环境。

  1. 测试环境
  2. 线上环境

测试环境用于验证代码的正确性,当测试环境验证ok后才会部署线上环境。

鉴于CI/CD应用的普遍性,源代码一键部署是必要的。

本文是探索对DolphinScheduler源代码改造,构建测试,线上双环境一键部署和上线。

同时,我对dolphinscheduler-api进行改造,使得前端管理系统前后端分离,以使得部署更贴近生产环境,方便生产环境组件横向部署,这也让前后端并行代码开发更加便利。

如果熟悉DolphinScheduler的同学可以前面的介绍,直接跳到部署方案那里看起。

DolphinScheduler介绍

Apache DolphinScheduler 是一个分布式易扩展的可视化DAG工作流任务调度开源系统。适用于企业级场景,提供了一个可视化操作任务、工作流和全生命周期数据处理过程的解决方案。

Apache DolphinScheduler 旨在解决复杂的大数据任务依赖关系,并为应用程序提供数据和各种 OPS 编排中的关系。 解决数据研发ETL依赖错综复杂,无法监控任务健康状态的问题。 DolphinScheduler 以 DAG(Directed Acyclic Graph,DAG)流式方式组装任务,可以及时监控任务的执行状态,支持重试、指定节点恢复失败、暂停、恢复、终止任务等操作。

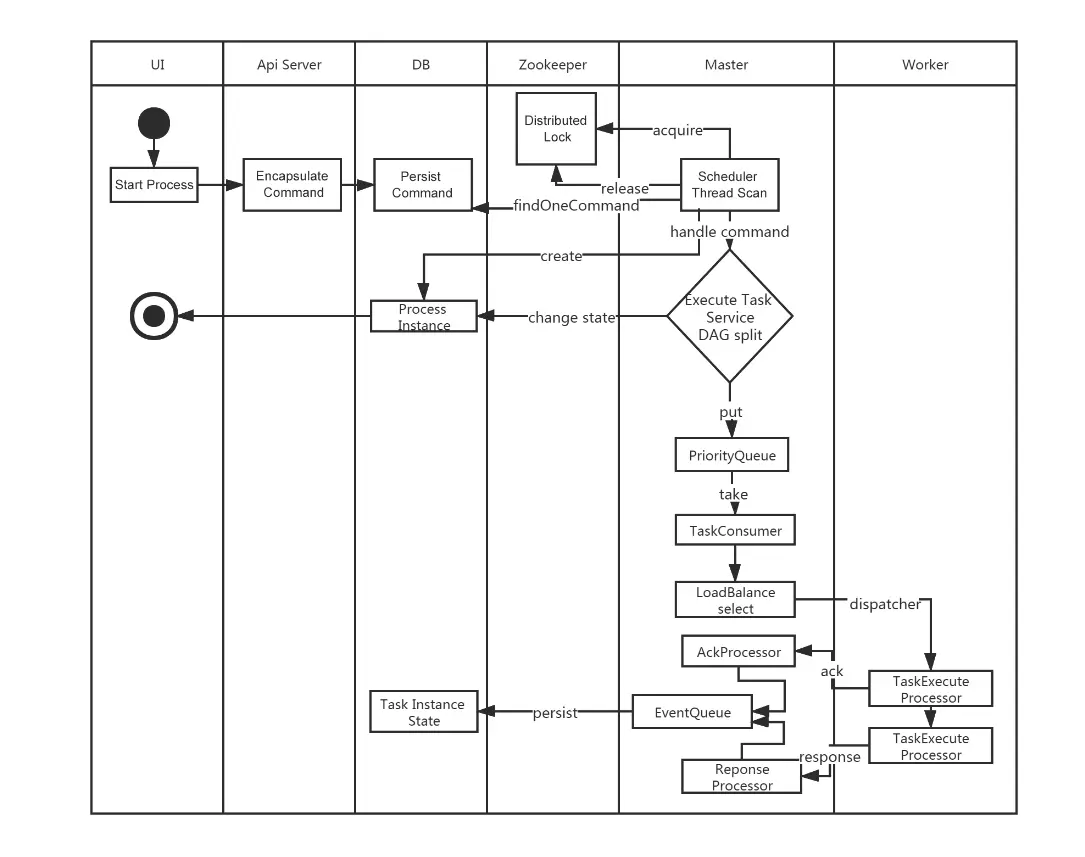
工作流定义启动流程

很丝滑有木有(这里面没有alert-server的位置,不过这个也不负责具体的任务执行)
源代码编译,Apache DolphinScheduler前后端分离部署解决方案_SeaTunnel_02

DolphinScheduler核心模块

在二进制文件部署方案中,DolphinScheduler主要是有4个核心server如下:

  • alert-server
    提供告警服务,通过告警插件的方式实现丰富的告警手段。

  • master-server
    MasterServer采用分布式无中心设计理念,MasterServer主要负责 DAG 任务切分、任务提交监控,并同时监听其它MasterServer和WorkerServer的健康状态。 MasterServer服务启动时向Zookeeper注册临时节点,通过监听Zookeeper临时节点变化来进行容错处理。 MasterServer基于netty提供监听服务。

该服务内主要包含:
DistributedQuartz分布式调度组件,主要负责定时任务的启停操作,当quartz调起任务后,Master内部会有线程池具体负责处理任务的后续操作;

MasterSchedulerService是一个扫描线程,定时扫描数据库中的t_ds_command表,根据不同的命令类型进行不同的业务操作;

WorkflowExecuteRunnable主要是负责DAG任务切分、任务提交监控、各种不同事件类型的逻辑处理;

TaskExecuteRunnable主要负责任务的处理和持久化,并生成任务事件提交到工作流的事件队列;

EventExecuteService主要负责工作流实例的事件队列的轮询;

StateWheelExecuteThread主要负责工作流和任务超时、任务重试、任务依赖的轮询,并生成对应的工作流或任务事件提交到工作流的事件队列;

FailoverExecuteThread主要负责Master容错和Worker容错的相关逻辑;

  • worker-server
    WorkerServer也采用分布式无中心设计理念,WorkerServer主要负责任务的执行和提供日志服务。 WorkerServer服务启动时向Zookeeper注册临时节点,并维持心跳。 WorkerServer基于netty提供监听服务。

  • api-server
    API接口层,主要负责处理前端UI层的请求。该服务统一提供RESTful api向外部提供请求服务。

从严格意义上来讲,api-server包含了两个模块,一个是后端接口api-server,一个是api-ui前端页面。在dolphinscheduler的二进制部署方案中ApiServer和ui是合并打包的。

在实际的生产环境中一般前后端是分离部署,一个是缩小上线改动的影响范围,上线效率更快,一个是前端和后端的部署机器没必要都保持一样的数量,分离部署更灵活,这个博文是使用最新的release版本3.2.1进行部署的。(2024年7月22日)

  • api-ui

系统的前端页面,提供系统的各种可视化操作界面。

部署方案

DolphinScheduler部署主要有四种:

  • 单机部署(Standalone)
  • 伪集群部署(Pseudo-Cluster)
  • 集群部署(Cluster)
  • 快速试用 Kubernetes 部署

其中单机部署主要是用于操作体验,并不能执行工作流调度。

官网部署指南: https://dolphinscheduler.apache.org/zh-cn/docs/3.2.2/��%A

DolphinScheduler官网提供了二进制文件部署,这种我也试了一下,安装流程很流畅,不过还是没有采用这种部署方案,主要考虑后面产品或者业务会提一些需求,需要这边基于最新的版本做一些开发。

最终决定采用如下两套部署方案:

  • 伪集群部署方案 作为测试环境(stag)
  • 集群部署方案 作为线上环境(prod)

下文用stag和prod作为测试环境和线上环境标志。

源代码开发pom管理有两种方案:

  1. 升级版本信息3.2.1到3.2.2
  2. 使用snapshot版本

为了不跟主线混淆主版本,也是致敬经典,我就使用snapshot作为后续的开发迭代版本了。

修改pom版本

本文基于3.2.1版本统一改成了snapshot版本,这样我自己修改的代码,重新编译之后可以在测试或者生产环境生效。

<groupId>org.apache.dolphinscheduler</groupId>
<artifactId>dolphinscheduler</artifactId>
<version>3.2.100-SNAPSHOT</version>

备注:需要修改所有子模块的pom版本信息。

修改通用环境配置

目前环境需要的依赖或者配置信息目录在根目录下的script/env下,/script/env下保存了测试环境和线上环境都要求一致的配置信息。

如果确定使用mysql数据库,需要引入jar包mysql-connector-java-8.0.33.jar。可以把mysql-connector-java-8.0.33.jar放在/script/env目录下,这个测试和线上环境都是一致的配置和需求版本。

另外一个主要的配置信息是dolphinscheduler_env.sh文件。

dolphinscheduler_env.sh用来配置各种路径和环境变量信息。

如果线上有和测试环境配置不一样的配置信息,可以分别创建测试和线上目录,build的时候根据环境信息打包各自的配置文件:

  • /script/env/stag
  • /script/env/prod

将线上和测试环境不同的配置信息dolphinscheduler_env.sh文件copy到这两个目录下。

dolphinscheduler_env.sh文件包含的配置信息包括JAVA_HOMEPYTHON_LAUNCHERHADOOP_CLASSPATHSPARK_DIST_CLASSPATHHADOOP_CLIENT_OPTSSPARK_SUBMIT_OPTS等环境信息,根据实际情况配置好就ok了。

我的stag环境dolphinscheduler_env.sh配置信息包括如下(这个根据自己的情况配置,不能直接copy哦)

export HADOOP_CLASSPATH=`hadoop classpath`:${DOLPHINSCHEDULER_HOME}/tools/libs/*
export SPARK_DIST_CLASSPATH=$HADOOP_CLASSPATH:$SPARK_DIST_CLASS_PATH
export HADOOP_CLIENT_OPTS="-javaagent:${DOLPHINSCHEDULER_HOME}/tools/libs/aspectjweaver-1.9.7.jar":$HADOOP_CLIENT_OPTS
export SPARK_SUBMIT_OPTS="-javaagent:${DOLPHINSCHEDULER_HOME}/tools/libs/aspectjweaver-1.9.7.jar":$SPARK_SUBMIT_OPTS
export FLINK_ENV_JAVA_OPTS="-javaagent:${DOLPHINSCHEDULER_HOME}/tools/libs/aspectjweaver-1.9.7.jar":$FLINK_ENV_JAVA_OPTS
export JAVA_HOME=${JAVA_HOME:-/usr/java/jdk1.8.0_181-amd64/}
export PYTHON_LAUNCHER=${PYTHON_LAUNCHER:-/usr/local/python3.7.2/bin/python3}

export SPRING_CACHE_TYPE=${SPRING_CACHE_TYPE:-none}
export SPRING_JACKSON_TIME_ZONE=${SPRING_JACKSON_TIME_ZONE:-UTC}
export MASTER_FETCH_COMMAND_NUM=${MASTER_FETCH_COMMAND_NUM:-10}


export PATH=$PYTHON_LAUNCHER:$JAVA_HOME/bin:$HADOOP_CLASSPATH:$SPARK_DIST_CLASSPATH:$FLINK_ENV_JAVA_OPTS:$PATH
  • 1.
  • 2.
  • 3.
  • 4.
  • 5.
  • 6.
  • 7.
  • 8.
  • 9.
  • 10.
  • 11.
  • 12.
  • 13.
  • 14.

备注:jdk需要时1.8以上的版本

dolphinscheduler-api双环境部署方案改造

对于alert-server,master-server,worker-server改造和dolphinscheduler-api改造一样,这里就不都一一例举和分析了。

增加线上和测试环境配置信息

删除/dolphinscheduler-api/resources/application.yaml这个是配置样例,可以根据实际需要修改对应的配置信息。

添加测试环境配置信息
/dolphinscheduler-api/resources/stag/application.yaml

添加线上环境配置信息
/dolphinscheduler-api/resources/prod/application.yaml

application.yaml需要修改的内容包括(我列的这几个是需要修改的项,其他的可以留着不动)。

修改mysql对应配置

spring:
  profiles:
    active: mysql
  datasource:
    driver-class-name: com.mysql.cj.jdbc.Driver
    url: jdbc:mysql://ip:port/dolphinscheduler
    username: user
    password: pass
quartz:
  properties:
    org.quartz.jobStore.driverDelegateClass:org.quartz.impl.jdbcjobstore.StdJDBCDelegate
  • 1.
  • 2.
  • 3.
  • 4.
  • 5.
  • 6.
  • 7.
  • 8.
  • 9.
  • 10.
  • 11.

修改zk对应的配置:

registry:
  type: zookeeper
  zookeeper:
    namespace: dolphinscheduler
    connect-string: ip:port
    retry-policy:
      base-sleep-time: 60ms
      max-sleep: 300ms
      max-retries: 5
    session-timeout: 30s
    connection-timeout: 9s
    block-until-connected: 600ms
    digest: ~
  • 1.
  • 2.
  • 3.
  • 4.
  • 5.
  • 6.
  • 7.
  • 8.
  • 9.
  • 10.
  • 11.
  • 12.
  • 13.

增加双环境jvm启动参数信息

  • 创建dolphinscheduler-api/src/main/bin/stag目录,mv并修改jvm_args_env.sh配置信息。

修改jvm_args_env.sh

-Xms1g
-Xmx1g
-Xmn512m

-XX:+IgnoreUnrecognizedVMOptions
-XX:+PrintGCDateStamps
-XX:+PrintGCDetails
-Xloggc:gc.log

-XX:+ExitOnOutOfMemoryError
-XX:+HeapDumpOnOutOfMemoryError
-XX:HeapDumpPath=dump.hprof

-Duser.timezone=${SPRING_JACKSON_TIME_ZONE}
  • 1.
  • 2.
  • 3.
  • 4.
  • 5.
  • 6.
  • 7.
  • 8.
  • 9.
  • 10.
  • 11.
  • 12.
  • 13.
  • 14.
  • 创建dolphinscheduler-api/src/main/bin/prod目录,mv并修改jvm_args_env.sh配置信息

修改jvm_args_env.sh

-Xms8g
-Xmx8g
-Xmn2g

-XX:+IgnoreUnrecognizedVMOptions
-XX:+PrintGCDateStamps
-XX:+PrintGCDetails
-Xloggc:gc.log

-XX:+ExitOnOutOfMemoryError
-XX:+HeapDumpOnOutOfMemoryError
-XX:HeapDumpPath=dump.hprof

-Duser.timezone=${SPRING_JACKSON_TIME_ZONE}
  • 1.
  • 2.
  • 3.
  • 4.
  • 5.
  • 6.
  • 7.
  • 8.
  • 9.
  • 10.
  • 11.
  • 12.
  • 13.
  • 14.

start.sh文件不用做改动,直接copy到对应的目录即可。

  • 增加src/main/assembly/xml 线上和测试环境打包配置文件
    dolphinscheduler-api-server-stag.xml
    dolphinscheduler-api-server-prod.xml

       <fileSet>
          <directory>${basedir}/../../script/env</directory>
          <outputDirectory>libs</outputDirectory>
          <includes>
              <include>mysql-connector-java-8.0.33.jar</include>
          </includes>
          <fileMode>0755</fileMode>
          <directoryMode>0755</directoryMode>
       </fileSet>
    

线上和测试环境一般不同所以需要根据路径加载线上或者测试环境配置信息

对于测试环境:

    <fileSet>
        <directory>${basedir}/src/main/resources/stag</directory>
        <includes>
            <include>*.yaml</include>
            <include>*.xml</include>
        </includes>
        <outputDirectory>conf</outputDirectory>
    </fileSet>
    <fileSet>
        <directory>${basedir}/src/main/bin/stag</directory>
        <outputDirectory>bin</outputDirectory>
        <fileMode>0755</fileMode>
        <directoryMode>0755</directoryMode>
    </fileSet>

线上环境:

    <fileSet>
        <directory>${basedir}/src/main/resources/prod</directory>
        <includes>
            <include>*.yaml</include>
            <include>*.xml</include>
        </includes>
        <outputDirectory>conf</outputDirectory>
    </fileSet>
    <fileSet>
        <directory>${basedir}/src/main/bin/prod</directory>
        <outputDirectory>bin</outputDirectory>
        <fileMode>0755</fileMode>
        <directoryMode>0755</directoryMode>
    </fileSet>

修改pom文件

  • 增加profile信息
    <profiles>
        <!--测试环境-->
        <profile>
            <id>stag</id>
            <properties>
                <spring.profiles.active>stag</spring.profiles.active>
            </properties>
            <activation>
                <activeByDefault>true</activeByDefault>
            </activation>
        </profile>
        <!--生产环境-->
        <profile>
            <id>prod</id>
            <properties>
                <spring.profiles.active>prod</spring.profiles.active>
            </properties>
        </profile>
    </profiles>
  • 1.
  • 2.
  • 3.
  • 4.
  • 5.
  • 6.
  • 7.
  • 8.
  • 9.
  • 10.
  • 11.
  • 12.
  • 13.
  • 14.
  • 15.
  • 16.
  • 17.
  • 18.
  • 19.
  • 根据环境信息修改对应的assembly文件
           <plugin>
                <artifactId>maven-assembly-plugin</artifactId>
                <executions>
                    <execution>
                        <id>dolphinscheduler-api-server</id>
                        <goals>
                            <goal>single</goal>
                        </goals>
                        <phase>package</phase>
                        <configuration>
                            <finalName>api-server</finalName>
                            <descriptors>
                                <descriptor>src/main/assembly/dolphinscheduler-api-server-${spring.profiles.active}.xml</descriptor>
                            </descriptors>
                            <appendAssemblyId>false</appendAssemblyId>
                        </configuration>
                    </execution>
                </executions>
             </plugin>
  • 1.
  • 2.
  • 3.
  • 4.
  • 5.
  • 6.
  • 7.
  • 8.
  • 9.
  • 10.
  • 11.
  • 12.
  • 13.
  • 14.
  • 15.
  • 16.
  • 17.
  • 18.
  • 19.

配置完上述信息之后,可以通过根据命令打包。

线上:
mvn clean install -P prod ‘-Dmaven.test.skip=true’ ‘-Dcheckstyle.skip=true’ ‘-Dmaven.javadoc.skip=true’

测试:
mvn clean install -P stag ‘-Dmaven.test.skip=true’ ‘-Dcheckstyle.skip=true’ ‘-Dmaven.javadoc.skip=true’

如果需要根据pid文件判断程序的健康检查状态并支持故障自动拉起的功能,可以修改 ApiApplicationServer的main方法,支持生成pid文件信息

   public static void main(String[] args) {
        ApiServerMetrics.registerUncachedException(DefaultUncaughtExceptionHandler::getUncaughtExceptionCount);
        Thread.setDefaultUncaughtExceptionHandler(DefaultUncaughtExceptionHandler.getInstance());
        SpringApplication application = new SpringApplicationBuilder(ApiApplicationServer.class).application();
        application.addListeners(new ApplicationPidFileWriter("ApiServer.pid"));
        application.run(args);
    }
  • 1.
  • 2.
  • 3.
  • 4.
  • 5.
  • 6.
  • 7.

build之后,启动执行sh bin/start.sh.

如果启动报错mysql表找不到,可以下载一下二进制安装包,激活一下conf中的mysql数据库,执行tools/bin/upgrade-schema.sh即可完成数据库的初始化。

如果你修改代码,且引入了一些jar包,然后报一些莫名其妙的错误,十有八九是jar包依赖版本错乱了,将对应的jar包和官方代码依赖的重复jar包 exlude出去就可以了。(最后如果有其他问题可以留言)。

dolphinscheduler-ui部署方案

配置测试环境和线上环境后端接口api域名

修改.env.development 测试环境
VITE_APP_PROD_WEB_URL='https://stag.busi.com'

修改.env.production 测试环境
VITE_APP_PROD_WEB_URL='https://prod.busi.com'

这个地址是后端接口的域名前缀,也就是dolphinscheduler-api提供http接口的地址

修改package.json文件,在"build:prod"下面增加一行测试环境 build:stag命令

“build:prod”: “vue-tsc --noEmit && vite build --mode production”,
“build:stag”: “vue-tsc --noEmit && vite build --mode development”,

修改router

二进制文件打包默认目录是/dolphinscheduler/ui,对于前后端分离部署,并没有这个必要。

修改src/router/index.ts代码:

const router = createRouter({
  history: createWebHistory(
    import.meta.env.MODE === 'production' ? '/' : '/'
  ),
  routes
})
  • 1.
  • 2.
  • 3.
  • 4.
  • 5.
  • 6.

修改pom文件(增加build:stag)配置

                            <execution>
                                <id>pnpm run build:stag</id>
                                <goals>
                                    <goal>pnpm</goal>
                                </goals>
                                <configuration>
                                    <arguments>run build:stag</arguments>
                                </configuration>
                            </execution>
  • 1.
  • 2.
  • 3.
  • 4.
  • 5.
  • 6.
  • 7.
  • 8.
  • 9.

修改vite.config.ts文件中base目录信息

二进制文件打包默认目录是/dolphinscheduler/ui,对于前后端分离部署,并没有这个必要。

 base: process.env.NODE_ENV === 'production' ? '/' : '/',
  • 1.

nginx配置信息

对于测试环境

       server {
            listen 你的port; # 自定义接口
            server_name dolphinscheduler-test.buis.com;
            root /home/deploy/api-ui_stag; #本地网站文件路径

            index index.html;  #设置默认网页
            try_files $uri $uri/ /index.html;
            location /dolphinscheduler {
                 proxy_pass http://api-server-ip:api-server-port;
            }
        }
  • 1.
  • 2.
  • 3.
  • 4.
  • 5.
  • 6.
  • 7.
  • 8.
  • 9.
  • 10.
  • 11.

对于线上环境

       server {
            listen 你的port; # 自定义接口
            server_name dolphinscheduler-prod.buis.com;
            root /home/deploy/api-ui_prod; #本地网站文件路径

            index index.html;  #设置默认网页
            try_files $uri $uri/ /index.html;
            location /dolphinscheduler {
                 proxy_pass http://api-server-ip:api-server-port;
            }
        }
  • 1.
  • 2.
  • 3.
  • 4.
  • 5.
  • 6.
  • 7.
  • 8.
  • 9.
  • 10.
  • 11.

其中api-ui_prodapi-ui_stagdolphinscheduler-ui build之后的dist目录。

nginx有一个配置非常关键

try_files $uri $uri/ /index.html;

由于dolphinscheduler-ui的vue router 模式为history模式,所有页面的录入都是通过域名根目录进入的。

例如
访问https://dolphinscheduler-test.busi.com/目录会跳转到
 https://dolphinscheduler-test.busi.com/home目录。

但是你如果直接请求https://dolphinscheduler-test.busi.com/home会报404错误。

解决的办法,就是增加配置try_files $uri $uri/ /index.html;

同时去掉

location / {

}
  • 1.
  • 2.
  • 3.

配置

去掉location这个很关键.

关于try_files的语法

Checks the existence of files in the specified order and uses the first found
 file for request processing; the processing is performed in the current 
context. The path to a file is constructed from the file parameter according
 to the root and alias directives. It is possible to check directory’s 
existence by specifying a slash at the end of a name, e.g. “$uri/”. 
If none of the files were found, an internal redirect to the uri 
specified in the last parameter is made.
参考
https://juejin.cn/post/6844903856359342087
  • 1.
  • 2.
  • 3.
  • 4.
  • 5.
  • 6.
  • 7.
  • 8.
  • 9.

大意就是它会按照try_files后面的参数依次去匹配root中对应的文件或文件夹。如果匹配到的是一个文件,那么将返回这个文件;如果匹配到的是一个文件夹,那么将返回这个文件夹中index指令指定的文件。最后一个uri参数将作为前面没有匹配到的fallback。(注意try_files指令至少需要两个参数)

build命令

测试环境打包:pnpm run build:stag
线上环境打包:pnpm run build:prod

最后执行
nginx -s reload
使得nginx部署生效

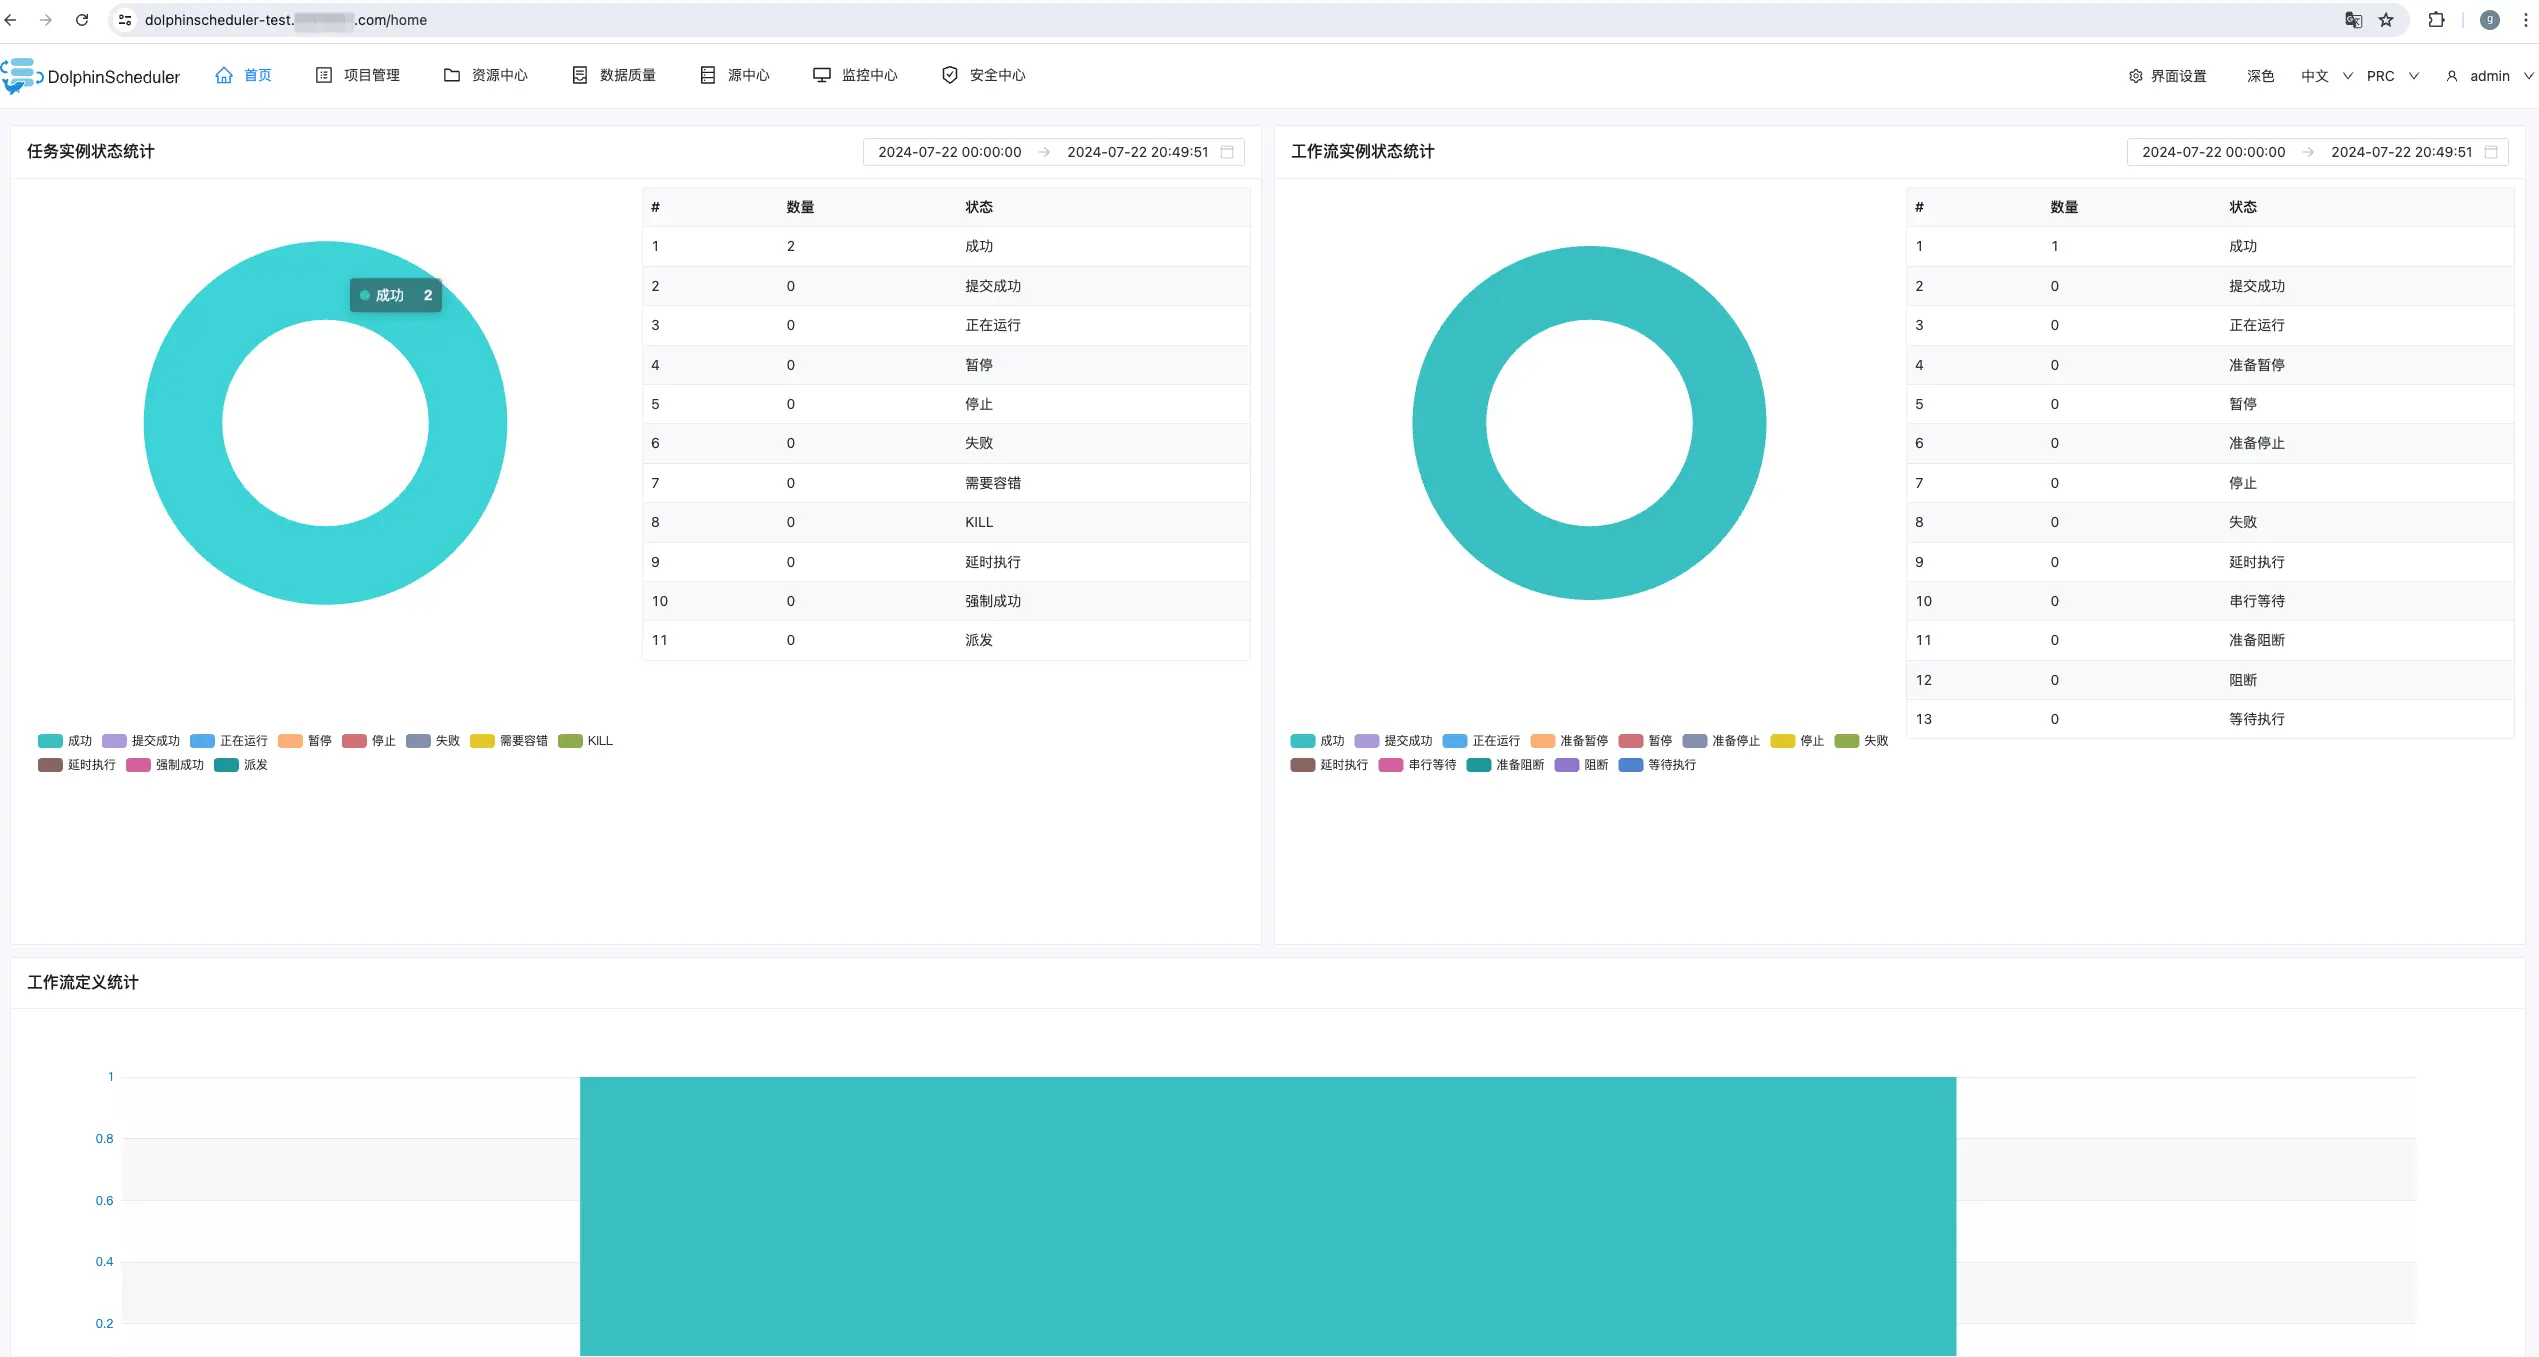
看一下效果

  • 用户名:admin
  • 密码:dolphinscheduler123

源代码编译,Apache DolphinScheduler前后端分离部署解决方案_SeaTunnel_03

钉钉报警和优化

目前我这报警主要是钉钉报警,钉钉报警可以发到群报警机器人,并且支持@owner的功能,好用且不收费。

原生的报警格式如下:

start process success
[{"projectCode":14285493640640,"projectName":"xxx_test","owner":"admin",
"processId":12,"processDefinitionCode":14285512555584,
"processName":"flow_test1-1-20240717191405669","processType":"START_PROCESS",
"processState":"SUCCESS","modifyBy":"admin","recovery":"NO",
"runTimes":1,"processStartTime":"2024-07-17 19:14:05",
"processEndTime":"2024-07-17 19:14:09","processHost":"10.76.6.66:5678"}]
@xxx
  • 1.
  • 2.
  • 3.
  • 4.
  • 5.
  • 6.
  • 7.
  • 8.

我看起来感觉不太易读,重新优化了一下报警格式,是不是看起来板正多了,后续可以考虑加一个钩子,做一下中英文替换,或者直接修改报警源内容,看起来就更方便了。

start process success
projectCode:14285493640640
projectName:xxx_test
owner:admin
processId:22
processDefinitionCode:14371091350208
processName:testflow123-1-20240723111659147
processType:START_PROCESS
processState:SUCCESS
modifyBy:admin
recovery:NO
runTimes:1
processStartTime:2024-07-23 11:16:59
processEndTime:2024-07-23 11:17:00
processHost:10.76.6.66:5678
@xxx
  • 1.
  • 2.
  • 3.
  • 4.
  • 5.
  • 6.
  • 7.
  • 8.
  • 9.
  • 10.
  • 11.
  • 12.
  • 13.
  • 14.
  • 15.
  • 16.

备注:本文的一些关键配置信息我这隐掉了,每个公司的配置不一样,参考自己公司的配置,比如机器部署目录,域名信息,mysql,zk配置信息,用户名,密码等。

本文由  白鲸开源 提供发布支持!