


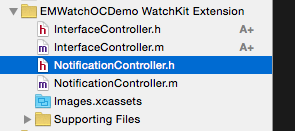
第3章主要介绍怎样在Watch App的页面上显示iPhone程序里的数据。主要操作的是“EMWatchOCDemo WatchKit Extension”这个文件夹,附源码EMWatchOCDemo。
如果你已经看过我在第1章推荐的blog,应该明白这个target主要是负责逻辑的,从iPhone App中获取数据,调动Watch App显示数据。
默认是这个样子的
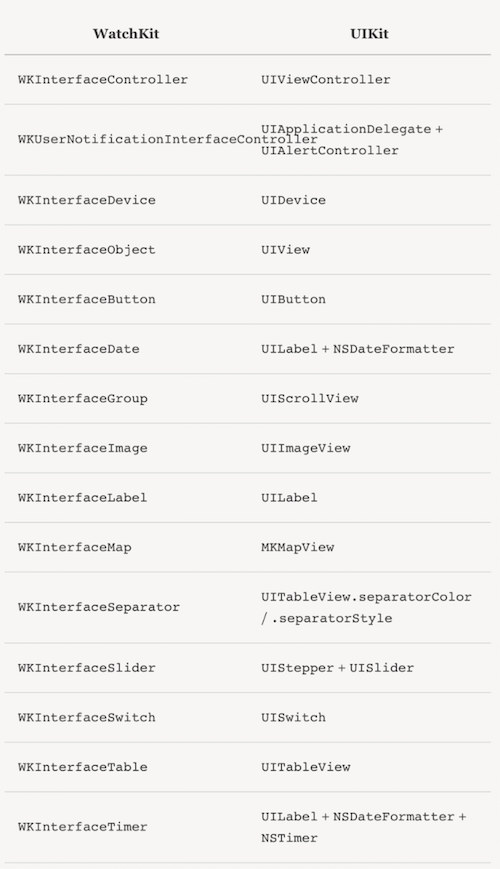
一、WathKit定义了一些专门用于Watch App的类,与UIKit的对比如下图
二、整合Watch App和iPhone App
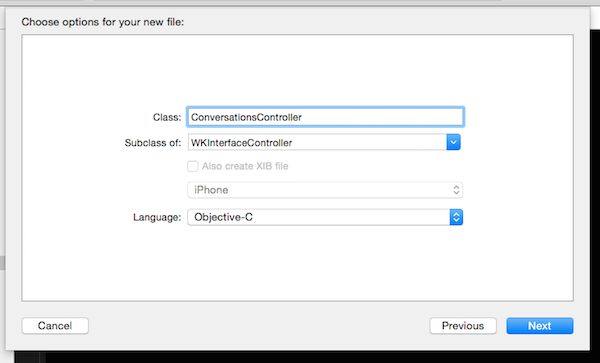
1、新建Controller
根据Interface.storyboard,我需要新建5个Controller。右键---New File---Cocoa Touch Class
新建的类默认有三个方法,[-awakeWithContext:]相当于[-viewDidLoad],[-willActivate]相当于[-viewWillAppear],[-didDeactivate]相当于[-viewDidDisappear],“相当于”一下是不是就很容易理解每个方法中能进行什么操作了?
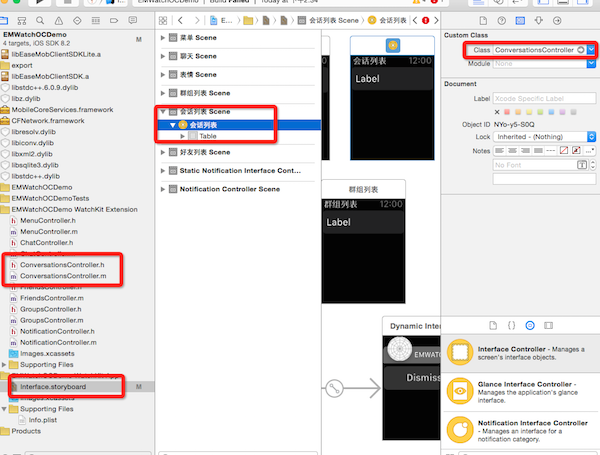
建好这5个Controller之后,再次打开Interface.storyboard,在每个storyboard Controller的Class属性中填写对应的类名,这种操作对于熟悉storyboard的开发者来说,应该都不陌生。
附图一张
2、将自定义的类与storyboard关联起来之后,继续关联其他的控件。
声明插件变量Table,并在storyboard中进行关联。
@property (weak, nonatomic) IBOutlet WKInterfaceTable *table;
创建自定义的Table Row Controller,右键---New File---Cocoa Touch Class---Subclass of “NSObject”,声明插件变量Label,在storyboard中将Table Row Controller和Label进行关联。要记得填写Table Row Controller的Identifier,在加载数据时会用到这个属性。
3、接下来要进行每个页面的数据获取了,我是在[-awakeWithContext:]中进行的数据获取。
WKInterfaceController有个类方法[+ openParentApplication: reply:],用于向对应的iPhone App发起申请。
而对应的iPhone App要想检测到这个请求,需要在AppDelegate中监听 [- application: handleWatchKitExtensionRequest: reply:].
以菜单页面MenuController为例,当页面加载时要先向iPhone App发起获取是否登录的申请,iPhone App收到申请,将是否登录的值返给WatchKit Extension;如果没有登录,页面上显示“登录”选项,如果登录了,显示“会话”“好友”“群组”三个选项。
MenuController:
[WKInterfaceController openParentApplication:@{@'action':@'isLogined'} reply:^(NSDictionary *replyInfo, NSError *error) {
BOOL isLogined = NO;
if ([replyInfo count] > 0) {
isLogined = [[replyInfo objectForKey:@'isLogined'] boolValue];
}
if (isLogined) {
NSDictionary *conversationInfo = [NSDictionary dictionaryWithObjectsAndKeys:@'会话', @'title', nil];
NSDictionary *friendInfo = [NSDictionary dictionaryWithObjectsAndKeys:@'好友', @'title', nil];
NSDictionary *groupInfo = [NSDictionary dictionaryWithObjectsAndKeys:@'群组', @'title', nil];
[self.dataSoure addObject:conversationInfo];
[self.dataSoure addObject:friendInfo];
[self.dataSoure addObject:groupInfo];
NSInteger count = [self.dataSoure count];
//@'RowType2Controller'就是上边提到的Table Row Controller 的Identifier属性
[self.table setNumberOfRows:[self.dataSoure count] withRowType:@'RowType2Controller'];
for (int i = 0; i < count; i++) {
RowType2Controller *rowController = [self.table rowControllerAtIndex:i];
NSDictionary *dic = self.dataSoure[i];
NSString *title = dic[@'title'];
[rowController.titleLabel setText:title];
}
}
else{
//@'RowType2Controller'就是上边提到的Table Row Controller 的Identifier属性
[self.table setNumberOfRows:1 withRowType:@'RowType2Controller'];
RowType2Controller *rowController = [self.table rowControllerAtIndex:0];
[rowController.titleLabel setText:@'登录'];
}
}];
AppDelegate
- (void)application:(UIApplication *)application handleWatchKitExtensionRequest:(NSDictionary *)userInfo reply:(void (^)(NSDictionary *))reply
{
if ([userInfo count] > 0) {
NSString *actionString = [userInfo objectForKey:@'action'];
EaseMob *easemob = [EaseMob sharedInstance];
if ([actionString isEqualToString:@'isLogined']) {
reply(@{@'isLogined':[NSNumber numberWithBool:[easemob.chatManager isLoggedIn]]});
}
}
4、获取到了数据,接下来要调用Watch App显示数据了。
显示数据主要用到了WKInterfaceTable。WKInterfaceTable相对于UITableView而言,能调用的接口少的可怜


WK_CLASS_AVAILABLE_IOS(8_2)
@interface WKInterfaceTable : WKInterfaceObject
- (void)setRowTypes:(NSArray *)rowTypes; // row names. size of array is number of rows
- (void)setNumberOfRows:(NSInteger)numberOfRows withRowType:(NSString *)rowType; // repeating row name
@property(nonatomic,readonly) NSInteger numberOfRows;
- (id)rowControllerAtIndex:(NSInteger)index;
- (void)insertRowsAtIndexes:(NSIndexSet *)rows withRowType:(NSString *)rowType;
- (void)removeRowsAtIndexes:(NSIndexSet *)rows;
- (void)scrollToRowAtIndex:(NSInteger)index;
@end
WKInterfaceTable.h
- (void)table:(WKInterfaceTable *)table didSelectRowAtIndex:(NSInteger)rowIndex; // row selection if controller has WKInterfaceTable property
- (id)contextForSegueWithIdentifier:(NSString *)segueIdentifier inTable:(WKInterfaceTable *)table rowIndex:(NSInteger)rowIndex;
- (NSArray *)contextsForSegueWithIdentifier:(NSString *)segueIdentifier inTable:(WKInterfaceTable *)table rowIndex:(NSInteger)rowIndex;
WKInterfaceController中
上一步中的代码示例已经给出了WKInterfaceTable使用方式,具体代码请看demo。
5、每个单独的页面都写好了,现在要让他们动起来。
WatchKit提供了三类页面导航方式。
第一种UINavigationController 控制的类似栈的导航方式,相应接口
- (void)pushControllerWithName:(NSString *)name context:(id)context; // context passed to child controller via initWithContext:
- (void)popController;
- (void)popToRootController;
第二种 modal 形式,相应接口
- (void)presentControllerWithName:(NSString *)name context:(id)context; // modal presentation
- (void)dismissController;
第三种 类似 UIPageController 的分页式导航,相应接口
- (void)presentControllerWithNames:(NSArray *)names contexts:(NSArray *)contexts; // modal presentation of paged controllers. contexts matched to controllers
- (void)becomeCurrentPage;
其中的“WithName(s):”参数就是每个控件在storyboard中设置的Identifier属性。
好了,就先写这么多吧,后期有时间会继续补充。


 1157
1157


 被折叠的 条评论
为什么被折叠?
被折叠的 条评论
为什么被折叠?
 到【灌水乐园】发言


