Silverlight4继续摸索中,这回来到了RichTextBox,MS提供的类库中提供了RichTextBox,但是并没有带工具栏,需要的话必须自己实现,好在在Silverlight4的文档中自带一个叫Issue Tracker的示例程序,里面有应用RichTextBox的例子,但是缺少了字体颜色,文本对齐和插入图片的功能,我摸索着加上这三个功能,我是在Issue Tracker的例子上修改的,Issue Tracker在Silverlight4 文档 - 入门 - Silverlight实例 - 行业示例中。
如图所示:

首先我删掉了ReadOnly按钮,没啥理由。
1, 选择颜色
颜色面板用WrapPanel最合适不过了,只要按规律把R,G,B(红绿蓝)不用组合全部塞入到Panel里就好了。
<
UserControl
xmlns:toolkit
="http://schemas.microsoft.com/winfx/2006/xaml/presentation/toolkit"
x:Class
="Vega.Controls.ColorControl"
xmlns ="http://schemas.microsoft.com/winfx/2006/xaml/presentation"
xmlns:x ="http://schemas.microsoft.com/winfx/2006/xaml"
xmlns:d ="http://schemas.microsoft.com/expression/blend/2008"
xmlns:mc ="http://schemas.openxmlformats.org/markup-compatibility/2006"
mc:Ignorable ="d"
d:DesignHeight ="240" d:DesignWidth ="360" >
< toolkit:WrapPanel x:Name ="panel" Width ="360" />
</ UserControl >
public
partial
class
ColorControl : UserControl
{
public EventHandler SelectColor;
public ColorControl()
{
InitializeComponent();
int granularity = 51 ;
for ( int r = 0 ; r <= 255 ; r += granularity)
{
for ( int g = 0 ; g <= 255 ; g += granularity)
{
for ( int b = 0 ; b <= 255 ; b += granularity)
{
var rectangle = new Rectangle
{
Width = 20 ,
Height = 20 ,
Cursor = Cursors.Hand,
Fill = new SolidColorBrush(Color.FromArgb( 255 , ( byte )r, ( byte )g, ( byte )b))
};
rectangle.MouseLeftButtonUp += new MouseButtonEventHandler(rectangle_MouseLeftButtonUp);
this .panel.Children.Add(rectangle);
}
}
}
}
private void rectangle_MouseLeftButtonUp( object sender, MouseButtonEventArgs e)
{
this .Visibility = System.Windows.Visibility.Collapsed;
if ( this .SelectColor != null )
{
this .SelectColor(sender, e);
}
}
}
{
public EventHandler SelectColor;
public ColorControl()
{
InitializeComponent();
int granularity = 51 ;
for ( int r = 0 ; r <= 255 ; r += granularity)
{
for ( int g = 0 ; g <= 255 ; g += granularity)
{
for ( int b = 0 ; b <= 255 ; b += granularity)
{
var rectangle = new Rectangle
{
Width = 20 ,
Height = 20 ,
Cursor = Cursors.Hand,
Fill = new SolidColorBrush(Color.FromArgb( 255 , ( byte )r, ( byte )g, ( byte )b))
};
rectangle.MouseLeftButtonUp += new MouseButtonEventHandler(rectangle_MouseLeftButtonUp);
this .panel.Children.Add(rectangle);
}
}
}
}
private void rectangle_MouseLeftButtonUp( object sender, MouseButtonEventArgs e)
{
this .Visibility = System.Windows.Visibility.Collapsed;
if ( this .SelectColor != null )
{
this .SelectColor(sender, e);
}
}
}
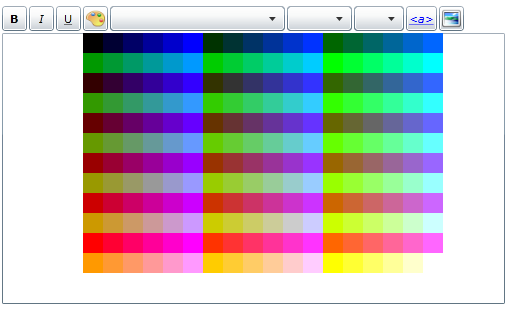
显示效果,颜色有点乱,还不知道有没有更好算法:
加一个按钮,点击的时候显示颜色面板。

将选择的颜色应用到Section:
private
void
colorButton_Click(
object
sender, RoutedEventArgs e)
{
this .color.Visibility = System.Windows.Visibility.Visible;
this .color.SelectColor = (senderObj, eventArgs) => {
var rectangle = senderObj as Rectangle;
this .richTextBox.Selection.ApplyPropertyValue(Run.ForegroundProperty, rectangle.Fill);
this .richTextBox.Focus();
};
}
{
this .color.Visibility = System.Windows.Visibility.Visible;
this .color.SelectColor = (senderObj, eventArgs) => {
var rectangle = senderObj as Rectangle;
this .richTextBox.Selection.ApplyPropertyValue(Run.ForegroundProperty, rectangle.Fill);
this .richTextBox.Focus();
};
}
2,对齐
加入个ComboBox先。
<
ComboBox
x:Name
="alignmentComboBox"
Margin ="0,2,2,2"
Height ="25"
Width ="65"
xmlns:sys ="clr-namespace:System;assembly=mscorlib" SelectionChanged ="alignmentComboBox_SelectionChanged" >
< sys:String > 左对齐 </ sys:String >
< sys:String > 居中 </ sys:String >
< sys:String > 右对齐 </ sys:String >
</ ComboBox >
Margin ="0,2,2,2"
Height ="25"
Width ="65"
xmlns:sys ="clr-namespace:System;assembly=mscorlib" SelectionChanged ="alignmentComboBox_SelectionChanged" >
< sys:String > 左对齐 </ sys:String >
< sys:String > 居中 </ sys:String >
< sys:String > 右对齐 </ sys:String >
</ ComboBox >
对齐也很简单
private
void
alignmentComboBox_SelectionChanged(
object
sender, SelectionChangedEventArgs e)
{
TextAlignment align = TextAlignment.Left;
switch ( this .alignmentComboBox.SelectedItem.ToString())
{
case " 左对齐 " :
align = TextAlignment.Left;
break ;
case " 居中 " :
align = TextAlignment.Center;
break ;
case " 右对齐 " :
align = TextAlignment.Right;
break ;
}
this .richTextBox.Selection.ApplyPropertyValue(Block.TextAlignmentProperty, align);
}
{
TextAlignment align = TextAlignment.Left;
switch ( this .alignmentComboBox.SelectedItem.ToString())
{
case " 左对齐 " :
align = TextAlignment.Left;
break ;
case " 居中 " :
align = TextAlignment.Center;
break ;
case " 右对齐 " :
align = TextAlignment.Right;
break ;
}
this .richTextBox.Selection.ApplyPropertyValue(Block.TextAlignmentProperty, align);
}
记得修改richTextBox_SelectionChanged方法,在用户移动光标的时候修改ComboBox的选择状态
try
{
switch ((TextAlignment) this .richTextBox.Selection.GetPropertyValue(Block.TextAlignmentProperty))
{
case TextAlignment.Left:
this .alignmentComboBox.SelectedItem = " 左对齐 " ;
break ;
case TextAlignment.Center:
this .alignmentComboBox.SelectedItem = " 居中 " ;
break ;
case TextAlignment.Right:
this .alignmentComboBox.SelectedItem = " 右对齐 " ;
break ;
}
}
catch { }
{
switch ((TextAlignment) this .richTextBox.Selection.GetPropertyValue(Block.TextAlignmentProperty))
{
case TextAlignment.Left:
this .alignmentComboBox.SelectedItem = " 左对齐 " ;
break ;
case TextAlignment.Center:
this .alignmentComboBox.SelectedItem = " 居中 " ;
break ;
case TextAlignment.Right:
this .alignmentComboBox.SelectedItem = " 右对齐 " ;
break ;
}
}
catch { }
3,添加图片功能
新建一个子窗口,用于添加,上传图片用。
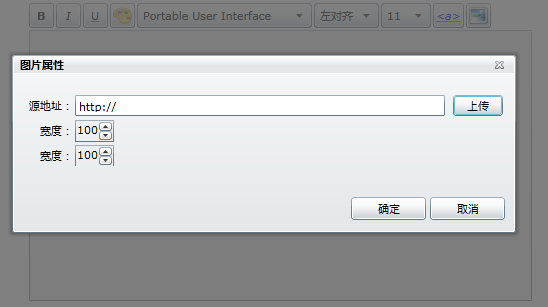
这个窗口有三个属性,图片的URL,宽度和高度。
public
string
Source
{
get { return ( string )GetValue(SourceProperty); }
set { SetValue(SourceProperty, value); }
}
public int ImageWidth
{
get { return ( int )GetValue(ImageWidthProperty); }
set { SetValue(ImageWidthProperty, value); }
}
public int ImageHeight
{
get { return ( int )GetValue(ImageHeightProperty); }
set { SetValue(ImageHeightProperty, value); }
}
public static readonly DependencyProperty SourceProperty =
DependencyProperty.Register( " Source " , typeof ( string ), typeof (ImageAttributeWindow), new PropertyMetadata( " http:// " ));
public static readonly DependencyProperty ImageWidthProperty =
DependencyProperty.Register( " ImageWidth " , typeof ( int ), typeof (ImageAttributeWindow), new PropertyMetadata( 100 ));
public static readonly DependencyProperty ImageHeightProperty =
DependencyProperty.Register( " ImageHeight " , typeof ( int ), typeof (ImageAttributeWindow), new PropertyMetadata( 100 ));
{
get { return ( string )GetValue(SourceProperty); }
set { SetValue(SourceProperty, value); }
}
public int ImageWidth
{
get { return ( int )GetValue(ImageWidthProperty); }
set { SetValue(ImageWidthProperty, value); }
}
public int ImageHeight
{
get { return ( int )GetValue(ImageHeightProperty); }
set { SetValue(ImageHeightProperty, value); }
}
public static readonly DependencyProperty SourceProperty =
DependencyProperty.Register( " Source " , typeof ( string ), typeof (ImageAttributeWindow), new PropertyMetadata( " http:// " ));
public static readonly DependencyProperty ImageWidthProperty =
DependencyProperty.Register( " ImageWidth " , typeof ( int ), typeof (ImageAttributeWindow), new PropertyMetadata( 100 ));
public static readonly DependencyProperty ImageHeightProperty =
DependencyProperty.Register( " ImageHeight " , typeof ( int ), typeof (ImageAttributeWindow), new PropertyMetadata( 100 ));
窗口布局
<
controls:ChildWindow
xmlns:toolkit
="http://schemas.microsoft.com/winfx/2006/xaml/presentation/toolkit"
x:Class
="Vega.Controls.ImageAttributeWindow"
xmlns ="http://schemas.microsoft.com/winfx/2006/xaml/presentation"
xmlns:x ="http://schemas.microsoft.com/winfx/2006/xaml"
xmlns:controls ="clr-namespace:System.Windows.Controls;assembly=System.Windows.Controls"
Width ="504" Height ="178"
Title ="图片属性" Name ="imageAttributeWindow" >
< toolkit:BusyIndicator x:Name ="busyIndicator" >
< Grid x:Name ="LayoutRoot" Margin ="2" >
< Grid.RowDefinitions >
< RowDefinition Height ="10" />
< RowDefinition Height ="*" />
< RowDefinition Height ="40" />
</ Grid.RowDefinitions >
< Grid Grid.Row ="1" Name ="grid1" >
< Grid.RowDefinitions >
< RowDefinition Height ="25" />
< RowDefinition Height ="25" />
< RowDefinition Height ="25" />
</ Grid.RowDefinitions >
< Grid.ColumnDefinitions >
< ColumnDefinition Width ="50" />
< ColumnDefinition Width ="*" />
</ Grid.ColumnDefinitions >
< TextBlock HorizontalAlignment ="Right" Text ="源地址:" VerticalAlignment ="Center" />
< TextBlock HorizontalAlignment ="Right" Text ="宽度:" VerticalAlignment ="Center" Grid.Row ="1" />
< TextBlock HorizontalAlignment ="Right" Text ="宽度:" VerticalAlignment ="Center" Grid.Row ="2" />
< TextBox Grid.Column ="1" Margin ="2,2,60,2" Text =" {Binding Path=Source, Mode=TwoWay, ElementName=imageAttributeWindow} " />
< Button Content ="上传" Width ="50" Grid.Column ="1" HorizontalAlignment ="Right" VerticalAlignment ="Center" Margin ="2" Name ="uploadButton" Click ="uploadButton_Click" />
< toolkit:NumericUpDown HorizontalAlignment ="Left" Grid.Column ="1" Grid.Row ="1" Margin ="2,2,0,0" Value =" {Binding Path=ImageWidth, Mode=TwoWay, ElementName=imageAttributeWindow} " Maximum ="1000" Height ="22" VerticalAlignment ="Top" />
< toolkit:NumericUpDown HorizontalAlignment ="Left" Grid.Column ="1" Grid.Row ="2" Margin ="2" Value =" {Binding Path=ImageHeight, Mode=TwoWay, ElementName=imageAttributeWindow} " Maximum ="1000" />
</ Grid >
< Button x:Name ="CancelButton" Content ="取消" Click ="CancelButton_Click" Width ="75" Height ="23" HorizontalAlignment ="Right" Margin ="0,12,0,0" Grid.Row ="2" />
< Button x:Name ="OKButton" Content ="确定" Click ="OKButton_Click" Width ="75" Height ="23" HorizontalAlignment ="Right" Margin ="0,12,79,0" Grid.Row ="2" />
</ Grid >
</ toolkit:BusyIndicator >
</ controls:ChildWindow >
我把图片URL,宽度,高度都和子窗口的Source,ImageWidth,ImageHeight绑定了起来,效果如下

上传图片的代码
private
void
uploadButton_Click(
object
sender, RoutedEventArgs e)
{
var fileDialog = new OpenFileDialog()
{
Filter = " 图片(.jpg)|*.jpg|图片(.jpeg)|*.jpeg|图片(.png)|*.png " ,
Multiselect = false
};
var result = fileDialog.ShowDialog();
if (result.HasValue && result.Value)
{
using (var stream = fileDialog.File.OpenRead())
{
var imgSource = new BitmapImage();
imgSource.SetSource(stream);
var bitmap = new WriteableBitmap(imgSource);
this .ImageWidth = bitmap.PixelWidth;
this .ImageHeight = bitmap.PixelHeight;
stream.Seek( 0 , SeekOrigin.Begin);
var bytes = new byte [stream.Length];
stream.Read(bytes, 0 , bytes.Length);
this .busyIndicator.IsBusy = true ;
var op = this .uploadContext.Upload(bytes, fileDialog.File.Extension);
op.Completed += (opSender, opE) => {
var source = Application.Current.Host.Source;
this .Source = String.Format( " {0}://{1}:{2}{3} " , source.Scheme, source.Host, source.Port, op.Value);
this .busyIndicator.IsBusy = false ;
};
}
}
}
{
var fileDialog = new OpenFileDialog()
{
Filter = " 图片(.jpg)|*.jpg|图片(.jpeg)|*.jpeg|图片(.png)|*.png " ,
Multiselect = false
};
var result = fileDialog.ShowDialog();
if (result.HasValue && result.Value)
{
using (var stream = fileDialog.File.OpenRead())
{
var imgSource = new BitmapImage();
imgSource.SetSource(stream);
var bitmap = new WriteableBitmap(imgSource);
this .ImageWidth = bitmap.PixelWidth;
this .ImageHeight = bitmap.PixelHeight;
stream.Seek( 0 , SeekOrigin.Begin);
var bytes = new byte [stream.Length];
stream.Read(bytes, 0 , bytes.Length);
this .busyIndicator.IsBusy = true ;
var op = this .uploadContext.Upload(bytes, fileDialog.File.Extension);
op.Completed += (opSender, opE) => {
var source = Application.Current.Host.Source;
this .Source = String.Format( " {0}://{1}:{2}{3} " , source.Scheme, source.Host, source.Port, op.Value);
this .busyIndicator.IsBusy = false ;
};
}
}
}
负责上传的uploadContext在上一篇随笔 http://www.cnblogs.com/subwayline13/archive/2010/09/01/1813836.html 有提到,很简单。区别是,silvelight 客户端有加上通过WriteableBitmap读取宽度和高度方法,读取到长和宽之后记得归位 stream.Seek( 0 , SeekOrigin.Begin);不然stream.Read不到,因为指针已经到尾部了。
调用添加图片子窗口的代码
private
void
imageButton_Click(
object
sender, RoutedEventArgs e)
{
var window = new ImageAttributeWindow();
window.Closed += (senderObj, ea) =>
{
if ( ! window.DialogResult.HasValue || ! window.DialogResult.Value)
{
return ;
}
InlineUIContainer container = new InlineUIContainer();
container.Child = new Image()
{
Stretch = Stretch.Uniform,
Width = window.ImageWidth,
Height = window.ImageHeight,
Source = new BitmapImage( new Uri(window.Source,UriKind.Absolute))
};
this .richTextBox.Selection.Insert(container);
};
window.Show();
}
{
var window = new ImageAttributeWindow();
window.Closed += (senderObj, ea) =>
{
if ( ! window.DialogResult.HasValue || ! window.DialogResult.Value)
{
return ;
}
InlineUIContainer container = new InlineUIContainer();
container.Child = new Image()
{
Stretch = Stretch.Uniform,
Width = window.ImageWidth,
Height = window.ImageHeight,
Source = new BitmapImage( new Uri(window.Source,UriKind.Absolute))
};
this .richTextBox.Selection.Insert(container);
};
window.Show();
}
网上搜了一下,发现RichTextBox还不少,有一个免费开源的 http://www.vectorlight.net/demos/richtextbox.aspx,不过存储的不是XAML的,是自定义的XML的。


 151
151

 被折叠的 条评论
为什么被折叠?


