


实验环境:两台Centos7.2的虚拟机,一台作CA服务器,一台作Apache服务器,此处安装httpd-2.4.6的版本.
1)CA服务器
# 私钥一般存放位置:/etc/pki/CA/private
  [root@happiness ~]# cd /etc/pki/CA/private
# 生成私钥
  [root@happiness private]# (umask 077; openssl genrsa -out /etc/pki/CA/private/cakey.pem 4096)
# 生成自签证书,有效期365天
  [root@happiness private]# openssl req -new -x509 -key /etc/pki/CA/private/cakey.pem -out /etc/pki/CA/cacert.pem -days 365
      -new:生成新证书签署请求;
      -x509:生成自签格式证书,专用于创建私有CA时使用;
      -key:生成请求时用到的私有文件路径;
      -out:生成的请求文件路径;如果自签操作将直接生成签署过的证书;
      -days:证书的有效时长,单位是day

# 为CA提供所需的文件
  [root@happiness CA]# touch /etc/pki/CA/{serial,index.txt
  [root@happiness CA]# echo 01 > /etc/pki/CA/serial
2)Apache服务器
Centos7.2已经默认安装好httpd-2.4.6和openssl,如果没有安装可以配置好yum源进行安装。
  [root@happiness ~]# mkdir /etc/httpd/ssl
  [root@happiness ~]# cd /etc/httpd/ssl
# 生成私钥
  [root@happiness ssl]# (umask 077;openssl genrsa -out /etc/httpd/ssl/httpd.key 2048)
# 生成证书签署请求
  [root@happiness ssl]# openssl req -new -key /etc/httpd/ssl/httpd.key -out /etc/httpd/ssl/httpd.csr -days 365
  注意:此处生成请求时填写的信息,需要跟CA生成证书时的信息保持一致。
# 把证书请求发给CA服务器
  [root@happiness ssl]# scp httpd.csr root@192.168.4.119:/tmp/
3)CA服务器
# 签署证书
  [root@happiness ~]# openssl ca -in /tmp/httpd.csr -out /etc/pki/CA/certs/httpd.crt -days 365
# 传输给Apache服务器
  [root@happiness ~]# spc /etc/pki/CA/certs/httpd.crt root@192.168.4.50:/etc/httpd/ssl/
4)Apache服务器
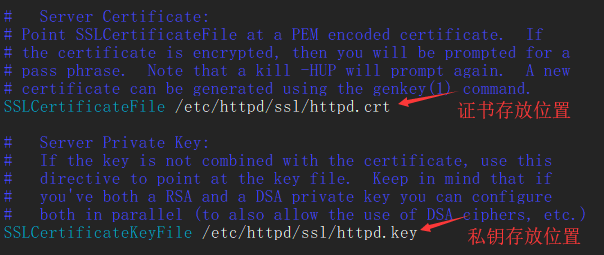
# httpd-2.4.6默认没安装ssl模块,自行安装
  [root@happiness ~]# yum install mod_ssl -y
# 安装后生成的文件信息
  [root@happiness ~]# rpm -ql mod_ssl
  /etc/httpd/conf.d/ssl.conf
  /etc/httpd/conf.modules.d/00-ssl.conf
  /usr/lib64/httpd/modules/mod_ssl.so
  /usr/libexec/httpd-ssl-pass-dialog
  /var/cache/httpd/ssl
# 编辑ssl配置文件
  [root@happiness ~]# vim /etc/httpd/conf.d/ssl.conf
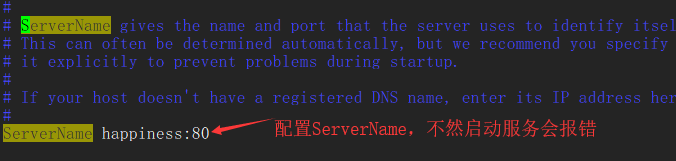
# 编辑httpd配置文件
  [root@happiness ~]# vim /etc/httpd/conf/httpd.conf
# 启动httpd服务
  [root@happiness ~]# systemctl start httpd
5)浏览器测试

后话:
实验过程中,由于自己在/etc/httpd/conf/httpd.conf配置中又添加了"Listen 443",导致启动httpd无法启动服务,查看错误日志:cat /var/log/httpd/error_log。

安装mod_ssl模块后生成的配置文件/etc/httpd/conf.d/ssl.conf中,已经启用监听443端口,无须在主配置文件httpd.conf再添加。


 1439
1439

 被折叠的 条评论
为什么被折叠?
被折叠的 条评论
为什么被折叠?
 到【灌水乐园】发言


