


补充:
一、django中间件之路由斜杠的自动添加源码
其实我们每次在写路由的时候,如果在路由层给他设置的是加/,但实际上我们在浏览器中输入的时候并没有加/发现也能调用,前面说了是浏览器内部走了重定向,所以会自动的给我们加上/匹配,但是难道我们就不好奇究竟是谁让他内部走了重定向吗?
想想,它在第一次来的时候没有匹配上路由就会直接重定向,那他肯定是还没走到视图层,在想一想django的请求生命周期,来了请求之后,进入django内部是不是要先经过什么?好像是中间件!!那就必然和中间件有某种关系,然后我们在去查看中间件的源码的时候,发现了果然如此!

# 查看中间件源码的方式
from django.middleware.common import CommonMiddleware

MIDDLEWARE = [
    'django.middleware.security.SecurityMiddleware',
    'django.contrib.sessions.middleware.SessionMiddleware',
    # 内部重定向,刚开始没有斜杠会自动加斜杠,内部走了301重定向
    'django.middleware.common.CommonMiddleware',
    # 'django.middleware.csrf.CsrfViewMiddleware',
    'django.contrib.auth.middleware.AuthenticationMiddleware',
    'django.contrib.messages.middleware.MessageMiddleware',
    'django.middleware.clickjacking.XFrameOptionsMiddleware',
]
我们看了一下是CommonMiddleware这个中间件做的鬼,那我们就点进去看看!


class CommonMiddleware(MiddlewareMixin):
    """
    "Common" middleware for taking care of some basic operations:

        - Forbids access to User-Agents in settings.DISALLOWED_USER_AGENTS

        - URL rewriting: Based on the APPEND_SLASH and PREPEND_WWW settings,
          this middleware appends missing slashes and/or prepends missing
          "www."s.

            - If APPEND_SLASH is set and the initial URL doesn't end with a
              slash, and it is not found in urlpatterns, a new URL is formed by
              appending a slash at the end. If this new URL is found in
              urlpatterns, then an HTTP-redirect is returned to this new URL;
              otherwise the initial URL is processed as usual.

          This behavior can be customized by subclassing CommonMiddleware and
          overriding the response_redirect_class attribute.

        - ETags: If the USE_ETAGS setting is set, ETags will be calculated from
          the entire page content and Not Modified responses will be returned
          appropriately. USE_ETAGS is deprecated in favor of
          ConditionalGetMiddleware.
    """

    response_redirect_class = http.HttpResponsePermanentRedirect  # 点进去看看,发现内部走了重定向

class HttpResponsePermanentRedirect(HttpResponseRedirectBase):
    status_code = 301
发现在内部其实是走了301重定向
二、django模型表之一对一关系源码
入口
class Book(models.Model):
    title = models.CharField(max_length=32)
    price = models.IntegerField()
    # 就是它???
    book_detail = models.OneToOneField(to='self')
    pub_date = models.DateField()
    publish = models.ForeignKey("Publish")
    authors = models.ManyToManyField("Author")
内部源码
class OneToOneField(ForeignKey):
    """
    A OneToOneField is essentially the same as a ForeignKey, with the exception
    that it always carries a "unique" constraint with it and the reverse
    relation always returns the object pointed to (since there will only ever
    be one), rather than returning a list.
    """

    # Field flags
    many_to_many = False
    many_to_one = False
    one_to_many = False
    one_to_one = True

    related_accessor_class = ReverseOneToOneDescriptor
    forward_related_accessor_class = ForwardOneToOneDescriptor
    rel_class = OneToOneRel

    description = _("One-to-one relationship")

    def __init__(self, to, on_delete=None, to_field=None, **kwargs):
        # 这里是直接添加上了unique
        kwargs['unique'] = True

        if on_delete is None:
            warnings.warn(
                "on_delete will be a required arg for %s in Django 2.0. Set "
                "it to models.CASCADE on models and in existing migrations "
                "if you want to maintain the current default behavior. "
                "See https://docs.djangoproject.com/en/%s/ref/models/fields/"
                "#django.db.models.ForeignKey.on_delete" % (
                    self.__class__.__name__,
                    get_docs_version(),
                ),
                RemovedInDjango20Warning, 2)
            on_delete = CASCADE

        elif not callable(on_delete):
            warnings.warn(
                "The signature for {0} will change in Django 2.0. "
                "Pass to_field='{1}' as a kwarg instead of as an arg.".format(
                    self.__class__.__name__,
                    on_delete,
                ),
                RemovedInDjango20Warning, 2)
            to_field = on_delete
            on_delete = CASCADE  # Avoid warning in superclass
        # 调用了父类的__init__方法,那我们就看看父类是做的什么
        super(OneToOneField, self).__init__(to, on_delete, to_field=to_field, **kwargs)
我们看到实际上他还是调用了父类的__init__,而他的父类就是ForeignKey,所以虽然他是一对一,但是本质上还是调用了父类,也可以说本质上他就是ForeignKey,只不过自己的unique设置了True,可以理解为是外键,然后是一对多,但是我让那个字段变成了唯一,那就是只能对应一个了,所以就是一对一!
三、TOKEN
什么是token?token就是因为浏览器的HTTP是一个无状态无连接的,所以无法用来记录我们的登录状态,于是先诞生了cookie和session,将随机字符串存放在客户端的称为cookie,然后将保存在服务端的叫做session,但是这样子有个弊端,就是当用户越来越多,我们需要一个专门的电脑用来帮我们保存这个session,而且我们还得保证这个电脑一直处于一个开机状态,不能坏,一旦这个电脑挂点,就意味着所有的用户就会在一瞬间都得重新登录,那你这个网站估计也活不了多久,于是就想了一个新的方法,那就是token。
所谓的token就是服务端不在保存这个随机的字符串,我将这个随机的字符串通过某种加密算法,比如摘要算法,将生成的一个随机字符串在用户登录的时候直接发送过去,服务器这边就不保存,在服务器或者是移动端那边自己保存,比如里面的信息可以是这个用户的用户名和一些其他信息,再加上自己的算法产生的随机字符串,这样子就会完美的解决session的哪个问题,用户在下次登录的时候,我直接根据用户信息,取出里面的随机字符串,然后我通过自己的加密算法再算一遍,判断两者相不相同,如果相同,那么就是我这个网站已经登录过的用户,如果不相同,那么就代表着它是一个非法用户!
具体查看请点击https://www.cnblogs.com/liuqingzheng/articles/8990027.html???
四、UUID
什么是uuid?
UUID 是 通用唯一识别码(Universally Unique Identifier)的缩写,是一种软件建构的标准,亦为开放软件基金会组织在分布式计算环境领域的一部分。其目的,是让分布式系统中的所有元素,都能有唯一的辨识信息,而不需要通过中央控制端来做辨识信息的指定。如此一来,每个人都可以创建不与其它人冲突的UUID。在这样的情况下,就不需考虑数据库创建时的名称重复问题。目前最广泛应用的UUID,是微软公司的全局唯一标识符(GUID),而其他重要的应用,则有Linux ext2/ext3文件系统、LUKS加密分区、GNOME、KDE、Mac OS X等等。另外我们也可以在e2fsprogs包中的UUID库找到实现。(来自百度百科)。
详细点击连接https://www.cnblogs.com/liuqingzheng/articles/9872350.html???
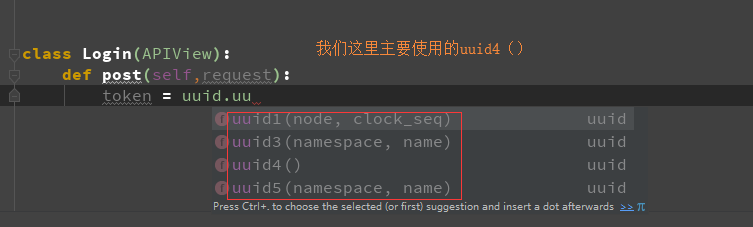
我们这里是主要用他的几个方法来帮我们生成随机的id,并且这个id是全球唯一的,这样就可以保证了我们用户在访问的时候每个用户都有自己的记录状态,而且也不会混乱,具体使用如下。
导入
import uuid
使用
正文:在补充完这些信息之后,我们就正式开始吧!
认证源码分析
认证源码,进入还是从dispatch进入
 def dispatch(self, request, *args, **kwargs):
        """
        `.dispatch()` is pretty much the same as Django's regular dispatch,
        but with extra hooks for startup, finalize, and exception handling.
        """
        self.args = args
        self.kwargs = kwargs
        # 这一步就是将原来的request变成了APIView的request
        request = self.initialize_request(request, *args, **kwargs)
        # 这里就是将对象自己的request变成了APIView的request方法,此时的request已经是新的request了
        self.request = request
        self.headers = self.default_response_headers  # deprecate?

        try:
            # 这一步就是权限认证
            self.initial(request, *args, **kwargs)
走的是self,还是按照查找顺序查找!
    def initial(self, request, *args, **kwargs):
        """
        Runs anything that needs to occur prior to calling the method handler.
        """
        self.format_kwarg = self.get_format_suffix(**kwargs)

        # Perform content negotiation and store the accepted info on the request
        neg = self.perform_content_negotiation(request)
        request.accepted_renderer, request.accepted_media_type = neg

        # Determine the API version, if versioning is in use.
        version, scheme = self.determine_version(request, *args, **kwargs)
        request.version, request.versioning_scheme = version, scheme

        # Ensure that the incoming request is permitted
        # 这三个分别是用户认证
        self.perform_authentication(request)
        # 权限认证
        self.check_permissions(request)
        # 频率认证
        self.check_throttles(request)
然后我们点开用户认证进行查看
   def perform_authentication(self, request):
        """
        Perform authentication on the incoming request.

        Note that if you override this and simply 'pass', then authentication
        will instead be performed lazily, the first time either
        `request.user` or `request.auth` is accessed.
        """
        # 在这里调用了user的方法/属性
        request.user
发现在上面调用了request.user,这个user要么是属性,要么是方法,被封装成了属性!是真是假进去一看究竟!
首先我们得知道目前的的这个request是谁!它就是APIView自己写的那个新的request,所以我们还是要去它原来的产生request的类Request中查看,发现他果然有user这个方法
   @property
    def user(self):
        """
        Returns the user associated with the current request, as authenticated
        by the authentication classes provided to the request.
        """
        if not hasattr(self, '_user'):
            with wrap_attributeerrors():
          # 在返回之前,首先需要走self的这个方法
                self._authenticate()
        return self._user
然后一看它果然是个方法,被封装成了属性,那我们接着去看,它现在的self就是Request对象
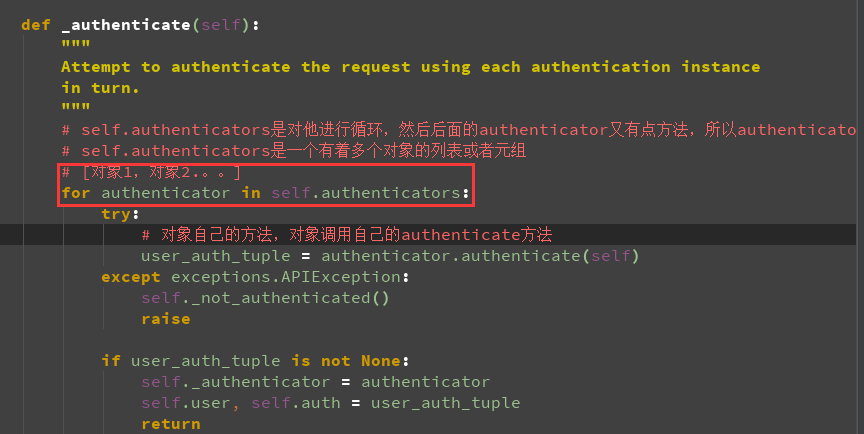
    def _authenticate(self):
        """
        Attempt to authenticate the request using each authentication instance
        in turn.
        """
        # self.authenticators是对他进行循环,然后后面的authenticator又有点方法,所以authenticator肯定是个对象,那么猜测
        # self.authenticators是一个有着多个对象的列表或者元组
        for authenticator in self.authenticators:
            try:
                user_auth_tuple = authenticator.authenticate(self)
            except exceptions.APIException:
                self._not_authenticated()
                raise

            if user_auth_tuple is not None:
                self._authenticator = authenticator
                self.user, self.auth = user_auth_tuple
                return
点开一看就是这样
class Request(object):
    """
    Wrapper allowing to enhance a standard `HttpRequest` instance.

    Kwargs:
        - request(HttpRequest). The original request instance.
        - parsers_classes(list/tuple). The parsers to use for parsing the
          request content.
        - authentication_classes(list/tuple). The authentications used to try
          authenticating the request's user.
    """

    def __init__(self, request, parsers=None, authenticators=None,
                 negotiator=None, parser_context=None):
        assert isinstance(request, HttpRequest), (
            'The `request` argument must be an instance of '
            '`django.http.HttpRequest`, not `{}.{}`.'
            .format(request.__class__.__module__, request.__class__.__name__)
        )

        self._request = request
        self.parsers = parsers or ()
       # 对象自己的方法,是一个这个对象或者元组,接着找
        self.authenticators = authenticators or ()
    def initialize_request(self, request, *args, **kwargs):
        """
        Returns the initial request object.
        """
        parser_context = self.get_parser_context(request)

        return Request(
            request,
            parsers=self.get_parsers(),
            # 然后顺着self我们找到了这里,发现他是调用了一个新的方法
            authenticators=self.get_authenticators(),
            negotiator=self.get_content_negotiator(),
            parser_context=parser_context
        )
去看看这个方法做了什么,此时的self是我们自己写的那个类的对象,父级没有找父父级,所以就在APIView中找到了
    def get_authenticators(self):
        """
        Instantiates and returns the list of authenticators that this view can use.
        """
     # 它走的是对象自身的authentication_classes,如果自身没有就会去找父类的,那么我们只要在这里自定义了,那不就是走我们自己的方法了么!在自己的类中写这个就好!
return [auth() for auth in self.authentication_classes]
那我们自定义不就是我们自己的了
class Books(APIView):
  # 自定义的方法
    authentication_classes=[MyAuth]
    def get(self,request):
        # get是用来获取,得到所有的书籍
        book_list = models.Book.objects.all()
那我们看看如果我们不写,接着会走到那里呢?发现它最后走的是settings中的默认配置,所以我们是不是也可以在还没有走settings的配置之前配置,那走的还是我们自己方法,因为settings我们配置了就不会走django默认的了
class APIView(View):

    # The following policies may be set at either globally, or per-view.
    renderer_classes = api_settings.DEFAULT_RENDERER_CLASSES
    parser_classes = api_settings.DEFAULT_PARSER_CLASSES
    # 我们看到了在那里调用的方法,如果自身没有就会直接来到默认的这里,这里就是settings中配置的
    authentication_classes = api_settings.DEFAULT_AUTHENTICATION_CLASSES
    throttle_classes = api_settings.DEFAULT_THROTTLE_CLASSES
    permission_classes = api_settings.DEFAULT_PERMISSION_CLASSES
    content_negotiation_class = api_settings.DEFAULT_CONTENT_NEGOTIATION_CLASS
    metadata_class = api_settings.DEFAULT_METADATA_CLASS
    versioning_class = api_settings.DEFAULT_VERSIONING_CLASS

    # Allow dependency injection of other settings to make testing easier.
   # settings就是api_settings
    settings = api_settings

    schema = DefaultSchema()
最后他给我们返回的是一个列表,并且这个自动加括号调用了,所以我们的猜测是对的,它就是一个列表,里面放的是一个个的对象,并且自动加括号调用,然后我们接着回到刚开始那里
对象调用自己的authenticate方法,那我们自己写一个
class MyAuth():
    def authenticate(self):
        pass
接着看刚才的源码地方
    def _authenticate(self):
        """
        Attempt to authenticate the request using each authentication instance
        in turn.
        """
        # self.authenticators是对他进行循环,然后后面的authenticator又有点方法,所以authenticator肯定是个对象,那么猜测
        # self.authenticators是一个有着多个对象的列表或者元组
        # [对象1,对象2.。。]
        for authenticator in self.authenticators:
            try:
                # 对象自己的方法,对象调用自己的authenticate方法,现在的这个参数self是什么?
                # self在Request类中,所以self就是Request对象,那么我们在自己定义的方法中就要接收这个参数
                # authenticator是我自己定义的MyAuth类的对象,隐藏了自定义类的self
                user_auth_tuple = authenticator.authenticate(self)
            except exceptions.APIException:
                # 进行了异常的捕获
                self._not_authenticated()
                raise
            # 接着开始走这个
            if user_auth_tuple is not None:
                # 将authenticator赋值给request,后面我们可以直接调用
                self._authenticator = authenticator
                # 将user_auth_tuple这个东西赋值给这两个,后面我们可以直接用request.user,request.auth来拿到东西
                # 是什么东西呢?一喽便知
                self.user, self.auth = user_auth_tuple
                # 这个return仅仅只是用来结束for循环的
                return

        self._not_authenticated()
这个是user_auth_tuple,它里面是两个值,第一个是用户,第二个是token,所以上面解压赋值给了它!
    def authenticate(self, request):
        return (self.force_user, self.force_token)
认证源码结束
权限源码开始
进入和认证源码一样,所以我们只看里面的方法
  def check_permissions(self, request):
        """
        Check if the request should be permitted.
        Raises an appropriate exception if the request is not permitted.
        """
        # 这个我们还是预测和认证是一样的[对象1,对象2.。。]
        for permission in self.get_permissions():
            # 调用对象自己的方法
            if not permission.has_permission(request, self):
                self.permission_denied(
                    request, message=getattr(permission, 'message', None)
                )
先去看看这个self.get_permissions(),这个就是当前类的对象,然后就找到了当前的这个方法
 def get_permissions(self):
        """
        Instantiates and returns the list of permissions that this view requires.
        """
        return [permission() for permission in self.permission_classes]
返回的也是一个个的对象,然后使用列表包裹着,那我们就可以和认证源码一样,自己书写这个permission_classes方法!
# 调用对象自己的方法
  if not permission.has_permission(request, self):
如果自己定义的方法有的话就会直接进行校验,没有就会走上面的方法。
基于源码实现我们自己的逻辑。
class Login(APIView):
    #这个是post请求
    def post(self,request):
        back_dic = {'code': 100, 'msg': ''}
        # print(request.data)
        name = request.data.get('name')
        age = request.data.get('age')
        try:
            user = models.Author.objects.filter(name=name, age=age).get()
            back_dic['msg'] = '登录成功'
            # 登录成功以后应该给客户端返回那个token
            token = uuid.uuid4()
            # 将产生的随机token保存到库中
            models.Token.objects.update_or_create(author=user, defaults={'token':token})
            # 将产生的随机字符串返回给用户
            back_dic['token'] = token

        except AuthenticationFailed as e:
            back_dic['code'] = 101
            back_dic['msg'] = '用户名或者密码错误'
        except Exception as e:
            back_dic['code'] = 102
            back_dic['msg'] = str(e)
        return Response(back_dic)
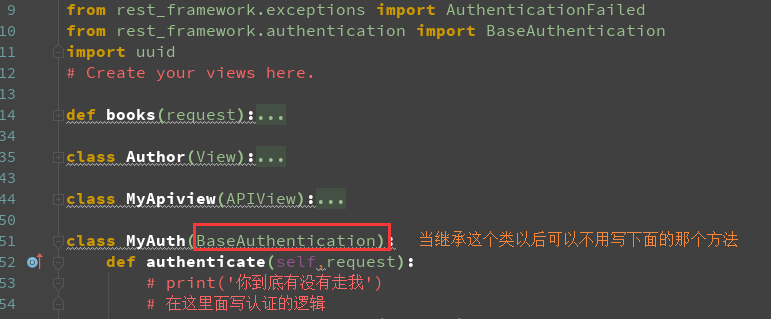
然后认证组件
class MyAuth(BaseAuthentication):
    def authenticate(self,request):
        # print('你到底有没有走我')
        # 在这里面写认证的逻辑
        token = request.GET.get('token')
        token_obj = models.Token.objects.filter(token=token).first()
        if token_obj:
            # 有值表示登录了
            return
        else:
            # 没有值,表示没有登录,抛异常
            raise AuthenticationFailed('您还没有登陆呢')
    # 这个没有写会出现这个错误
    #AttributeError: 'MyAuth' object has no attribute 'authenticate_header'
    # def authenticate_header(self,abc):
    #     pass

class Publish(APIView):
    authentication_classes = [MyAuth]
    def get(self, request):
        publish_list = models.Publish.objects.all()
        publish_ser = Myseria(instance=publish_list, many=True)
        return Response(publish_ser.data)
我们不想每次都写那个方法,所以可以直接这样子
认证结束啦~


 691
691


 被折叠的 条评论
为什么被折叠?
被折叠的 条评论
为什么被折叠?
 到【灌水乐园】发言


