


ClassPathXmlApplicationContext
在我的 BeanFactory 容器 文章中主要提及了 BeanFactory 容器初始化(Spring 配置文件加载(还没解析))的一些过程结合源码进行分析。那么,本篇文章主要对
ClassPathXmlApplicationContext cp = new ClassPathXmlApplicationContext("bean3.xml");
Spring 配置文件路径占位符加载、解析的过程结合源码进行分析,本篇也不会对 配置文件的解析过程进行分析,解析过程我会在后面再进行说明,因为涉及到的东西实在太多了!
使用 BeanFactory 和 ClassPathXmlApplicationContext 在加载配置文件时是有相同操作的。
ClassPathXmlApplicationContext关系图
Spring 文档
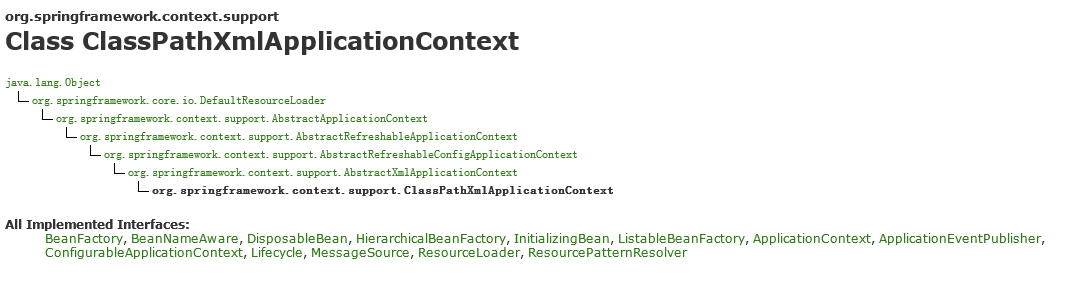
(Spring 文档关系图)
UML
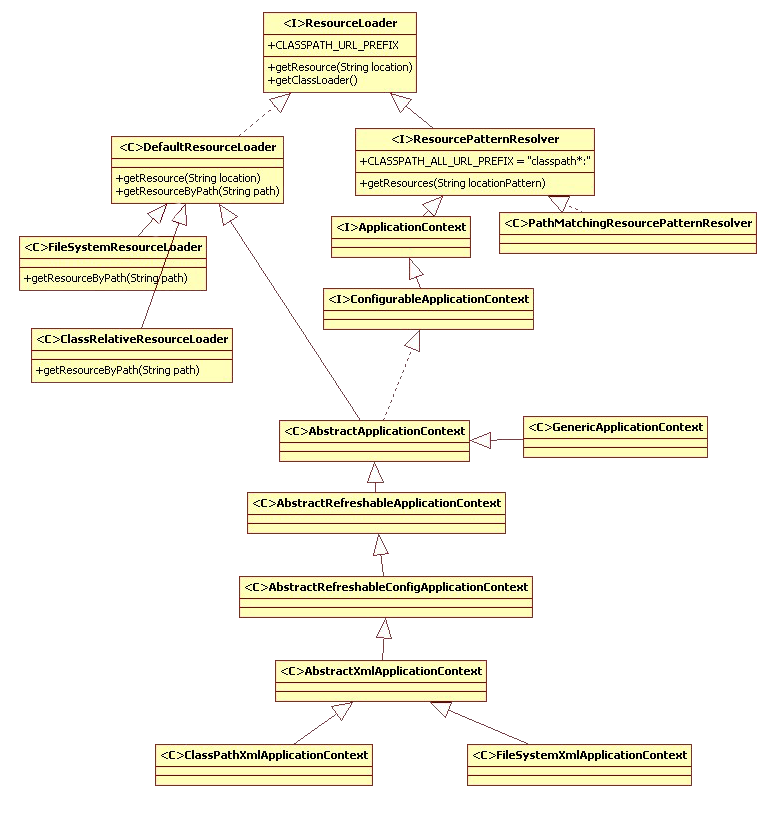
(UML 图)
构造方法
实例化 ClassPathXmlApplicationContext 传入一个字符串(配置文件名称),所以调用下面构造方法

((String configLocation) 构造方法)
之后调用本类的另一个构造方法
public ClassPathXmlApplicationContext(String[] configLocations, boolean refresh, ApplicationContext parent)
            throws BeansException {
     //一直调用父类构造,直到 AbstractApplicationContext,设置一个空的 ApplicationContext 对象
        super(parent);
     //设置配置文件路径
        setConfigLocations(configLocations);
     //默认为 true
        if (refresh) {
            refresh();
        }
    }
父类 AbstractApplicationContext 构造方法
public AbstractApplicationContext(ApplicationContext parent) {
  //调用本类的无参构造
    this();
    setParent(parent);
}
AbstractApplicationContext 无参构造方法
public AbstractApplicationContext() {
    this.resourcePatternResolver = getResourcePatternResolver();
}
AbstractApplicationContext.getResourcePatternResolver()
protected ResourcePatternResolver getResourcePatternResolver() {
    return new PathMatchingResourcePatternResolver(this);
}
从 PathMatchingResourcePatternResolver 类上的注释可知 该类支持 Ant 风格的路径解析。
设置配置文件路径
在 ClassPathXmlApplicationContext 构造方法中调用了 setConfigLocations(配置文件路径数组)
setConfigLocations(configLocations)
public void setConfigLocations(String... locations) {
        if (locations != null) {
            Assert.noNullElements(locations, "Config locations must not be null");
       //configLocations 是一个 String 类型的数组
            this.configLocations = new String[locations.length];
       //遍历路径数组,将 解析(分解) 后的路径放到 configLocations 中
            for (int i = 0; i < locations.length; i++) {
          //resolvePath() 方法用于解析路径
                this.configLocations[i] = resolvePath(locations[i]).trim();
            }
        }
        else {
            this.configLocations = null;
        }
    }
resolvePath()方法
protected String resolvePath(String path) {
        return getEnvironment().resolveRequiredPlaceholders(path);
    }
getEnvironment() 是 ConfigurableApplicationContext 接口的方法,AbstractApplicationContext 对其进行了重写
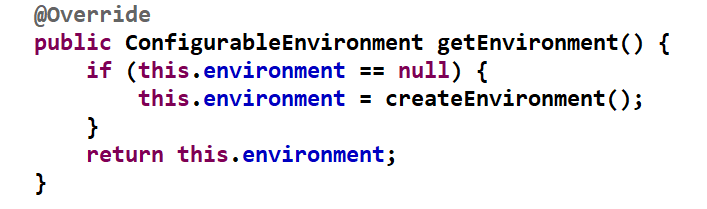
(getEnvironment() 方法)
很简单,当前 ConfigurableEnvironment 对象为空就创建一个,不为空就直接返回。
注意
上面说到了创建一个 ConfigurableEnvironment 对象返回,但是其中还发生了一些其他事情,如下
首先是 createEnvironment() 方法,很简单,就创建一个 StandardEnvironment 对象
protected ConfigurableEnvironment createEnvironment() {
    return new StandardEnvironment();
}
但是,StandardEnvironment 类继承自 AbstractEnvironment 类,StandardEnvironment 类只有一个无参的构造方法,所以,在初始化 StandardEnvironment 时,便会调用父类 AbstractEnvironment 类的无参构造方法,如下
public AbstractEnvironment() {
  //调用方法
    customizePropertySources(this.propertySources);
    //一个日志输出
}
StandardEnvironment 类对 customizePropertySources() 方法进行了重写,下面就是来到重写后的 customizePropertySources() 方法
@Override
protected void customizePropertySources(MutablePropertySources propertySources) {
  /*
   SYSTEM_PROPERTIES_PROPERTY_SOURCE_NAME: systemProperties
   SYSTEM_ENVIRONMENT_PROPERTY_SOURCE_NAME: systemEnvironment
  */
    propertySources.addLast(new MapPropertySource(SYSTEM_PROPERTIES_PROPERTY_SOURCE_NAME, getSystemProperties()));
    propertySources.addLast(new SystemEnvironmentPropertySource(SYSTEM_ENVIRONMENT_PROPERTY_SOURCE_NAME, getSystemEnvironment()));
}
AbstractEnvironment.getSystemProperties(),如下
public Map<String, Object> getSystemProperties() {
    try {
     //首先获取全部属性
        return (Map) System.getProperties();
    }
    catch (AccessControlException ex) {
        return (Map) new ReadOnlySystemAttributesMap() {
            @Override
            protected String getSystemAttribute(String attributeName) {
                try {
            //如果获取全部属性失败,则获取单个指定属性
            //如果获取单个还是不行则抛出异常
                    return System.getProperty(attributeName);
                }
                catch (AccessControlException ex) {
                    if (logger.isInfoEnabled()) {
                        logger.info(format("Caught AccessControlException when accessing system " +
                                "property [%s]; its value will be returned [null]. Reason: %s",
                                attributeName, ex.getMessage()));
                    }
                    return null;
                }
            }
        };
    }
}
getSystemEnvironment()方法的逻辑和 getSystemProperties() 方法的实现差不多的。只是最后使用 System.getenv() 来获取。
Environment
Environment是一个接口,代表了当前应用程序所处的环境,从下面 UML 图中的大部分方法中可以看出 该接口主要和 profile、property有关。

(http://www.cnblogs.com/dream-saddle/gallery/image/215409.html)
profile
profile 是 Spring3.1开始有的。详情见下面几篇文章吧
https://www.cnblogs.com/strugglion/p/7091021.html
另外我们可以使用下面这种方式进行设置当前使用的 profile

(设置 profile)
property
property 就是应用程序运行时的参数
配置文件路径中 placeholder(占位符)解析
为什么需要解析 placeholder?因为我们可以这样写:
//自定义一个系统属性,名为 spring 值为 *1(PathMatchingResourcePatternResolver 支持 Ant 风格的路径解析) 或配置文件全名
System.setProperty("spring", "*1");
//使用占位符设置配置文件路径
ClassPathXmlApplicationContext cp = new ClassPathXmlApplicationContext("${spring}.xml");  //通过下面步骤的解析,最后得到的路径就是 *1.xml
resolveRequiredPlaceholders(path)
该方法是 PropertyResovler 接口定义(该接口关系图在上面已经有了)的方法,所以,来到其实现类 AbstractEnvironment 进行了重写。
@Override
public String resolveRequiredPlaceholders(String text) throws IllegalArgumentException {
  //propertyResolver  private final ConfigurablePropertyResolver propertyResolver = new PropertySourcesPropertyResolver(this.propertySources);
  //text 就是传过来的配置文件路径 如 classpath:bean.xml
    return this.propertyResolver.resolveRequiredPlaceholders(text);
}
继续跟踪来到 AbstractPropertyResolver.resolveRequiredPlaceholders(String text)
@Override
public String resolveRequiredPlaceholders(String text) throws IllegalArgumentException {
  //strictHelper 是 PropertyPlaceholderHelper 对象,如果为空就创建一个
    if (this.strictHelper == null) {
        this.strictHelper = createPlaceholderHelper(false);
    }
  //开始解析占位符
    return doResolvePlaceholders(text, this.strictHelper);
}
AbstractPropertyResolver.createPlaceholderHelper(boolean ignoreUnresolvablePlaceholders)
private PropertyPlaceholderHelper createPlaceholderHelper(boolean ignoreUnresolvablePlaceholders) {
  /*
  placeholderPrefix: ${
  placholderSuffix: }
  valuleSeparator: :
  ignoreUnresolvablePlaceholders: 默认 false
  */
    return new PropertyPlaceholderHelper(this.placeholderPrefix, this.placeholderSuffix,
            this.valueSeparator, ignoreUnresolvablePlaceholders);
}
AbstractPropertyResolver.doResolverPlaceholders(String text, PropertyPlaceholderHelper helper)
private String doResolvePlaceholders(String text, PropertyPlaceholderHelper helper) {
  //继续调用
    return helper.replacePlaceholders(text, new PropertyPlaceholderHelper.PlaceholderResolver() {
        @Override
        public String resolvePlaceholder(String placeholderName) {
            return getPropertyAsRawString(placeholderName);
        }
    });
}
PropertyPlaceholderHelper.replacePlaceholders(String value, PlaceholderResolver placeholderResolver)
/**
     * Replaces all placeholders of format {@code ${name}} with the value returned
     * from the supplied {@link PlaceholderResolver}.
   * 替换所有的占位符*/
    public String replacePlaceholders(String value, PlaceholderResolver placeholderResolver) {
        Assert.notNull(value, "'value' must not be null");
        return parseStringValue(value, placeholderResolver, new HashSet<String>());
    }
继续调用本类的 parseStringValue() 方法,这个方法代码挺多的,这里只说明几个重要的部分吧,请读者结合源码阅读!
/*
 this.placeholderPrefix: ${
 this.placeholderSuffix: }
 this.valueSeparator: :
*/
protected String parseStringValue(
        String strVal, PlaceholderResolver placeholderResolver, Set<String> visitedPlaceholders) {

    StringBuilder result = new StringBuilder(strVal);

  //获取 ${ 在路径中的位置,用于判断是否需要进行解析,如果没有就直接返回
    int startIndex = strVal.indexOf(this.placeholderPrefix);
    while (startIndex != -1) {
     //获取占位符字符串的最后一个字符串索引 如:${config}.xml,就是 ${config} 的长度
     //获取长度只是个客观说法,但是实际逻辑并不是这样,而是获取 "}" 的位置,具体还请读者跟进方法查看
        int endIndex = findPlaceholderEndIndex(result, startIndex);
        if (endIndex != -1) {
        //获取占位符 即${} 中的部分
            String placeholder = result.substring(startIndex + this.placeholderPrefix.length(), endIndex);
            String originalPlaceholder = placeholder;
            if (!visitedPlaceholders.add(originalPlaceholder)) {
                throw new ...;
            }
            // Recursive invocation, parsing placeholders contained in the placeholder key.
       //递归调用了一次
            placeholder = parseStringValue(placeholder, placeholderResolver, visitedPlaceholders);
            // Now obtain the value for the fully resolved key...
        //根据占位符从 systemProperties,systemEnvironment 中获取值,获取的就是 System.setProperty(key, value) 中的 value
            String propVal = placeholderResolver.resolvePlaceholder(placeholder);
            if (propVal == null && this.valueSeparator != null) {
                int separatorIndex = placeholder.indexOf(this.valueSeparator);
                if (separatorIndex != -1) {
                    String actualPlaceholder = placeholder.substring(0, separatorIndex);
                    String defaultValue = placeholder.substring(separatorIndex + this.valueSeparator.length());
                    propVal = placeholderResolver.resolvePlaceholder(actualPlaceholder);
                    if (propVal == null) {
                        propVal = defaultValue;
                    }
                }
            }
            if (propVal != null) {
                // Recursive invocation, parsing placeholders contained in the
                // previously resolved placeholder value.
                propVal = parseStringValue(propVal, placeholderResolver, visitedPlaceholders);
         //将获取到的值进行替换,得到的就是配置文件真实名称
                result.replace(startIndex, endIndex + this.placeholderSuffix.length(), propVal);
                if (logger.isTraceEnabled()) {
                    ...;
                }
                startIndex = result.indexOf(this.placeholderPrefix, startIndex + propVal.length());
            }
            else if (this.ignoreUnresolvablePlaceholders) {
                // Proceed with unprocessed value.
                startIndex = result.indexOf(this.placeholderPrefix, endIndex + this.placeholderSuffix.length());
            }
            else {
                throw new ...;
            }
            visitedPlaceholders.remove(originalPlaceholder);
        }
        else {
            startIndex = -1;
        }
    }

    return result.toString();
}
到这里,整个配置文件路径的解析,设置就结束了。
System.setProperty("spring", "*1");
ApplicationContext cp = new ClassPathXmlApplicationContext("${spring}.xml");
就是将 ${spring}.xml 中的 spring 解析出来,然后替换为 *1,最后存入到 AbstractRefreshableConfigApplicationContext 类的 configLocations 数组中。
接着就是读取配置文件、解析、注册Bean,太多了,还是等到后面再说吧!
我们已经知道 setConfigLocations(configLocations) 方法可以将 ${xxx}.xml 这样的 xml 配置解析为 xxx.xml 了,但是这个 xxx 可以是我们随意指定的 一个 Ant 风格的路径,那又是怎么解析的呢? 接着就是 refresh() 方法,后面会介绍到!


 1055
1055


 被折叠的 条评论
为什么被折叠?
被折叠的 条评论
为什么被折叠?
 到【灌水乐园】发言


