


一、环境搭建
由于条件有限,一台虚拟机,一台笔记本。
1、在虚拟机上装上mongodb数据库、redis数据库、redis_scrapy、pymongo、scrapyd
2、在本地电脑上装上monodb数据库、redis数据库、redis_scrapy、pymongo、scrapyd-clientl、scrapyd-api
二、修改爬虫项目的settings
如果使用分布式爬虫,配置文件需要做以下修改:
# -*- coding: utf-8 -*-

# Scrapy settings for zhihu project
#
# For simplicity, this file contains only settings considered important or
# commonly used. You can find more settings consulting the documentation:
#
#     https://doc.scrapy.org/en/latest/topics/settings.html
#     https://doc.scrapy.org/en/latest/topics/downloader-middleware.html
#     https://doc.scrapy.org/en/latest/topics/spider-middleware.html

BOT_NAME = 'zhihu'

SPIDER_MODULES = ['zhihu.spiders']
NEWSPIDER_MODULE = 'zhihu.spiders'


# Crawl responsibly by identifying yourself (and your website) on the user-agent
#USER_AGENT = 'zhihu (+http://www.yourdomain.com)'

# Obey robots.txt rules
ROBOTSTXT_OBEY = False

# Configure maximum concurrent requests performed by Scrapy (default: 16)
#CONCURRENT_REQUESTS = 32

# Configure a delay for requests for the same website (default: 0)
# See https://doc.scrapy.org/en/latest/topics/settings.html#download-delay
# See also autothrottle settings and docs
#DOWNLOAD_DELAY = 3
# The download delay setting will honor only one of:
#CONCURRENT_REQUESTS_PER_DOMAIN = 16
#CONCURRENT_REQUESTS_PER_IP = 16

# Disable cookies (enabled by default)
#COOKIES_ENABLED = False

# Disable Telnet Console (enabled by default)
#TELNETCONSOLE_ENABLED = False

# Override the default request headers:
DEFAULT_REQUEST_HEADERS = {
  'Accept': 'text/html,application/xhtml+xml,application/xml;q=0.9,*/*;q=0.8',
  'Accept-Language': 'en',
 'User-Agent': 'Mozilla/5.0 (Windows NT 6.1; Win64; x64) AppleWebKit/537.36 (KHTML, like Gecko) Chrome/74.0.3729.169 Safari/537.36',
':authority': 'www.zhihu.com'
}

# Enable or disable spider middlewares
# See https://doc.scrapy.org/en/latest/topics/spider-middleware.html
#SPIDER_MIDDLEWARES = {
#    'zhihu.middlewares.ZhihuSpiderMiddleware': 543,
#}

# Enable or disable downloader middlewares
# See https://doc.scrapy.org/en/latest/topics/downloader-middleware.html
#DOWNLOADER_MIDDLEWARES = {
#    'zhihu.middlewares.ZhihuDownloaderMiddleware': 543,
#}

# Enable or disable extensions
# See https://doc.scrapy.org/en/latest/topics/extensions.html
#EXTENSIONS = {
#    'scrapy.extensions.telnet.TelnetConsole': None,
#}

# Configure item pipelines
# See https://doc.scrapy.org/en/latest/topics/item-pipeline.html
ITEM_PIPELINES = {
   # 'zhihu.pipelines.ZhihuPipeline': 300,
   'zhihu.pipelines.MongoPipeline': 300,
   'scrapy_redis.pipelines.RedisPipeline': 301,

}

# Enable and configure the AutoThrottle extension (disabled by default)
# See https://doc.scrapy.org/en/latest/topics/autothrottle.html
#AUTOTHROTTLE_ENABLED = True
# The initial download delay
#AUTOTHROTTLE_START_DELAY = 5
# The maximum download delay to be set in case of high latencies
#AUTOTHROTTLE_MAX_DELAY = 60
# The average number of requests Scrapy should be sending in parallel to
# each remote server
#AUTOTHROTTLE_TARGET_CONCURRENCY = 1.0
# Enable showing throttling stats for every response received:
#AUTOTHROTTLE_DEBUG = False

# Enable and configure HTTP caching (disabled by default)
# See https://doc.scrapy.org/en/latest/topics/downloader-middleware.html#httpcache-middleware-settings
#HTTPCACHE_ENABLED = True
#HTTPCACHE_EXPIRATION_SECS = 0
#HTTPCACHE_DIR = 'httpcache'
#HTTPCACHE_IGNORE_HTTP_CODES = []
#HTTPCACHE_STORAGE = 'scrapy.extensions.httpcache.FilesystemCacheStorage'

MONGO_URI="localhost"
MONGO_DATABASE="zhihu"


SCHEDULER = "scrapy_redis.scheduler.Scheduler"

DUPEFILTER_CLASS = "scrapy_redis.dupefilter.RFPDupeFilter"

# SCHEDULER_PERSIST=True #爬取的requests以及dupefilter会保存在数据库中

REDIS_URL = 'redis://root:bright@192.168.0.104:6379'
# REDIS_URL = 'redis:127.0.0.1:6379'
在以前的配置文件中加入:
 'scrapy_redis.pipelines.RedisPipeline': 301, #pipeline配置中加入

SCHEDULER = "scrapy_redis.scheduler.Scheduler"

  DUPEFILTER_CLASS = "scrapy_redis.dupefilter.RFPDupeFilter"
这样完成了增量式的爬虫,但还不是分布式的爬虫。
三、将爬虫项目在虚拟机上运行,这时借助scrapyd来部署爬虫项目
(1)在爬虫项目的scrapy.cfg中进行如下修改
# Automatically created by: scrapy startproject
#
# For more information about the [deploy] section see:
# https://scrapyd.readthedocs.io/en/latest/deploy.html

[settings]
default = zhihu.settings

[deploy]
url = http://192.168.0.104:6800/addversion.json #表示要上传主机的ip
project = zhihu
详细配置可参考:https://scrapyd.readthedocs.io/en/latest/api.html
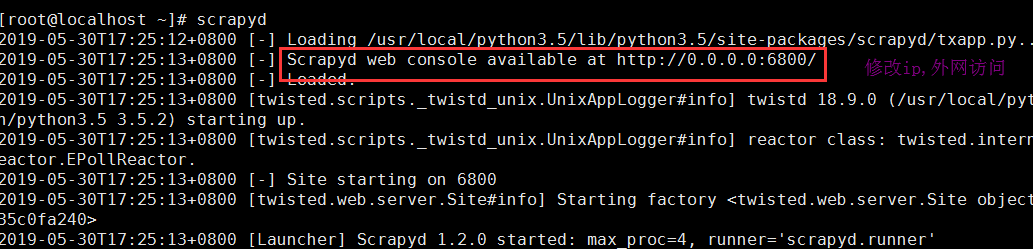
(2)在linux主机上先启动scrapyd服务
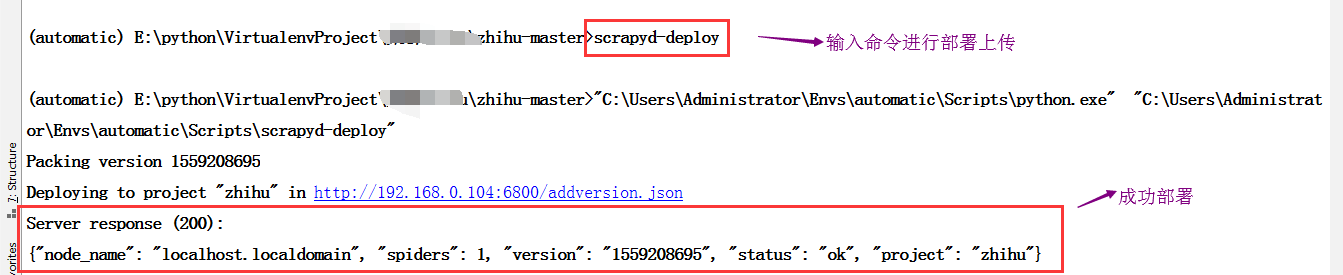
(3)上传项目
这样可以上传项目到服务上,并且访问网址查看当前的状态

目前没有上传任何项目,此时进行上传,笔者是在pycharm中直接上传的
此处可能有坑:
(1)报错一
'scrapyd-deploy' 不是内部或外部命令,也不是可运行的程序 或批处理文件
这时可以需要在你当前python环境的目录下建立scrapyd-deploy.bat文件,里面填充,注意是自己的python路径以及scrapyd-deploy路径,因为这是在windows下执行命令。
"C:\Users\Administrator\Envs\automatic\Scripts\python.exe" "C:\Users\Administrator\Envs\automatic\Scripts\scrapyd-deploy" %*
(2)报错二
builtins.AttributeError: 'int' object has no attribute 'splitlines'
这是因为版本不匹配的原因,将linux服务器上的相应包进行回退
Scrapy==1.6.0 Twisted==18.9.0
参考文章:https://blog.csdn.net/qq_29719097/article/details/89431234
当一切顺利后,可以查看是否上传成功
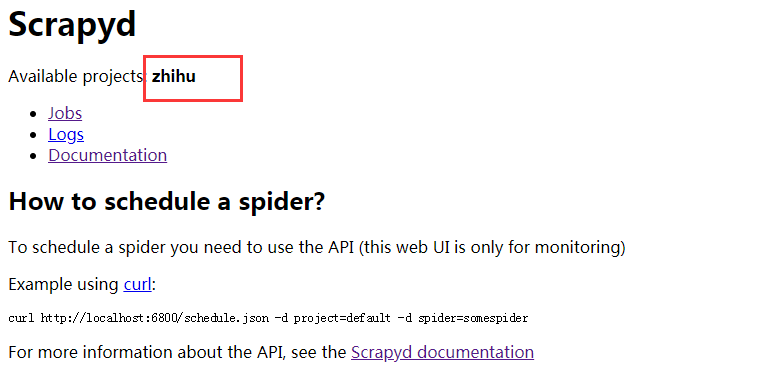
已经上传成功,那么在linux上如何开启爬虫呢?
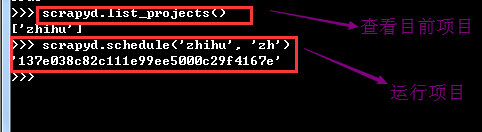
scrapyd中有很多接口,包括如何工作之类的接口,但都是以url来进行调度的,在这里可以使用scrapyd-api,这是将scrapyd进行封装,以方法的方式进行调度,比较简单,进行相应的python环境中就可以使用了。
(4)启动linux上的爬虫项目
在启动前先确保linux上的redis,以及mongodb服务已经开启,因为配置文件中进行了配置,在这里利用scrapy-api进行开启任务。详细使用查看https://python-scrapyd-api.readthedocs.io/en/latest/usage.html#calling-the-api
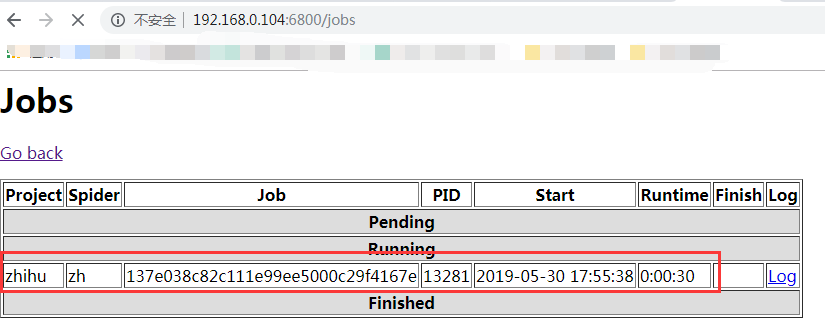
可以在web上查看目前状态
(5)查看数据库
可以查看redis数据库,里面包含请求requests、item、dupefilter数据
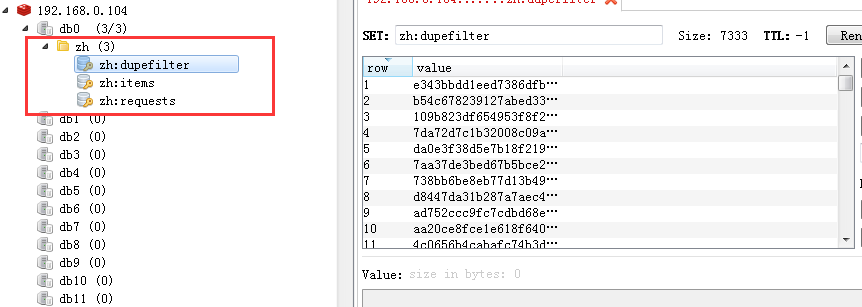
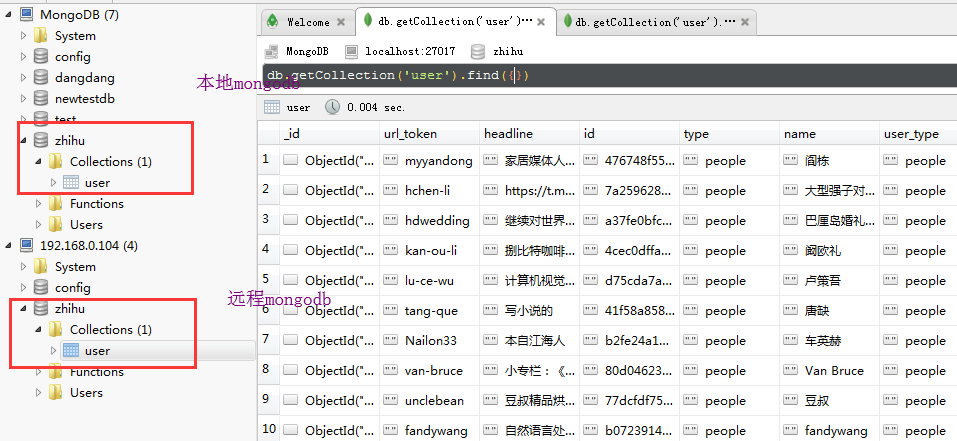
另外,mongodb中的数据也进行了分布式的爬取,不同主机爬取的放入不同主机下的mongodb数据库中
这样就完成了分布式的爬取。
总结:
(1)一系列包的安装
(2)linux服务器上开启scrapyd、mongodb、redis服务
(3)本地部署上传(更改scrapy.cfg文件,scrapyd-deploy命令上传(需要安装scrapyd-client))
(4)利用scrapyd-api在python环境中进行开启爬虫
(5)本地同时利用scrapy crawl spider命令进行爬取


 1817
1817


 被折叠的 条评论
为什么被折叠?
被折叠的 条评论
为什么被折叠?
 到【灌水乐园】发言


