2019.9.10 Golang 垃圾回收剖析

转自http://legendtkl.com/2017/04/28/golang-gc/

另外还有一篇这个https://studygolang.com/articles/14497


1. Golang GC 发展

Golang 从第一个版本以来,GC 一直是大家诟病最多的。但是每一个版本的发布基本都伴随着 GC 的改进。下面列出一些比较重要的改动。

  • v1.1 STW
  • v1.3 Mark STW, Sweep 并行
  • v1.5 三色标记法
  • v1.8 hybrid write barrier

2. GC 算法简介

这一小节介绍三种经典的 GC 算法:引用计数(reference counting)、标记-清扫(mark & sweep)、节点复制(Copying Garbage Collection),分代收集(Generational Garbage Collection)。

2.1 引用计数

引用计数的思想非常简单:每个单元维护一个域,保存其它单元指向它的引用数量(类似有向图的入度)。当引用数量为 0 时,将其回收。引用计数是渐进式的,能够将内存管理的开销分布到整个程序之中。C++ 的 share_ptr 使用的就是引用计算方法。

引用计数算法实现一般是把所有的单元放在一个单元池里,比如类似 free list。这样所有的单元就被串起来了,就可以进行引用计数了。新分配的单元计数值被设置为 1(注意不是 0,因为申请一般都说 ptr = new object 这种)。每次有一个指针被设为指向该单元时,该单元的计数值加 1;而每次删除某个指向它的指针时,它的计数值减 1。当其引用计数为 0 的时候,该单元会被进行回收。虽然这里说的比较简单,实现的时候还是有很多细节需要考虑,比如删除某个单元的时候,那么它指向的所有单元都需要对引用计数减 1。那么如果这个时候,发现其中某个指向的单元的引用计数又为 0,那么是递归的进行还是采用其他的策略呢?递归处理的话会导致系统颠簸。关于这些细节这里就不讨论了,可以参考文章后面的给的参考资料。

优点
  1. 渐进式。内存管理与用户程序的执行交织在一起,将 GC 的代价分散到整个程序。不像标记-清扫算法需要 STW (Stop The World,GC 的时候挂起用户程序)。
  2. 算法易于实现。
  3. 内存单元能够很快被回收。相比于其他垃圾回收算法,堆被耗尽或者达到某个阈值才会进行垃圾回收。
缺点
  1. 原始的引用计数不能处理循环引用。大概这是被诟病最多的缺点了。不过针对这个问题,也除了很多解决方案,比如强引用等。
  2. 维护引用计数降低运行效率。内存单元的更新删除等都需要维护相关的内存单元的引用计数,相比于一些追踪式的垃圾回收算法并不需要这些代价。
  3. 单元池 free list 实现的话不是 cache-friendly 的,这样会导致频繁的 cache miss,降低程序运行效率。

2.2 标记-清扫

标记-清扫算法是第一种自动内存管理,基于追踪的垃圾收集算法。算法思想在 70 年代就提出了,是一种非常古老的算法。内存单元并不会在变成垃圾立刻回收,而是保持不可达状态,直到到达某个阈值或者固定时间长度。这个时候系统会挂起用户程序,也就是 STW,转而执行垃圾回收程序。垃圾回收程序对所有的存活单元进行一次全局遍历确定哪些单元可以回收。算法分两个部分:标记(mark)和清扫(sweep)。标记阶段表明所有的存活单元,清扫阶段将垃圾单元回收。可视化可以参考下图。

标记-清扫算法的优点也就是基于追踪的垃圾回收算法具有的优点:避免了引用计数算法的缺点(不能处理循环引用,需要维护指针)。缺点也很明显,需要 STW。

三色标记算法

三色标记算法是对标记阶段的改进,原理如下:

  1. 起初所有对象都是白色。
  2. 从根出发扫描所有可达对象,标记为灰色,放入待处理队列。
  3. 从队列取出灰色对象,将其引用对象标记为灰色放入队列,自身标记为黑色。
  4. 重复 3,直到灰色对象队列为空。此时白色对象即为垃圾,进行回收。

可视化如下。

三色标记的一个明显好处是能够让用户程序和 mark 并发的进行,具体可以参考论文:《On-the-fly garbage collection: an exercise in cooperation.》。Golang 的 GC 实现也是基于这篇论文,后面再具体说明。

2.3 节点复制

节点复制也是基于追踪的算法。其将整个堆等分为两个半区(semi-space),一个包含现有数据,另一个包含已被废弃的数据。节点复制式垃圾收集从切换(flip)两个半区的角色开始,然后收集器在老的半区,也就是 Fromspace 中遍历存活的数据结构,在第一次访问某个单元时把它复制到新半区,也就是 Tospace 中去。在 Fromspace 中所有存活单元都被访问过之后,收集器在 Tospace 中建立一个存活数据结构的副本,用户程序可以重新开始运行了。

优点
  1. 所有存活的数据结构都缩并地排列在 Tospace 的底部,这样就不会存在内存碎片的问题。
  2. 获取新内存可以简单地通过递增自由空间指针来实现。
缺点
  1. 内存得不到充分利用,总有一半的内存空间处于浪费状态。

2.4 分代收集

基于追踪的垃圾回收算法(标记-清扫、节点复制)一个主要问题是在生命周期较长的对象上浪费时间(长生命周期的对象是不需要频繁扫描的)。同时,内存分配存在这么一个事实 “most object die young”。基于这两点,分代垃圾回收算法将对象按生命周期长短存放到堆上的两个(或者更多)区域,这些区域就是分代(generation)。对于新生代的区域的垃圾回收频率要明显高于老年代区域。

分配对象的时候从新生代里面分配,如果后面发现对象的生命周期较长,则将其移到老年代,这个过程叫做 promote。随着不断 promote,最后新生代的大小在整个堆的占用比例不会特别大。收集的时候集中主要精力在新生代就会相对来说效率更高,STW 时间也会更短。

优点
  1. 性能更优。
缺点
  1. 实现复杂

3. Golang GC

3.1 Overview

在说 Golang 的具体垃圾回收流程时,我们先来看一下几个基本的问题。

1. 何时触发 GC

在堆上分配大于 32K byte 对象的时候进行检测此时是否满足垃圾回收条件,如果满足则进行垃圾回收。

1
2
3
4
5
6
7
8
9
10
11
12
13
14
15
16
17
func mallocgc(size uintptr, typ *_type, needzero bool) unsafe.Pointer {
...
shouldhelpgc := false
// 分配的对象小于 32K byte
if size <= maxSmallSize {
...
} else {
shouldhelpgc = true
...
}
...
// gcShouldStart() 函数进行触发条件检测
if shouldhelpgc && gcShouldStart(false) {
// gcStart() 函数进行垃圾回收
gcStart(gcBackgroundMode, false)
}
}

上面是自动垃圾回收,还有一种是主动垃圾回收,通过调用 runtime.GC(),这是阻塞式的。

1
2
3
4
5
6
// GC runs a garbage collection and blocks the caller until the
// garbage collection is complete. It may also block the entire
// program.
func GC() {
gcStart(gcForceBlockMode, false)
}


2. GC 触发条件

触发条件主要关注下面代码中的中间部分:forceTrigger || memstats.heap_live >= memstats.gc_trigger 。forceTrigger 是 forceGC 的标志;后面半句的意思是当前堆上的活跃对象大于我们初始化时候设置的 GC 触发阈值。在 malloc 以及 free 的时候 heap_live 会一直进行更新,这里就不再展开了。

1
2
3
4
5
6
7
8
9
10
11
12
13
14
15
16
17
18
19
20
21
22
23
24
25
26
27
28
// gcShouldStart returns true if the exit condition for the _GCoff
// phase has been met. The exit condition should be tested when
// allocating.
//
// If forceTrigger is true, it ignores the current heap size, but
// checks all other conditions. In general this should be false.
func gcShouldStart(forceTrigger bool) bool {
return gcphase == _GCoff && (forceTrigger || memstats.heap_live >= memstats.gc_trigger) && memstats.enablegc && panicking == 0 && gcpercent >= 0
}

//初始化的时候设置 GC 的触发阈值
func gcinit() {
_ = setGCPercent(readgogc())
memstats.gc_trigger = heapminimum
...
}
// 启动的时候通过 GOGC 传递百分比 x
// 触发阈值等于 x * defaultHeapMinimum (defaultHeapMinimum 默认是 4M)
func readgogc() int32 {
p := gogetenv("GOGC")
if p == "off" {
return -1
}
if n, ok := atoi32(p); ok {
return n
}
return 100
}


3. 垃圾回收的主要流程

三色标记法,主要流程如下:

  • 所有对象最开始都是白色。
  • 从 root 开始找到所有可达对象,标记为灰色,放入待处理队列。
  • 遍历灰色对象队列,将其引用对象标记为灰色放入待处理队列,自身标记为黑色。
  • 处理完灰色对象队列,执行清扫工作。

详细的过程如下图所示,具体可参考 [9]。
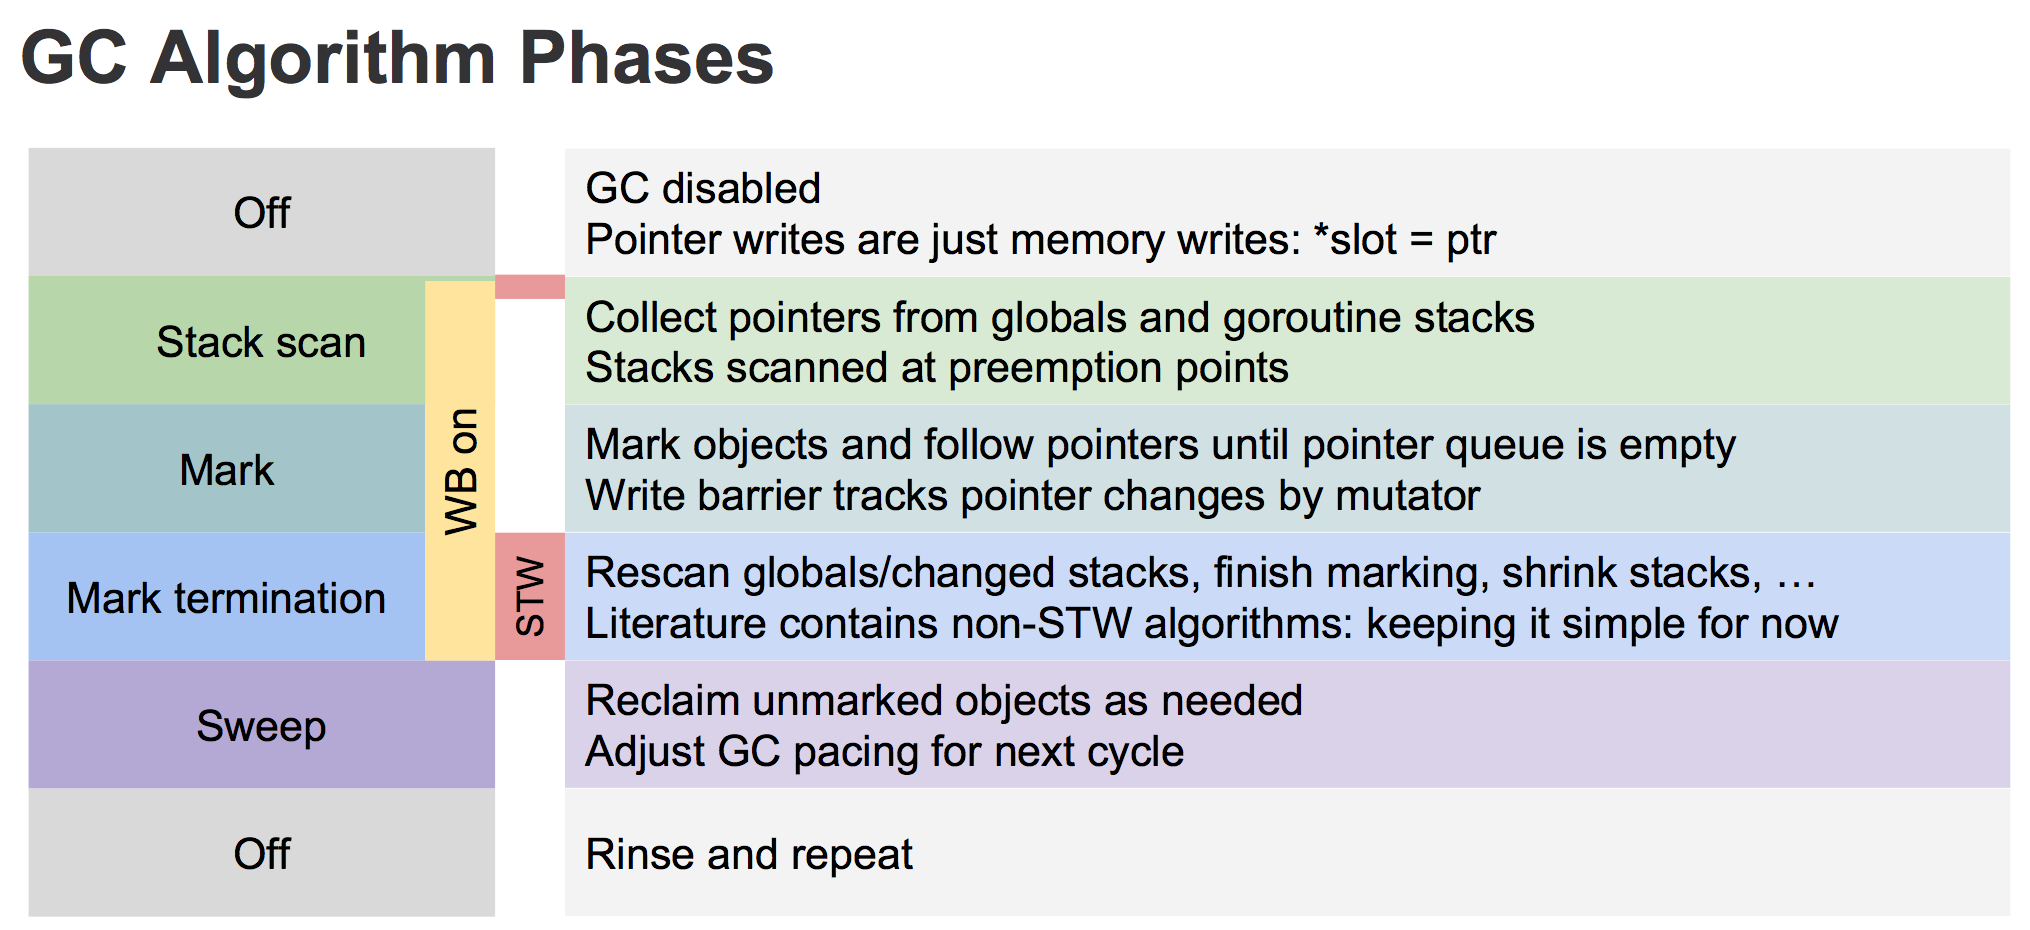
关于上图有几点需要说明的是。

  1. 首先从 root 开始遍历,root 包括全局指针和 goroutine 栈上的指针。
  2. mark 有两个过程。
    1. 从 root 开始遍历,标记为灰色。遍历灰色队列。
    2. re-scan 全局指针和栈。因为 mark 和用户程序是并行的,所以在过程 1 的时候可能会有新的对象分配,这个时候就需要通过写屏障(write barrier)记录下来。re-scan 再完成检查一下。
  3. Stop The World 有两个过程。
    1. 第一个是 GC 将要开始的时候,这个时候主要是一些准备工作,比如 enable write barrier。
    2. 第二个过程就是上面提到的 re-scan 过程。如果这个时候没有 stw,那么 mark 将无休止。

另外针对上图各个阶段对应 GCPhase 如下:

  • Off: _GCoff
  • Stack scan ~ Mark: _GCmark
  • Mark termination: _GCmarktermination

3.2 写屏障 (write barrier)

关于 write barrier,完全可以另外写成一篇文章,所以这里只简单介绍一下,这篇文章的重点还是 Golang 的 GC。垃圾回收中的 write barrier 可以理解为编译器在写操作时特意插入的一段代码,对应的还有 read barrier。

为什么需要 write barrier,很简单,对于和用户程序并发运行的垃圾回收算法,用户程序会一直修改内存,所以需要记录下来。

Golang 1.7 之前的 write barrier 使用的经典的 Dijkstra-style insertion write barrier [Dijkstra ‘78], STW 的主要耗时就在 stack re-scan 的过程。自 1.8 之后采用一种混合的 write barrier 方式 (Yuasa-style deletion write barrier [Yuasa ‘90] 和 Dijkstra-style insertion write barrier [Dijkstra ‘78])来避免 re-scan。具体的可以参考 17503-eliminate-rescan

3.3 标记

下面的源码还是基于 go1.8rc3。这个版本的 GC 代码相比之前改动还是挺大的,我们下面尽量只关注主流程。垃圾回收的代码主要集中在函数 gcStart() 中。

1
2
3
4
5
6
// gcStart 是 GC 的入口函数,根据 gcMode 做处理。
// 1. gcMode == gcBackgroundMode(后台运行,也就是并行), _GCoff -> _GCmark
// 2. 否则 GCoff -> _GCmarktermination,这个时候就是主动 GC
func gcStart(mode gcMode, forceTrigger bool) {
...
}


1. STW phase 1

在 GC 开始之前的准备工作。

1
2
3
4
5
6
7
8
9
10
11
12
13
14
15
16
17
18
19
20
21
22
23
24
25
26
27
28
29
30
31
32
func gcStart(mode gcMode, forceTrigger bool) {
...
//在后台启动 mark worker
if mode == gcBackgroundMode {
gcBgMarkStartWorkers()
}
...
// Stop The World
systemstack(stopTheWorldWithSema)
...
if mode == gcBackgroundMode {
// GC 开始前的准备工作

//处理设置 GCPhase,setGCPhase 还会 enable write barrier
setGCPhase(_GCmark)

gcBgMarkPrepare() // Must happen before assist enable.
gcMarkRootPrepare()

// Mark all active tinyalloc blocks. Since we're
// allocating from these, they need to be black like
// other allocations. The alternative is to blacken
// the tiny block on every allocation from it, which
// would slow down the tiny allocator.
gcMarkTinyAllocs()

// Start The World
systemstack(startTheWorldWithSema)
} else {
...
}
}


2. Mark

Mark 阶段是并行的运行,通过在后台一直运行 mark worker 来实现。

1
2
3
4
5
6
7
8
9
10
11
12
13
14
15
16
17
18
19
20
21
22
23
24
25
26
27
28
29
30
31
32
33
34
35
36
37
38
39
40
41
42
43
44
45
46
47
48
49
50
51
52
53
func gcStart(mode gcMode, forceTrigger bool) {
...
//在后台启动 mark worker
if mode == gcBackgroundMode {
gcBgMarkStartWorkers()
}
}

func gcBgMarkStartWorkers() {
// Background marking is performed by per-P G's. Ensure that
// each P has a background GC G.
for _, p := range &allp {
if p == nil || p.status == _Pdead {
break
}
if p.gcBgMarkWorker == 0 {
go gcBgMarkWorker(p)
notetsleepg(&work.bgMarkReady, -1)
noteclear(&work.bgMarkReady)
}
}
}
// gcBgMarkWorker 是一直在后台运行的,大部分时候是休眠状态,通过 gcController 来调度
func gcBgMarkWorker(_p_ *p) {
for {
// 将当前 goroutine 休眠,直到满足某些条件
gopark(...)
...
// mark 过程
systemstack(func() {
// Mark our goroutine preemptible so its stack
// can be scanned. This lets two mark workers
// scan each other (otherwise, they would
// deadlock). We must not modify anything on
// the G stack. However, stack shrinking is
// disabled for mark workers, so it is safe to
// read from the G stack.
casgstatus(gp, _Grunning, _Gwaiting)
switch _p_.gcMarkWorkerMode {
default:
throw("gcBgMarkWorker: unexpected gcMarkWorkerMode")
case gcMarkWorkerDedicatedMode:
gcDrain(&_p_.gcw, gcDrainNoBlock|gcDrainFlushBgCredit)
case gcMarkWorkerFractionalMode:
gcDrain(&_p_.gcw, gcDrainUntilPreempt|gcDrainFlushBgCredit)
case gcMarkWorkerIdleMode:
gcDrain(&_p_.gcw, gcDrainIdle|gcDrainUntilPreempt|gcDrainFlushBgCredit)
}
casgstatus(gp, _Gwaiting, _Grunning)
})
...
}
}


Mark 阶段的标记代码主要在函数 gcDrain() 中实现。

1
2
3
4
5
6
7
8
9
10
11
12
13
14
15
16
17
18
19
20
21
22
23
24
25
26
27
28
29
30
31
32
33
34
35
36
37
38
39
40
// gcDrain scans roots and objects in work buffers, blackening grey
// objects until all roots and work buffers have been drained.
func gcDrain(gcw *gcWork, flags gcDrainFlags) {
...
// Drain root marking jobs.
if work.markrootNext < work.markrootJobs {
for !(preemptible && gp.preempt) {
job := atomic.Xadd(&work.markrootNext, +1) - 1
if job >= work.markrootJobs {
break
}
markroot(gcw, job)
if idle && pollWork() {
goto done
}
}
}

// 处理 heap 标记
// Drain heap marking jobs.
for !(preemptible && gp.preempt) {
...
//从灰色列队中取出对象
var b uintptr
if blocking {
b = gcw.get()
} else {
b = gcw.tryGetFast()
if b == 0 {
b = gcw.tryGet()
}
}
if b == 0 {
// work barrier reached or tryGet failed.
break
}
//扫描灰色对象的引用对象,标记为灰色,入灰色队列
scanobject(b, gcw)
}
}


3. Mark termination (STW phase 2)

mark termination 阶段会 stop the world。函数实现在 gcMarkTermination()。1.8 版本已经不会再对 goroutine stack 进行 re-scan 了。细节有点多,这里不细说了。

1
2
3
4
5
6
7
8
9
10
11
12
13
14
15
16
17
18
19
func gcMarkTermination() {
// World is stopped.
// Run gc on the g0 stack. We do this so that the g stack
// we're currently running on will no longer change. Cuts
// the root set down a bit (g0 stacks are not scanned, and
// we don't need to scan gc's internal state). We also
// need to switch to g0 so we can shrink the stack.
systemstack(func() {
gcMark(startTime)
// Must return immediately.
// The outer function's stack may have moved
// during gcMark (it shrinks stacks, including the
// outer function's stack), so we must not refer
// to any of its variables. Return back to the
// non-system stack to pick up the new addresses
// before continuing.
})
...
}


3.4 清扫

清扫相对来说就简单很多了。

1
2
3
4
5
6
7
8
9
10
11
12
13
14
15
16
17
18
19
20
21
22
23
24
25
func gcSweep(mode gcMode) {
...
//阻塞式
if !_ConcurrentSweep || mode == gcForceBlockMode {
// Special case synchronous sweep.
...
// Sweep all spans eagerly.
for sweepone() != ^uintptr(0) {
sweep.npausesweep++
}
// Do an additional mProf_GC, because all 'free' events are now real as well.
mProf_GC()
mProf_GC()
return
}

// 并行式
// Background sweep.
lock(&sweep.lock)
if sweep.parked {
sweep.parked = false
ready(sweep.g, 0, true)
}
unlock(&sweep.lock)
}


对于并行式清扫,在 GC 初始化的时候就会启动 bgsweep(),然后在后台一直循环。

1
2
3
4
5
6
7
8
9
10
11
12
13
14
15
16
17
18
19
20
21
22
23
24
25
26
27
28
29
30
31
32
33
func bgsweep(c chan int) {
sweep.g = getg()

lock(&sweep.lock)
sweep.parked = true
c <- 1
goparkunlock(&sweep.lock, "GC sweep wait", traceEvGoBlock, 1)

for {
for gosweepone() != ^uintptr(0) {
sweep.nbgsweep++
Gosched()
}
lock(&sweep.lock)
if !gosweepdone() {
// This can happen if a GC runs between
// gosweepone returning ^0 above
// and the lock being acquired.
unlock(&sweep.lock)
continue
}
sweep.parked = true
goparkunlock(&sweep.lock, "GC sweep wait", traceEvGoBlock, 1)
}
}

func gosweepone() uintptr {
var ret uintptr
systemstack(func() {
ret = sweepone()
})
return ret
}


不管是阻塞式还是并行式,都是通过 sweepone()函数来做清扫工作的。如果对于上篇文章 Golang 内存管理 熟悉的话,这个地方就很好理解。内存管理都是基于 span 的,mheap_ 是一个全局的变量,所有分配的对象都会记录在 mheap_ 中。在标记的时候,我们只要找到对对象对应的 span 进行标记,清扫的时候扫描 span,没有标记的 span 就可以回收了。

1
2
3
4
5
6
7
8
9
10
11
12
13
14
15
16
17
18
19
20
21
22
23
24
// sweeps one span
// returns number of pages returned to heap, or ^uintptr(0) if there is nothing to sweep
func sweepone() uintptr {
...
for {
s := mheap_.sweepSpans[1-sg/2%2].pop()
...
if !s.sweep(false) {
// Span is still in-use, so this returned no
// pages to the heap and the span needs to
// move to the swept in-use list.
npages = 0
}
}
}

// Sweep frees or collects finalizers for blocks not marked in the mark phase.
// It clears the mark bits in preparation for the next GC round.
// Returns true if the span was returned to heap.
// If preserve=true, don't return it to heap nor relink in MCentral lists;
// caller takes care of it.
func (s *mspan) sweep(preserve bool) bool {
...
}


3.5 其他

1. gcWork

这里介绍一下任务队列,或者说灰色对象管理。每个 P 上都有一个 gcw 用来管理灰色对象(get 和 put),gcw 的结构就是 gcWork。gcWork 中的核心是 wbuf1 和 wbuf2,里面存储就是灰色对象,或者说是 work(下面就全部统一叫做 work)。

1
2
3
4
5
6
7
8
9
10
11
12
13
14
15
16
17
type p struct {
...
gcw gcWork
}

type gcWork struct {
// wbuf1 and wbuf2 are the primary and secondary work buffers.
wbuf1, wbuf2 wbufptr

// Bytes marked (blackened) on this gcWork. This is aggregated
// into work.bytesMarked by dispose.
bytesMarked uint64

// Scan work performed on this gcWork. This is aggregated into
// gcController by dispose and may also be flushed by callers.
scanWork int64
}


既然每个 P 上有一个 work buffer,那么是不是还有一个全局的 work list 呢?是的。通过在每个 P 上绑定一个 work buffer 的好处和 cache 一样,不需要加锁。

1
2
3
4
5
6
var work struct {
full uint64 // lock-free list of full blocks workbuf
empty uint64 // lock-free list of empty blocks workbuf
pad0 [sys.CacheLineSize]uint8 // prevents false-sharing between full/empty and nproc/nwait
...
}


那么为什么使用两个 work buffer (wbuf1 和 wbuf2)呢?我下面举个例子。比如我现在要 get 一个 work 出来,先从 wbuf1 中取,wbuf1 为空的话则与 wbuf2 swap 再 get。在其他时间将 work buffer 中的 full 或者 empty buffer 移到 global 的 work 中。这样的好处在于,在 get 的时候去全局的 work 里面取(多个 goroutine 去取会有竞争)。这里有趣的是 global 的 work list 是 lock-free 的,通过原子操作 cas 等实现。下面列举几个函数看一下 gcWrok。

初始化。

1
2
3
4
5
6
7
8
func (w *gcWork) init() {
w.wbuf1 = wbufptrOf(getempty())
wbuf2 := trygetfull()
if wbuf2 == nil {
wbuf2 = getempty()
}
w.wbuf2 = wbufptrOf(wbuf2)
}

put。

1
2
3
4
5
6
7
8
9
10
11
12
13
14
15
16
17
18
19
20
21
22
// put enqueues a pointer for the garbage collector to trace.
// obj must point to the beginning of a heap object or an oblet.
func (w *gcWork) put(obj uintptr) {
wbuf := w.wbuf1.ptr()
if wbuf == nil {
w.init()
wbuf = w.wbuf1.ptr()
// wbuf is empty at this point.
} else if wbuf.nobj == len(wbuf.obj) {
w.wbuf1, w.wbuf2 = w.wbuf2, w.wbuf1
wbuf = w.wbuf1.ptr()
if wbuf.nobj == len(wbuf.obj) {
putfull(wbuf)
wbuf = getempty()
w.wbuf1 = wbufptrOf(wbuf)
flushed = true
}
}

wbuf.obj[wbuf.nobj] = obj
wbuf.nobj++
}


get。

1
2
3
4
5
6
7
8
9
10
11
12
13
14
15
16
17
18
19
20
21
22
23
24
25
26
27
28
29
30
// get dequeues a pointer for the garbage collector to trace, blocking
// if necessary to ensure all pointers from all queues and caches have
// been retrieved. get returns 0 if there are no pointers remaining.
//go:nowritebarrier
func (w *gcWork) get() uintptr {
wbuf := w.wbuf1.ptr()
if wbuf == nil {
w.init()
wbuf = w.wbuf1.ptr()
// wbuf is empty at this point.
}
if wbuf.nobj == 0 {
w.wbuf1, w.wbuf2 = w.wbuf2, w.wbuf1
wbuf = w.wbuf1.ptr()
if wbuf.nobj == 0 {
owbuf := wbuf
wbuf = getfull()
if wbuf == nil {
return 0
}
putempty(owbuf)
w.wbuf1 = wbufptrOf(wbuf)
}
}

// TODO: This might be a good place to add prefetch code

wbuf.nobj--
return wbuf.obj[wbuf.nobj]
}


2. forcegc

我们上面讲了两种 GC 触发方式:自动检测和用户主动调用。除此之后 Golang 本身还会对运行状态进行监控,如果超过两分钟没有 GC,则触发 GC。监控函数是 sysmon(),在主 goroutine 中启动。

1
2
3
4
5
6
7
8
9
10
11
12
13
14
15
16
17
18
19
20
21
22
23
24
25
26
// The main goroutine
func main() {
...
systemstack(func() {
newm(sysmon, nil)
})
}
// Always runs without a P, so write barriers are not allowed.
func sysmon() {
...
for {
now := nanotime()
unixnow := unixnanotime()

lastgc := int64(atomic.Load64(&memstats.last_gc))
if gcphase == _GCoff && lastgc != 0 && unixnow-lastgc > forcegcperiod && atomic.Load(&forcegc.idle) != 0 {
lock(&forcegc.lock)
forcegc.idle = 0
forcegc.g.schedlink = 0
injectglist(forcegc.g) // 将 forcegc goroutine 加入 runnable queue
unlock(&forcegc.lock)
}
}
}

var forcegcperiod int64 = 2 * 60 *1e9 //两分钟

4.参考资料

  1. 《Go 语言学习笔记》
  2. 《垃圾收集》 - 豆瓣
  3. Tracing Garbage Collection - wikipedia
  4. 《On-the-fly garbage collection: an exercise in cooperation.》 — Edsger W. Dijkstra, Leslie Lamport, A. J. Martin
  5. Garbage Collection)
  6. Tracing Garbage Collection
  7. Copying Garbage Collection – youtube
  8. Generational Garbage Collection – youtube
  9. golang gc talk
  10. 17503-eliminate-rescan

转载于:https://www.cnblogs.com/dynasty919/p/11496162.html

  • 0
    点赞
  • 0
    收藏
    觉得还不错? 一键收藏
  • 0
    评论

“相关推荐”对你有帮助么?

  • 非常没帮助
  • 没帮助
  • 一般
  • 有帮助
  • 非常有帮助
提交
评论
添加红包

请填写红包祝福语或标题

红包个数最小为10个

红包金额最低5元

当前余额3.43前往充值 >
需支付:10.00
成就一亿技术人!
领取后你会自动成为博主和红包主的粉丝 规则
hope_wisdom
发出的红包
实付
使用余额支付
点击重新获取
扫码支付
钱包余额 0

抵扣说明:

1.余额是钱包充值的虚拟货币,按照1:1的比例进行支付金额的抵扣。
2.余额无法直接购买下载,可以购买VIP、付费专栏及课程。

余额充值