一 使用缘由
最近写微服务的blog,研读了o’reilly出的 《building Microservices With Asp.net Core》,其中使用的微服务分布式权限组件是microsoft.aspnetcore.authentication.jwtbearer,那最近identityserver4这么流行,就决定替换掉它。
二 开始
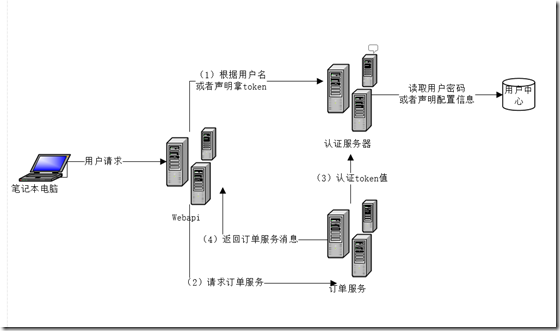
1 认证流程:
2 开发
认证服务器:
(1) 首先一个空的asp.net core 项目,在nuget包中安装identityserver4 包
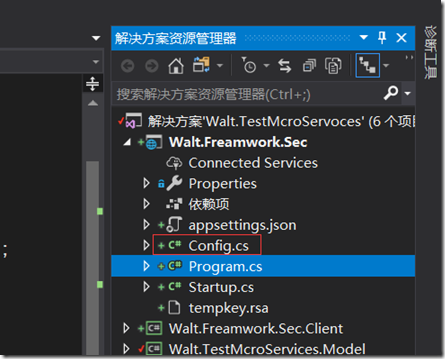
(2) 项目组织,会增加Config.cs的文件。
相关代码:
using IdentityServer4.Models;
using System;
using System.Collections.Generic;
using System.Linq;
using System.Threading.Tasks;

namespace Walt.Freamwork.Sec
{
    public class Config
    {
        public static IEnumerable<ApiResource> GetApiResources()
        {
            return new List<ApiResource>
                {
                    new ApiResource("api1", "My API")
                };
        }

        public static IEnumerable<Client> GetClients()
        {
            return new List<Client>
                    {
                        new Client
                        {
                            ClientId = "client",

                            // no interactive user, use the clientid/secret for authentication
                            AllowedGrantTypes = GrantTypes.ClientCredentials,

                            // secret for authentication
                            ClientSecrets =
                            {
                                new Secret("secret".Sha256())
                            },
                            // scopes that client has access to
                            AllowedScopes = { "api1" }
                        }
                    };
        }
    }
}
 public void ConfigureServices(IServiceCollection services)
        {
            // configure identity server with in-memory stores, keys, clients and resources
            services.AddIdentityServer()
                .AddDeveloperSigningCredential()
                .AddInMemoryApiResources(Config.GetApiResources())
                .AddInMemoryClients(Config.GetClients());
            services.AddMvc();
        }

public void Configure(IApplicationBuilder app, IHostingEnvironment env)
        {
            if (env.IsDevelopment())
            {
                app.UseDeveloperExceptionPage();
            }
            app.UseIdentityServer();
            app.UseMvc((route) => {
                route.MapRoute("default", "{controller=Home}/{action=Index}/{id?}");
            });
        }
被请求资源服务器
(1)为webapi增加identityserver4.accesstokenvalidation包
(2) 配置
 public void ConfigureServices(IServiceCollection services)
        {
            services.AddMvc().SetCompatibilityVersion(CompatibilityVersion.Version_2_1);
            services.AddAuthorization();
            services.AddAuthentication("Bearer")
          .AddIdentityServerAuthentication(options =>
          {
              options.Authority = "http://localhost:64433"; //授权服务器
              options.RequireHttpsMetadata = false;

              options.ApiName = "api1";
          });
        }


 public void Configure(IApplicationBuilder app, IHostingEnvironment env)
        {
           var log=     LoggerFac.CreateLogger<Startup>();
            log.LogInformation("infomation");
            if (env.IsDevelopment())
            {
                app.UseDeveloperExceptionPage();
            }
            else
            {
                app.UseHsts();
            }
            app.UseAuthentication();   //使用认证
             app.UseHttpsRedirection();
            app.UseMvc();
        }
客户端:从代码中可以看出,分两步,第一步获取token
,第二部根据token去访问需要的服务。
using System;
using System.Net.Http;
using IdentityModel.Client;
using IdentityServer4;
using Newtonsoft.Json.Linq;

namespace Walt.Freamwork.Sec.Client
{
    class Program
    {
        static  void Main(string[] args)
        {
            var disco =  DiscoveryClient.GetAsync("http://localhost:64433/").Result;
            if (disco.IsError)
            {
                Console.WriteLine(disco.Error);
                return;
            }


            // request token
            var tokenClient = new TokenClient(disco.TokenEndpoint, "client", "secret");
            var tokenResponse =  tokenClient.RequestClientCredentialsAsync("api1").Result;

            if (tokenResponse.IsError)
            {
                Console.WriteLine(tokenResponse.Error);
                return;
            }

            Console.WriteLine(tokenResponse.Json);

            // call api
            var client = new HttpClient();
            client.SetBearerToken(tokenResponse.AccessToken);

            var response =  client.GetAsync("http://localhost:50403/api/identity").Result;
            if (!response.IsSuccessStatusCode)
            {
                Console.WriteLine(response.StatusCode);
            }
            else
            {
                var content =  response.Content.ReadAsStringAsync().Result;
                Console.WriteLine(JArray.Parse(content));
            }


            Console.ReadKey();
        }
    }
}
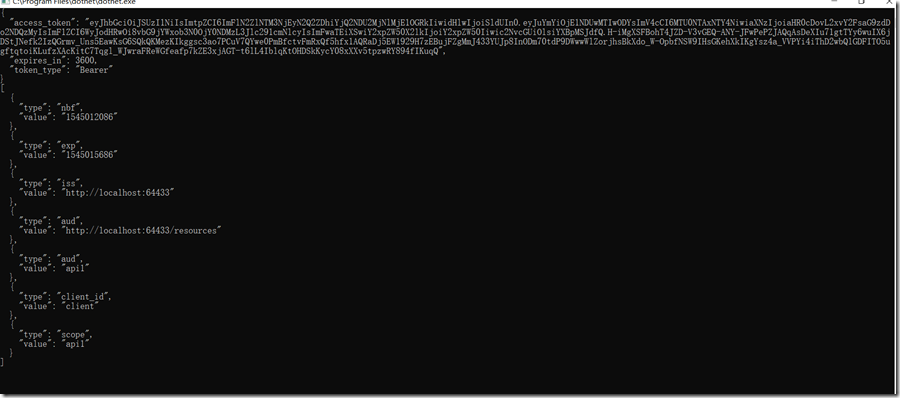
运行情况:咱们为webapi定义一个api
using Microsoft.AspNetCore.Authorization;
using Microsoft.AspNetCore.Mvc;
using System;
using System.Collections.Generic;
using System.Linq;
using System.Threading.Tasks;

namespace Walt.Freamwork.Sec
{
    [Route("api/[controller]")]
    [ApiController]
    [Authorize]
    public class IdentityController : ControllerBase
    {
        [HttpGet]
        public IActionResult Get()
        {
            return new JsonResult(from c in User.Claims select new { c.Type, c.Value });
        }
    }
}
如果不带token
using System;
using System.Net.Http;
using IdentityModel.Client;
using IdentityServer4;
using Newtonsoft.Json.Linq;

namespace Walt.Freamwork.Sec.Client
{
    class Program
    {
        static  void Main(string[] args)
        {
            var disco =  DiscoveryClient.GetAsync("http://localhost:64433/").Result;
            if (disco.IsError)
            {
                Console.WriteLine(disco.Error);
                return;
            }


            // request token
            var tokenClient = new TokenClient(disco.TokenEndpoint, "client", "secret");
            var tokenResponse =  tokenClient.RequestClientCredentialsAsync("api1").Result;

            if (tokenResponse.IsError)
            {
                Console.WriteLine(tokenResponse.Error);
                return;
            }

            Console.WriteLine(tokenResponse.Json);

            // call api
            var client = new HttpClient();
           // client.SetBearerToken(tokenResponse.AccessToken);   这块注释掉了

            var response =  client.GetAsync("http://localhost:50403/api/identity").Result;
            if (!response.IsSuccessStatusCode)
            {
                Console.WriteLine(response.StatusCode);
            }
            else
            {
                var content =  response.Content.ReadAsStringAsync().Result;
                Console.WriteLine(JArray.Parse(content));
            }


            Console.ReadKey();
        }
    }
}
总结:本实例使用的是声明的方式认证,也可以使用用户名密码。 identityserver4是个功能强大但是使用很简洁的一个认证框架,
也支持OAUTH为外部认证提供支持,这里就不讨论了。


 248
248


 被折叠的 条评论
为什么被折叠?


