


摘要
一、原理及特点
1. 关键字驱动测试是数据驱动测试的一种改进类型
2. 主要关键字包括三类:被操作对象(Item)、操作(Operation)和值(value),用面向对象形式可将其表现为Item.Operation(Value)
3. 将测试逻辑按照这些关键字进行分解,形成数据文件。
4. 用关键字的形式将测试逻辑封装在数据文件中,测试工具只要能够解释这些关键字即可对其应用自动化
二、准备
使用工具:eclipse
用到的第三方jar包:poi.jar(操作excel);selenium.jar
理解难点:java反射机制;逐步分层
三、框架构思
1、编写脚本
首先我们来写一个登陆开源中国的脚本
public class Login_Script {
            public static WebDriver driver=null;             public static void main(String []agrs) throws InterruptedException{ //                启动火狐浏览器                 driver= new FirefoxDriver(); //                最大化                 driver.manage().window().maximize(); //                打开开源中国网址                 driver.get("http://www.oschina.net/"); //                点击登录                 driver.findElement(By.xpath("//*[@id='OSC_Userbar']/a[1]")).click(); //                输入用户名                 driver.findElement(By.xpath("//*[@id='f_email']")).sendKeys("XXXXXXB"); //                输入密码                 driver.findElement(By.xpath("//*[@id='f_pwd']")).sendKeys("XXXXXXXA"); //                点击登录按钮 //                driver.findElement(By.xpath("//*[@id='login_osc']/table/tbody/tr[7]/td/input")).click(); //                Thread.sleep(30); //                点击退出按钮                 driver.findElement(By.xpath("//*[@id='OSC_Userbar']/a[3]")).click(); //                关闭浏览器                 driver.quit();                 } }
2、脚本分析
这是登陆的场景
操作步骤
第一步:启动浏览器
第二步:输入网址
第四步:点击登录
第五步:输入用户名
第六步:输入密码
第七步:点击登录按钮
第八步:点击退出
第九步:关闭浏览器
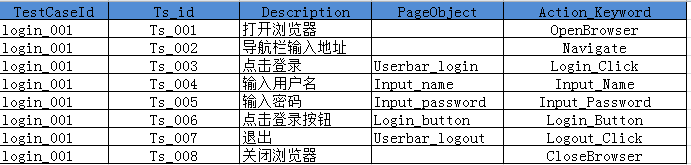
3、使用excel
建立一个excel

在java中创建一个操作excel的类 ,主要实现是对excel的读和写,主要代码如下:
public class ExcelUtils { public static HSSFSheet ExcelSheet; public static HSSFWorkbook ExcelBook; public static HSSFRow Row; public static HSSFCell Cell; public static void setExcelFile(String Path,String SheetName) throws Exception{ FileInputStream ExcelFile=new FileInputStream(Path); ExcelBook=new HSSFWorkbook(ExcelFile); ExcelSheet=ExcelBook.getSheet(SheetName); } public static void setCellData(String Result, int RowNum, int ColNum,String Path) throws Exception{ Row = ExcelSheet.getRow(RowNum); Cell = Row.getCell(ColNum, Row.RETURN_BLANK_AS_NULL); if (Cell == null) { Cell = Row.createCell(ColNum); Cell.setCellValue(Result); } else { Cell.setCellValue(Result); } FileOutputStream fileOut = new FileOutputStream(Path); ExcelBook.write(fileOut); fileOut.flush(); fileOut.close(); } public static String getCellDate(int RowNum,int CloNum){ Cell=ExcelSheet.getRow(RowNum).getCell(CloNum); String cellData=Cell.getStringCellValue(); return cellData; } }4、新建一个ActionKeyWords类
public class ActionKeyWords {
    public static WebDriver driver=null; //    启动浏览器并最大化     public static void OpenBrowser (){         driver= new FirefoxDriver();         driver.manage().window().maximize();     } //    打开开源中国网址     public static void Navigate (){         driver.get("http://www.oschina.net/");     } //    点击登录     public static void Login_Click (){         driver.findElement(By.xpath("//*[@id='OSC_Userbar']/a[1]")).click();     } //    输入用户名     public static void Input_Name (){         driver.findElement(By.xpath("//*[@id='f_email']")).sendKeys("XXXXXXA");     } //    输入密码     public static void Input_Password (){         driver.findElement(By.xpath("//*[@id='f_pwd']")).sendKeys("XXXXXXB");     } //    点击登录按钮     public static void Login_Button (){         driver.findElement(By.xpath("//*[@id='login_osc']/table/tbody/tr[7]/td/input")).click();     }     //    点击退出按钮     public static void Logout_Click (){         driver.findElement(By.xpath("//*[@id='OSC_Userbar']/a[3]")).click();     } //    关闭浏览器     public static void CloseBrowser (){         driver.quit();     } }
5、修改Login_Script脚本.
public class Login_Script {
            public static void main(String []agrs) throws Exception{                 ExcelUtils.setExcelFile("D:\\data\\TestData.xls", "steps");                 ActionKeyWords actionKeyWords= new ActionKeyWords();                 String Keywords=null;                 for(int RowNum=1;RowNum<=ExcelUtils.getLastRowNums();RowNum++){                     Keywords=ExcelUtils.getCellDate(RowNum, 3);                     if(Keywords.trim().equals("OpenBrowser")){                         actionKeyWords.OpenBrowser();                     }else if(Keywords.trim().equals("Navigate")){                         actionKeyWords.Navigate();                     }else if(Keywords.trim().equals("Login_Click")){                         actionKeyWords.Login_Click();                     }else if(Keywords.trim().equals("Input_Name")){                         actionKeyWords.Input_Name();                     }else if(Keywords.trim().equals("Input_Password")){                         actionKeyWords.Input_Password();                     }else if(Keywords.trim().equals("Login_Button")){                         actionKeyWords.Login_Button();                     }else if(Keywords.trim().equals("Logout_Click")){                         actionKeyWords.Logout_Click();                     }else if(Keywords.trim().equals("CloseBrowser")){                         actionKeyWords.CloseBrowser();                     }                 }             } }
这样代码的框架就基本已经搭建起来了,代码结构如下:

四、结构优化
1、优化Login_Script 类中的代码
注:这里用到了反射机制
public class Login_Script { public static ActionKeyWords actionKeyWords; public static String Keywords=null; public static Method[] method; public Login_Script(){ actionKeyWords= new ActionKeyWords(); method=actionKeyWords.getClass().getMethods(); } public static void main(String []agrs) throws Exception{ ExcelUtils.setExcelFile("D:\\data\\TestData.xls", "steps"); new Login_Script(); for(int RowNum=1;RowNum<=ExcelUtils.getLastRowNums();RowNum++){ Keywords=ExcelUtils.getCellDate(RowNum, 3); login_action(); } } public static void login_action(){ for(int i=0;i<method.length;i++){ // System.out.println(method[i].getName()+" "+actionKeyWords+Keywords); if(method[i].getName().trim().equals(Keywords)){ try { method[i].invoke(actionKeyWords); } catch (IllegalAccessException e) { // TODO Auto-generated catch block e.printStackTrace(); } catch (IllegalArgumentException e) { // TODO Auto-generated catch block e.printStackTrace(); } catch (InvocationTargetException e) { // TODO Auto-generated catch block e.printStackTrace(); } } } } }2、将程序中的常量统一管理
例如:网页的地址,账户、密码,excel路径,这里我们在文件下面建立一个
public class Contants {
    public static  String url="http://www.oschina.net/";     public static String excelFile="D:\\data\\";     public static String excelName="TestData.xls";     public static String excelSheet="steps";     public static int excelKWCloNum=3;     public static String userName="XXXXXXXA";     public static String userPassword="XXXXXB"; }
3、增加对象库
下面我们看一下ActionKeyWords类中定位元素的路径 是在代码里面的,如果每次去修改的定位路径的是时候都要修改代码,为了便于维护,我们将这些元素的对象放在一个文件中,同时我们在Excel增加一列 Page Objects,这样程序根据Excel中的Page Objects,去文件中读取相应的元素,这里我们增加一个类OrpUtil,读取元素的对象
# Home Page Objects
Userbar_login=//*[@id='OSC_Userbar']/a[1]
Userbar_logout=//div[@id='OSC_Userbar']/a[3] #Login Page Objects Input_name=//*[@id='f_email'] Input_password=//*[@id='f_pwd'] Login_button=//*[@id='login_osc']/table/tbody/tr[7]/td/input
//OrpUtil类
public class OrpUtil { public static String readValue(String a){ Properties pro=new Properties(); String popath=Contants.ObjectReUrl; String value=null; try { InputStream in =new BufferedInputStream(new FileInputStream(popath)); pro.load(in); value=pro.getProperty(a); } catch (FileNotFoundException e) { // TODO Auto-generated catch block e.printStackTrace(); }catch (IOException e) { // TODO Auto-generated catch block e.printStackTrace(); } return value; } }优化后的ActionKeyWords类
public class ActionKeyWords {
    public static WebDriver driver=null; //    启动浏览器并最大化     public static void OpenBrowser (String OR){         System.setProperty("webdriver.chrome.driver", ".//server//chromedriver.exe");         driver= new ChromeDriver();         driver.manage().window().maximize();     } //    打开开源中国网址     public static void Navigate (String OR){         driver.get(Contants.url);     } //    点击登录     public static void Login_Click (String OR){         driver.findElement(By.xpath(OrpUtil.readValue(OR))).click();     } //    输入用户名     public static void Input_Name (String OR){         driver.findElement(By.xpath(OrpUtil.readValue(OR))).clear();         driver.findElement(By.xpath(OrpUtil.readValue(OR))).sendKeys(Contants.userName);     } //    输入密码     public static void Input_Password (String OR){         driver.findElement(By.xpath(OrpUtil.readValue(OR))).click();         driver.findElement(By.xpath(OrpUtil.readValue(OR))).sendKeys(Contants.userPassword);     } //    点击登录按钮     public static void Login_Button (String OR){         driver.findElement(By.xpath(OrpUtil.readValue(OR))).click();     }     //    点击退出按钮     public static void Logout_Click (String OR){         try {             Thread.sleep(300);             driver.findElement(By.xpath(OrpUtil.readValue(OR))).click();         } catch (InterruptedException e) {             // TODO Auto-generated catch block             e.printStackTrace();         }     } //    关闭浏览器     public static void CloseBrowser (String OR){         driver.quit();     } }
这个OR的值是从Excel中读取的
4、增加测试场景
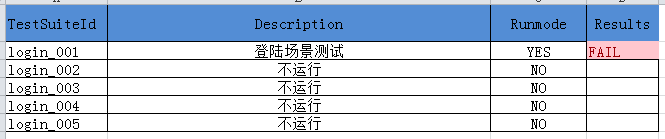
从Excel中我们可以看到,这操作是对应的用例编写中的我们的操作步骤,在用例设计的时候还有测试场景和结果,这里
我们先增加个场景在EXCEL中增加一个名称为Suite的Sheet页

我们程序的运行逻辑是循环读取Suite页中的Runmode,当为YES时根据对应的TestSuiteID去读取对应的Steps页中的操作在步骤,进行运行
public static void main(String []agrs) throws Exception{ ExcelUtils.setExcelFile(Contants.excelFile+Contants.excelName ); new Login_Script(); bResult = true; // 循环读取suitSheet里面的值,找出运行的场景 for(int j=1;j<=ExcelUtils.getLastRowNums(Contants.suitSheet);j++){ String Runmode=ExcelUtils.getCellDate(j, Contants.suitRunmode,Contants.suitSheet); String suitTestSuiteId=ExcelUtils.getCellDate(j, Contants.suitTestSuiteId,Contants.suitSheet); int sRowNum; if(Runmode.equals("YES")){ // 根据stepTestSuiteId在caseSheet中循环查找相对应的执行步骤 for(sRowNum=1;sRowNum<=ExcelUtils.getLastRowNums(Contants.caseSheet);sRowNum++){ String stepTestSuiteId=ExcelUtils.getCellDate(sRowNum, Contants.stepTestSuiteId,Contants.caseSheet); System.out.println(ExcelUtils.getCellDate(sRowNum, Contants.excelKWCloNum,Contants.caseSheet)); if(stepTestSuiteId.trim().equals(suitTestSuiteId)){ Keywords=ExcelUtils.getCellDate(sRowNum, Contants.excelKWCloNum,Contants.caseSheet); r=ExcelUtils.getCellDate(sRowNum, Contants.excelPOCloNum,Contants.caseSheet); login_action(sRowNum); if(bResult == false){ ExcelUtils.setCellData(Contants.fail, j, Contants.suitResult,Contants.excelFile+Contants.excelName, Contants.suitSheet); } } } if(bResult == true){ ExcelUtils.setCellData(Contants.pass, j, Contants.suitResult,Contants.excelFile+Contants.excelName, Contants.suitSheet); } }else{ System.out.println("没有要执行的用例"); break; } } }
5、增加测试结果
在Excel中新增一列Resut
在Login_Script中定义一个boolean类型的变量bResult,默认是true在各个地方try,,cacth,当出现异常的时候在bResult赋值为false,在Excel工具类中增加一个写入excel值得方法
五、小结
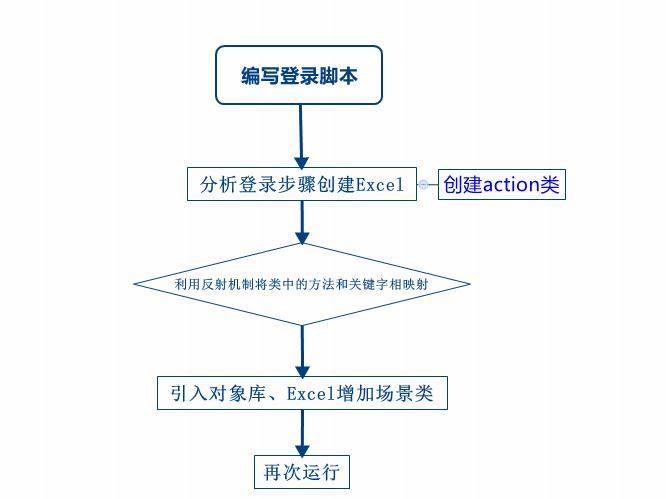
这样我们的关键字驱动框架就初步搭好了,下面我们回归一下基本思路:
转自:http://my.oschina.net/hellotest/blog/531932


 1097
1097

 被折叠的 条评论
为什么被折叠?
被折叠的 条评论
为什么被折叠?
 到【灌水乐园】发言


