


版权声明:本文出自阿钟的博客,转载请注明出处:http://blog.csdn.net/a_zhon/。
一:函数指针
1.函数指针顾名思义就是定义一个指针变量指向一个函数,和一级指针并没有很大的区别我们看如下代码就很清楚的知道了
#include<stdio.h>
#include<stdlib.h>

//定义一个函数
int add(int a,int b) { return a + b; } main() { //定义函数指针 //返回值类型,变量名可以随便取,函数没有方法体 int (*point)(int a,int b); //给函数指针赋值 point = add; //使用函数指针 int result= point(12,5); printf("result=%d\n",result); system("pause"); }
输出的结果就是12+5=17;可以理解为把add函数的地址赋值给point,所以调用add和point是一样的效果。
二:Unition联合体
1.定义一个联合体并对其中的变量进行赋值
#include<stdio.h>
#include<stdlib.h>

//定一个联合体,
union Mix {
    long i;//4个字节 int k;//4个字节 }; main() { printf("mix长度=%d\n",sizeof(union Mix)); union Mix m; m.k=100; m.k=123; printf("m.i=%d\n",m.i); printf("m.k=%d\n",m.k); system("pause"); }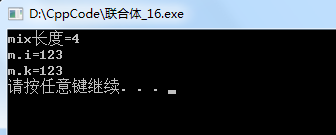
2.上面的程序中我们只改变了k的值,但是从结果可以看出i的值也跟着变了,这就要说说Unition联合体的特点了:
- 特点:所有的字段都是使用同一块内存空间
- 应用场景:各个类型之间方便转换
三:枚举就很简单了 关键字:“enum”
#include<stdio.h>
#include<stdlib.h>
/**
    枚举的值是递增的,首元素默认等于0
 */
enum WeekDay {
    Monday=1,Tuesday,Wednesday,Thursday,Friday,Saturday,Sunday
};
main() {
    //enum WeekDay day= Sunday;
    printf("%d\n",Sunday); system("pause"); }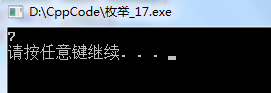
四:Typedef别名,理解起来so easy
别名:字面意思就是给一个东西取另外一个名字来代替它;就好比如你的好朋友给你取的外号,这样就好理解了。
#include<stdio.h>
#include<stdlib.h>

typedef int i;//给int类型取了个别名叫i typedef long l;//给long类型取了个别名叫l main() { //这里i就代表了int类型 i a=10; //l就代表了long类型 l b=1234355466; printf("a=%d\n",a); printf("b=%ld\n",b); system("pause"); }
五:结构体
1.C语言中定义一个结构体 关键字:“struct”
#include<stdio.h>
#include<stdlib.h>

struct Student {
    int age;//年龄 float score;//分数 char sex;//性别 }; main() { //使用结构体,并对变量进行初始化 struct Student stu= {18,90.9,'W'}; printf("age=%d\n",stu.age); printf("score=%.1f\n",stu.score); printf("sex=%c\n",stu.sex); //结构体赋值 stu.age=20; stu.score=100; stu.sex='M'; printf("age=%d\n",stu.age); printf("score=%.1f\n",stu.score); printf("sex=%c\n",stu.sex); };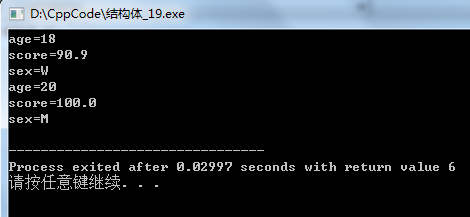
用Java的方式来说上面代码就是:定义了一个Student实体类(结构体),并声明三个成员变量(age, score,sex);使用结构体的时候为变量进行初始化。
2.我们来通过Java代码来实现上述程序一样的效果,这样你就可以很好的理解上面所讲的结构体了。
class Student {
    public int age;// 年龄
    public float score;// 分数 public char sex;// 性别 public Student(int age, float score, char sex) { this.age = age; this.score = score; this.sex = sex; } } public class Test { public static void main(String[] args) { Student student = new Student(18, 90.9f, 'W'); System.out.println(student.age); System.out.println(student.score); System.out.println(student.sex); student.age = 20; student.score = 100; student.sex = 'M'; System.out.println(student.age); System.out.println(student.score); System.out.println(student.sex); } }
五:结构体指针和多级结构体指针
1.使用一级结构体指针
#include<stdio.h>
#include<stdlib.h>

struct Student {
    int age;//年龄
    float score;//分数 char sex;//性别 }; main() { //使用结构体 struct Student stu= {18,90.9,'W'}; //结构体指针 struct Student* point = &stu; //结构体指针取值,(*point)取得是结构体 printf("(*point).age=%d\n",(*point).age); //(*point).age等价于point->age; printf("point->age=%d\n",point->age); printf("point->score=%.1f\n",point->score); printf("point->sex=%c\n",point->sex); //结构体赋值 point->age=22; printf("修改后age=%d\n",point->age); };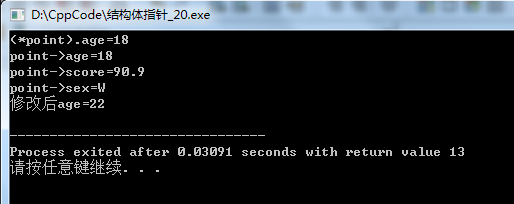
结构体指针取值我们可以通过:student.age或者(*point).age又或者point->age 用“->”可以简化代码的书写就像Java8所支持的Lambda表达式一样使代码更加简洁。
2.使用二级结构体指针或者多级结构体指针
#include<stdio.h>
#include<stdlib.h>

struct Student {
    int age;//年龄 float score;//分数 char sex;//性别 }; main() { //使用结构体 struct Student stu= {18,90.9,'W'}; //结构体指针 struct Student* point = &stu; //二级结构体指针 struct Student** point2 = &point; //二级结构体取值 //(**point2).age也等价于(*point2)->age printf("(**point2).age=%d\n",(**point2).age); printf("*point2->age=%d\n",(*point2)->age); //二级指针赋值 (*point2)->age=25; printf("*point2->age=%d\n",(*point2)->age); }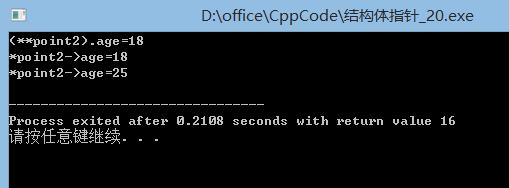
从上面我们可以看出一级结构体指针(*point).age==point->age;二级结构体指针(**point2).age==(*point2)->age。也就是说“->”代表了一个等级的指针。


 1468
1468


 被折叠的 条评论
为什么被折叠?
被折叠的 条评论
为什么被折叠?
 到【灌水乐园】发言


