


这个 asp.net 内置票据认证 其实是和 vs2010 的工具栏里面的 登陆控件一起使用的,但是如果和登陆控件一起用的话,就会默认又增多一个数据库。所以牛腩在讲的时候,没有用登陆控件,而是手写登陆,但是用到了这个 内置票据认证控件
记住,因为我们的web层是用新建项目建立的,所以我们修改了代码的话,就需要对web层也进行一个重新生成。
我们一般判断权限是这样判断的,登陆之后,用一个session 来判断

protected void btnLogin_Click(object sender, EventArgs e)
        {
            string name = txtUserName.Text.Trim();
            string pwd = txtUserPwd.Text.Trim();

            if (name.Length==0 || pwd.Length==0)
            {
                litMessage.Text = "<span style='color:Red'>请填写完整信息</span>";
                return;
            }
            if (name == "joey" && pwd == "123456")
            {
                Response.Redirect("index.aspx");
            }
            else
            {
                litMessage.Text = "<span style='color:Red'>密码错误</span>";
                return;
            }

        }
我们现在使用asp.net 内置票据认证控件来进行权限的设置
根据你的设置,在进入到某一个目录下的页面的时候,自动判断你是否有权限进入。如果没有权限,则跳转到你指定的页面(例如,跳转到登陆页)
使用步骤:
1:在根目录添加一个 global.asax 文件,添加如下代码
protected void Application_AuthenticateRequest(object SENDER, EventArgs e)
{
if (HttpContext.Current.User != null)
{
if (HttpContext.Current.User.Identity.IsAuthenticated)
{
if (HttpContext.Current.User.Identity is FormsIdentity)
{
FormsIdentity id = (FormsIdentity)HttpContext.Current.User.Identity;
FormsAuthenticationTicket tiecket = id.Ticket;
string userData = tiecket.UserData;
string[] roles = userData.Split(',');
HttpContext.Current.User = new System.Security.Principal.GenericPrincipal(id, roles);
}
}
}
}
2:在web.config 文件中 配置目录的权限和默认的登陆页 (注意下面的代码,我之前是从其他的地方拷贝的,结果老是运行提示 什么字符错误,后来我去博客园复制了一次,就好了,可能是字符编码问题或者是其他的问题)
分两个步骤,(1) 在web.config的节点 system.web 节点 配置
<authentication mode="Forms">
            <forms name="mycook" loginUrl="admin/login.aspx" protection="All" path="/"/>
        </authentication>
(2) 配置目录权限,这个是在 system.web 节点外面
<location path="admin">
        <system.web>
            <authorization>
                <allow roles="admin"/>
                <deny users="*"/>
            </authorization>
        </system.web>
    </location>
    <location path="user">
        <system.web>
            <authorization>
                <allow roles="user"/>
                <allow roles="admin"/>
                <deny users="*"/>
            </authorization>
        </system.web>
    </location>
    <location path="admin/login.aspx">
        <system.web>
            <authorization>
                <allow users="*"/>
            </authorization>
        </system.web>
    </location>
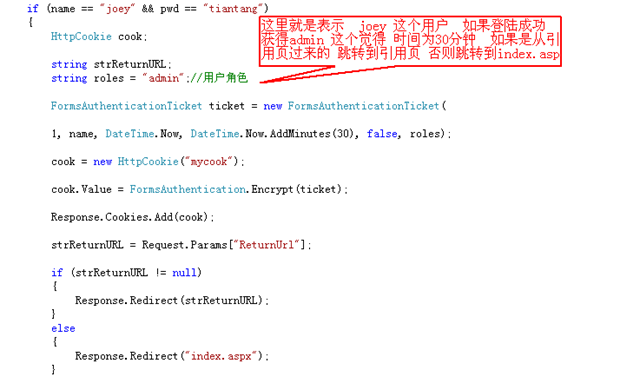
3:在登陆页的登陆过程成功后,拷入一段代码
             HttpCookie cook;

                string strReturnURL;
                string roles = "admin";//用户角色

                FormsAuthenticationTicket ticket = new FormsAuthenticationTicket(

                1, name, DateTime.Now, DateTime.Now.AddMinutes(30), false, roles);

                cook = new HttpCookie("mycook");

                cook.Value = FormsAuthentication.Encrypt(ticket);

                Response.Cookies.Add(cook);

                strReturnURL = Request.Params["ReturnUrl"];

                if (strReturnURL != null)
                {
                    Response.Redirect(strReturnURL);
                }
                else
                {
                    Response.Redirect("index.aspx");
                }
这样就配置成功了。


 1105
1105


 被折叠的 条评论
为什么被折叠?
被折叠的 条评论
为什么被折叠?
 到【灌水乐园】发言


